by Preethi Kasireddy
A Beginner-Friendly Introduction to Containers, VMs and Docker

If you’re a programmer or techie, chances are you’ve at least heard of Docker: a helpful tool for packing, shipping, and running applications within “containers.” It’d be hard not to, with all the attention it’s getting these days — from developers and system admins alike. Even the big dogs like Google, VMware and Amazon are building services to support it.
Regardless of whether or not you have an immediate use-case in mind for Docker, I still think it’s important to understand some of the fundamental concepts around what a “container” is and how it compares to a Virtual Machine (VM). While the Internet is full of excellent usage guides for Docker, I couldn’t find many beginner-friendly conceptual guides, particularly on what a container is made up of. So, hopefully, this post will solve that problem :)
Let’s start by understanding what VMs and containers even are.
What are “containers” and “VMs”?
Containers and VMs are similar in their goals: to isolate an application and its dependencies into a self-contained unit that can run anywhere.
Moreover, containers and VMs remove the need for physical hardware, allowing for more efficient use of computing resources, both in terms of energy consumption and cost effectiveness.
The main difference between containers and VMs is in their architectural approach. Let’s take a closer look.
Virtual Machines
A VM is essentially an emulation of a real computer that executes programs like a real computer. VMs run on top of a physical machine using a “hypervisor”. A hypervisor, in turn, runs on either a host machine or on “bare-metal”.
Let’s unpack the jargon:
A hypervisor is a piece of software, firmware, or hardware that VMs run on top of. The hypervisors themselves run on physical computers, referred to as the “host machine”. The host machine provides the VMs with resources, including RAM and CPU. These resources are divided between VMs and can be distributed as you see fit. So if one VM is running a more resource heavy application, you might allocate more resources to that one than the other VMs running on the same host machine.
The VM that is running on the host machine (again, using a hypervisor) is also often called a “guest machine.” This guest machine contains both the application and whatever it needs to run that application (e.g. system binaries and libraries). It also carries an entire virtualized hardware stack of its own, including virtualized network adapters, storage, and CPU — which means it also has its own full-fledged guest operating system. From the inside, the guest machine behaves as its own unit with its own dedicated resources. From the outside, we know that it’s a VM — sharing resources provided by the host machine.
As mentioned above, a guest machine can run on either a hosted hypervisor or a bare-metal hypervisor. There are some important differences between them.
First off, a hosted virtualization hypervisor runs on the operating system of the host machine. For example, a computer running OSX can have a VM (e.g. VirtualBox or VMware Workstation 8) installed on top of that OS. The VM doesn’t have direct access to hardware, so it has to go through the host operating system (in our case, the Mac’s OSX).
The benefit of a hosted hypervisor is that the underlying hardware is less important. The host’s operating system is responsible for the hardware drivers instead of the hypervisor itself, and is therefore considered to have more “hardware compatibility.” On the other hand, this additional layer in between the hardware and the hypervisor creates more resource overhead, which lowers the performance of the VM.
A bare metal hypervisor environment tackles the performance issue by installing on and running from the host machine’s hardware. Because it interfaces directly with the underlying hardware, it doesn’t need a host operating system to run on. In this case, the first thing installed on a host machine’s server as the operating system will be the hypervisor. Unlike the hosted hypervisor, a bare-metal hypervisor has its own device drivers and interacts with each component directly for any I/O, processing, or OS-specific tasks. This results in better performance, scalability, and stability. The tradeoff here is that hardware compatibility is limited because the hypervisor can only have so many device drivers built into it.
After all this talk about hypervisors, you might be wondering why we need this additional “hypervisor” layer in between the VM and the host machine at all.
Well, since the VM has a virtual operating system of its own, the hypervisor plays an essential role in providing the VMs with a platform to manage and execute this guest operating system. It allows for host computers to share their resources amongst the virtual machines that are running as guests on top of them.
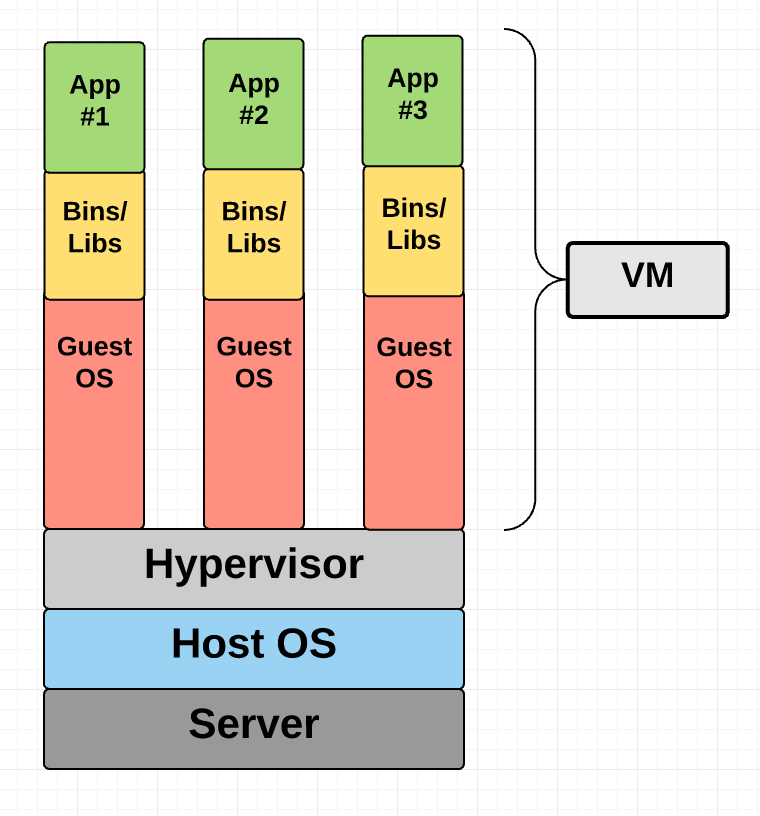
As you can see in the diagram, VMs package up the virtual hardware, a kernel (i.e. OS) and user space for each new VM.
Container
Unlike a VM which provides hardware virtualization, a container provides operating-system-level virtualization by abstracting the “user space”. You’ll see what I mean as we unpack the term container.
For all intent and purposes, containers look like a VM. For example, they have private space for processing, can execute commands as root, have a private network interface and IP address, allow custom routes and iptable rules, can mount file systems, and etc.
The one big difference between containers and VMs is that containers *share* the host system’s kernel with other containers.

This diagram shows you that containers package up just the user space, and not the kernel or virtual hardware like a VM does. Each container gets its own isolated user space to allow multiple containers to run on a single host machine. We can see that all the operating system level architecture is being shared across containers. The only parts that are created from scratch are the bins and libs. This is what makes containers so lightweight.
Where does Docker come in?
Docker is an open-source project based on Linux containers. It uses Linux Kernel features like namespaces and control groups to create containers on top of an operating system.
Containers are far from new; Google has been using their own container technology for years. Others Linux container technologies include Solaris Zones, BSD jails, and LXC, which have been around for many years.
So why is Docker all of a sudden gaining steam?
1. Ease of use: Docker has made it much easier for anyone — developers, systems admins, architects and others — to take advantage of containers in order to quickly build and test portable applications. It allows anyone to package an application on their laptop, which in turn can run unmodified on any public cloud, private cloud, or even bare metal. The mantra is: “build once, run anywhere.”
2. Speed: Docker containers are very lightweight and fast. Since containers are just sandboxed environments running on the kernel, they take up fewer resources. You can create and run a Docker container in seconds, compared to VMs which might take longer because they have to boot up a full virtual operating system every time.
3. Docker Hub: Docker users also benefit from the increasingly rich ecosystem of Docker Hub, which you can think of as an “app store for Docker images.” Docker Hub has tens of thousands of public images created by the community that are readily available for use. It’s incredibly easy to search for images that meet your needs, ready to pull down and use with little-to-no modification.
4. Modularity and Scalability: Docker makes it easy to break out your application’s functionality into individual containers. For example, you might have your Postgres database running in one container and your Redis server in another while your Node.js app is in another. With Docker, it’s become easier to link these containers together to create your application, making it easy to scale or update components independently in the future.
Last but not least, who doesn’t love the Docker whale? ;)

Fundamental Docker Concepts
Now that we’ve got the big picture in place, let’s go through the fundamental parts of Docker piece by piece:
Docker Engine
Docker engine is the layer on which Docker runs. It’s a lightweight runtime and tooling that manages containers, images, builds, and more. It runs natively on Linux systems and is made up of:
1. A Docker Daemon that runs in the host computer.
2. A Docker Client that then communicates with the Docker Daemon to execute commands.
3. A REST API for interacting with the Docker Daemon remotely.
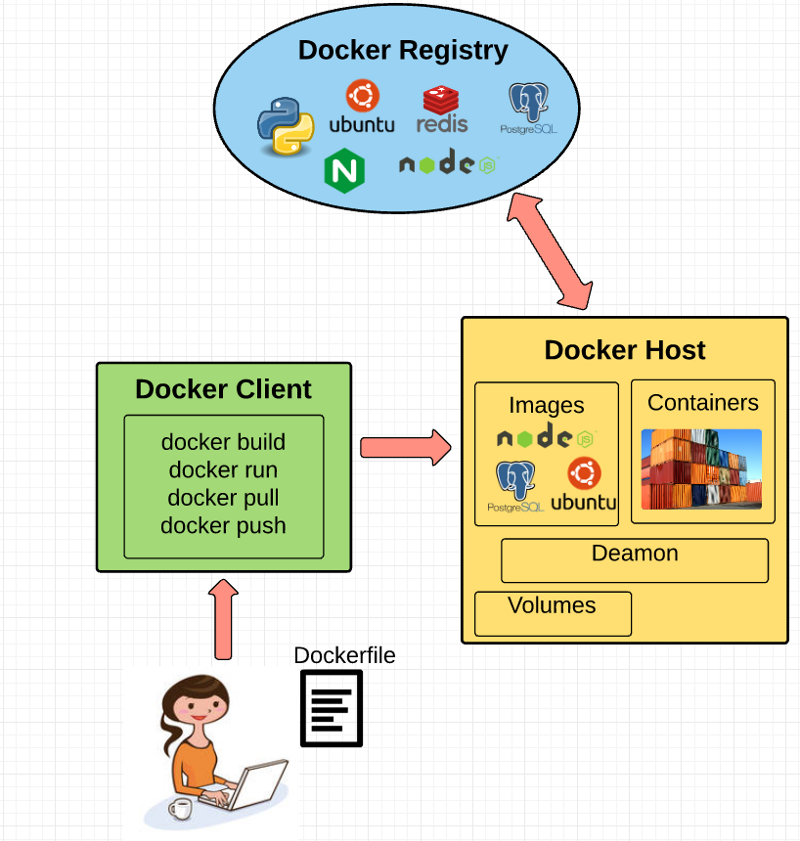
Docker Client
The Docker Client is what you, as the end-user of Docker, communicate with. Think of it as the UI for Docker. For example, when you do…
you are communicating to the Docker Client, which then communicates your instructions to the Docker Daemon.
Docker Daemon
The Docker daemon is what actually executes commands sent to the Docker Client — like building, running, and distributing your containers. The Docker Daemon runs on the host machine, but as a user, you never communicate directly with the Daemon. The Docker Client can run on the host machine as well, but it’s not required to. It can run on a different machine and communicate with the Docker Daemon that’s running on the host machine.
Dockerfile
A Dockerfile is where you write the instructions to build a Docker image. These instructions can be:
- RUN apt-get y install some-package: to install a software package
- EXPOSE 8000: to expose a port
- ENV ANT_HOME /usr/local/apache-ant to pass an environment variable
and so forth. Once you’ve got your Dockerfile set up, you can use the docker build command to build an image from it. Here’s an example of a Dockerfile:
Docker Image
Images are read-only templates that you build from a set of instructions written in your Dockerfile. Images define both what you want your packaged application and its dependencies to look like *and* what processes to run when it’s launched.
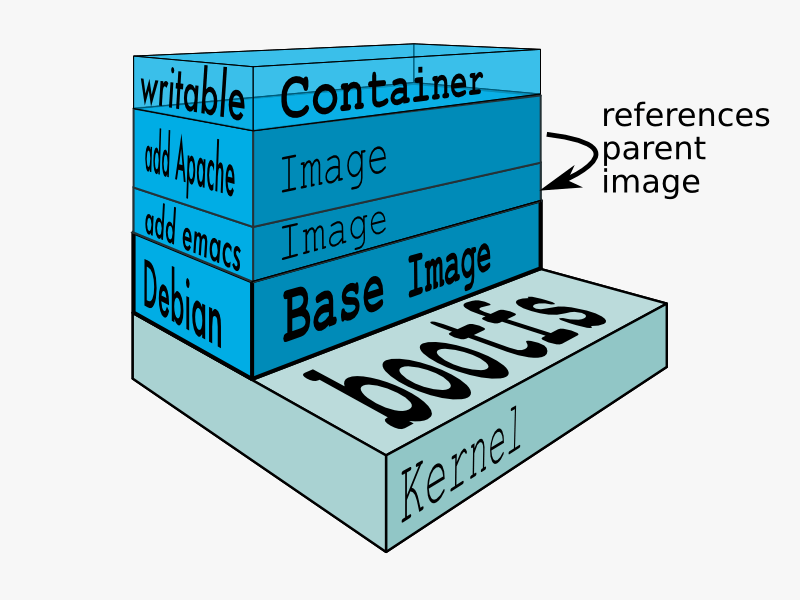
The Docker image is built using a Dockerfile. Each instruction in the Dockerfile adds a new “layer” to the image, with layers representing a portion of the images file system that either adds to or replaces the layer below it. Layers are key to Docker’s lightweight yet powerful structure. Docker uses a Union File System to achieve this:
Union File Systems
Docker uses Union File Systems to build up an image. You can think of a Union File System as a stackable file system, meaning files and directories of separate file systems (known as branches) can be transparently overlaid to form a single file system.
The contents of directories which have the same path within the overlaid branches are seen as a single merged directory, which avoids the need to create separate copies of each layer. Instead, they can all be given pointers to the same resource; when certain layers need to be modified, it’ll create a copy and modify a local copy, leaving the original unchanged. That’s how file systems can *appear* writable without actually allowing writes. (In other words, a “copy-on-write” system.)
Layered systems offer two main benefits:
1. Duplication-free: layers help avoid duplicating a complete set of files every time you use an image to create and run a new container, making instantiation of docker containers very fast and cheap.
2. Layer segregation: Making a change is much faster — when you change an image, Docker only propagates the updates to the layer that was changed.
Volumes
Volumes are the “data” part of a container, initialized when a container is created. Volumes allow you to persist and share a container’s data. Data volumes are separate from the default Union File System and exist as normal directories and files on the host filesystem. So, even if you destroy, update, or rebuild your container, the data volumes will remain untouched. When you want to update a volume, you make changes to it directly. (As an added bonus, data volumes can be shared and reused among multiple containers, which is pretty neat.)
Docker Containers
A Docker container, as discussed above, wraps an application’s software into an invisible box with everything the application needs to run. That includes the operating system, application code, runtime, system tools, system libraries, and etc. Docker containers are built off Docker images. Since images are read-only, Docker adds a read-write file system over the read-only file system of the image to create a container.
Moreover, then creating the container, Docker creates a network interface so that the container can talk to the local host, attaches an available IP address to the container, and executes the process that you specified to run your application when defining the image.
Once you’ve successfully created a container, you can then run it in any environment without having to make changes.
Double-clicking on “containers”
Phew! That’s a lot of moving parts. One thing that always got me curious was how a container is actually implemented, especially since there isn’t any abstract infrastructure boundary around a container. After lots of reading, it all makes sense so here’s my attempt at explaining it to you! :)
The term “container” is really just an abstract concept to describe how a few different features work together to visualize a “container”. Let’s run through them real quick:
1) Namespaces
Namespaces provide containers with their own view of the underlying Linux system, limiting what the container can see and access. When you run a container, Docker creates namespaces that the specific container will use.
There are several different types of namespaces in a kernel that Docker makes use of, for example:
a. NET: Provides a container with its own view of the network stack of the system (e.g. its own network devices, IP addresses, IP routing tables, /proc/net directory, port numbers, etc.).
b. PID: PID stands for Process ID. If you’ve ever ran ps aux in the command line to check what processes are running on your system, you’ll have seen a column named “PID”. The PID namespace gives containers their own scoped view of processes they can view and interact with, including an independent init (PID 1), which is the “ancestor of all processes”.
c. MNT: Gives a container its own view of the “mounts” on the system. So, processes in different mount namespaces have different views of the filesystem hierarchy.
d. UTS: UTS stands for UNIX Timesharing System. It allows a process to identify system identifiers (i.e. hostname, domainname, etc.). UTS allows containers to have their own hostname and NIS domain name that is independent of other containers and the host system.
e. IPC: IPC stands for InterProcess Communication. IPC namespace is responsible for isolating IPC resources between processes running inside each container.
f. USER: This namespace is used to isolate users within each container. It functions by allowing containers to have a different view of the uid (user ID) and gid (group ID) ranges, as compared with the host system. As a result, a process’s uid and gid can be different inside and outside a user namespace, which also allows a process to have an unprivileged user outside a container without sacrificing root privilege inside a container.
Docker uses these namespaces together in order to isolate and begin the creation of a container. The next feature is called control groups.
2) Control groups
Control groups (also called cgroups) is a Linux kernel feature that isolates, prioritizes, and accounts for the resource usage (CPU, memory, disk I/O, network, etc.) of a set of processes. In this sense, a cgroup ensures that Docker containers only use the resources they need — and, if needed, set up limits to what resources a container *can* use. Cgroups also ensure that a single container doesn’t exhaust one of those resources and bring the entire system down.
Lastly, union file systems is another feature Docker uses:
3) Isolated Union file system:
Described above in the Docker Images section :)
This is really all there is to a Docker container (of course, the devil is in the implementation details — like how to manage the interactions between the various components).
The Future of Docker: Docker and VMs Will Co-exist
While Docker is certainly gaining a lot of steam, I don’t believe it will become a real threat to VMs. Containers will continue to gain ground, but there are many use cases where VMs are still better suited.
For instance, if you need to run multiple applications on multiple servers, it probably makes sense to use VMs. On the other hand, if you need to run many *copies* of a single application, Docker offers some compelling advantages.
Moreover, while containers allow you to break your application into more functional discrete parts to create a separation of concerns, it also means there’s a growing number of parts to manage, which can get unwieldy.
Security has also been an area of concern with Docker containers — since containers share the same kernel, the barrier between containers is thinner. While a full VM can only issue hypercalls to the host hypervisor, a Docker container can make syscalls to the host kernel, which creates a larger surface area for attack. When security is particularly important, developers are likely to pick VMs, which are isolated by abstracted hardware — making it much more difficult to interfere with each other.
Of course, issues like security and management are certain to evolve as containers get more exposure in production and further scrutiny from users. For now, the debate about containers vs. VMs is really best off to dev ops folks who live and breathe them everyday!
Conclusion
I hope you’re now equipped with the knowledge you need to learn more about Docker and maybe even use it in a project one day.
As always, drop me a line in the comments if I’ve made any mistakes or can be helpful in anyway! :)