

You are a developer and you want to discover docker-compose? This article is made for you.
After a short introduction on Docker-Compose, you will be able to create your first client/server-side application with Docker.
This article takes into consideration that you know the basics of Docker. If not, don’t panic! I suggest that you read my first article to discover Docker and learn how to create your first application.
What is Docker-Compose?
Docker-Compose is a tool provided by Docker. To make it simple, this tool is implemented to solve architectural problems in your projects.
As you may have noticed in my previous article, we created a simple program that displayed “Docker is magic!” when it was launched.
Unfortunately, when you are a developer you rarely create a stand-alone program (a program that does not require any other services to run, such as a database).
However, how do you know if you need Docker-Compose? It’s very simple — if your application requires several services to run, you need this tool. For example, if you create a website that needs to connect to your database to authenticate users (here 2 services, website and database).
Docker-compose offers you the possibility to launch all these services in a single command.
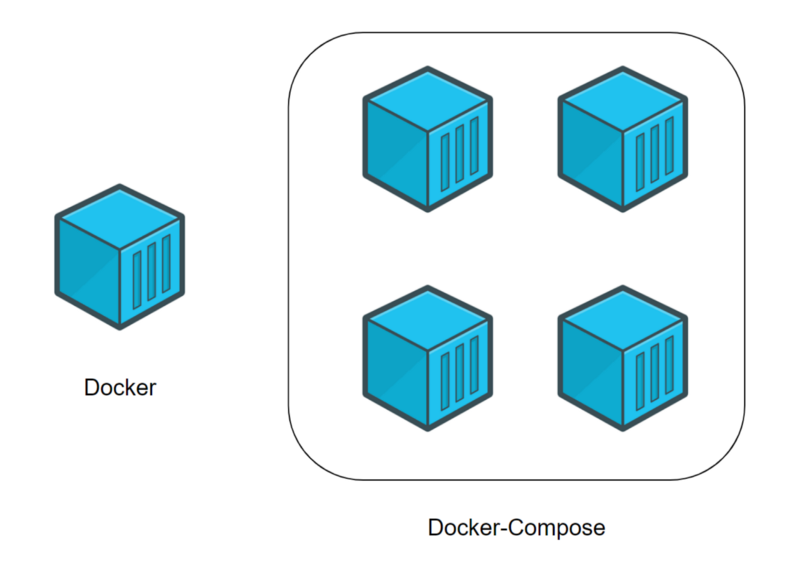
Difference between Docker and Docker-Compose
Docker is used to manage an individual container (service) for your application.
Docker-Compose is used to manage several containers at the same time for the same application. This tool offers the same features as Docker but allows you to have more complex applications.
A typical use case
This tool can become very powerful and allow you to deploy applications with complex architectures very quickly. I will give you a concrete case study that will prove that you need it.
Imagine, you are the proud creator of your web software.
Your solution offers two websites. The first allows stores to create their online store in just a few clicks. The second is dedicated to customer support. These two sites interact with the same database.
You are beginning to be successful and your server is no longer sufficient. So, you decide to migrate your entire software to another machine.
Unfortunately, you didn’t use docker-compose. So you’re going to have to migrate and reconfigure your services one after the other, hoping nothing has been forgotten.
If you had used a docker-compose, in only a few commands you would have deployed your entire architecture on your new server. All you have to do now is make a few configurations and load the backup of your database to finalize the migration.
Now let’s create your first client/server-side application with Docker-Compose
Now that you know what docker-compose is going to be used for, it’s time to create your first client/server-side application!
The objective of this tutorial is to create a small website (server) in Python that will contain a sentence. This sentence must be retrieved by a program (client) in Python that will display the sentence.
Note: This tutorial takes into consideration that you have already installed Docker on your computer and that you have the basics. If this is not the case, I invite you to refer to my previous article.
1. Create your project
To create your first client/server application, I invite you to create a folder on your computer. It must contain at root the following file and folders:
- A ‘docker-compose.yml’ file (docker-compose file that will contain the necessary instructions to create the different services).
- A ‘server’ folder (this folder will contain the files necessary to set up the server).
- A ‘client’ folder (this folder will contain the files necessary to set up the client).
Normally you should have this folder architecture:
.
├── client/
├── docker-compose.yml
└── server/
2 directories, 1 file
2. Create your server
In order to start with reminders of Docker’s basics, we will start by creating the server.
2a. Create files
Move to your ‘server’ folder and create the following files:
- A ‘server.py’ file (python file that will contain the server code).
- An ‘index.html’ file (html file that will contain the sentence to be displayed).
- A ‘Dockerfile’ file (docker file that will contain the necessary instructions to create the environment of the server).
Normally you should have this folder architecture in the following path ‘server/’:
.
├── Dockerfile
├── index.html
└── server.py
0 directories, 3 files
2b. Edit the Python file
You can add the following code to the ‘server.py’ file:
#!/usr/bin/env python3

# Import of python system libraries.
# These libraries will be used to create the web server.
# You don't have to install anything special, these libraries are installed with Python.
import http.server
import socketserver

# This variable is going to handle the requests of our client on the server.
handler = http.server.SimpleHTTPRequestHandler

# Here we define that we want to start the server on port 1234.
# Try to remember this information it will be very useful to us later with docker-compose.
with socketserver.TCPServer(("", 1234), handler) as httpd:
    # This instruction will keep the server running, waiting for requests from the client.
    httpd.serve_forever()
This code will allow you to create a simple web server inside this folder. It will retrieve the content of the index.html file to share it on a web page.
2c. Edit the Html file
You can add the following sentence to the ‘index.html’ file:
Docker-Compose is magic!This file will be shared by the server when it is started and this sentence will be displayed.
2d. Edit the Docker file
Here we will create a basic Dockerfile that will be in charge of executing our Python file. We will use the official image created to execute Python.
# Just a remember, dockerfile must always start by importing the base image.
# We use the keyword 'FROM' to do that.
# In our example, we want to import the python image (from DockerHub).
# So, we write 'python' for the image name and 'latest' for the version.
FROM python:latest

# In order to launch our python code, we must import the 'server.py' and 'index.html' file.
# We use the keyword 'ADD' to do that.
# Just a remember, the first parameter 'server.py' is the name of the file on the host.
# The second parameter '/server/' is the path where to put the file on the image.
# Here we put files at the image '/server/' folder.
ADD server.py /server/
ADD index.html /server/

# I would like to introduce something new, the 'WORKDIR' command.
# This command changes the base directory of your image.
# Here we define '/server/' as base directory (where all commands will be executed).
WORKDIR /server/
3. Create your client
In order to continue with reminders of Docker’s basics, we will create the client.
3a. Create files
Move to your ‘client’ folder and create the following files:
- A ‘client.py’ file (python file that will contain the client code).
- A ‘Dockerfile’ file (docker file that will contain the necessary instructions to create the environment of the client).
Normally you should have this folder architecture in the following path ‘client/’:
.
├── client.py
└── Dockerfile
0 directories, 2 files
3b. Edit the Python file
You can add the following code to the ‘client.py’ file:
#!/usr/bin/env python3

# Import of python system library.
# This library is used to download the 'index.html' from server.
# You don't have to install anything special, this library is installed with Python.
import urllib.request

# This variable contain the request on 'http://localhost:1234/'.
# You must wondering what is 'http://localhost:1234'?
# localhost: This means that the server is local.
# 1234: Remember we define 1234 as the server port.
fp = urllib.request.urlopen("http://localhost:1234/")

# 'encodedContent' correspond to the server response encoded ('index.html').
# 'decodedContent' correspond to the server response decoded (what we want to display).
encodedContent = fp.read()
decodedContent = encodedContent.decode("utf8")

# Display the server file: 'index.html'.
print(decodedContent)

# Close the server connection.
fp.close()
This code will allow you to get the content of the server web page and to display it.
3c. Edit the Docker file
As for the server, we will create a basic Dockerfile that will be in charge of executing our Python file.
# Same thing than the 'server' Dockerfile.
FROM python:latest

# Same thing than the 'server' Dockerfile.
# We import 'client.py' in '/client/' folder.
ADD client.py /client/

# I would like to introduce something new, the 'WORKDIR' command.
# This command changes the base directory of your image.
# Here we define '/client/' as base directory.
WORKDIR /client/
4. Back to Docker-Compose
As you may have noticed, we have created two different projects, the server, and the client, both with a Dockerfile.
So far nothing has changed from the basics you already know.
Now we are going to edit the ‘docker-compose.yml’ at the root of the repository.
Note: Docker-Compose being very complete, this article aims to give you a concrete and typical example. That’s why you won’t see all the keywords.
# A docker-compose must always start by the version tag.
# We use "3" because it's the last version at this time.
version: "3"

# You should know that docker-composes works with services.
# 1 service = 1 container.
# For example, a service maybe, a server, a client, a database...
# We use the keyword 'services' to start to create services.
services:
  # As we said at the beginning, we want to create: a server and a client.
  # That is two services.

  # First service (container): the server.
  # Here you are free to choose the keyword.
  # It will allow you to define what the service corresponds to.
  # We use the keyword 'server' for the server.
  server:
    # The keyword "build" will allow you to define
    # the path to the Dockerfile to use to create the image
    # that will allow you to execute the service.
    # Here 'server/' corresponds to the path to the server folder
    # that contains the Dockerfile to use.
    build: server/

    # The command to execute once the image is created.
    # The following command will execute "python ./server.py".
    command: python ./server.py

    # Remember that we defined in'server/server.py' 1234 as port.
    # If we want to access the server from our computer (outside the container),
    # we must share the content port with our computer's port.
    # To do this, the keyword 'ports' will help us.
    # Its syntax is as follows: [port we want on our machine]:[port we want to retrieve in the container]
    # In our case, we want to use port 1234 on our machine and
    # retrieve port 1234 from the container (because it is on this port that
    # we broadcast the server).
    ports:
      - 1234:1234

  # Second service (container): the client.
  # We use the keyword 'client' for the server.
  client:
    # Here 'client/ corresponds to the path to the client folder
    # that contains the Dockerfile to use.
    build: client/

    # The command to execute once the image is created.
    # The following command will execute "python ./client.py".
    command: python ./client.py

    # The keyword 'network_mode' is used to define the network type.
    # Here we define that the container can access to the 'localhost' of the computer.
    network_mode: host

    # The keyword'depends_on' allows you to define whether the service
    # should wait until other services are ready before launching.
    # Here, we want the 'client' service to wait until the 'server' service is ready.
    depends_on:
      - server
5. Build Docker-Compose
Once the docker-compose is set up, your client/server application need to be built. This step corresponds to the ‘docker build’ command but applied to the different services.
$ docker-compose build6. Run Docker-Compose
Your docker-compose is built! Now it’s time to start! This step corresponds to the ‘docker run’ command but applied to the different services.
$ docker-compose upThere you go, that’s it. You should normally see “Docker-Compose is magic!” displayed in your terminal.
Note: As indicated in the tutorial, your ‘server’ service uses port 1234 of your computer to distribute its content. If you open the ‘http://localhost:1234/’ page on your computer, you should see ‘Docker-Compose is magic!’.
Code is available
If you want to retrieve the complete code to discover it more simply or to execute it, I have put it at your disposal on my Github.
-> GitHub: Client Server Docker-Compose example
Useful commands for Docker
As usual, I have prepared a list of orders that may be useful to you with docker-compose.
- Stops containers and removes containers, images… created by ‘docker-compose up’.
$ docker-compose down- Displays log output from services (example: ‘docker-compose logs -f client’).
$ docker-compose logs -f [service name]- Lists containers.
$ docker-compose ps- Executes a command in a running container (example: ‘docker-compose exec server ls’).
$ docker-compose exec [service name] [command]- Lists images.
$ docker-compose imagesConclusion
You can refer to this post every time you need a simple and concrete example on how to create a client/server-side with docker-compose. If you have any questions or feedback, feel free to ask.
If you want more content like this, you can follow me on Twitter, where I tweet about web development, self-improvement, and my journey as a full stack developer!
You can find other articles like this on my website: herewecode.io.