
If you are a developer and you want to get started with Git and GitHub, then this article is made for you.
After a short introduction on what is Git and how to use it, you will be able to create and work on a GitHub project.
What is Git?
Git is a free and open source software created by Linus Torvalds in 2005. This tool is a version control system that was initially developed to work with several developers on the Linux kernel.
Many control systems exist, like CVS, SVN, Mercurial and others, but today Git is the standard software for version control.
Version control, right?
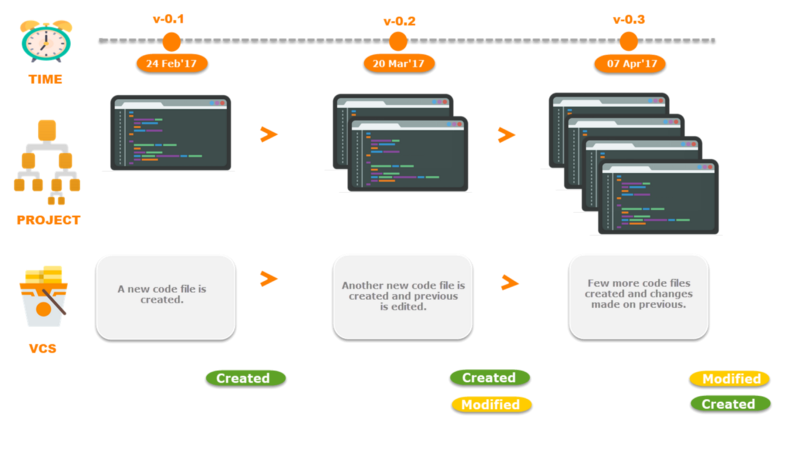
If you are new in the development world, these words will not tell you anything. However, don’t worry after this short paragraph, you will exactly know what a “Version Control System (VCS)” is.
Version control is a management system that takes into consideration modifications you’ve made on a file or a set of files (example: a code project). With this system, developers can collaborate and work together on the same project.
A branch system is carried by version control and allow developers to work individually on a task (example: One branch, one task or one branch, one developer) before to combine all changes made by the collaborators into the main branch.
All changes made by developers are traced and saved in a history. It can be beneficial to track modifications made by every collaborator.
Where to find Git repositories
If you want to start using Git, you need to know where to host your repositories. There are many hosting platforms where you can put your code free of charge. Some options aren’t free, but mostly you don’t need them except in specific cases.
Here the three most popular Git hosting services:
- GitHub: Owned recently by Microsoft — Launched in 2008 (31 million users in October 2018).
- GitLab: Owned by GitLab Inc. — Launched in 2011.
- BitBucket: Owned by Atlassian — Launched in June 2008.
Note: Hosting platforms are available in two ways, on the cloud (hosted online) or self-installed on your server (private hosting).
Why use Git as a developer
This tool is inescapable for worldwide developers. Here is a list of advantages of this tool:
- No more copies, when you finish your work on a significant update for your application or a bug fix, you just need to “push” your project online to save it.
- Delete and break your code; you just need to type a command to come back to the previous version and continue your work.
- Work with your friends without sending an e-mail with the compressed project each time the code changes.
- You can afford to forget what you did. A simple command is necessary to check your changes since the last time you saved your work.
I just told you the main advantages if you don’t use Git at the moment. Believe me; this tool can become paramount. As an example, you can configure services to work with Git and automatically deploy and test your code.
Now, let’s practice with Git and GitHub
Now that you know what Git and Github are, it’s time to practice with concrete exercises.
After these exercises, you will be able to create and manage your projects via GitHub with all the basic features of Git.
Note: I chose GitHub as our hosting service for Git because it’s the most used in the world. Don’t be afraid; the procedure is quite the same on other services.
Please remember this article take into consideration you know at all the basics SHELL commands. If not, some parts of this article will be confusing.
#1 step — Time to start!
Looking forward to getting started? Let’s do it!
This first exercise is not very complicated; it’s divided into two steps. The Git installation and GitHub account creation.
a. GitHub account creation
To create your account, you need to connect on the main GitHub page and to fill in the registration form.
Nothing more! You are officially a new member of GitHub!
b. Git installation
Now you need to install Git tools on your computer. There are different Git software, but it’s better to install the basic one to start. We will use the command line to communicate with GitHub.
Once you are more comfortable with the command line, you can download Git software with a user interface.
- For Ubuntu:
First, update your packages:
$ sudo apt updateNext, install Git with apt-get:
$ sudo apt-get install gitFinally, verify that Git is installed correctly:
$ git --version- For MacOSX:
First, download the latest Git for Mac installer.
Next, follow instructions on your screen.
Finally, open a terminal and verify that Git is installed correctly:
$ git --version- For Windows:
First, download the latest Git for Windows installer.
Next, follow instructions on your screen (you can leave the default options).
Finally, open a terminal (example: powershell or git bash) and verify that Git is installed correctly:
$ git --version- For all users:
One last step is needed to complete the installation correctly! You need to run in your terminal the following commands with your information to set a default username and email when you are going to save your work:
$ git config --global user.name "Gaël Thomas"
$ git config --global user.email "example@mail.com"
#2 step — Your first GitHub project!
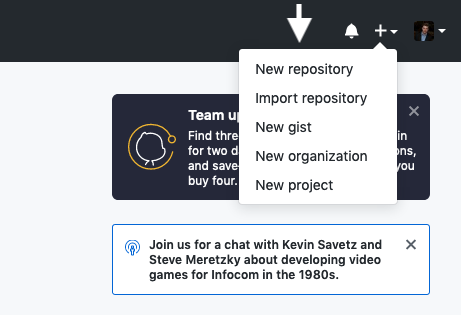
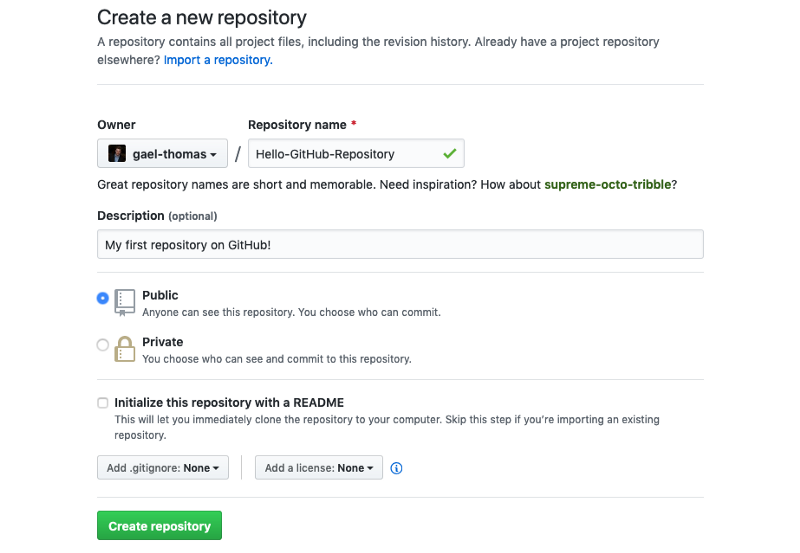
Now that you’re ready, you can return to the main GitHub page and click on the “+” icon in the menu bar.

Once you click on this button, a new menu appears with a “New repository” entry. Click on it!
The repository creation page will appear. Choose a cool name for your first repository and put a small description before clicking on the “Create repository” button.
Note: In the context of this article, please don’t tick “Initialize this repository with a README”. We will create a “README” file later!
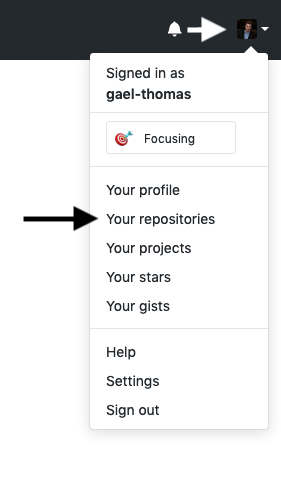
Well done! Your first GitHub repository is created. If you want to see all your repositories, you need to click on your profile picture in the menu bar then on “Your repositories”.
#3 step — A good cover
It’s time to make your first modification to your repository. What do you think about creating a cover for it, a kind of welcome text?
a. A local version of your project
Your first mission is to get a copy of the repository on your computer. To do that, you need to “clone” the repository. On the repository page, you need to get the “HTTPS” address.
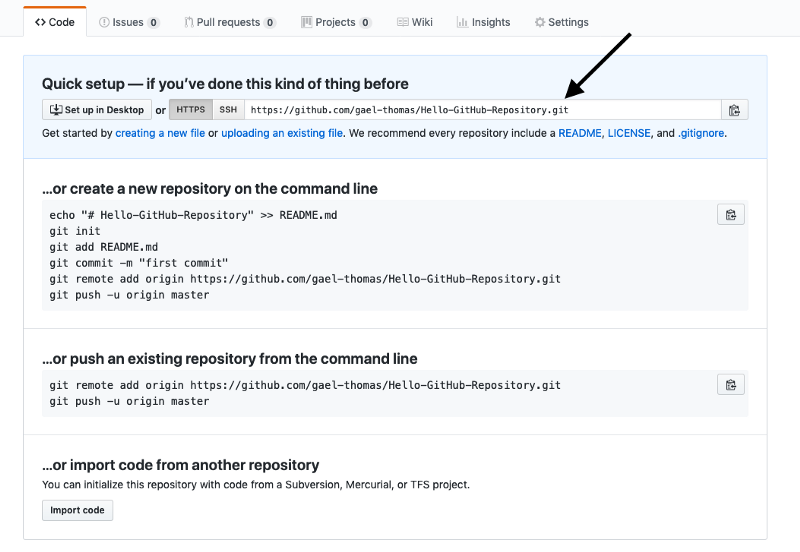
Once you had the address of the repositories, you need to use your terminal (through shell commands) to move in the place where you want to put the directory copy (for example you can move in your “Documents” folder). When you are ready, you can enter:
$ git clone [HTTPS ADDRESS]This command will make a local copy of the repository hosted at the given address.

Now, your repository is on your computer. You need to move in it with:
$ cd [NAME OF REPOSITORY]Note: When you clone, Git will create a repository on your computer. If you want, you can access your project with the computer user interface.
b. Repository edition
Now you can create a file named “README.md” in your folder (through the terminal or user interface on your computer). I’m not giving you any more details about this step, nothing in particular. Open your folder and add a file as if it were a standard folder.
If you want to do something cool, copy and paste this template in your “README.md” file. You can replace information between the hooks to personalize the output.
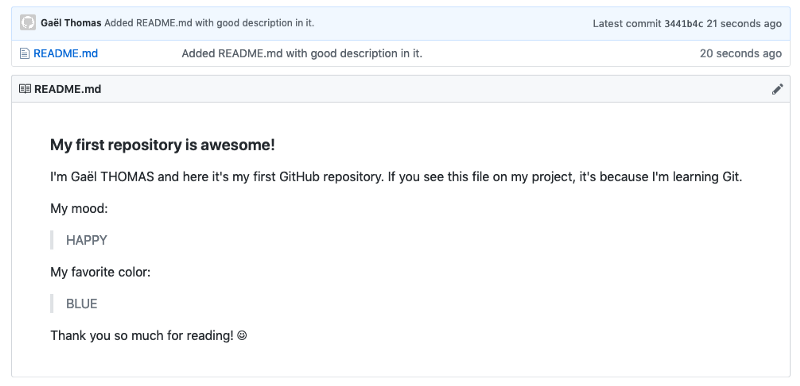
### My first repository is awesome!

I'm [PSEUDO/NAME] and here it's my first GitHub repository.
If you see this file on my project, it's because I'm learning Git.

My mood:

> [MOOD NAME]

My favorite color:

> [COLOR NAME]

Thank you so much for reading! ☺
c. Let’s share our work!
Now that you have modified your project, you need to save it. This process is called committing.
To do this, get back to your terminal. If you have closed it, go back in your folder.
When you want to save your work, four steps are required. These steps are called: “status”, “add”, “commit” and “push”. I have prepared a standard procedure for you to perform each time you want to save your work.
Note: All the following steps must be performed within your project.
- “status”: The first thing you need to do once your work is to check the files you have modified. To do this, you can type the following command to make a list of changes appear:
$ git status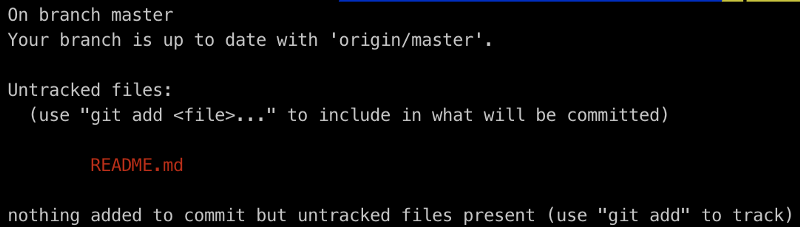
- “add”: With the help of the change list, you can add all files you want to upload with the following command:
$ git add [FILENAME] [FILENAME] [...]In our case, we are going to add “README.md” because we want to save this file.
$ git add README.mdNote: If you type again “git status”, the “README.md” will appear now in green. This means that we have added the file correctly.
- “commit”: Now that we have added the files of our choice, we need to write a message to explain what we have done. This message may be useful later if we want to check the change history. Here is an example of what we can put in our case.
$ git commit -m "Added README.md with good description in it."- “push”: You’re there, you can now put your work online! If you type the following command, all your work will be put online and visible directly on the repository page.
$ git push origin masterYou did it! If you come back on your repository page on GitHub, you are going to your “README.md” file with a beautiful preview of it.
Useful commands for Git
You are still missing some essential commands as a beginner with Git. Here is a list that will be useful to you during your project.
- Display the history of commits (all modifications made on the project).
$ git log- Revert back all your changes since the last commit.
$ git checkout .- Revert all changes on a specific file since the last commit.
$ git checkout [FILENAME]- Display the last changes on a file since the last commit.
$ git diff [FILENAME]- Remove all unexpected files in your project (not committed).
$ git clean -dfx- Add all files and make a commit at the same time.
$ git commit -am [MESSAGE]What’s next?
In the next part of this beginner’s guide, you will discover these three topics:
- What is a good commit message.
- Why it's essential.
- A checklist to write your commit messages.
-> A Beginner’s Guide to Git — How to Write a Good Commit Message
Conclusion
I hope that you’ve found this guide and examples on Git/GitHub helpful! If you have any questions or feedback, feel free to ask.
If you want more content like this, you can follow me on Twitter, where I tweet about web development, self-improvement, and my journey as a full stack developer!
You can find other articles like this on my website: herewecode.io.