by Ralu Bolovan
A Beginner’s guide to the new AWS Python SDK for Alexa

Amazon Web Services (AWS) recently added a new Python SDK to their Alexa family. It is currently in beta, but that should not stop us from getting some exposure.
What we’ll build: a very simple voice app that can say 10 facts about cats.
Why we’ll build it: The app’s concept is simple enough for us to focus on how to work with the SDK, and how to use DynamoDB to persist the most important data for our app.
By the end of the tutorial you’ll walk away with:
- What each of the main Alexa request types does and how to build your own.
- An understanding of how you can persist your app’s data in DynamoDB and avoid pitfalls.
- See the two Python styles for Alexa in action and choose your preferred one.
- Python tips.
- Alexa console tips.
Prerequisites:
1. AWS account
2. AWS developer account (if you want to test on your registered device, for example, an Echo, sign up with the same email as your Amazon account)
3. Python 3.6
If you’re still with me, let’s start!
Alexa: what happens behind the scenes (big picture)
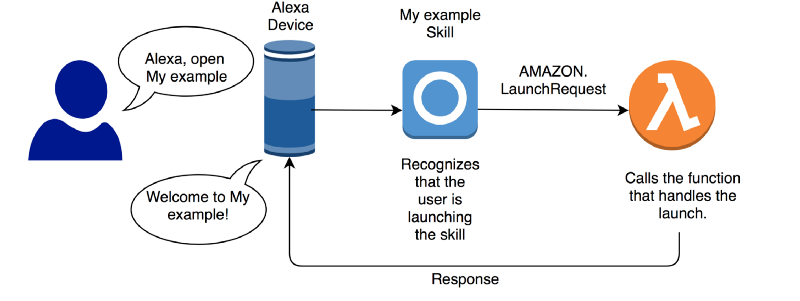
To illustrate the main idea behind an interaction with Alexa, let’s look at the launch of a fictitious skill called “My example”.
When the user says: “Open My example,” the “My example” bit is the skill’s Invocation name, which Alexa uses to communicate. The user’s device passes what the user said to the “My example” skill.
At this point, Alexa uses the skill’s Interaction model to understand what the user requested. The interaction model is a JSON file that maps what the user says to a request type. In this case, it will map it to the built-in AMAZON.LaunchRequest.
Next, it calls its backend, an AWS Lambda function, which receives the identified request.
The Lambda searches for a function that can handle the LaunchRequest and executes it.
This function then returns a response that gets sent back all the way up to the user’s device. At this point, the “My example” skill will greet them and will be able to accept further user requests.
Let’s get down to business!
Architecture overview

Now that we’ve nailed down the main idea behind an Alexa Skill invocation, let’s explore how we will create our sample “Cat Facts” skill.
The architecture is similar to the one we discussed: Alexa Skill that invokes a Lambda function to process the identified request and returns a response to be spoken back to the user.
We have two additions: DynamoDB and IAM.
DynamoDB
Our skill is going to keep track of the index of the last fact that our user heard from our list of ten cat facts. It uses DynamoDB to persist the index and the number of times the user has opened our skill.
IAM
We will need it in two places:
- First, a role for our Lambda to be able to interact with DynamoDB to persist our user data. We also need to grant it CloudWatchLogs permissions to write important details about the requests we receive.
- Second, we will need a Lambda Permission to allow our Alexa skill to invoke our Lambda as its backend.
Implementation
Alexa Skill
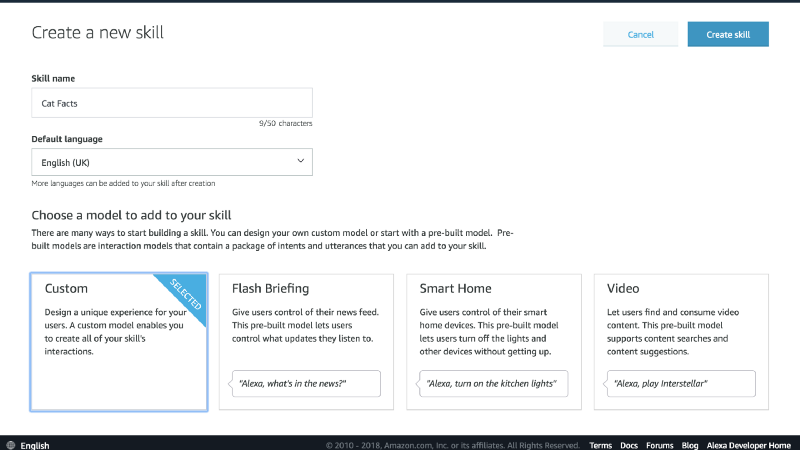
Go to your Alexa developer console and click on “Create Skill”. Name the skill “Cat Facts” and choose your preferred English locale.
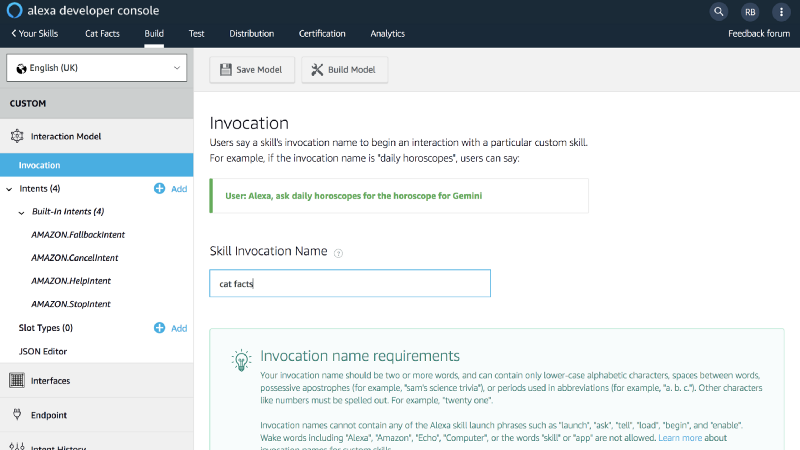
Add the invocation name: “cat facts”.
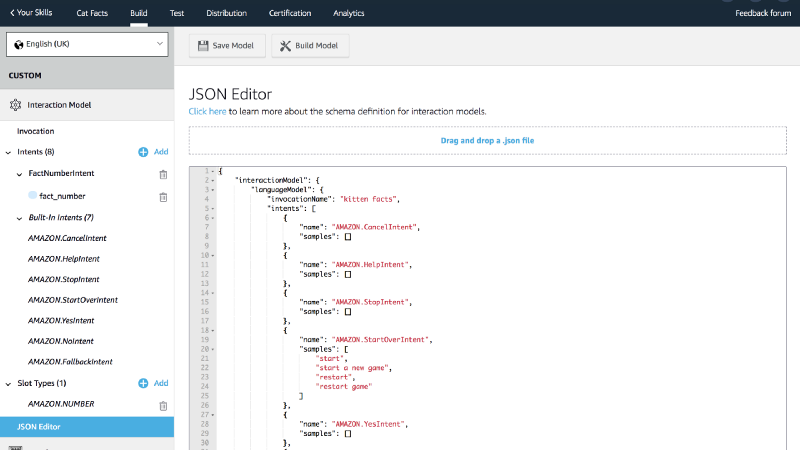
Add the following interaction model to the console’s JSON editor:
{ "interactionModel": { "languageModel": { "invocationName": "cat facts", "intents": [ { "name": "AMAZON.CancelIntent", "samples": [] }, { "name": "AMAZON.HelpIntent", "samples": [] }, { "name": "AMAZON.StopIntent", "samples": [] }, { "name": "AMAZON.StartOverIntent", "samples": [ "start", "start a new game", "restart", "restart game" ] }, { "name": "AMAZON.YesIntent", "samples": [] }, { "name": "AMAZON.NoIntent", "samples": [] }, { "name": "AMAZON.FallbackIntent", "samples": [] }, { "name": "FactNumberIntent", "slots": [ { "name": "fact_number", "type": "AMAZON.NUMBER" } ], "samples": [ "{fact_number}", "I want {fact_number}", "I want fact {fact_number}", "I want fact number {fact_number}", "Tell me {fact_number}", "Tell me fact {fact_number}", "Tell me fact number {fact_number}" ] } ], "types": [] } }}Click the “Save Model” button.
Tip:
For the AWS resources, use an Alexa supported region:
- Asia Pacific (Tokyo)
- EU (Ireland)
- US East (N. Virginia)
- US West (Oregon)
DynamoDB table
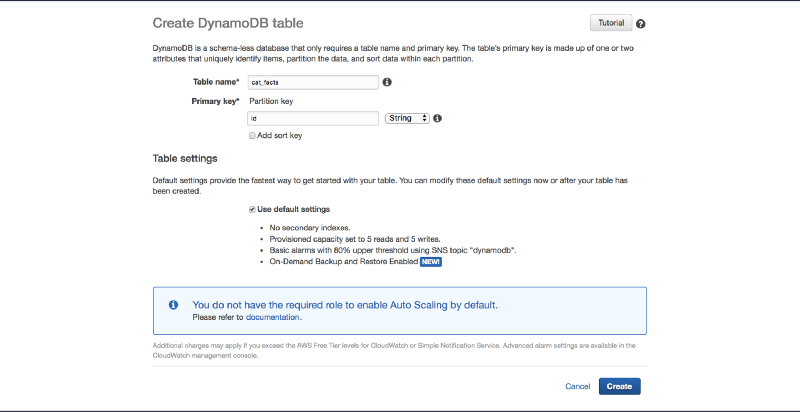
In the console go to DynamoDB and create a new table called “cat_facts”. Name the partition key: “id”.
IAM
We will now create the IAM policy that we will attach to our Lambda’s role.
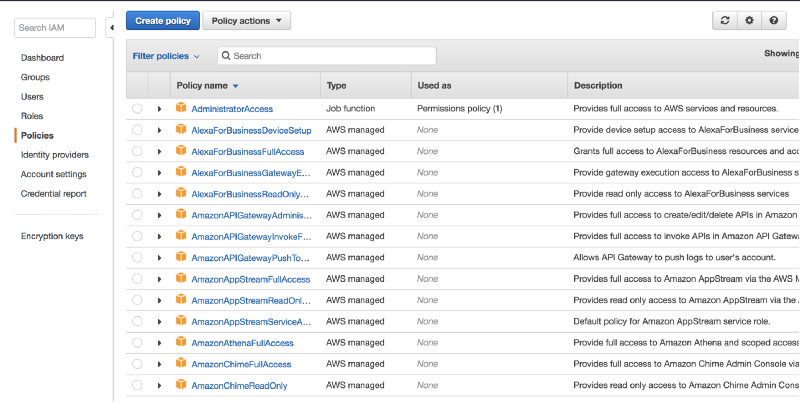
Go to “Services” -> “IAM” -> “Policies” and click on “Create policy”.
Then paste the following policy in the JSON editor and click on “Review policy”.
{ "Version": "2012-10-17", "Statement": [ { "Sid": "", "Effect": "Allow", "Action": [ "dynamodb:BatchGetItem", "dynamodb:BatchWriteItem", "dynamodb:PutItem", "dynamodb:ListTables", "dynamodb:DeleteItem", "dynamodb:Scan", "dynamodb:ListTagsOfResource", "dynamodb:Query", "dynamodb:UpdateItem", "dynamodb:DescribeTimeToLive", "dynamodb:CreateTable", "dynamodb:DescribeTable", "dynamodb:GetItem", "dynamodb:DescribeLimits", "dynamodb:UpdateTable", "logs:CreateLogGroup", "logs:PutLogEvents", "logs:CreateLogStream" ], "Resource": "*" } ]}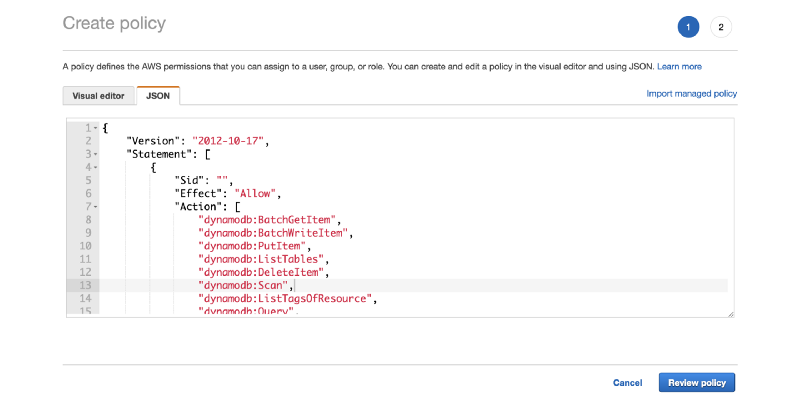
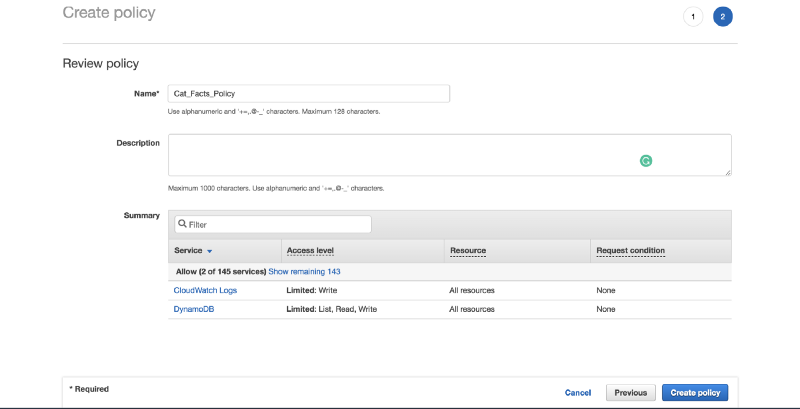
Name the policy “Cat_Facts_Policy” and finish by selecting “Create policy”.
We then want to attach this policy to a Lambda Role. Go back to “IAM” -> “Roles” and choose “Create role”.
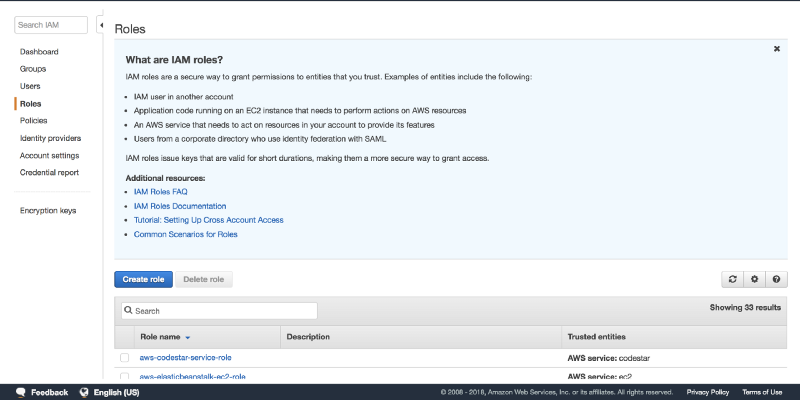
Then we choose “Lambda” service and click on “Next: Permissions”.

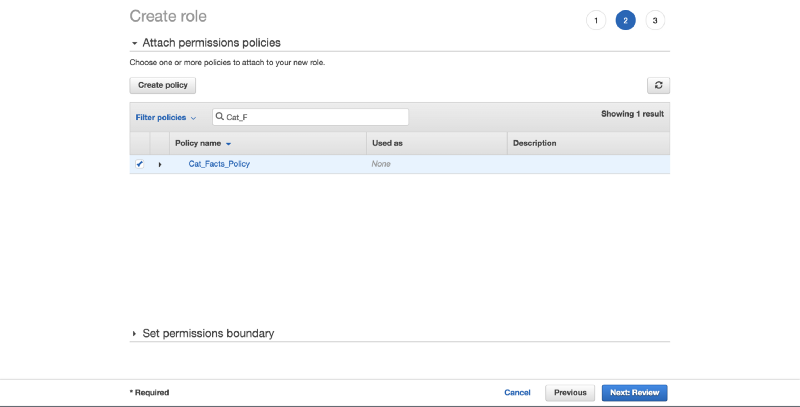
We attach the “Cat_Facts_Policy” and click on “Next: Review”.
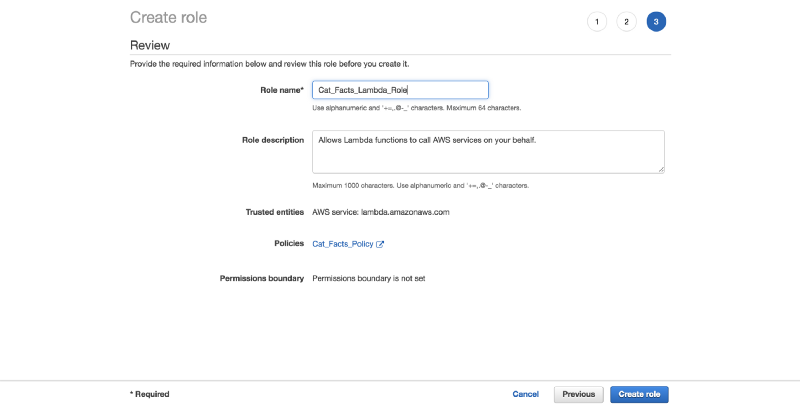
We finish by giving our role the name “Cat_Facts_Lambda_Role” and by clicking on “Create role”.
Lambda Code
In your terminal, create a new folder:
mkdir alexa_cat_facts_skill
Within this folder create a new directory for the Lambda:
cd alexa_cat_facts_skill/mkdir lambdaWithin the lambda folder, create a new virtual environment. The virtual env allows us to keep our skill’s libraries separate from those in any other Python project.
cd lambdapython3 -m venv catfactsenvsource catfactsenv/bin/activatepip install ask-sdkdeactivateWindows Tip: To activate the virtual environment run the following: catfactsenv\Scripts\activate.bat
Class and decorator Python styles
The Python SDK offers us two ways to write our Alexa interactions: either by using classes or by using decorators.
We’ll now do a comparison between the two styles while looking at the requests that we want to support as part of our app. We’ll achieve the exact same functionality.
Create two new Python files, one for each style:
touch catfacts_classes_lambda.pytouch catfacts_decorators_lambda.pyImports
In both cases, we import the “os” module to retrieve any environment variables that we pass to our Lambda — in this case, the name of the DynamoDB table to persist our user data.
SkillBuilders are classes that make it easy for us to attach components that can handle our user’s requests and generate appropriate responses.
We import the “StandardSkillBuilder”, which offers DynamoDB support out of the box. It also integrates with the Default API client, getting basic details about the user’s device.
We create a new instance to which we pass the name of the DynamoDB table. We want to use the user id that Alexa gives us as our table’s partition key. We do this by specifying a built-in helper function called user_id_partition_keygen, which extracts the user’s id from the incoming requests.
We include the is_request_type, is_intent_name functions to help us later determine the requests the skills has sent over.
We import ask_sdk_dynamodb to extract information from our Dynamo data.
Classes
In the case of classes, we introduce four abstract classes that we will implement for our skill to work:
AbstractRequestHandler— this class is able to process requests from the user and return an appropriate responseAbstractExceptionHandler— for handling exceptionsAbstractRequestInterceptor— executes before a requestAbstractResponseInterceptor— executes after a request
Decorators
Tip
We could have created our DynamoDB table within the Lambda by setting auto_create_table=True. The problem is that this is an asynchronous function, so the first user of the app would have experienced errors while the table was initializing.
Data

We store the ten cat facts in a list for both versions of the code.
We’ll look at each abstract class that we need to implement once, and then focus on the code, as the syntax remains the same.

HandlerInput
Whenever we need to process a request, an exception, or intercept a request before or after we’ve processed it, what makes this possible is a HandlerInput (in the code, handler_input) object. It contains all we need to understand the state of our skill.
The HandlerInput offers the following attributes for us to use:
request_envelope: the whole request bodyatributes_manager:an easy way to access request, session, and persistent attributesservice_client_factory: builds API clients that can perform functions for us like retrieving the user’s name and address, or make purchasesresponse_builder: way to build the response we want to pass to our usercontext: an optional object that is passed by the service that is running the skill code. For a Lambda backend, this is the context object that gives us information like the remaining time until AWS terminates our Lambda.
LaunchRequest

Classes
For all request types that map to an intent, we need to implement the AbstractRequestHandler class methods can_handle and handle.
We first determine if the class can process the incoming request. For that, we use the is_request_type function. This takes in a request type — in our case, LaunchRequest— and returns a predicate function. We then pass the handler_input to this predicate, which checks if the incoming request is launching the app or not.
If this is a LaunchRequest, we can handle it. Because the launch is the gateway to our app, we want to see if this user has used our app before so we can customise their experience. We do this by using the attributes_manager attribute of handler_input to retrieve the persistent_attributes from our DynamoDB cat_facts table.
Behind the scenes, it calls the partition_keygen function that we used to create the StandardSkillBuilder instance.
In our case, we’re interested in making the user’s identifier the partition key. Once it has retrieved the user Id using this function from the request’s envelope, it then queries the DynamoDB table’s “id” column to see if there is an entry for this user in our table. If there is, it returns a dictionary containing all the attributes names and values, otherwise an empty dictionary.
If there’s no match, we record that this user has not played our game before. Also, we’re adding the index of the current fact from our cat_facts list, which is -1 because the user has not listened to any facts.
We point the contents of the persistent_attributes to session_attributes. We will be using the session attributes throughout the application, whenever we’re modifying a field. This will help us not only maintain the state of our app, but also avoid making unnecessary calls to our DynamoDB table.
To demonstrate the functionality, we’re assuming that the user can play as long as they’ve not listened to all ten facts.
If they have listened to all the facts, we ask them if they want to start again. If they want to restart, we start playing the facts in ascending order from the first one to the last.
We then use the response_builder to create our response. We use its speak function to make the user’s Device say the response. If they haven’t responded in eight seconds, the “ask” command will automatically reprompt them for an answer.
Decorators
The handler code is the same as for the classes version. The syntax differs in that we’re using the StandardSkillBuilder object’s request_handler function to decorate our function. We must pass it a parameter can_handle_func, which has to map to a function. We use the same is_request_type method, which gives us back the necessary function for this decorator to work.
Python tips:
We used attr.set_default(“facts_index”, -1) which checks if there is a facts_index key in our “attr” dictionary and sets it to -1 if there isn’t. Otherwise the value is not modified.
For Python 3.6 we can use “f” strings or formatted strings, which are expressions evaluated at runtime. They are faster and more readable than other ways of formatting.
FactNumberIntent
This is a custom request type that we define. We want to allow our user to ask for a fact number from 1 to 10, in addition to going through the list of facts in order.
Classes
The interesting bit here is that this request will pass us the number of the fact the user wants via a slot. A slot is an argument given to an intent.
In our interaction model we defined in our Alexa console, we tell Alexa that we can support a user saying a number and that it should be mapped to one via the built-in Amazon.NUMBER:
{ "name": "FactNumberIntent", "slots": [ { "name": "fact_number", "type": "AMAZON.NUMBER" } ], "samples": [ "{fact_number}", "I want {fact_number}", "I want fact {fact_number}", "I want fact number {fact_number}", "Tell me {fact_number}", "Tell me fact {fact_number}", "Tell me fact number {fact_number}" ] }From the Lambda side, we know that we will receive a number. We get all the slots from the intent, and then transform this value into an integer.
We make sure that the number can be mapped to an index, and we return the fact. Otherwise, we ask the user for a different number that we support.
We use the is_intent_name function to determine that we’re processing the FactNumberIntent.
Decorators
StartOverIntent
This is a built-in AMAZON intent used for restarting games, audio tracks, or transactions. In our case, restarting means resetting the facts_index.
Classes
Decorators
HelpIntent:
A built-in AMAZON intent to guide the user.
Classes
Decorators

StopOrCancelIntent
Here we’ve combined the handling of the built-in intents AMAZON.StopIntent and AMAZON.CancelIntent to explicitly end the user’s session by setting set_should_end_session to “True” in the response_builder.
Classes
We persist the gathered session_attributes in DynamoDB by calling our helper function persist_user_attributes. We also increase the number of times this user has interacted with our app.
The save_persistent_attributes function will save the attributes into DynamoDB. This uses the skill builder instance’s partition_keygen function to get the userId to use as the partition key. This is done behind the scenes.
Decorator:
For the can_handle_func we’re making our own inline function, using Python’s lambda operator, where we’re passing in the handler_input to be checked against the StopIntent and the CancelIntent. In this case, we must explicitly invoke the is_intent_name function with both these inputs, which will return a boolean. Because we’re using lambda, the result will be a predicate function, which is what the can_handle_func needs.
SessionEndedRequest
We use the is_request_type function to determine if the session has been terminated. This happens when the user says “Exit” — we don’t receive a response that can be mapped to any intent, or an error occurs. This is not invoked when explicitly ending the session using set_should_end_session, so we must ensure that we persist the attributes in both cases.
Classes
Decorators
YesIntent

This is a built-in intent for affirmative responses for a yes/no question. We’re keeping things very basic. We check if a new fact can be retrieved and, if not, we ask the user to restart the game. Otherwise, we tell them the fact and ask them if they want to hear another one.
Classes
Decorators
NoIntent
It’s a built-in intent for negative responses for a yes/no question. We choose to end the session and persist the session attributes in DynamoDB.
Classes
Decorators
FallbackIntent
Another built-in AMAZON intent that is supported at the time of writing in English locales.
It provides a fallback mechanism when the user says something that does not match any of our skill’s intents.
Classes
Decorators
AllException

To keep things simple, we want to use this handler to handle every possible exception.
Classes
We need to implement the can_handle method to which we pass the handler_input and the exception. We want this function to handle any exceptions, but for more specialized cases we could look at exception classes and have specific ways to handle them.
In the handle function we pass the handler_input and the exception and we return a simple message.
Decorator
For the decorator version, we need to pass to can_handle_func a function that takes as input the handler_input and the exception and returns a boolean. The function that gets decorated receives both of these parameters.
GlobalRequestInterceptor
We use the global request interceptor to execute code before every request’s handler gets invoked. In our case, we want to record the request we received. We also want to log the user’s id and their device id.
Classes
Decorators
For decorators, the global request interceptor is invoked directly as a function. It needs the skill builder instance to register the interceptor on our behalf.
Helper functions
The get_device_id and get_user_id are two helper functions to showcase how to extract the deviceId and the userId from the request using the ask_dynamo_db package.
We can use ask_sdk_dynamodb.partition_keygen.device_id_partition_keygen and the ask_sdk_dynamodb.partition_keygen.user_id_partition_keygen as the partition key getters for our table. When we created our skill builder instance, we used the second function.
GlobalResponseInterceptor
Similar to the global request interceptor, the global response interceptor is used to execute code after any request’s handler gets invoked. Here we will just log the response we pass back to the user.
Classes
Decorators
Registering and calling our handlers:
The request and response interceptors are executed in the same order as they are registered.
Classes
We must explicitly register each request handler, each exception handler, and the global request and global response interceptors.
We then create a lambda_handler that can be used by our Lambda as the gateway to invoking all the supported handlers.
Decorators
We don’t need to register the handlers explicitly as that’s done directly by the decorators. But we must pay attention to the order we’ve written the handlers as that is the order in which they’ll be executed.
We’re officially done with the syntax part and understanding what goes into our code.

Packaging our Python code
Because we’re using non-standard Python libraries like the AWS Python SDK, we need to package them up alongside our Lambda code.
The way we achieve this is by creating a bash script that will do the work for us. In the “alexa_cat_facts_skill” directory create a new bash file: “create_lambda_package.sh”
cd ..touch create_lambda_package.shAdd the following to the new bash file. This will zip the Python libraries as well as the two versions of our code into a package called “lambda_package.zip”.
#!/bin/bashBASEDIR=$(pwd)rm -rf $BASEDIR/lambda_package.zipcd $BASEDIR/lambda/catfactsenv/lib/python3.6/site-packages/zip -r9 $BASEDIR/lambda_package.zip *cd $BASEDIR/lambda/catfactsenv/lib64/python3.6/site-packages/zip -r9 $BASEDIR/lambda_package.zip *cd $BASEDIR/lambdazip -r9 $BASEDIR/lambda_package.zip catfacts_classes_lambda.py catfacts_decorators_lambda.pyRun the bash script: bash -x create_lambda_package.sh
Windows Tip
The Python libraries will be found instead under catfactsenv\Lib\site-packages .
Setting up the Lambda
Start by going to the “AWS console” -> “Services” -> “Lambda”

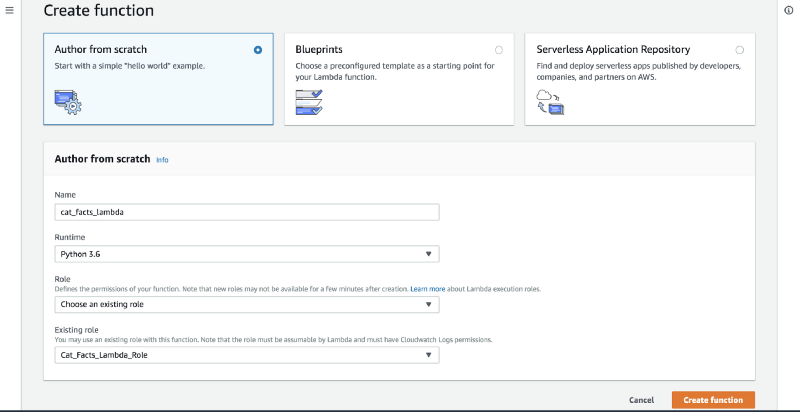
We will author from scratch. Name the Lambda: “cat_facts_lambda”. Select the runtime to be “Python 3.6” and for the role choose the “Cat_Facts_Lambda_Role” we created above. Click on “Create function”.
Add the environment variable “skill_persistence_table” with the value cat_facts.

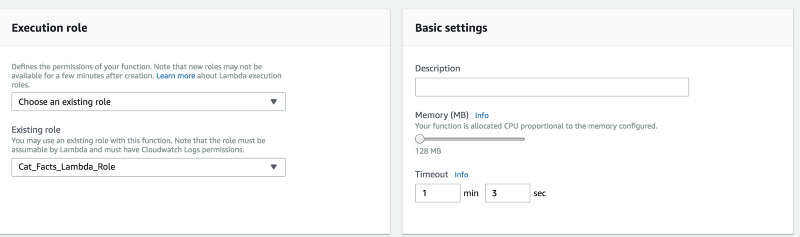
Increase the “Timeout”.
Import the code by uploading the “lambda_package.zip” file. Add the Lambda’s handler to be: “catfacts_decorators_lambda.handler”.
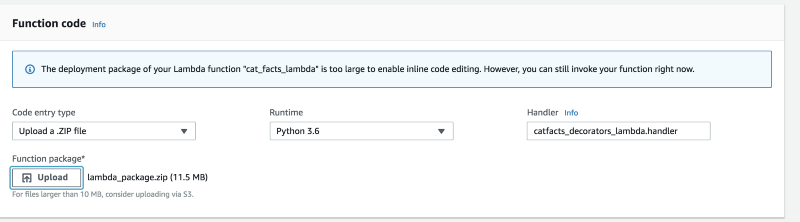
Save the function.
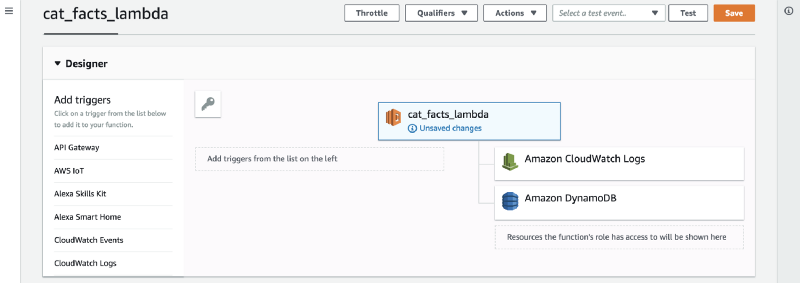
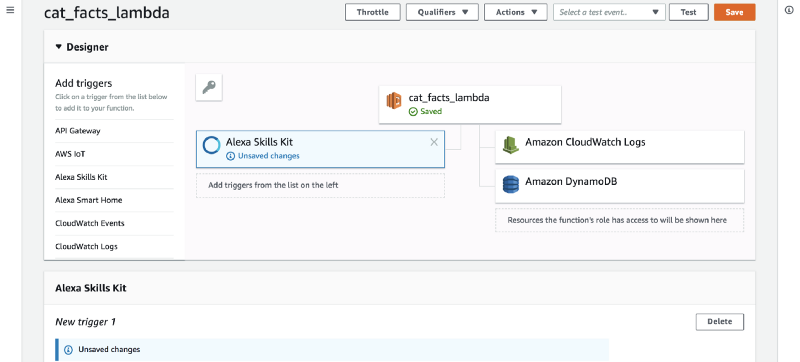
Add the Alexa trigger
From the function’s “Designer” menu, choose “Alexa Skills Kit”. Then click on the button with the same name to fix the configuration.
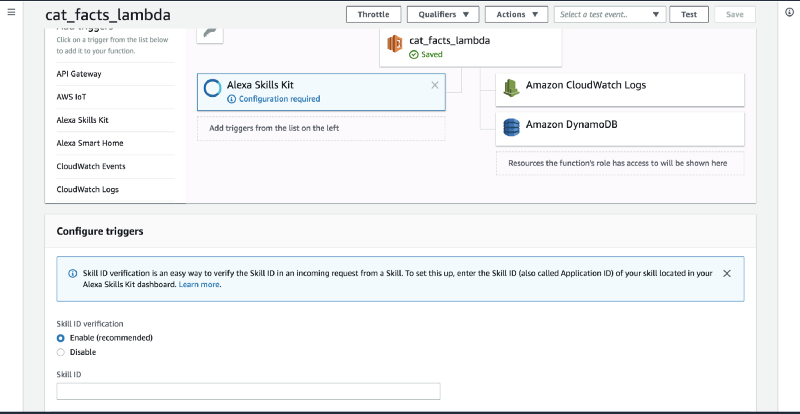
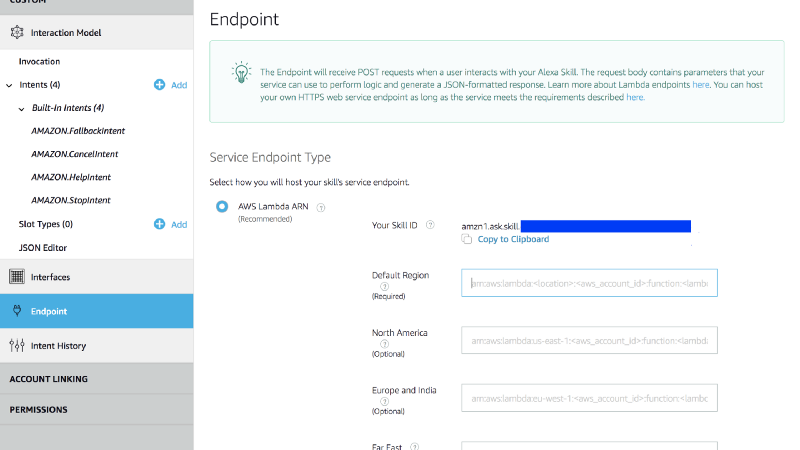
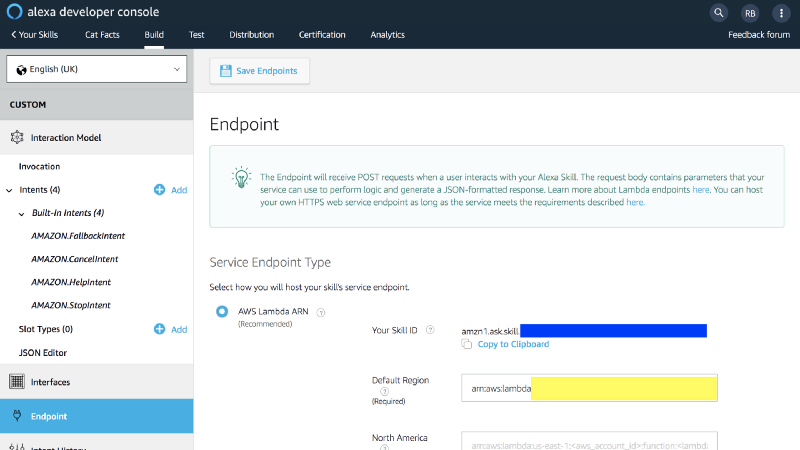
Go to the Alexa developer console, to “Endpoint” and you will see the skill’s id. Copy it to your clipboard.
Paste the Skill ID into the Lambda console and then click “Add”.
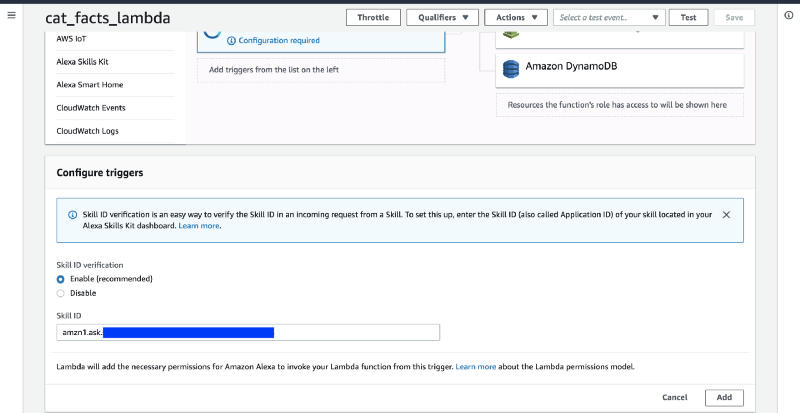
Save the function.
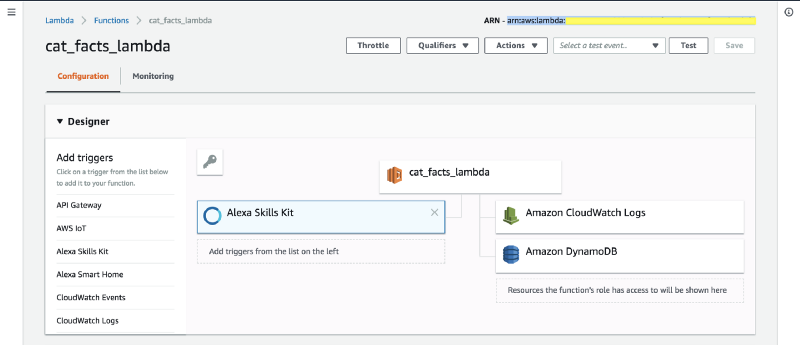
Then copy the Lambda’s ARN from the top right corner of the page.
Alexa console setup finish
Select “AWS Lambda ARN” from “Endpoint”, and paste the Lambda’s ARN into the “Default Region” Field.
Then go to “Build” -> “JSON Editor” -> “Save Model”. Once the model is saved, click on “Build Model” so all our changes take effect.
We’re officially done with our setup! Congratulations on making it this far!

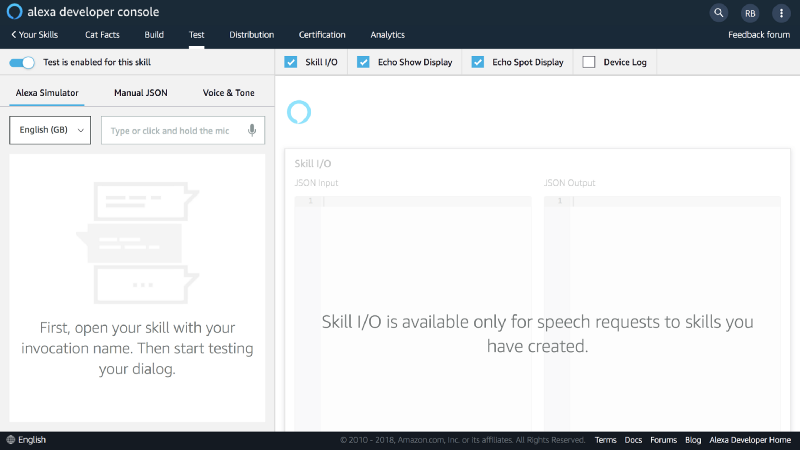
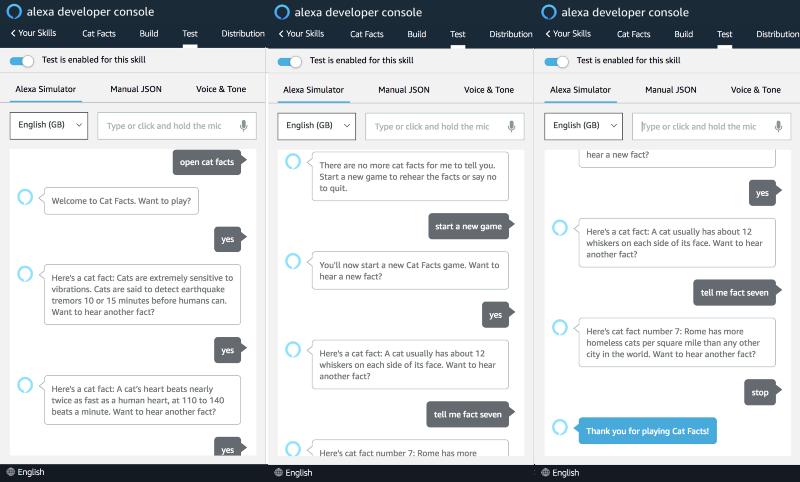
Testing
Let’s interact with our skill directly from the Alexa console. Go to “Test” and enable testing for the skill to run the Alexa simulator.
Alexa console tip
When testing the FactNumberIntent, write the numbers as characters, for example “two” instead of “2”. Otherwise, the intent will be mapped to the FallbackIntent.
Let’s test the Decorators version
Let’s run a simple scenario to see how our skill performs. We’re especially interested in testing the fact number intent and its boundaries. Feel free to either speak the commands by clicking and holding the mic icon or by writing them.
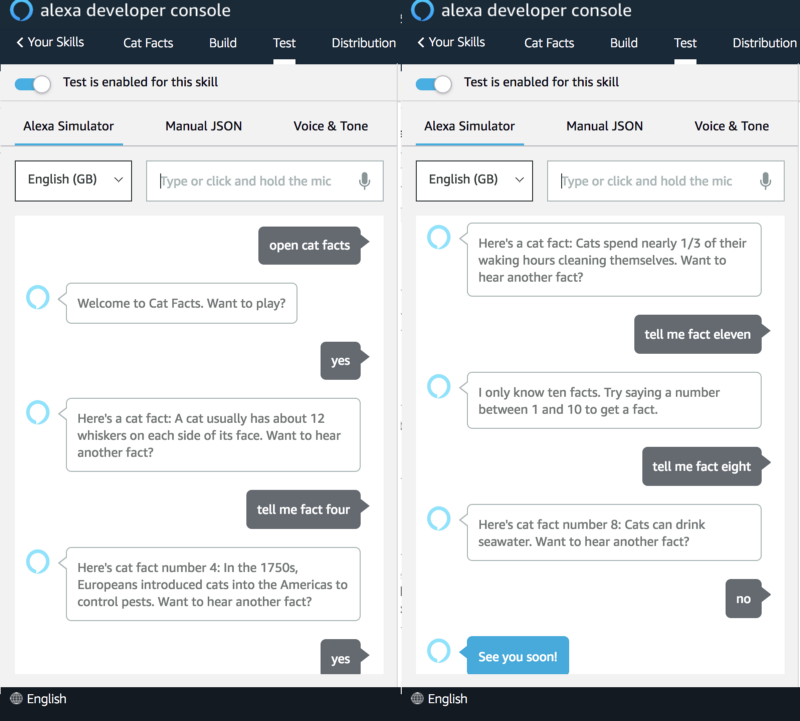
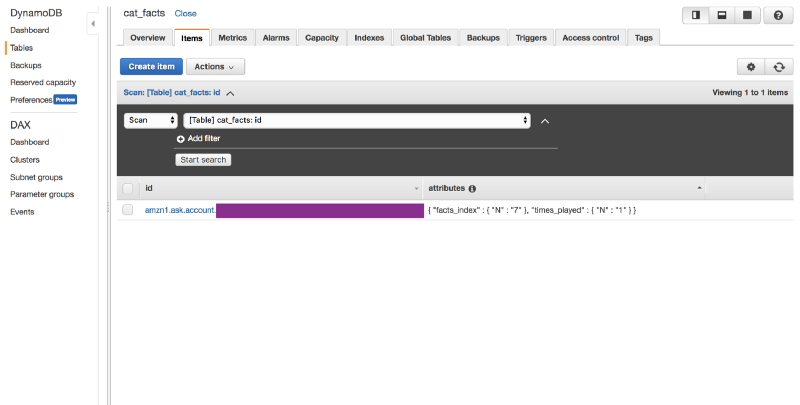
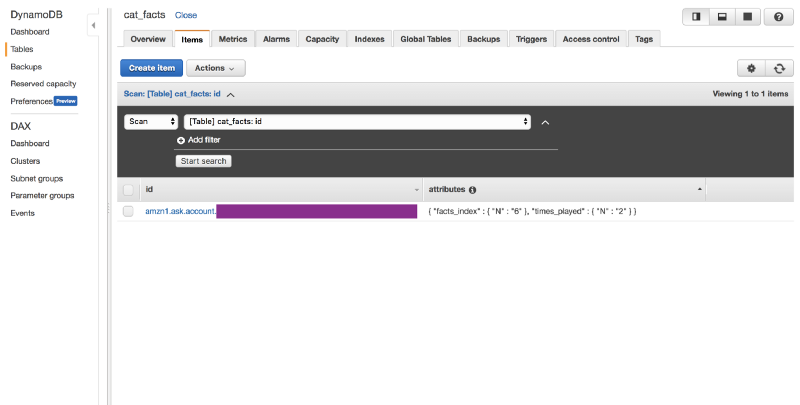
See the results in DynamoDB by going into your AWS console to “Services”-> “DynamoDB” -> “Tables” -> “cat_facts”. You will see a similar item, with your user id as the partition key.
Let’s test the Classes version
To switch to the classes version of our code, go to “Services” -> “Lambda” -> “cat_facts_lambda”. The simple change is to rename the Handler from “catfacts_decorators_lambda.handler” to “catfacts_classes_lambda.handler”. “Save” the function and the switch happens automatically.

Let’s do another run with our Alexa skill, where we want to test the start over behaviour. Even though we changed the code, the behaviour is the same.
Let’s go back to our DynamoDB table and refresh our page. Our Lambda has successfully recorded the last heard fact’s index and that the user has interacted with the skill twice.
Congratulations! You’ve successfully created your first Alexa Skill using the Python SDK. You now know how to persist relevant attributes in DynamoDB, how to create your skill’s infrastructure, what the major intents do, how to create your own, and how to make Lambda answer to any intents.
Room for improvement
We specifically did not focus on infrastructure such as code, git, multiple languages, CI/CD, testing, and APIs for our cat facts. That would have made the tutorial much more complex and would have taken away from the main focus. In a real-life environment, these make our lives a lot easier.
Even though adding such improvements would increase our productivity, knowing how to start and how to go about it can be overwhelming. Combining new technology trends like AI, Serverless and DevOps, requires fulfilling many roles at the same time, which can seem insurmountable.
Get more help
But what if there was a way to overcome this obstacle and be empowered to build your own applications using these concepts? I have created a course that demystifies this process. You can find it here, with a free trial by going here.
Thank you for taking the time to read this article. May it be a stepping stone in your journey to creating something great!