by Ali Spittel
A Complete Beginner’s Guide to React

I want to get back into writing more technical content. React is one of my favorite technologies, so I thought I would create a React intro! This post requires knowledge of HTML and JavaScript. I am of the firm opinion that you should know these before moving on to libraries like React!
What is React
React is a JavaScript library built in 2013 by the Facebook development team. React wanted to make user interfaces more modular (or reusable) and easier to maintain. According to React’s website, it is used to “Build encapsulated components that manage their own state, then compose them to make complex UIs.”
I’m going to use a lot of Facebook examples throughout this post since they wrote React in the first place!
Remember when Facebook moved from likes to reactions? Instead of being able to like posts, you can now react with a heart, or a smiley face, or a like to any post. If those reactions were primarily made in HTML, it would be a tremendous amount of work to change all those likes to reactions and to make sure that they work.
This is where React comes in. Instead of implementing “separation of concerns”, we have a different architecture in React. This architecture increases modularity based on a component’s structure.
Today, we’ll keep the CSS separate, but you can even make that component specific if you want!
React vs. Vanilla JavaScript
When we talk about “vanilla” JavaScript, we are normally talking about writing JavaScript code that doesn’t use additional libraries like JQuery, React, Angular, or Vue. If you would like to read more about those and what a framework is, I have a post all about web frameworks.
A couple quick notes before we begin
- To make this tutorial a little more succinct, some code examples have
...before or after them. This means we omitted some code. - I use Git diffs in some places to show lines of code that will change. If you copy and past, you need to delete the
+at the beginning of the line. - I have full CodePens with the completed versions of each section — so you can use those to play catch-up!
- More advanced concepts that aren’t essential for the tutorial are in blockquotes. These are facts that are interesting!
Set Up
If you are creating a production React application, you will want to use a build tool like Webpack. Webpack will bundle your code since React utilizes some patterns that won’t work by default in the browser. Create React App is super helpful for these purposes since it does most of the configuration for you!
For now, we will be using the React CDN, which is only for development purposes! We will also use the Babel CDN so that we can use some non-standard JavaScript features (we’ll talk more about that later!).
<script crossorigin src="https://unpkg.com/react@16/umd/react.development.js"></script><script crossorigin src="https://unpkg.com/react-dom@16/umd/react-dom.development.js"></script><script src="https://cdnjs.cloudflare.com/ajax/libs/babel-core/6.1.19/browser.js">I also made a Codepen template that you can use!
In a full React project, I would split my components into different files. For learning purposes we will combine our JavaScript into one file for now.
Components
For this tutorial, we will be building a Facebook status widget, since Facebook wrote React in the first place!
Think about how many places the like widget appears on Facebook. You can like a status, or a link post, or a video post, or a picture! Or even a page! Every time Facebook tweaks something about the like functionality, they don’t want to have to do so in all those places. So, that’s where components come in! All the reusable pieces of a webpage are abstracted into a component. That component can be used over and over again. Ee will only have to change the code in one place to update it.
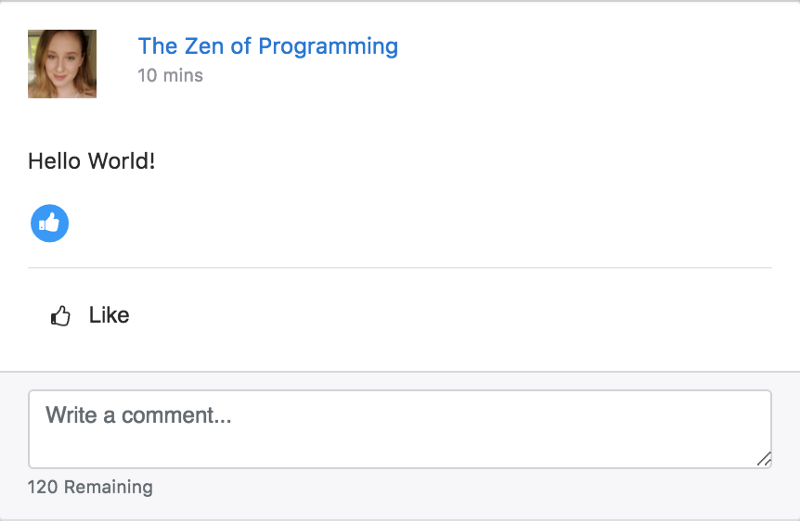
Let’s look at a picture of a Facebook status and break down the different components within it.

The status itself will be a component. There are lots of statuses within a Facebook timeline. We definitely want to be able to reuse the status component.
Within that component, we will have subcomponents or components within a parent component. Those will be reusable as well . We could have the like button component be a child of the PhotoStatus component and the LinkStatus component.
Maybe our subcomponents would look something like this:

We can even have subcomponents within subcomponents! So, the group of like, comment, and share could be its own ActionBar component. It would have components for liking commenting and sharing within it!

There are a bunch of ways you could break down these components and subcomponents depending on where you will reuse the functionality in your application.
Getting Started
I wanted to start off this tutorial with a React “Hello World” — it is the tradition after all! Then we’ll move to the slightly more complex status example.
In our HTML file, let’s add just one element — a div with an id on it. By convention, you will normally see that div have an id "root" on it since it will be the root of our React application!
If you’re writing the code in the CodePen template, you can write this JavaScript directly in the js section. If you are instead writing this on your computer, you will have to add a script tag with the type text/jsx, so:
<script type="text/jsx"><;/script>Now, let’s get to our React code!
class HelloWorld extends React.Component { render() { // Tells React what HTML code to render return <h1>Hello World</h1> }}// Tells React to attach the HelloWorld component to the 'root' HTML divReactDOM.render(<HelloWorld />, document.getElementById("root"))All that happens is that “Hello World” is displayed as an H1 on the page!
Let’s walk through what’s going on here.
First, we are using an ES6 class that inherits from the React.Component class. This is a pattern that we will use for most of our React components.
Next, we have a method in our class — and its a special method called render. React looks for the render method to decide what to render on the page! The name makes sense. Whatever is returned from that render method, will be rendered by that component.
In this case, we are returning an H1 with the text of “Hello World” — this is exactly what would be in the HTML file normally.
Finally, we have:
ReactDOM.render(<HelloWorld />, document.getElementById("root"))We are using the ReactDOM functionality to attach our react component to the DOM.
React utilizes something called the virtual DOM which is a virtual representation of the DOM that you would normally interact with in Vanilla JavaScript or JQuery. This reactDOM.render renders this virtual DOM to the actual DOM. Behind the scenes, React does a lot of work to efficiently edit and re-render the DOM when something on the interface needs to change.Our component, <HelloWorld />, looks like an HTML tag! This syntax is part of JSX which is an extension of JavaScript. You can't natively use it in the browser. Remember how we're using Babel for our JavaScript? Babel will transpile (or convert) our JSX into regular JavaScript so the browser can understand it.
JSX is actually optional in React, but you’ll see it used in the vast majority of cases!
Then, we are using JavaScript’s built-in document.getElementById to grab our root element we created in our HTML.
All in all, in this ReactDOM.render statement, we are attaching our HelloWorld component to our div that we created in our HTML file.
Starter Code
Okay — now that we’ve done a “Hello World,” we can get started with our Facebook component.
First, I want you to play around with this demo. We’ll be working on this throughout the rest of the tutorial. Feel free to look at the code too, but don’t worry about not understanding it! That’s what the rest of the tutorial is for!
Let’s start off by “hard coding” the HTML for the widget:
With some added CSS, this looks like the following:
Here’s a Codepen with the full starter code.
For the sake of this tutorial, we will be creating four components: a Status component which will be the parent, a Like component that will encompass the liking logic, and the Comment component which will contain the logic for typing in a comment. The Like component will also have a child LikeIcon that will show up or be hidden when you toggle the like button.
Component Architecture
Let’s go ahead and divide the HTML code that we’ve written into those components.
We’ll start with the shell of a component, and we’ll render it as well to make sure it’s working!
One interesting note about the above, is that we had to change “class” attributes to “className”. Class already means something in JavaScript — it’s for ES6 classes! Some attributes are named differently in JSX than in HTML.
We can also delete the content of our HTML, leaving just an element with the ID root — the parent “content” div is just for styling!
<body> <div class="content"> <div id="root"></div> </div> </body>Here’s the HTML that is going to go in the Status component. Notice, some of the original HTML isn’t there yet — it’s going to go into our subcomponents instead!
Let’s create a second component, and then we’ll include it in our Status component.
class Comment extends React.Component { render() { return ( <div> <textarea className="form-control" placeholder="Write a comment..." /> <small>140 Remaining</small> </div> ) } }Here’s the component for our comment. It has our textarea to type in, and the text with how many characters we have remaining. Notice that both are wrapped in a div. This is because React requires us to wrap all the contents of a component within one HTML tag. If we didn't have the parent div we'd be returning a textarea and a small tag.
So, now we need to include this component within our Status component since it will be our subcomponent. We can do so using that same JSX syntax we used to render the Status component!
Okay, now we just need to do the same for our likes:
Then we need to include it in our original Status component:
Cool, now we have React-ified our original HTML, but it still doesn’t do anything. Let’s start fixing that!
All in all, the code from this section will look like this CodePen.
State and Props
We have two different user interactions that we want to implement:
- We want the like icon to show up only if the like button is pressed
- We want the number of characters remaining to decrease as the person
Let’s start working on these!
Props
Imagine that we wanted our comment box to allow for a different number of letters in different places. On a status, for example, we want a user to be allowed to write a 200 letter long response. On a picture, however, we only want them to be able to write a 100 character response.
React allows us to pass props (short for properties) from the PictureStatus component and the Status component to specify how many letters we want to allow in our response, rather than having two different comment components.
The syntax for props looks like the following:
<Comment maxLetters={20} /> <Comment text='hello world' /> <Comment show={false} /> let test = 'hello world' <Comment text={test} />The props look like HTML attributes. If you are passing a string via props, you don’t need the brackets. Any other data type or a variable needs to be within the brackets.
Then, within our component, we can use our props:
console.log(this.props.maxLetters)They are bundled together in the props attribute of the instance so they can be accessed with this.props.myPropName.
So, let’s change the hardcoded 140 characters to be changeable outside the component!
First, we’ll change where we instantiate the Comment component within the Status component (note some code is omitted):
class Status extends React.Component { ... <div className="card-footer text-muted"> <Comment maxLetters={280} /> </div> </div>; </div> ) } }Then we’ll change the hardcoded 140 character limit in the Comment component.
class Comment extends React.Component { ... <div> <textarea className="form-control" placeholder="Write a comment..." /> <small>{this.props.maxLetters} Remaining</small>; </div> ... }State
The props that we pass from component to component will never change within the child component. They can change within the parent but not within the child. But — a lot of the time we will have attributes that we will want to change within the life of a component.
For example, we want to keep a tally of how many characters the user has typed into the textarea, and we want to keep track of whether the status has been “liked” or not. We will store those attributes that we want to change within the component in its state.
You’ll notice a lot of immutability within React — it is highly influenced by the functional paradigm, so side effects are also discouraged.
We want this state to be created whenever we create a new instance of a component, so we will use the ES6 class constructor to create it. If you want a quick refresh on ES6 classes MDN is a great resource!
State is going to be an object with any key-value pairs that we want to include. In this case, we want a characterCount of how many characters the user has typed. We’ll set that to zero for now:
class Comment extends React.Component { constructor () { super() this.state = { characterCount: 0 } } ...Now let’s subtract that from the maxLetters prop, so we always know how many characters we have remaining:
<small>{this.props.maxLetters - this.state.characterCount} Remaining</small>If you increase the characterCount, the characters remaining display decreases.
But — nothing happens when you type! We’re never changing the value of characterCount. We need to add an event handler to the textarea so that we change the characterCount when the user types.
Event Handlers
When you’ve written JavaScript in the past, you’ve probably written event handlers to interact with user input. We are going to do the same in React, the syntax is going to be a little bit different.
We are going to add a onChange handler to our textarea. Inside of it, we will place a reference to an event-handling method that will run every time the user types in the textarea.
<textarea className="form-control" placeholder="Write a comment..." onChange={this.handleChange}/>Now we need to create a handleChange method!
class Comment extends React.Component { constructor () { super() this.state = { characterCount: 0 } } handleChange (event) { console.log(event.target.value) } ...Right now, we’re just console.log-ing the event.target.value. This will work the same way as it does in React-less JavaScript (though if you dive a little deeper, the event object is a little bit different). If you look at that console, we are printing out what we are typing in the textbox.
Now we need to update the characterCount attribute in state. In React, we never directly modify state, so we can't do something like this: this.state.characterCount = event.target.value.length. We instead need to use the this.setState method.
handleChange (event) { this.setState({ characterCount: event.target.value.length }) }But! You get an error — “Uncaught TypeError: this.setState is not a function”. This error is telling us that need to preserve the context of the ES6 class within the event handler. We can do this by binding this to the method in the constructor! If you want to read more about this, here's a good article.
class Comment extends React.Component { constructor () { super() this.handleChange = this.handleChange.bind(this) ...Okay! We’re almost there. We just need to add the ability to toggle the like showing up.
We need to add a constructor to our Like component. In that constructor, we need to instantiate the component's state. The thing that will change within the lifecycle of the component is whether or not the status has been liked.
class Like extends React.Component { constructor() { super() this.state = { liked: false } } ...Now we need to add an event handler to change whether or not the status has been liked:
class Like extends React.Component { constructor() { super() this.state = { liked: false } this.toggleLike = this.toggleLike.bind(this) } toggleLike () { this.setState(previousState => ({ liked: !previousState.liked })) } ...The difference here is that the callback function this.setState receives a parameter -- previousState. As you can probably guess from the name of the parameter, this is the value of state before this.setState is called. setState is asynchronous, so we can't depend on using this.state.liked within it.
Now, we need to:
a) call the event handler whenever the user clicks on the like button
b) only show the LikeIcon when liked is true
Awesome! Now all of our functionality is in place!
Bonus: Functional components
If you feel like you’re in over your head already, feel free to skip this part. I wanted to make one more quick refactor to this project. If we create components that don’t have state associated with them (which we call stateless components), we can make our components into functions instead of ES6 classes.
In that case, our LikeIcon could look something like this:
We just return the UI of the component instead of using the render method!
Here is a CodePen that implements this refactor.
Cheat Sheet
I love cheatsheets, so I made one with the content of this post:
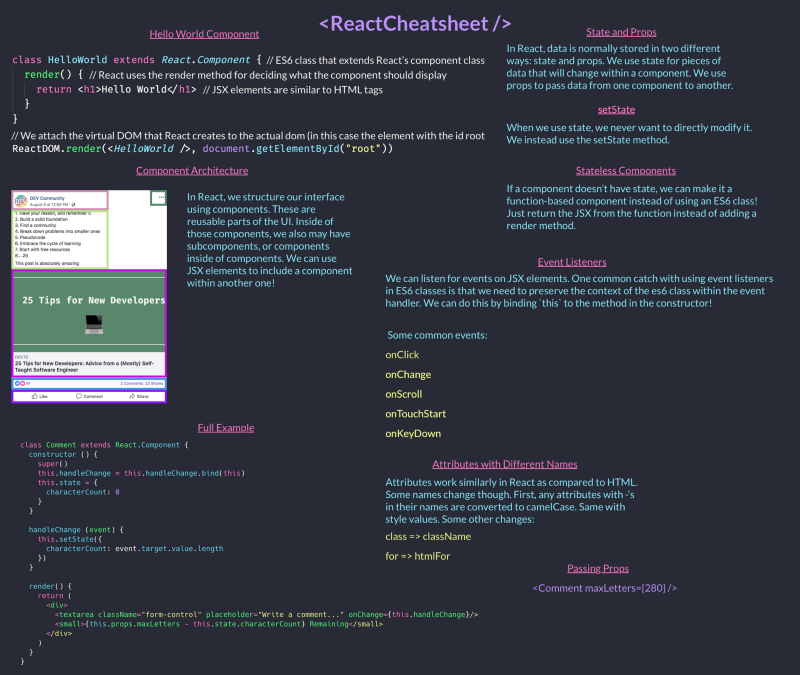
You can also download it as a PDF here!
Next Steps
To recap, we talked about the component architecture, the basic React syntax and JSX, state and props, event handlers, and functional components.
If you would like to view all the CodePens from this tutorial, here is a collection.
If you would like to try to extend the code from this tutorial, I would recommend changing likes to reactions or creating a photo component that reuses some of the components that we made!
Also, here are some other awesome places to learn React:
Keep in touch
If you liked this article and want to read more, I have a weekly newsletter with my favorite links from the week and my latest articles. Also, tweet me about things you want me to write tutorials on, or constructive feedback on how I could make these easier to follow! If you have any questions, my AMA repo is the best place to reach me!
Originally published at zen-of-programming.com.