by Jimmy Zhang
A Guide to Sublime Text Snippets

I recently switched jobs, which involves a lot of acclimation: new coworkers to befriend, new terms to learn, a new development environment to internalize. But most of all, the switch came with a change in programming languages, away from the tidy aesthetic of Python, and straight into the angled and curly world of JavaScript.
As I continued to misplace brackets and omit parenthesis, I searched for something that would help me navigate the unfamiliar territory. Luckily, I found Sublime Text Snippets.
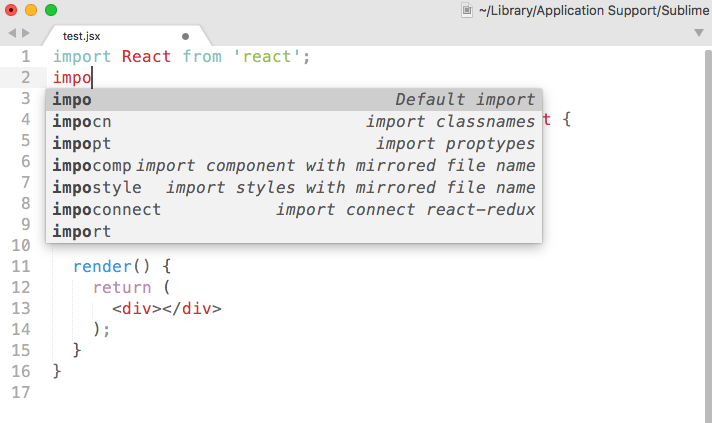
I love Sublime Text Snippets because they reduce cumbersome definitions to a few keystrokes, like this:
Overview
Sublime Text Snippets expedite the act of writing code by providing a quick way to insert blocks of text that show up repeatedly in a project. They are both easy to understand and straightforward to write, making them a great tool for saving time and eliminating errors while developing.
A snippet maps a trigger word to a pre-defined block of text, both of which you define. To invoke the snippet, type the trigger word and press tab. This simple action expands the trigger word into the mapped block of text — replete with as many brackets, parentheses, and semi-colons as necessary, always matching and in the correct order.
Note: The examples given below apply mostly to JavaScript and React, but the information about snippets can be applied to any programming language or framework.
Creating Snippets
To create a new snippet in Sublime Text 3, go to:
Tools -> Developer -> New Snippet...This opens a new window containing a new snippet template, which looks like this:
There are four parts to a snippet. Although only one part is required, defining all four is recommended.
1) The Content (Line 3): Required
<content><![CDATA[ Hello, ${1:this} is a ${2:snippet}.]]></content>Define the block of text to be expanded by the snippet by editing the line(s) between the <![CDATA[ and ]]> tags. (From now on, the block of text that is expanded after the snippet is invoked will be referred to as the snippet’s content).
You’ll notice the presence of words surrounded by a dollar sign, braces, numbers, and prefixed by a number. This optional markup specifies a Field Marker, which controls the cursor position after the snippet is invoked.
After content is expanded, the cursor moves automatically to the first field marker (${1:this} above). Pressing tab again moves the cursor to the next numbered field marker, or to the end of the snippet’s content if there are no fields left (see pro tip below).
Text after the colon in a field marker is optional. If specified, it is automatically selected as part of the cursor movement, meaning it can be deleted in one swift stroke. This makes text after the colon great for “placeholder” values that provide guidance of what should be filled in, or for optional default values, such as the isRequired field in the example below.
Pro tip
Use the $0 field marker (the exit marker) to explicitly define where the cursor will exit after all field markers have been cycled through. This is useful if you want to rebind the tab key to auto-completion after the snippet is invoked. To do so, place the exit marker immediately after the first field marker, like this:${1:example}$0
2: The Trigger Word (Line 6): Optional
<tabTrigger>hello</tabTrigger>Short and mnemonic trigger words work best. For example, the Babel React Snippet package maps cwm to componentWillMount and cwr to componentWillReceiveProps.
Trigger words are optional because there is an alternative way to invoke snippets, which we will cover in the Advanced Usage section.
3: A Scope (Line 8): Optional
<scope> source: python </scope>Scopes limit where your snippet can be invoked, improving precision and preventing collisions. For example, with scopes, the same trigger word can have different meanings for different programming languages.
This gist lists how to define scopes for a long list of programming languages, but scopes are capable of much more. We will cover scopes in more detail in the Advanced Usage section.
4: A Description (Line 10): Optional
<description> demo description </description>For some reason, the description tag doesn’t show up in the create snippet template. However, providing one will come in handy.
Snippets show up in Sublime Text’s auto-complete menu, along with a descriptive phrase. Without a description, this phrase defaults to the snippet’s filename, which isn’t guaranteed to have enough context when multiple snippets share the same prefix.
Pro tip
Create a keyboard shortcut to quickly create a new snippet. Go to Preferences -> Keybindings and add the following line to the “User” configuration file (of course, replace cmd+alt+n with whatever combination suits you best):
{ "keys": ["cmd+alt+n"], "command": "new_snippet" }Saving Snippets
After creating your snippet, make sure to save it in a file ending in sublime-snippet. On Mac, user created snippets are saved at:
~/Library/Application Support/Sublime Text 3/Packages/UserCreating a new snippet through the menu item or keyboard shortcut automatically prompts this location on save.
Advanced Usage
Environment Variables
We’ve covered the four aspects of creating a static snippet. However, it is possible to create dynamic snippets through the use of environment variables, which contain references to the context in which a snippet was invoked.
Context is a vague term, so see the Sublime Text Snippet Documentation for a table of environment variables and their exact meanings.
For an example of how environment variables can be used, my team follows a convention where a component’s stylesheet is saved under the same file name as the component, and given a .scss extension.
The component file can then leverage this convention with a snippet using the $TM_FILENAME environment variable.
<content><![CDATA[ import styles from './$TM_FILENAME${1:}scss']]></content>The $TM_SELECTED_TEXT or $SELECTION environment variable serves a more general purpose. Remember how I mentioned there was an alternative way of invoking snippets? Instead of keying the trigger word and hitting tab, you can also invoke snippets through the Command Palette.
On Mac, hit cmd+shift+p to bring up the Palette, type ‘Snippet’ and select the desired snippet from the drop-down. This roundabout approach has one major benefit — it is possible to invoke a snippet with a block of text selected, and for that text to be included as part of a snippet’s content. This allows you to create “wrapping” snippets, which wrap selected text with an if clause, for example.
Pro tip
Expand selection shortcuts are great for quickly selecting text to wrap with snippets like the one above.
Advanced Scopes
We’ve talked about limiting snippets to certain source code files, but snippets often have more granular contexts in which they are valid. As an example, a method such as componentWillUpdate typically only makes sense within a component (class) definition, which the following snippet definition makes explicit:
The inclusion of meta.class.js on line 8 means that the snippet is only valid in situations where the source code file being edited is a JavaScript file, and the cursor is “within” a class definition. If you tried to invoke the snippet in a blank JavaScript file, nothing would happen.
To fully leverage the power of scopes, you need to have a little understanding of syntax, scopes and scope selectors. These are nuanced topics worthy of their own post, so I’ll explain them at a very high level, with links to the documentation to fill in the gaps:
- a language syntax defines how source code is divided into scopes.
- scopes are labeled regions of text that correspond to the “units” of a programming language, such as class or function definitions. Every position within a source code file has an associated scope. Meta scopes are most relevant to snippets.
- scope selectors “query” scopes. Scopes selectors are bound to actions (such as snippets, or keyboard shortcuts), and are used to determine if the action is appropriate given the current scope.
Pro tip
The best way to learn about scopes is play around with them. Move your cursor to different positions within a file, and use the cmd+shift+p keyboard shortcut to bring up a pop-up menu displaying the associated scope:
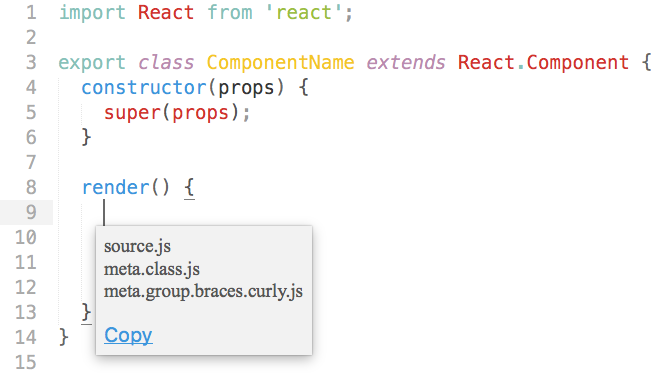
Snippets take mere seconds to create. Yet they save much more in effort, and not just by saving how much you have to type. By providing a quick, reproducible way to expand content, snippets reduce errors. They also abstract away hard-to-remember details, such as method names and their signatures. All of this frees your fingers — and your brain — to focus on what they want to do most: write great code.