
by Karan Thakkar
An illustrated guide to setting up your website using GitHub and Cloudflare
You should read this if…
- You want to setup custom redirects or other server configuration for free
- You want to get your site on HTTPS but don’t know where to start
- You’re overwhelmed with the amount of choices out there (like Netlify, Surge, BitBalloon, Now)
Why Github?
- Easy to setup and get started with Github Pages
- Instant deploys on pushing new code
Why Cloudflare?
- It’s free
- It comes with out-of-the-box support for SSL (HTTPS). (Here’s why HTTPS matters.)
- Super simple DNS management
- Ability to set browser cache expiration for assets
- Auto minify your static assets
- Custom page rules for setting up redirects, always HTTPS, etc.
- HTTP2/SPDY for supported browsers
- Allows for setting up HSTS (HTTP Strict Transport Security)
Before we get started you will need a few things:
- A Github account
- A Cloudflare account
- Access to a custom domain. You can buy it from any Domain Name Registrar like: Namecheap, GoDaddy, BigRock, etc.
If all this piqued your interest, then let’s get started!
Step 1: Create Github repo with your code
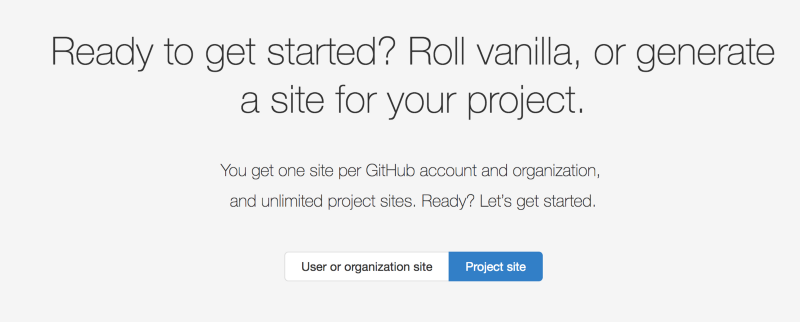
- Go to https://pages.github.com
- Select the option Project Site to find the instructions on how to create a basic page from scratch or a custom theme
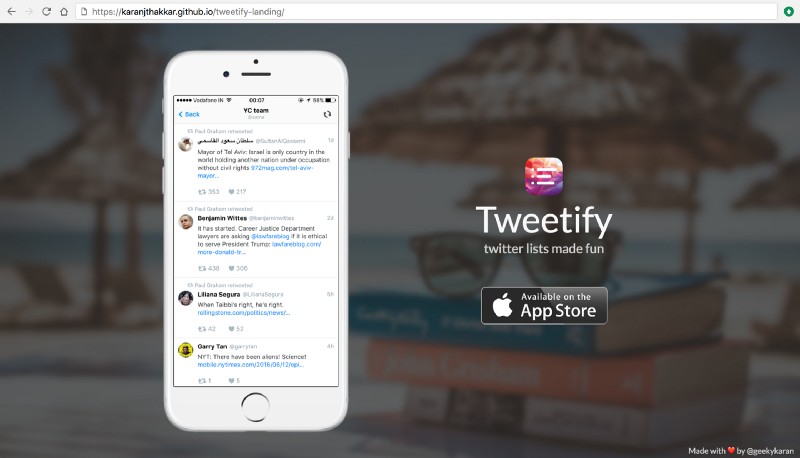
Step 2. Setup Github Pages for the repository

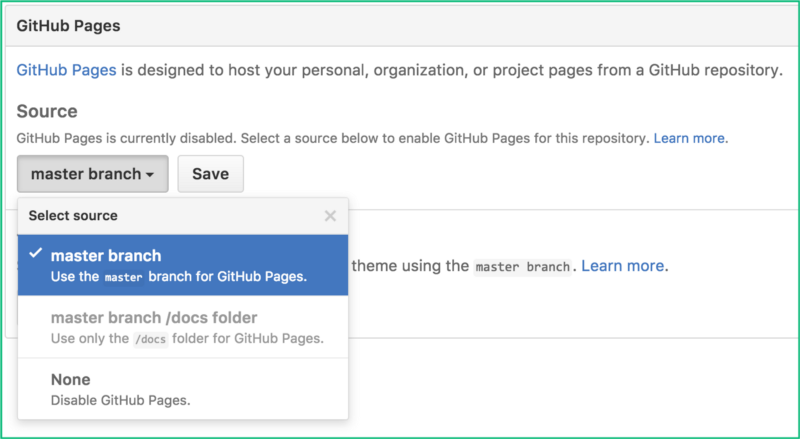
Go to Settings for your repository. In the Github Pages section, choose the master branch to serve your website from. Once you’ve done that, you can go to https://<yourgithubusername>.github.io/repository to see your website in action as shown below.
Step 3. Add custom domain
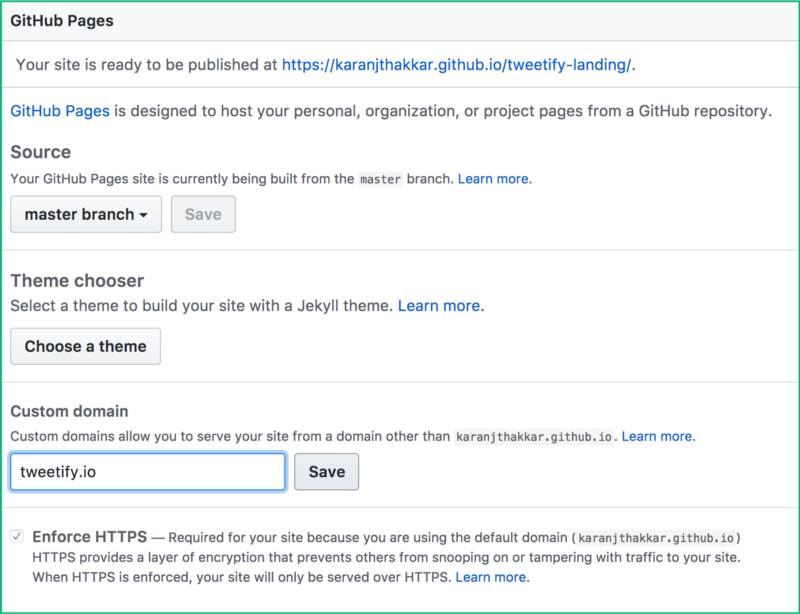
Add the custom domain that you have bought and save it. Your website is now ready with your own custom domain ? WOOT! ✨
So, we have everything setup on Github. We’ll start with setting up Cloudflare to jazz up your website with all the powerful features I mentioned at the beginning of this post.
Step 4: Setup your domain on Cloudflare
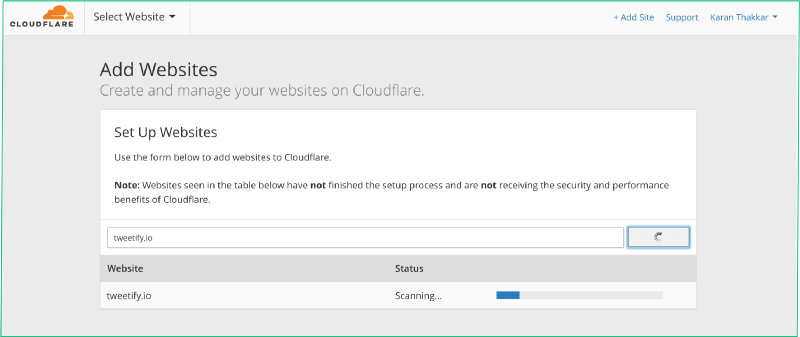
Login to Cloudflare. If you are using it for the first time, you should see a screen like the image shown above. If you have used it before, you can click on the Add Site option in the navigation bar on the top right to add a new domain. Enter the domain you want to manage and click on Begin Scan.
Step 5: Setup DNS Records for your domain
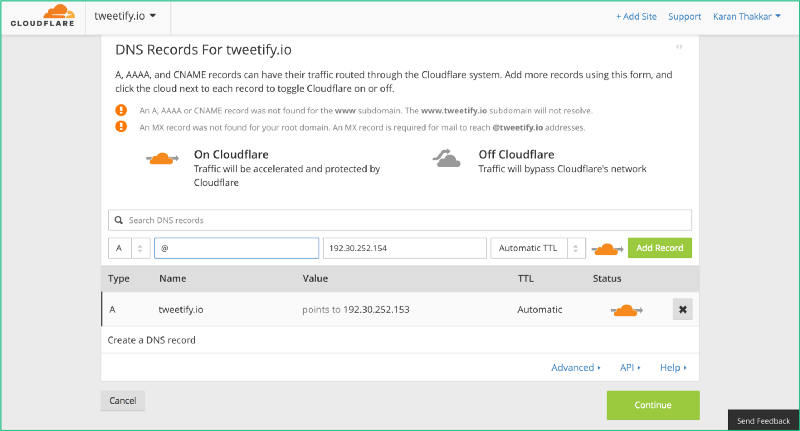
In this step, we inform Cloudflare to point our domain to the Github Pages server using two A Record DNS entries:
1. 192.30.252.153
2. 192.30.252.154
Once you have set this up, all requests to your custom domain i.e. yourcustomdomain.com will be routed to your website on Github on Step 3.
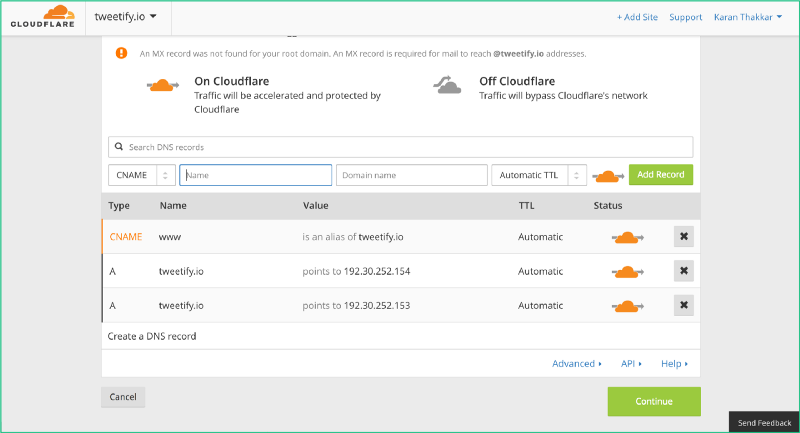
There’s one more step involved before we move on to the next stage. Oftentimes, you would want to use a subdomain like www for your website, i.e. www.yourcustomdomain.com For this, you will need to add a CNAME record DNS entry which will point your subdomain(www) to your apex domain(@).
Once you have set this up, all requests to your custom subdomain i.e. www.yourcustomdomain.com will be routed to your website on Github on Step 3.
NOTE: Don’t try to go access your custom domain right away. It won’t work. We have only done the Cloudflare to Github setup. We still have to do the DNS Registrar -> Cloudflare setup. This will come up in Step 7.
Click Continue to go to the next step.
Step 6: Choose the Free Cloudflare plan
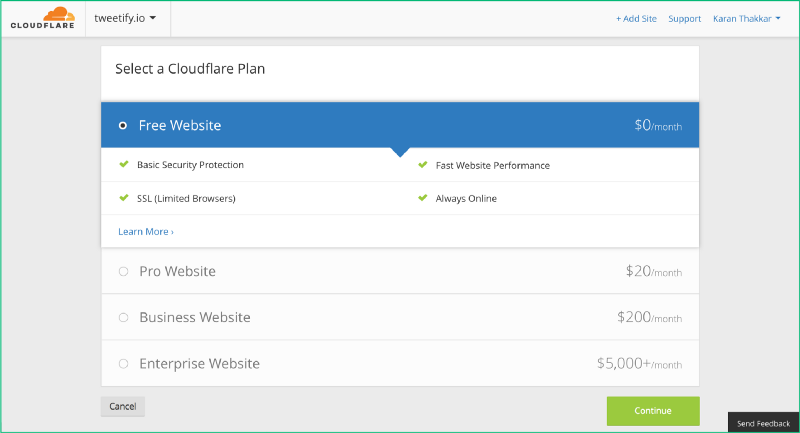
The Free plan for Cloudflare provides a lot of sophisticated options as discussed in the Why Cloudflare? section at the beginning.
Click Continue to go to the next step.
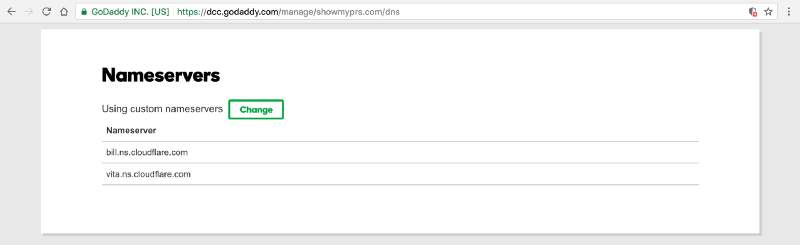
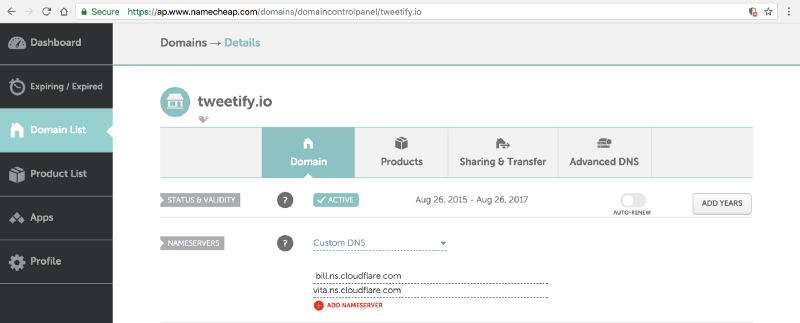
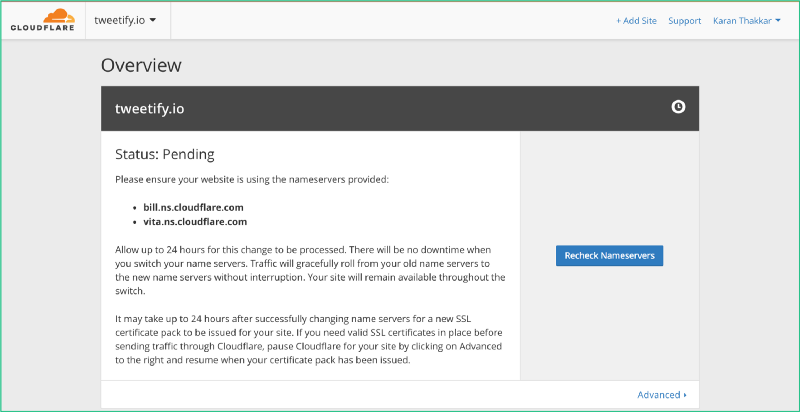
Step 7: Update Nameservers on your DNS Registrar
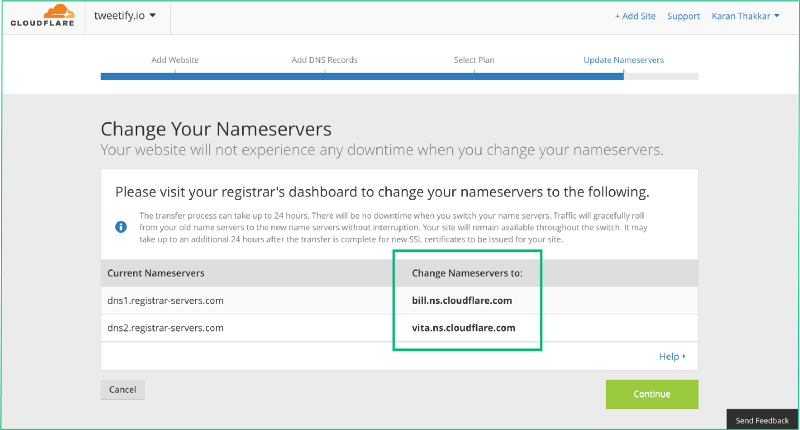
Once you’re on this page, keep it open in one tab and open your DNS Registrar’s (the place from where your bought your domain) site in another. If you’re using one of the following registrar’s then the links to understand how to change Nameserver are:
You need to replace the existing Nameservers in your Domain settings with the one’s on the Cloudflare page that is open in the other tab.
YASSS! You’ve successfully setup your custom domain to use Cloudflare as a DNS provider. You can go to the Overview option on the top and you will find that it is still waiting for your Nameserver change to be processed.
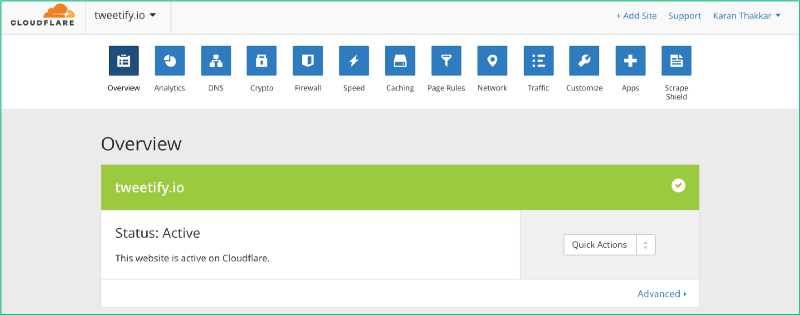
Once the Overview tab says Status: Active, you can now try to visit your site using your custom domain, AND IT SHOULD JUST WORK! ??
Step 8: Configure Minification
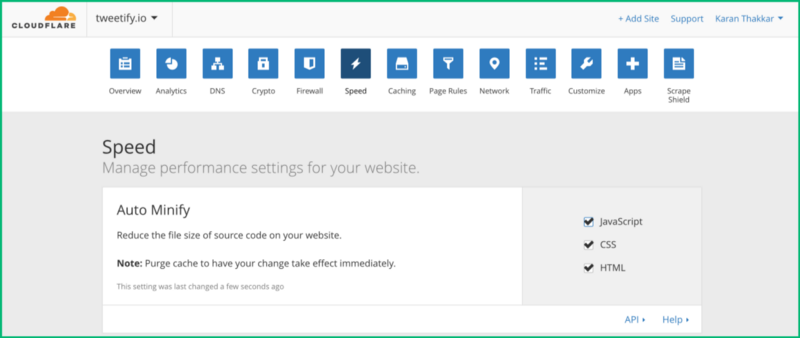
In the Speed setttings, in the Auto Minify section, choose the option to auto-minify everything: Javascript, CSS, HTML. This will be done by Cloudflare on-the-fly once and then cached. Whenever any of your assets change, Cloudflare will do this again for you.
The advantage of minification is that the size of the file delivered to your browser is a lot less since it strips off unwanted spaces and comments.
Step 9: Configure Browser Cache Expiration

If you scroll down on the same page as Auto Minify, you will find the Browser Cache Expiration section. It should be set to 30 days/1 month, ideally, for WebpageTest to not give you a warning. What this time indicates is that, once your site is loaded in any browser, then the browser will not request any assets for a second time until the Browser Cache time period expires for those assets.

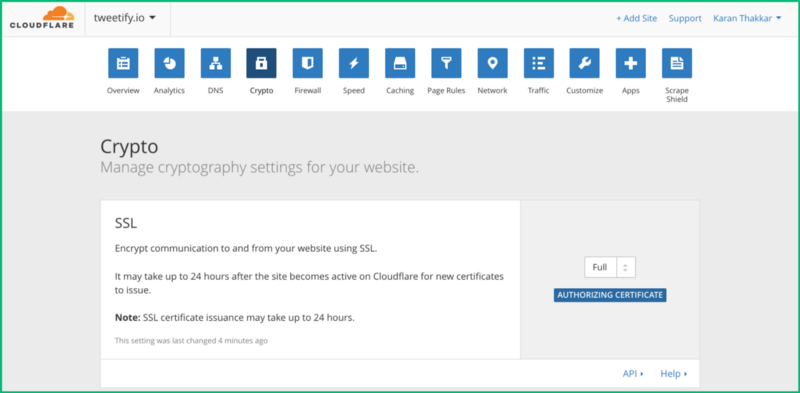
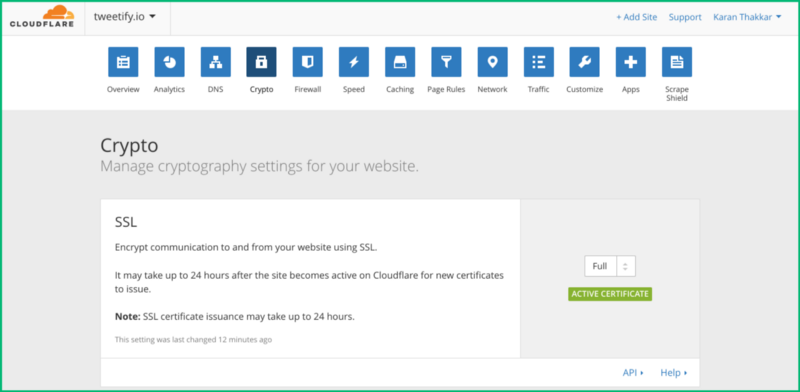
Before we move on to the next step, please check the Crypto settings on Cloudflare. It should say Active Certificate in the SSL section. (Note: Try reloading the page. Sometimes it doesn’t update). In the next two steps, we are going to make your site serve via HTTPS always. For that to work without any problems, it is important that you have an active certificate on Cloudflare.
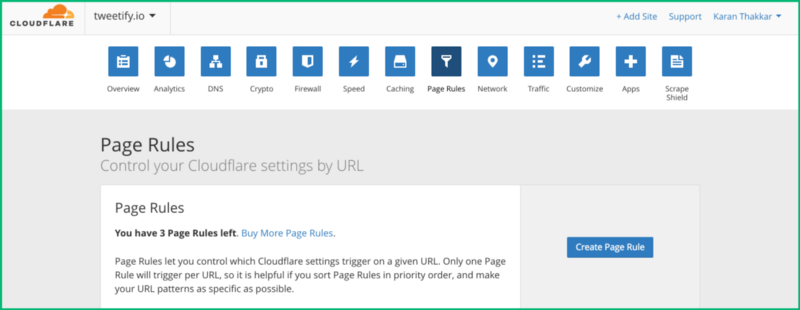
Step 10: Configure Page Rules
In this step, we are going to do two things:
- Redirect all requests for www.yourcustomdomain.com to yourcustomdomain.com
- Redirect all requests for http://yourcustomdomain.com to https://yourcustomdomain.com
Go to the Page Rules setting and click on Create Page Rule.
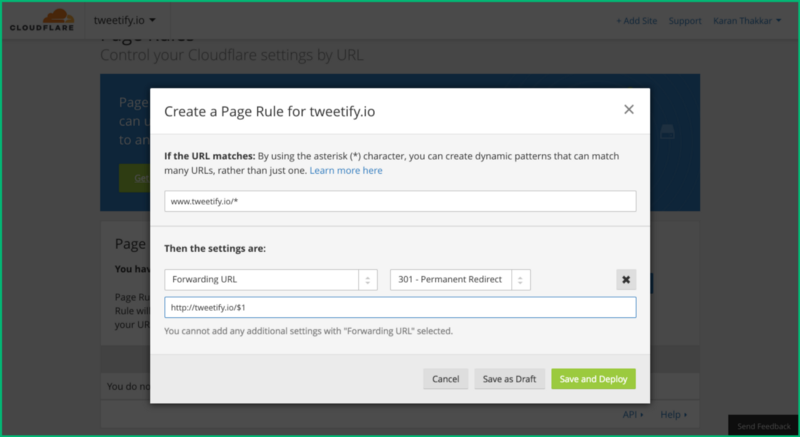
For handling the www.yourcustomdomain.com to yourcustomdomain.com redirect, replace tweetify.io with yourcustomdomain.com name. Click Save and Deploy.
For handling the http://yourcustomdomain.com to https://yourcustomdomain.com redirect, replace tweetify.io with yourcustomdomain.com name. Click Save and Deploy.

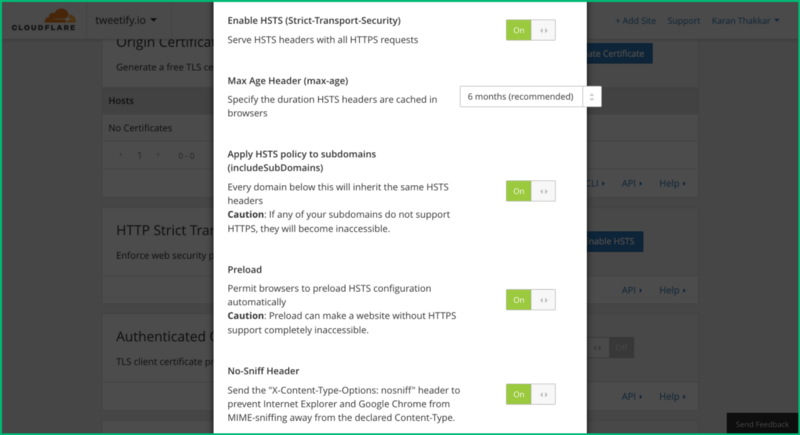
Step 11: Configure HSTS
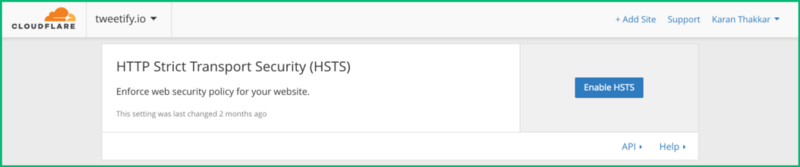
Go to the Crypto settings and scroll down to the HTTP Strict Transport Security (HSTS) section. Click on Enable HSTS. This will ask you to acknowledge that you know what you are doing. Before you select I understand, let me tell you why we need to enable this setting:
If a user has opened your website in the past, from then onwards whenever the user tries to access your website, they will always be taken to the HTTPS version of your site. This makes your site load a little faster on subsequent visits because the HTTP to HTTPS redirect happens on the client and not via the Cloudflare Page Rule that we added in Step 10.
Once you go to the next step, you should enable all the settings as shown below. You can read more details about these options here and here

That’s it. You’re all set to show off your website to the world! ?? If you found this useful, please ❤️ it and share it.

Karan Thakkar is the Frontend Lead at Crowdfire - Your super-smart marketing sidekick. His article has been previously featured on The Huffington Post. He likes trying out new technologies in his spare time and has built Tweetify (using React Native) and Show My PR’s (using Golang).
Other articles written by him:
How I grew from 300 to 5k followers in just 3 weeks
#GrowthHacking my Twitter account for @Crowdfire Twitter Premier Leagueblog.markgrowth.comUsing the Let’s Encrypt Certbot to get HTTPS on your Amazon EC2 NGINX box
Let’s Encrypt is a new Certificate Authority which provides free SSL certificates (up to a certain limit per week). It…medium.freecodecamp.com