by Stanislav Termosa
An Introduction to Flutter: The Basics
I’ve been hearing about how amazing Flutter is and I’ve decided to try it out to learn something new. I wished to have more topics to discuss with colleagues.
It started by watching, then reading, and then I started coding. It was a good experience. Apps were running, and everything that was written wasn’t hard to understand.
However, the process wasn’t smooth enough - some of the details were not explained in that resources. Also, since everything was new to me (the platform itself, programming language, approaches and even mobile app development), the lack of those details was painful.
Any time something didn’t work, I didn’t know what to Google: Dart, Flutter, Window, Screen, Route, Widget?
I decided that reading the documentation on Dart, Flutter and all of its widgets wouldn’t be a good idea as it would be too time consuming. Also, I didn’t have a lot of time as the purpose was to get to know the new thing, and not to become an expert in the field. I thought at that moment that it would be amazing if there was a short guide on Flutter, that would describe all the necessary concepts to understand the framework and be able to write simple apps, but no more!
About The Guide
Most of the articles on this topic are well written and straightforward. The problem is that they require you to know some basic things, and those small things are not described in articles that are suppose to give you basic knowledge.
In this series, I’ll try to avoid that problem. We’ll start from scratch and create applications sorting out every step we do. During this series, we will use all basic widgets, design a unique interface, interact with native modules, and build our app for both iOS and Android platforms.
This series is written from the perspective of a web developer. Most of you are probably familiar with this stack. The analogy with a familiar platform is better than one where you have to build houses or use Animal, Dog, Foo, Bar, etc.
I’ll keep it short, to save your time. For the most curious of you, I’ll put useful links around the text.
About The Platform
Flutter is very new, but a promising platform, that has attracted the attention of large companies who’ve released their apps already. It is interesting because of its simplicity compared to developing web applications, and because of its speed as compared with native applications.
High performance and productivity in Flutter are achieved by using several techniques:
- Unlike many other popular mobile platforms, Flutter doesn’t use JavaScript in any way. Dart is the programming language. It compiles to binary code, and that’s why it runs with the native performance of Objective-C, Swift, Java or Kotlin.
- Flutter doesn’t use native UI components. That may sound awkward at first. However, because components are implemented in Flutter itself, there is no communication layer between the view and your code. Due to this, games hit the best speed for their graphics out of the smartphones. So buttons, text, media elements, background are all drawn by Flutter’s graphics engine. As an aside, it should be mentioned that the bundle of the Flutter “Hello, World” application is quite small: iOS ≈ 2.5Mb and Android ≈ 4Mb.
- Flutter uses a declarative approach, inspired by the React web framework, to build its UI based on widgets (named “components” in the world of the web). To get more out of widgets, they are rendered only when necessary, usually when their state has been changed (just like the Virtual DOM does for us).
- In addition to all of the above, the framework has integrated Hot-reload, so typical for the web, but still missing on native platforms. This allows the Flutter framework to automatically rebuild the widget tree, allowing you to quickly view the effects of your changes.
There is an excellent article on the practical use of these features from an Android developer who recreated his application from Java to Dart and shared his impressions.
I wanted to share with you some numbers from his article.
- Java (before): Number of files = 179 and Lines of code 12,176
- Dart (after): Number of files = 31 and Lines of code 1,735.
You can read more about the technical details of the platform or look at examples of applications.
About Dart
Dart is a programming language that we’ll use to develop our application in Flutter. Learning it isn’t hard if you have experience with Java or JavaScript. You will quickly get it.
I tried to write an article on Dart for you, to describe the minimal scope that is required for Flutter. After several attempts, I was still failing to write it so that it was short and covered the core concepts at the same time. Authors of A Tour of the Dart Language coped well with this task!
Initial Setup
This topic, just like a Dart, is well covered in the official guide — so I won’t copy it here.
Go through this short setup guide, by choosing your OS and following it step-by-step. Also, configure your preferred editor to work with Dart and Flutter (usually it requires 2 different plugins). Run your application to make sure that you are ready to continue.
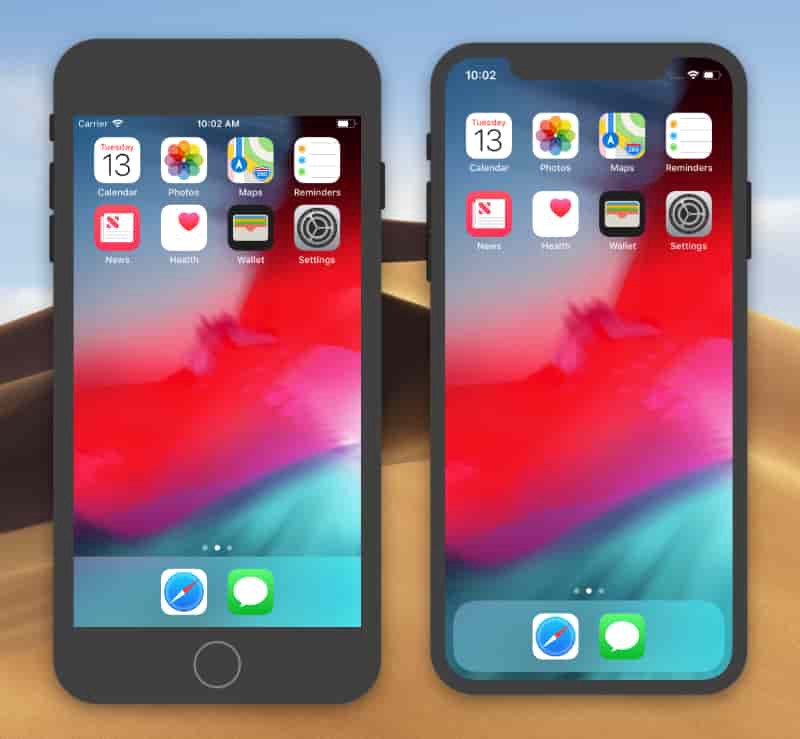
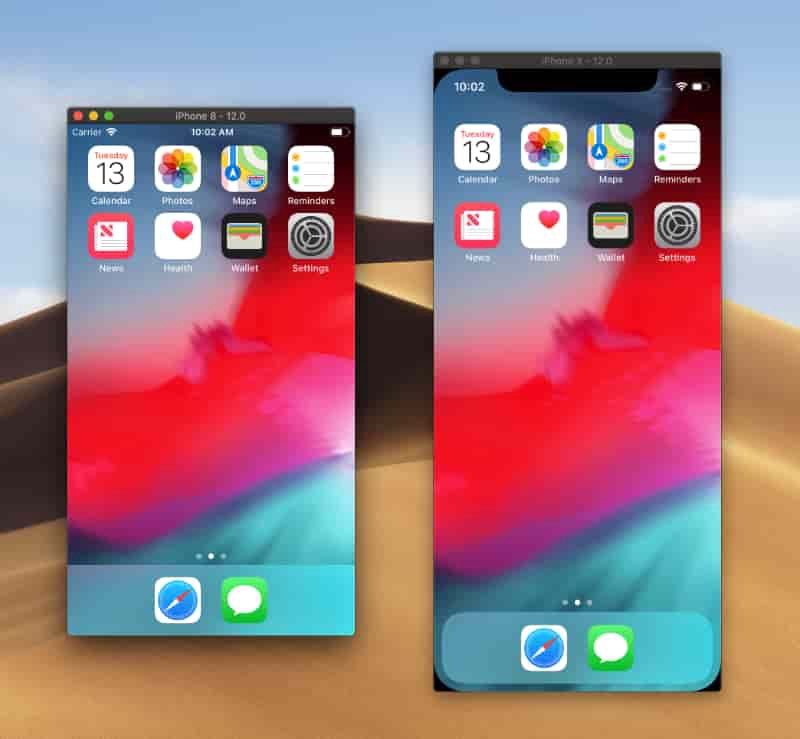
Here is a tip for MacOS users. If you don’t like how much space is wasted by virtual device bezels, you can turn them off, and switch to an iPhone 8 model (it is not as long as iPhone X):
- Hardware → Device → iOS # → iPhone 8
- Window → Show Device Bezels
It is possible to live without virtual buttons as we have hot keys: Shift + Cmd (⌘) + H - go home, Cmd (⌘) + Right - rotate the phone, and you can find more in the Hardware menu. I would also recommend to turn on the on-screen keyboard, as it is important to understand if your application is usable when half of the screen is overlapped. To do so you press Cmd (⌘) + K after you focus on an input field.
Project Structure
Let’s first see what’s in the project generated by the Flutter framework:
- lib/ - just as pub (Dart’s package manager), all the code will be here
- pubspec.yml - stores a list of packages that are required to run the application, just like package.json does it. You should remember that in Flutter projects you cannot use pub directly, but instead, you will use the Flutter command:
flutter pub get <package_name> - test/ - I’m sure you know what this is about. Right? You can run them via flutter test
- ios/ & android/ - the code specific for each platform, including app icons and settings where you set what permissions you’ll need for your application (like access to location, Bluetooth).
We don’t need to know more about the files in the folder for now. Let’s open the lib/ folder where main.dart is waiting for us. As you can guess this one is the entry point of our application. Just like in the C language (or tons of others) the app will be executed by calling the main() function.
About widgets (Hello World is here)
In Flutter everything is built on Widgets. UI elements, styles, themes, and even state is managed in specific Widgets. Let’s start from a small application.
Replace the code from main.dart with the one given below, read the comments, and run the application.
import 'package:flutter/widgets.dart'; // basic set of widgets

// When Dart is running the application, it calls to the main() function
main() => runApp( // The function runApp() starts the Flutter application
  Text( // this is a widget, it renders the given text (think of it like a <span>)
    'Hello, World!!!', // the first argument is a text that needs to be rendered
    textDirection: TextDirection.ltr, // here we set the direction "left to right"
  ),
);runApp(…) only has a widget argument. The widget will become the root widget for the whole application. BTW, changing the root widget cannot be handled by Hot-reload so you’ll have to restart your application to see changes.
Text(…) - Flutter cannot render text without knowing what’s the preference for text direction. To render text, we have to set Text.textDirection. Don’t confuse it with the CSS text-align rule. It is the analogy of direction - the part of the internationalization API. However, don’t worry, we won’t need to set it for each Text widget - later we’ll see how to set it for the whole app.
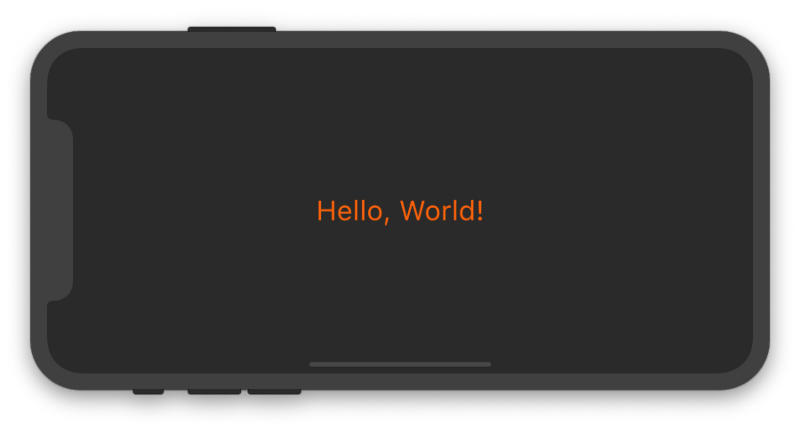
Is your application running already? Yay! “Hello, World!” is on the screen now. Right? Eh, something went wrong.

The text is overlapped by the notch. We can use the whole screen for our application, and we have printed our content at the very top of it where system information is also rendered.
Let’s try to shift our content.
import 'package:flutter/widgets.dart';

main() => runApp(
  Center( // The widget that aligns content in the center
    child: Text(
      'Hello, World!',
      textDirection: TextDirection.ltr,
    ),
  ),
);Center(…) is the widget that aligns another widget given in child property in the center of itself. You’ll often see child and children properties in Flutter applications, because almost all widgets are using them if they need one or several widgets to be rendered inside of them.
A composition of widgets in Flutter is used to represent an interface, to change its look, and to share data. For example, Directionality(…) sets the direction for the text for all nested widgets (so we don’t need to specify it for Text every time).
import 'package:flutter/widgets.dart';

main() => runApp(
  Directionality(
    textDirection: TextDirection.ltr,
    child: Center(
      child: Text('Hello, World!'),
    ),
  ),
);Let’s take a look at one very important widget, and change the design of our application:
import 'package:flutter/widgets.dart';

main() => runApp(
  Directionality(
    textDirection: TextDirection.ltr,
    child: Container( // the new widget! It is <div> for the Flutter's world
      // For [Container], property [color] means the color of the background
      color: Color(0xFF444444),
      child: Center(
        child: Text(
          'Hello, World!',
          style: TextStyle( // we use the [TextStyle] widget to customize text
            color: Color(0xFFFD620A), // set the color
            fontSize: 32.0, // and the font size
          ),
        ),
      ),
    ),
  ),
);
There are several options on how to use the Color(…) widget. We have used the widget with the number given to it using hexadecimal notation. This looks almost the same as we set HEX-colors on the web, but here we have 2 additional symbols at the beginning. This is a number that represents the transparency where 0x00 is fully transparent, and 0xFF is not transparent at all.
TextStyle(…) is more interesting. You can use it to set a color, font size and weight, line spacing, underline text, etc.
The Flutter application is complete! You can read how to build it for Android and iOS, where you can also learn how to publish it to the relevant app store. If it’s not enough for you, I’ve covered a few more topics below.
About Stateless Widgets
Now we know how easy it is to use widgets. The next logical step would be to create our widgets. I’ve mentioned before that there are two kinds of widgets (actually more, but let’s not over complicate it for now). There are stateless and stateful widgets.
We’ve been using stateless widgets in the previous examples. “Stateless” doesn’t mean they don’t have a state at all. Widgets are Dart classes, that can be declared with properties. But changing those properties in a stateless widget won’t affect what has already been rendered. Updating properties of a stateful widget will trigger life cycle hooks and render its content using the new state. We’ll start with Stateless widgets as they seem to be a bit easier.
To create one, we need:
- A beautiful name for the new class.
- To extend our class from StatelessWidget.
- Implement the build() method, that will receive one argument of type BuildContext and return a result of type Widget.
import 'package:flutter/widgets.dart';

main() => runApp(
  Directionality(
    textDirection: TextDirection.ltr,
    child: Center(
      child: MyStatelessWidget()
    ),
  ),
);

class MyStatelessWidget extends StatelessWidget {
  // @override annotation is needed for optimization, by using it
  // we say that we don't need the same method from the parent class
  // so the compiler can drop it
  @override
  Widget build(BuildContext context) { // I'll describe [context] later
    return Text('Hello!');
  }
}An example of the widget with an argument:
// …

class MyStatelessWidget extends StatelessWidget {
  // All properties of the Stateless widget must be declared with final or const keyword
  final String name; // usual class property
  MyStatelessWidget(this.name); // usual class constructor

  @override
  Widget build(BuildContext context) { // it is yet to early to describe [context]
    return Text('Hello, $name!');
  }
}I have nothing more to add about Stateless widgets. They are simple.
About Hot Reload
Notice that once we have moved our application content to the separate widget, the application is re-rendered each time we save our changes. This is hot-reload in action.
It is also crucial to understand, that while you are working in development mode with hot-reload enabled, the application will work much slower than in release mode.
About GestureDetector
We will create a StatefulWidget in the next section. To make sure it will be interesting we need to be able to change the state of the widget, right? We’ll use GestureDetector(…) for this purpose. This widget will not render anything to the screen but handles user interaction with the screen and calls related functions given to it.
The example below creates a blue button in the center of the screen, and once this button is pressed, the text is printed to the terminal:
import 'package:flutter/widgets.dart';

main() => runApp(
  Directionality(
    textDirection: TextDirection.ltr,
    child: Container(
      color: Color(0xFFFFFFFF),
      child: App(),
    ),
  ),
);

class App extends StatelessWidget {
  @override
  Widget build(BuildContext context) {
    return Center(
      child: GestureDetector( // just a normal widget
        onTap: () { // one of the [GestureDetector] properties
          // This function will be called when child widget is pressed
          print('You pressed me');
        },
        child: Container( // the [Container] will represent our button
          decoration: BoxDecoration( // this is how you style the [Container]
            shape: BoxShape.circle, // change its shape from rectangular to circular
            color: Color(0xFF17A2B8), // and paint it in blue
          ),
          width: 80.0,
          height: 80.0,
        ),
      ),
    );
  }
}Press the button, and the message will be printed to the terminal. Press it again, and the text will appear again.
About Stateful Widgets
StatefulWidget’s are simple. Yeah, even simpler than StatelessWidget’s! However, there is a nuance. They do not exist by themselves. They require an extra class to store the state of the widget. Moreover, the visual part of the widget becomes its state.
Here is the example of the StatefulWidget class:
// …

class Counter extends StatefulWidget {
  // The state is stored not in the widget, but in the specific class
  // that is created by createState()
  @override
  State<Counter> createState() => _CounterState();
  // The result of the function is an object, that must be
  // of the type State<Counter> (where Counter is the name of our widget)
}We’ve created an “empty” widget that implements only one method and doesn’t contain state or UI representation. Forcing such separation, Flutter seeks greater optimization of the application.
The state object is also not complicated. Indeed, it is just like our StatelessWidget. The main difference is its parent class.
// …

class _CounterState extends State<Counter> {
  // Finally, we can declare dynamic variables inside of our classes,
  // to store the state of our widgets

  // In this case, we'll store the number
  int counter = 0;

  // The rest is super simple, we just implement the familiar to us build() method,
  // in the same way as we did it for our [StatelessWidget]
  @override
  Widget build(BuildContext context) {
    // Almost nothing has changed since the last example.
    // I've added comments to highlight the difference
    return Center(
      child: GestureDetector(
        onTap: () {
          // Once the button is tapped we increase the value of [counter] variable
          setState(() {
            // Using setState() is required to trigger lifecycle hooks
            // so the widget will know that it should be updated
            ++counter;
          });
        },
        child: Container(
          decoration: BoxDecoration(
            shape: BoxShape.circle,
            color: Color(0xFF17A2B8),
          ),
          width: 80.0,
          child: Center(
            child: Text( // here we print the value of the [counter]
              '$counter', // to see how it changes
              style: TextStyle(fontSize: 30.0),
            ),
          ),
        ),
      ),
    );
  }
}
I named our state class starting with an underscore. In the Dart language all names that begin with an underscore are private (unlike JavaScript or Python they are truly unavailable outside of the library). Usually, we don’t need to expose our state classes outside of the library, so it is good practice to keep them private.
We’ve built such a wonderful application. Great result!
Before we end this part, let’s take a look at a few more interesting widgets. This time we’ll write more code at once, and I won’t explain every line. You can probably already understand most of the code:
import 'package:flutter/widgets.dart';

main() => runApp(App());

class App extends StatelessWidget {
  @override
  Widget build(BuildContext context) {
    return Directionality(
      textDirection: TextDirection.ltr,
      child: Container(
        padding: EdgeInsets.symmetric(
          vertical: 60.0,
          horizontal: 80.0,
        ),
        color: Color(0xFFFFFFFF),
        child: Content(),
      ),
    );
  }
}

class Content extends StatelessWidget {
  @override
  Widget build(BuildContext context) {
    return Column(
      children: [
        Counter('Manchester United'),
        Counter('Juventus'),
      ],
    );
  }
}

class Counter extends StatefulWidget {
  final String _name;
  Counter(this._name);

  @override
  State<Counter> createState() => _CounterState();
}

class _CounterState extends State<Counter> {
  int count = 0;

  @override
  Widget build(BuildContext context) {
    return Container(
      margin: EdgeInsets.only(bottom: 10.0),
      padding: EdgeInsets.all(4.0),
      decoration: BoxDecoration(
        border: Border.all(color: Color(0xFFFD6A02)),
        borderRadius: BorderRadius.circular(4.0),
      ),
      child: Row(
        mainAxisAlignment: MainAxisAlignment.spaceBetween,
        children: [
          // [widget] is the property of the State class that stores
          // the instance of the [StatefulWidget] ([Counter] in our case)
          _CounterLabel(widget._name),
          _CounterButton(
            count,
            onPressed: () {
              setState(() {
                ++count;
              });
            },
          ),
        ],
      ),
    );
  }
}

class _CounterLabel extends StatelessWidget {
  static const textStyle = TextStyle(
    color: Color(0xFF000000),
    fontSize: 26.0,
  );

  final String _label;
  _CounterLabel(this._label);

  @override
  Widget build(BuildContext context) {
    return Text(
      _label,
      style: _CounterLabel.textStyle,
    );
  }
}

class _CounterButton extends StatelessWidget {
  final count;
  final onPressed;
  _CounterButton(this.count, {@required this.onPressed});

  @override
  Widget build(BuildContext context) {
    return GestureDetector(
      onTap: onPressed,
      child: Container(
        padding: EdgeInsets.symmetric(horizontal: 6.0),
        decoration: BoxDecoration(
          color: Color(0xFFFD6A02),
          borderRadius: BorderRadius.circular(4.0),
        ),
        child: Center(
          child: Text(
            '$count',
            style: TextStyle(fontSize: 20.0),
          ),
        ),
      ),
    );
  }
}
So we have used two new widgets: Column() and Row(). It is not difficult to guess what their purpose is.
In the next article, we will look at them more precisely. We will also learn how to assemble several widgets and create a sexy app using Flutter’s Material library.
Additional Resources
If you wish to learn more about mentioned topics here is the list of interesting links:
- https://flutter.io/docs/get-started/flutter-for/web-devs
- Coding using VS Code and IntelliJ
- More details on widgets
- It is also important to read about Hot reload to understand when and why your application may not be updated automatically.