
by Harry Sauers
How to set up automated deployment in AWS

Provisioning and Configuring Servers
Introduction
In this tutorial, you’ll learn how to use Amazon’s AWS SDK to deploy your Python application to a real-world server.
Before we begin, you should have a working knowledge of Python, Git, and general cloud infrastructure. I recommend Codecademy if you want to learn these fundamentals.
Some of the Terminal/Bash commands I use are for an Ubuntu system. If they don’t work, check for your system’s equivalent.

Getting Started
- Spin up your favorite Python IDE and create a new project.
- Create your main project file and name it whatever you want — I chose “app.py” for simplicity.
- Add
print("Hello Python!")to the file and run it to ensure your environment is set up correctly. - Next, we need to install Amazon’s SDK. Though AWS does provide a standard HTTP API, the software development kit is much more robust. The SDK handles tedious and lower-level operations for you.r
- Open a terminal and type
sudo pip3 install boto3and enter your sudo password, if needed. - Add
import boto3to the top of your Python file. - This allows us to use Amazon’s SDK in our Python application.
AWS Credentials
Before we can actually use anything on AWS, we need credentials for our AWS account. If you don’t have one, you can sign up here.
- Go to your Identity and Access Management panel and click “Add user” under the “Users” tab.
- Enter a username and tick the box beside “programmatic access.”
- Click “Next: Permissions” and create a new group, if needed.
- For the purposes of this tutorial, I’ll create a new group with the “AdministratorAccess” policy. This gives us permission to manage everything in our AWS console programmatically.
- Click “Next: Tags” and add any relevant information. This is optional.
- Click “Review,” then “Create User.”
- Download your security credentials (the CSV file) and copy it into your project’s root directory. If you’re using source control, be careful.
Reading the Credentials
- Create a new file “creds.py” with the following code:
import csvclass Creds:# credentialsusername = “”access_key_id = “”secret_key = “”def __init__(self, creds_file):with open(creds_file) as file:reader = csv.reader(file, delimiter=”,”)header = next(reader)creds_line = next(reader)self.username = creds_line[0]self.access_key_id = creds_line[2]self.secret_key = creds_line[3]- Add
from creds import Credsto the top of your main Python file. - Initialize your Creds object in it:
creds = Creds(“credentials.csv”)
Great! Now we can use these to access Amazon Web Services.

Provisioning an EC2 Server
Add the following code after your creds variable:
REGION = “us-east-2”client = boto3.client(‘ec2’,aws_access_key_id=creds.access_key_id,aws_secret_access_key=creds.secret_key,region_name=REGION)Now, let’s provision a new instance of Ubuntu Server 18.04. This is eligible for Amazon’s free tier as well!
At the top of your file, add from botocore.exceptions import ClientError so your program knows how to handle errors.
Head over to your AWS dashboard and go to EC2->Network & Security-> Key pairs and click “Create key pair.”
Enter a name and hit “Create.” I used “robot” for mine. Though you should avoid hardcoding strings like this, we’ll overlook this, for now, to get it up and running.
To run commands on the server and open it to the Web, we have to create a security group and IAM role on AWS. Go to your dashboard.
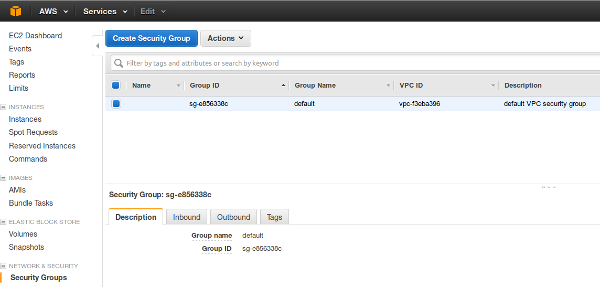
Creating a security group:
- Navigate to Network & Security -> Security Groups.
- Create a security group, and open ports 22, 80, 443, and 5000. This will allow general access to it from the Web. Allow all IPs to access them.
- Copy down the group ID of the security group you just created, and paste it into a global variable called SECURITY_GROUP.
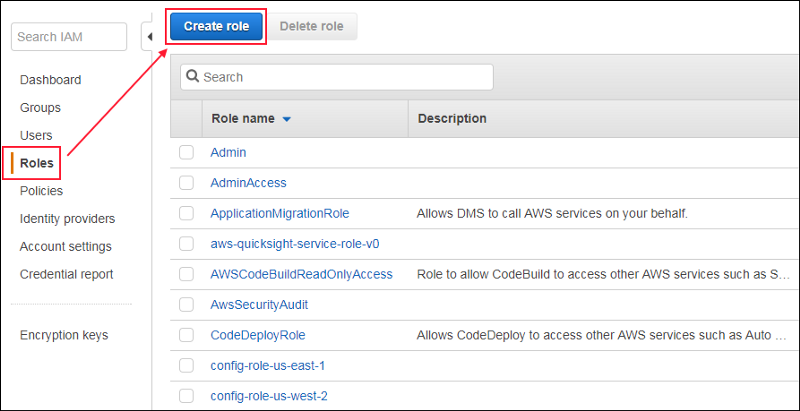
Creating an IAM role:
- Go to your AWS dashboard and navigate to the IAM service.
- Click on the “Roles” tab.
- Click “Create role” and select “EC2.” For the purposes of this tutorial, you’ll want to select “Administrator Access,” but in a real-world setting, this may not be appropriate.
- Click through the rest of the steps to create a role.
- Copy down the name of the IAM role and paste it into a global variable called IAM_PROFILE.
- Add this code to provision a minimal Ubuntu server from Amazon:
def provision_server():# Ubuntu Server 18.04 ID from the AWS panelimage_id = "ami-0f65671a86f061fcd"# Second smallest instance, free tier eligible.instance_type = "t2.micro"# Make this a command-line argument in the future.keypair_name = "robot"response = {}try:response = ec2.run_instances(ImageId=image_id,InstanceType=instance_type,KeyName=keypair_name,SecurityGroupIds=[SECURITY_GROUP],IamInstanceProfile={'Name': IAM_PROFILE},MinCount=1,MaxCount=1)print(response['Instances'][0])print("Provisioning instance…")# wait for server to be provisioned before returning anythingtime.sleep(60)return str(response['Instances'][0]['InstanceId'])except ClientError as e:print(e)Congratulations! You’re ready to provision your first EC2 server on Amazon. Learn how to configure its network and security settings and deploy a real web app to it in Part 2 when you’re ready to move on.
Deploying Your Application
You made it! Let’s learn how to manage EC2 instances and deploy an application from Github to one.
Amazon’Amazon’s SDK supports executing commands on the instance. This is very helpful. It allows us to manage the instance without having to worry about setting up a secure shell and the like.
- First, we need to get a list of the instances in your private cloud:
def get_instance_ids():instance_id_list = []instances = ec2.describe_instances()instances = instances[‘Reservations’][0][‘Instances’]for instance in instances:instance_id_list.append(instance[‘InstanceId’])return instance_id_list- Add this code to be able to execute commands on your server’s terminal:
def send_command_aws(commands=[“echo hello”], instance=”i-06cca6072e593a0ac”):ssm_client = boto3.client(‘ssm’,aws_access_key_id=creds.access_key_id,aws_secret_access_key=creds.secret_key,region_name=REGION)response = ssm_client.send_command(InstanceIds=[instance],DocumentName=”AWS-RunShellScript”,Parameters={‘commands’: commands}, )command_id = response[‘Command’][‘CommandId’]time.sleep(5)output = ssm_client.get_command_invocation(CommandId=command_id,InstanceId=instance,)print(output)- Finally, we need to generate commands to install dependencies and deploy a Flask webapp from Github on the live server:
def generate_git_commands(git_url=GIT_URL, start_command=”sudo python3 hellopython/app.py”, pip3_packages=[], additional_commands=[]):commands = []if “.git” in git_url:git_url = git_url[:-4]repo_name = git_url[git_url.rfind(‘/’):]# install dependenciescommands.append(“sudo apt-get update”)commands.append(“sudo apt-get install -y git”)commands.append(“sudo apt-get install -y python3”)commands.append(“sudo apt-get install -y python3-pip”)commands.append(“sudo rm -R hellopython”)commands.append(“pip3 — version”)commands.append(“sudo git clone “ + git_url)# commands.append(“cd “ + repo_name)# install python dependenciesfor dependency in pip3_packages:commands.append(“sudo pip3 install “ + dependency)# run any additional custom commandsfor command in additional_commands:commands.append(command)# start program executioncommands.append(start_command)return commands- Add these constants to the top of your program:
GIT_URL = "https://github.com/hsauers5/hellopython"REGION = "us-east-2"SECURITY_GROUP = "sg-0c7a3bfa35c85f8ce"IAM_PROFILE = "Python-Tutorial"- Now, add this line to the bottom of your program:
send_command_aws(commands=generate_git_commands(GIT_URL, pip3_packages=["flask"]), instance=provision_server())- Run your code!
python3 app.py - Head over to your EC2 panel, and copy the machine’s public DNS. Add “:5000” to it and navigate to it in your browser.
Congratulations! You just completed your first automated deployment using Amazon’s Boto3 SDK.
You can view or download the complete repository here: https://github.com/hsauers5/AWS-Deployment