
by Emmanuel Yusufu
Beginner’s Guide to React Router 4

React is a JavaScript library for building user interfaces. With the React paradigm, every piece of the UI is a component that manages its own self-contained state (data) and functions.
React, like other front-end JavaScript frameworks, is useful for creating Single Page Applications (SPAs). These are web apps that do not need a full page reload on change of view. Instead they swap views into or out from a section of the page as the user navigates through the app.
Though SPAs provide a fluid navigation experience for users, routing features of traditional websites are expected.
For instance:
- every view on the screen should have its own specific URL so I can bookmark the page.
- The forward and back button should move me forward or backward in my browsing history.
- Nested views and those with parameters should be supported, such as
example.com/products/shoes/101.
In the React community, React Router is the favorite library for handling routing. The most compelling aspect of this version of the library is that it’s “just React”. The routes are just components that get rendered to the screen when the app is running. They are not defined in external files as done in other frameworks.
Prerequisites
You will need the following: Basic knowledge of React, Git installed on your computer, and NPM installed on your computer.
Setting Up
If you have Git installed locate the empty source files (at the master branch) and clone to your computer using:
git clone https://github.com/emmyyusufu/react-router-demos.gitOpen the folder in your text editor and discover the sub-folders inside:

This post is divided into four subsections according to the folders which are: Basic routing, Nested routing, Nested routing with path parameters and Authenticated routing.
To launch the demos, open a given folder in your terminal then run npm install followed by npm start.
#1 Basic routing
Lets start out from scratch. Notice the folder structure of the basic routing folder.
All the demos in this post have been initially created using create-react-app. This brings some benefits such an already configured Webpack server that would bundle all the JavaScript file in our app into a bundle.js file that would be attached into the index.html file at run time. At run time Webpack’s dev server will listen to any change in our file and update it as the app runs during development.
I’ve created a components/ folder to keep all our components. Note that:
index.jsis the entry file to all.jsfiles in our app. This is where Webpack’s bundling will be performed so all.jsfiles should be imported into it.App.jsfile will contain everything pertaining to our React app.
By default, create-react-app does not place App.js in this folder. But because I’ve modified the folder structure, I made the appropriate changes to the path url and imported it into index.js. To learn more about create-react-app, this reference would be helpful.
Navigate to the first folder 01-basic-routing and run npm install.
Open the App.js file and you should see the following:
import React, { Component } from 'react';import '../styles/App.css';// import route Components hereclass App extends Component { render() { return ( <div className="App"><div className="container"> <ul> <li><a href="">Hello</a></li> <li><a href="">About</a></li> <li><a href="">Books</a></li> </ul> <hr/>{/* Routes will go here */}</div></div> ); }}export default App;Run npm start and view the app. No changes made yet.

Lets install React Router via NPM. With the folder open in your terminal, run:
npm install react-router-domWhy react-router-dom? This is because the React router library comprises of three packages: react-router, react-router-dom, and react-router-native.
react-router is the core package for the router, whereas the other two are environment specific. You should use react-router-dom if you’re building for the web, and react-router-native if you’re on a mobile app development environment using React Native.
Import the following into App.js
// import route Components hereimport { BrowserRouter as Router, Route, Link, Switch, Redirect} from 'react-router-dom'Later on we will understand what those components do. All of the routing components depend on BrowserRouter to provide the browser’s HTML5 History APIs to them.
Note that React components have their first letter capitalized so as to identify them differently from default HTML tags.
The History API is an object that lets us manage the current location via history.location as well as previous locations. Think of the location property of the object as an array. The current location is the last item on the array and we manipulate the array through methods such as history.push() orhistory.replace. Whatever manipulation is made on the array will trigger a page transition to the current location. This is what happens behind the scene when using Link and Redirect components as we’ll see soon.
We’ve imported the contents of BrowserRouter into the Router variable. We need to wrap our entire app with it so it supplies the needed APIs all through the app. In App.js add:
import React, { Component } from 'react';import '../styles/App.css';// import route Components hereimport { BrowserRouter as Router, Route, Link, Switch, Redirect} from 'react-router-dom'class App extends Component { render() { return ( <Router> <div className="App"><div className="container"> <ul> <li><a href="">Hello</a></li> <li><a href="">About</a></li> <li><a href="">Books</a></li> </ul> <hr/>{/* Routes will go here */}</div> </div> </Router> ); }}export default App;The <Route /> component
Lets begin exploring the Route component. This component renders a page if the current URL location matches the path prop specified in it. It also accepts component, render and children props.
Lets create ours where its written {/* Routes will go here */}:
<Route path="/hello" component={Hello} /><Route path="/about" component={About} /><Route path="/books" component={Books} />But those components don’t exist! Yes, you are right.
Again before we create them, lets add more imports to App.js. Import from the HelloComponent.js, AboutComponent.js, and BooksComponent.js using Hello, About, and Books as variables. The component={} prop uses curly braces to refer to variables not strings.
import React, { Component } from 'react';import '../styles/App.css';import Hello from './HelloComponent';import About from './AboutComponent';import Books from './BooksComponent';// import route Components hereimport { BrowserRouter as Router, Route, Link, Switch, Redirect} from 'react-router-dom'Note that render is similar to component={} but it lets us define a component inline and right there:
<Route path="/hello" render={() => { return ( <div className="jumbotron"> <h1 className="display-3">Hello, world!</h1> </div> ); }}/>Head over to the empty HelloComponent.js file and paste:
import React from 'react';const Hello = () => { return ( <div className="jumbotron"> <h1 className="display-3">Hello, world!</h1> </div> );}export default Hello;We used a Stateless functional component (hence the arrow function) above. We use them for components that render only static content to a webpage as opposed to components that render stateful/changing content.
If you didn’t notice, we are using Bootstrap 4 styles in our App.css file hence the jumbotron class in the div.
// inside App.css. You'll need internet connection to load the Bootstrap 4 styles..App { padding-top: 50px;}@import url('https://maxcdn.bootstrapcdn.com/bootstrap/4.0.0-beta.2/css/bootstrap.min.css');Head over to the empty AboutComponent.js file and paste:
import React from 'react';const About = () => { return ( <div className="jumbotron"> <h1 className="display-3">About Me</h1> </div> );}export default About;Finally, head over to the empty BooksComponent.js file and paste:
import React from 'react';const Books = () => { return ( <div className="jumbotron"> <h1 className="display-3">My Books</h1> </div> );}export default Books;One more thing we need to wrap up this section is the Link component.
The <Link></Link> Component
This is replaces the default <a href=""></a> HTML tag. It accepts a to="" prop that points to the URL location we want to go to.
Inside App.js, replace the default anchor tags with Link:
<ul> <li><Link to="/hello">Hello</Link></li> <li><Link to="/about">About</Link></li> <li><Link to="/books">Books</Link></li></ul>Run npm start from your terminal and see the complete app:

How would you render a component if the / URL is visited, such as the landing or home page. Your guess may be to create a route for it:
<Route path="/" component={Home} />This is fine but remember that the other paths have / in them. So if we visited other URLs such as /hello, /about and /books, theHome component will keep being rendered by default. To fix this, write another prop exact setting it to true or just write exact.
<Route path="/" exact={true} component={Home} />This would ensure to Home component is rendered only in cases where the URL is exactly matches this:/.
Create a new HomeComponent.js file in components/ folder. Paste this in:
import React from 'react';const Home = () => { return ( <div className="jumbotron"> <h1 className="display-3">Landing page</h1> </div> );}export default Home;Import into App.js
import Home from './HomeComponent';Add to the list of routes
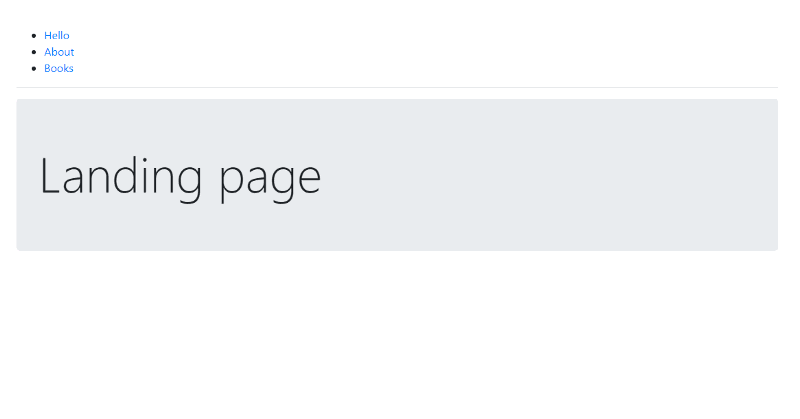
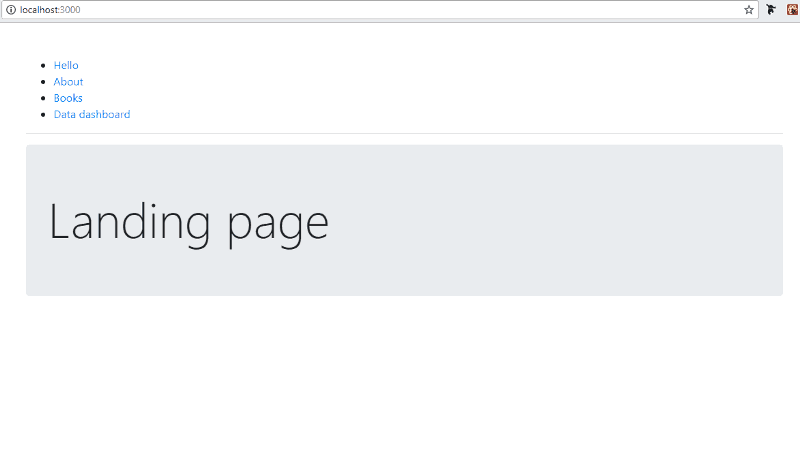
<Route exact={true} path="/" component={Home} /><Route path="/hello" component={Hello} /><Route path="/about" component={About} /><Route path="/books" component={Books} />Visit http://localhost:3000 and view:

Do some experiments. Remove exact={true} from Home route and see what happens. You’ll see why its important.
The <Switch></Switch> Component
This will require being wrapped around Route components when needed for implementation. When a URL path is visited, it allows only the first <Route>that matches the path to be rendered.
Earlier we had an issue with / rendering the Home component and that of other paths. If we create a /hello/goodmorning path, what will happen? The components of the /hello and /hello/goodmorning path will be rendered. Switch will help in this case again by choosing only one route to render but the most important route must be arranged to come first.
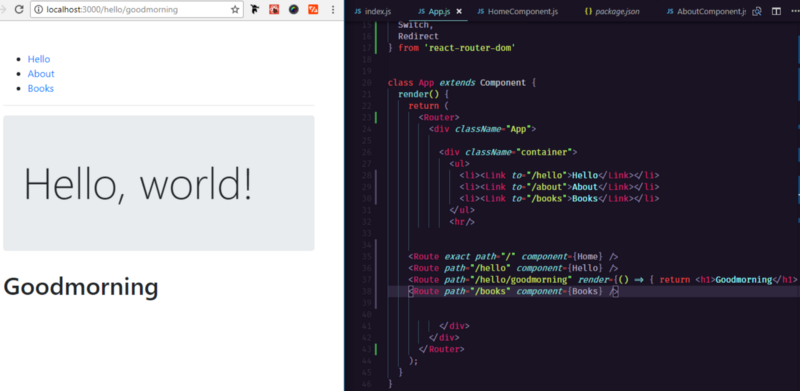
Using Switch, we can avoid what happens in the image above but only for URLs other than /. exact={true} handles it for /. Remember that Switch will pick only the first matching Route. Lets put it to work and see the result.
<Switch> <Route exact path="/" component={Home} /> <Route path="/hello" component={Hello} /> <Route path="/hello/goodmorning" render={() => { return <h1>Goodmorning</h1> }} /> <Route path="/books" component={Books} /></Switch>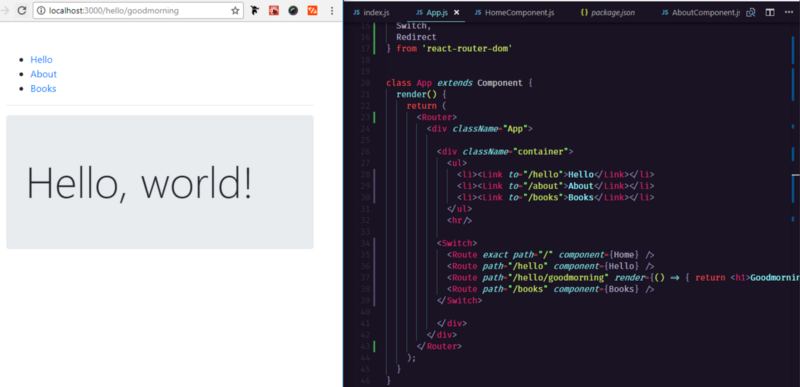
Furthermore, Switch allows us to specify a route to render if the URL matches no location. For that route, leave the path prop empty.
// Just an example. Don't implement. This catch-all Route would be at the bottom if implemented.<Route component={NoMatch} />In summary Switch will do the following:
- avoid inclusive route rendering.
- include a catch-all Route at the bottom of our Switch container.
#2 Nested routing
Remember that we could render components via Route inline or by specifying the component:
<Route component={SomeComponent}/>Or
<Route render={() => { return <h1>Soemthing</h1> }/>The component that will be created via Route will automatically be passed the followingprop objects:
- match
- location
- history
We will only explore the use of match as it is helpful for implementing nested routes. The match object contains the following properties:
- params — (object) Key/value pairs parsed from the URL corresponding to the dynamic segments of the path.
- isExact — (boolean) true if the entire URL was matched (no trailing characters).
- path — (string) The path pattern used to match. Useful for building nested <Route>s
- url — (string) The matched portion of the URL. Useful for building nested <Link>s
We want to add new routes under the /book route. They will be books:
- HTML
- CSS
- React
Navigate to the second sub-folder 02-nested-routing on your terminal and run npm install.
In your code editor, open BookComponent.js and modify:
const Books = ({ match }) => { return (<div> <div className="jumbotron"> <h1 className="display-3">My Books</h1> </div> <div className="container"> <div className="row"> <div className="col-md-3"> <ul> <li><Link to="">HTML</Link></li> <li><Link to="">CSS</Link></li> <li><Link to="">React</Link></li> </ul> </div> <div className="col-md-9"> {/* place routes here */} </div> </div> </div></div> );}Lets install React Router via NPM. With the folder open in your terminal, run:
npm install react-router-domWe’ve demonstrated syntactically that the match object is passed as props. Remember that the classes used are for Bootstrap’s styles to take effect. Don’t forget to import all React Router components after importing React:
import React from 'react';import { BrowserRouter as Router, Route, Link, Switch, Redirect } from 'react-router-dom';We didn’t need to import all of them but we did anyway. Place the routes:
<Route path="" render={() => { return <h1>HTML by Ducket book</h1> }}/><Route path="" render={() => { return <h1>CSS by Racheal Andrews</h1> }}/><Route path="" render={() => { return <h1>React by Fullstack.io book</h1> }}/>We are using inline component rendering to save time. Now, lets populate the to="" of Link and path="" of Route.
Make these changes:
<div className="col-md-3"> <ul> <li><Link to={`${match.url}/html`}>HTML</Link></li> <li><Link to={`${match.url}/css`}>CSS</Link></li> <li><Link to={`${match.url}/react`}>React</Link></li> </ul></div> <div className="col-md-9"> <Route path={`${match.path}/html`} render={() => { return <h1>HTML by Ducket book</h1> }}/> <Route path={`${match.path}/css`} render={() => { return <h1>CSS by Racheal Andrews</h1> }}/> <Route path={`${match.path}/react`} render={() => { return <h1>React by Fullstack.io book</h1> }}/></div>${match.url} evaluates to /books and ${match.path} evaluates to localhost://3000/books. The back ticks used are ES6’s way of concatenating strings containing variables.
Give it a save, run npm start and view the working app.

#3 Nested routing with path parameters
Any URL that ends with /:id,/:user or /:whatever indicates that that portion is a dynamically generated part of the URL that could be any value.
We can access such portions via match.params.id for use in routing.
Again open the third sub-folder 03-nested-routing-with-path-parameters in your terminal and run npm install.
Also, lets install React Router via NPM. With the folder open in your terminal, run:
npm install react-router-domTo illustrate the how path parameters can be used for routing, paste the following in Book.js:
import React from 'react';import { BrowserRouter as Router, Route, Link, Switch, Redirect } from 'react-router-dom';const Books = ({ match }) => { return ( <div> <div className="jumbotron"> <h1 className="display-3">My Books</h1> </div><div className="container"> <div className="row"> <div className="col-md-3"> <ul> <li><Link to={`${match.url}/html`}>HTML</Link></li> <li><Link to={`${match.url}/css`}>CSS</Link></li> <li><Link to={`${match.url}/react`}>React</Link></li> </ul> </div> <div className="col-md-9"> <Route path={`${match.path}/html`} render={() => { return <h1>HTML by Ducket book</h1> }}/> <Route path={`${match.path}/css`} render={() => { return <h1>CSS by Racheal Andrews</h1> }}/> <Route path={`${match.path}/react`} render={() => { return <h1>React by Fullstack.io book</h1> }}/> <Route path={`${match.path}/:id`} component={Child} /> </div> </div> </div> </div> );}const Child = ({ match }) => ( <div> <h3>URL ID parameter: {match.params.id}</h3> </div>);export default Books;Run npm start.

#4 Protected path routing
This kind of routing is for pages of a website that need the user to login and be authentication before viewing such pages. An example is an Admin page.
To handle protected paths, we’ll need to use <Redirect/> (a standard component)and <PrivateRoute/> (a custom component).
<PrivateRoute/> is not the standard <Route/> component. The standard route component provided by React Router is<Route/>;. We will define <PrivateRoute/> as our own custom <Route/>.
Custom routes are necessary when we need to make a decision whether a <Route/> of interest should be rendered or not. As you’ll see in the code, we will list <PrivateRoute/> together with other <Route/>s.
The <Redirect/> component
Rendering a <Redirect> will navigate to a new location. The new location will override the current location in the history stack, like server-side redirects (HTTP 3xx) do.
<Redirect/> has a couple of props but we will be using the to object prop this way:
<Redirect to={{ pathname: '/login', state: { from: props.location } }}/>When used, this will redirect to the /login path. Information about the last location before the redirect was done will be accessible by the LoginPage component via this.props.location.state.
Navigate to the last sub-folder 04-authenticated-routing. Run npm install.
Install React Router via NPM. With the folder open in your terminal, run:
npm install react-router-domOpen App.js and add a new list /admin item to the existing ones.
<ul> <li><Link to="/hello">Hello</Link></li> <li><Link to="/about">About</Link></li> <li> <Link to="/books">Books</Link> </li> <li> <Link to="/admin">Admin</Link> </li></ul>Add <PrivateRoute/>; and /login route to the group of existing <Route/>s.
<Switch> <Route exact path="/" component={Home} /> <Route path="/about" component={About} /> <Route path="/hello" component={Hello} /> <Route path="/books" component={Books} /> <Route path="/login" component={Login}/> <PrivateRoute authed={fakeAuth.isAuthenticated} path="/admin" component={Admin} /> </Switch>Now create the <PrivateRoute/> component outside of App component:
const PrivateRoute = ({ component: Component, ...rest }) => ( <Route {...rest} render={props => ( fakeAuth.isAuthenticated ? ( <Component {...props}/> ) : ( <Redirect to={{ pathname: '/login', state: { from: props.location } }}/> ) )}/>)<PrivateRoute/> will eventually render down to a <Route> component. The <Route> component uses a ternary operation to determine what to render based on whether the user is logged in or not: a <Redirect/> to the login page or Admin page component.
Create the Admin component:
const Admin = () => { return ( <div className="jumbotron"> <h3 className="display-3">Admin Access granted</h3> </div> );}Also, create the Login component:
class Login extends React.Component { constructor() { super(); this.state = { redirectToReferrer: false } // binding 'this' this.login = this.login.bind(this); } login() { fakeAuth.authenticate(() => { this.setState({ redirectToReferrer: true }) }) } render() { const { from } = this.props.location.state || { from: { pathname: '/' } } const { redirectToReferrer } = this.state; if (redirectToReferrer) { return ( <Redirect to={from} /> ) } return ( <div className="jumbotron"> <h1 className="display-3">Login required</h1> <p className="lead">You must log in to view the page at {from.pathname}.</p> <p className="lead"> <a className="btn btn-primary btn-lg" onClick={this.login} role="button">Login</a> </p> </div> ) } } /* A fake authentication function */ export const fakeAuth = { isAuthenticated: false, authenticate(cb) { this.isAuthenticated = true setTimeout(cb, 100) }, }This Login component implements a fake authentication function that will set a user either logged in or out.
Run npm start and see the working app.
This brings us to the end of the article. Kudos to you if you made it this far. If you would like more details about React Router, view the Documentations.
If you would like the completed version of the code, visit the completed branch on Github.
Feel free to support me (devapparel.co) and look good while at it. Also, Comment or Share this post. Thanks for reading!
Originally published at Zeolearn Blog.