by Ankita Masand
Why Progressive Web Apps are great and how to build one

In this tutorial, we’re going to build up the fundamentals of Progressive Web Applications (PWAs). I’ll help you understand the pain points of the traditional web and the need for something better to combat native applications. We’ll dive deeper into the components that make up a PWA — Service Workers, IndexedDB, manifest.json & Web Push Notifications. And the most interesting bit — we’ll build a PWA from scratch.
How I Got the Idea to Write This Tutorial
I was having dinner with my entire family, and a notification for a new text message popped up on my mobile phone. The message confirmed that I received a new paycheck. While this is regular news, my family gets delighted every time this happens.
Taking advantage of the pleasant environment, my brother exclaimed that he wants a new mobile phone. When I asked him why did he need one, he said that his phone has become very slow and gets low memory warnings every now and then. I was surprised to hear this as his phone is more advanced than mine which is still working perfectly fine.
To satisfy my curiosity, I checked his phone and found that he has installed more than 40 applications for his diverse needs. ?♀️ There were two applications for reading blogs on different categories, two of them were for getting news updates, three of them were E-Commerce apps, three for gaming, one for keeping an eye on his mutual funds and another one for handling his bank account transactions and there were a few more that he didn’t use frequently.
I asked him if he has ever tried going to the respective website before taking a bold step of installing the native application. He kept aside his piece of pizza and turned towards me in a mood of having a detailed conversation.
He began by saying that he has always visited a website first and it’s the website that forces him to download the native application by showing fat install banners. He says the experience on the web is so frustrating that it is impossible to get through even a simple task.
His E-Commerce applications are really great at giving him timely updates on his orders and do an amazing job of informing him of discounts by sending push-notifications. The user experience on native applications is simply amazing and the web can’t beat that. He was stern in his opinion about the web. However, he agreed that the size of the native application bloats his phone memory but he cannot do anything in that regard.
Misconceptions People Have About the Web
My brother thinks exactly what most users think about the web. The traditional web is slow and ugly. Let’s take a moment and check out Twitter on the mobile web, popularly called Twitter Lite, and understand the significance of the word traditional in my last statement.

Is the experience on par with the native app? It loads instantly. There is no janky scrolling. It doesn’t look like an old traditional website. You might’ve noticed a small banner at the bottom asking you to Add Twitter to your home screen. Is it the fancier way of urging users to install native applications? No, it isn’t. It won’t download a native application of megabytes in size. It is asking you to add Twitter Lite on your home screen. It literally means adding a shortcut to access twitter mobile web using that icon on the home screen.
Let’s experiment with this by clicking on Add Twitter to home screen and check out what the newer web has to offer. In case the banner didn’t appear in your case, please click on the three dots on the right side and choose option Add to home screen. Now, click on the twitter icon from your home screen. Isn’t that amazing? Oh yes, this app can also send you real-time push notifications. The web won’t feel like a lost world now. Once you opt-in for push notifications on a web application, it does a great job of engaging users by showing them all the updates.
There is one more important thing that is lacking in traditional old web — the ability to deal with intermittent or no internet connection. The Web behaves quite differently on 2G devices compared to on WIFI. Most of the times, it’s nothing or a loader on the screen while browsing on a 2G connection. This is frustrating to the end user.
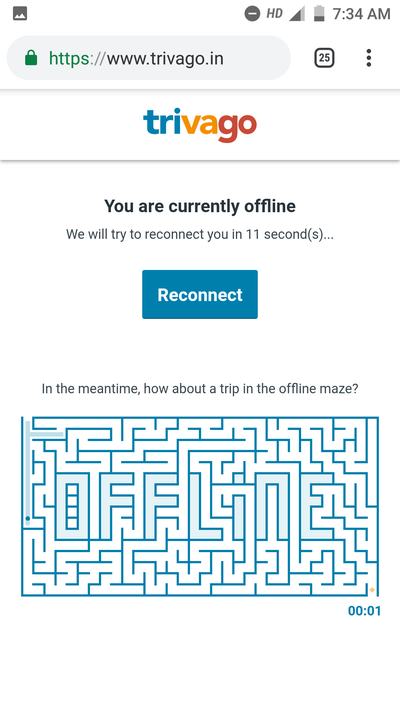
The good news is, the modern web can deal with this problem too. You don’t see the dinosaur when your internet goes off. It’s a nice application shell that pops up when you are not connected to the internet. I really like the way Trivago deals with this problem, they show a nice application shell to play around an offline maze.
Let’s check out one more application of this kind — Financial Times. Load Financial Times in your browser and now switch off your internet. Reload the page. The experience is still the same. Isn’t this something that makes the web look great? These web applications that solve the pain points of the traditional web are popularly called Progressive Web Applications.
In this tutorial, we’re going to explore Progressive Web Applications and also build one from scratch.
Benefits of Progressive Web Applications
Progressive Web Applications (PWAs) are:
Fast
They make good use of local caches to store static assets. Caching of static assets reduces the number of rides to the server to fetch these assets on every load. This makes for an incredible user experience similar to that of native applications. They respond quickly to user interactions.
Reliable
PWAs load data almost instantly. Every fetch network request from the application goes through Service Workers (more on that later). They operate the cache (IndexedDB or any other local cache). Service Workers can send the response to a network request directly from the cache in case of intermittent or slow internet connections. PWAs work reliably even on 2G connections.
Engaging
Native applications leverage the power of operating systems to show important notifications to the users and this is one of the powerful features of an application. Sending timely push notifications helps to retain users for a longer duration. PWAs make use of web push notifications to inform users of relevant updates.
Progressive Web Applications is used as terminology for web applications that are fast, reliable and engaging and they provide an experience similar to that of native applications. Applications that are eligible to be called Progressive Web Applications consists of and employ the following:
Service Workers
Service Workers, in simple terms, are a few lines of JavaScript code that keep running in the background. However, they go to a dormant state when they are not in use. They operate as an event-driven system. Whenever a particular event (for example, a fetch request to the server) is invoked, service workers come to life.
We can handle the response of the fetch event using the fetch event listener in the Service Worker. For a service worker to start doing its work of handling fetch requests and a few other events, it should be registered, installed and activated on a web application.
IndexedDB or any other local cache
PWAs store the static assets like JavaScript files, stylesheets, and images in the local cache for subsequent visits. Some of the PWAs make use of IndexedDB, which is basically a structured key-value pair data structure. IndexedDB is used for storing large amounts of data as compared to other client-side storage options.
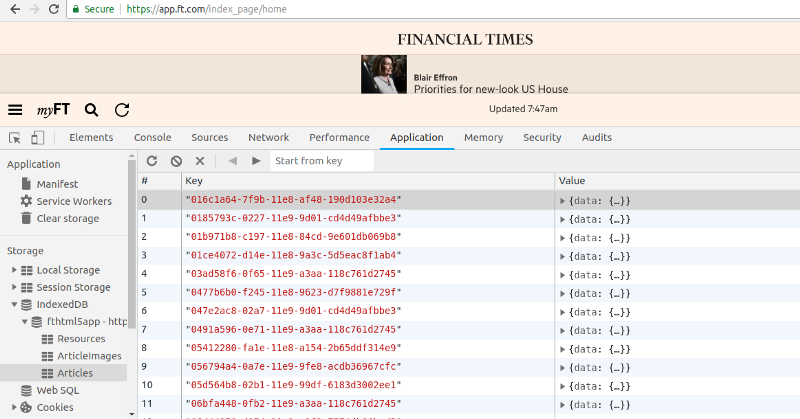
We saw earlier the way Financial Times handles the no internet condition. It still displays all the articles on the home page. It makes use of IndexedDB to store data from these articles.
Let’s see this in action. You’ll find IndexedDB in the Chrome DevTools under Applications tab. Under IndexedDB, go to the Articles section.
Web Push Notifications
Service Workers also listen to a push event and have a respective push event handler that takes care of showing the push notification to the user. An application must have the user’s permission in order to show them push notifications. Once a user opts-in for receiving push notifications, the browser generates a unique token for them. The server can then communicate with the user using this unique token.
manifest.json File
manifest.json is typically a metadata file of an application. An application includes the manifest.json in index.html as follows
<link rel="manifest" href="manifest.json">
manifest.json does the job of telling the browser that the application is a PWA. It tells the browser the Name, Background Color, Theme Color, and Icons to be used for this application. It also tells the mode in which the application should be opened. For example, a standalone mode launches a PWA by giving a feel similar to that of a native application.
Rich User Experience
PWAs are known to have a rich user experience. They access the static assets directly from the cache so there is no delay in responding to user interactions.
Let’s build a Progressive Web Application by making use of the components listed above.
Use Case — Building a Treasure Trove of Books
We will be building an application called BooksKeep. It will help in maintaining a systematic record of the books we’ve read and also the ones that are in our pipeline. No wise word learned should go in vain.
The following features will be incorporated in this application:
- Displaying a list of books (Title, Author, Summary, & Favorite Quotes)
- Adding a new book to the list
Prerequisites — Our Technology Stack
- React — for building the front-end
- IndexedDB — for storing the books records (please note, there is no back-end database)
- WebPack — as a development server and for bundling assets
Let get going! To make things simple, I’ve created a boilerplate to get started with.
Understanding the Boilerplate
package.json - package.json contains the project dependencies. When you do npm install, these dependencies will be downloaded in your system. Since we're using React to build up our front-end, react & react-dom libraries are included in the dependencies section.
In devDependencies object, babel presets and few webpack related plugins are included. Babel is a JavaScript compiler that is used for syntax transformation, converting the next-gen JavaScript into a browser compatible version.
The browser doesn't understand the React syntax directly, so we're using babel-preset-react to convert React and JSX into JavaScript that the browser understands. We're using WebPack as a module bundler.
webpack.config.js contains the configuration setup required for generating a bundle of static assets. The entry object in module.exports contains the entry point of the application, which in our case is app.js. Webpack generates a dependency graph using this entry point and keeps adding dependencies in the bundle starting from app.js. The output object contains the path of the output folder and filename generates dynamic filenames based on their value in the entry object. In our case, it will be bundle.js as we've mentioned bundle in the entry point.
Next, there are some rules to convert .js & .scss specific files. These files are to be transformed with their respective loaders before adding them to the main bundle.
- HTMLWebpackPlugin adds the generated output bundles in the provided
index.htmltemplate. - ExtractTextPlugin moves the .css modules into a separate file.
- CopyWebpackPlugin simply copies the
manifest.jsonfile andservice-worker.jsfile fromsrctodist.
We will be building up src along this tutorial. For now, it contains index.html that has one div element with id app. app.js is the root component of the application. It contains simple header & body components for now.
Let’s start building our BooksKeep PWA. We will be building this progressively in the following steps:
- Building a table component for displaying book records
- Provision to add a new book in the table
- Storing book records in IndexedDB
- Adding Service Worker to cache static assets
- Adding manifest.json
Building a Table Component for Displaying Book Records
We’re using react-bootstrap for building the UI. Let's import the Table component from react-bootstrap.
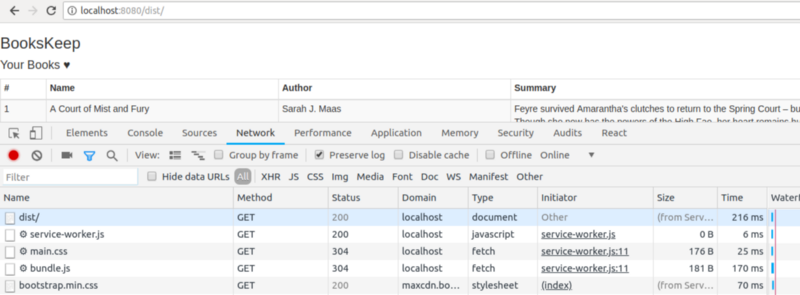
Start the server by using the command npm start in your terminal. Head over to localhost:8080/dist/. We don't have any book records yet so the table is empty. BooksHeaders are being imported from the constants folder. Please add BooksHeaders in books-headers.js file in the constants folder from here.
BooksHeaders is simply an array of objects that we're displaying in the table. getTableMarkup function builds up the table headers with getTableHeaders & body with getTableData functions. booksData maintains the state of the component. If any new book record is to be added, it should be pushed into booksData array.
Provision to Add a New Book in the Table
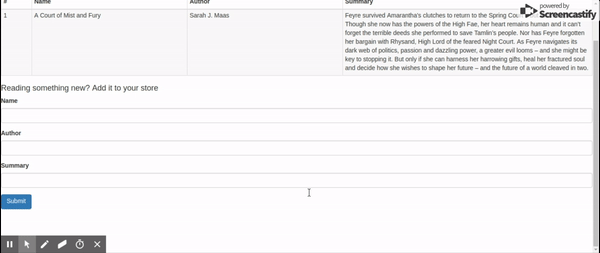
Let’s take it further and add our first book record in the table. All we have to add is to import the BookForm component from the base folder and provide it a onSubmit prop. onSubmit prop accepts a function that will be called when the user clicks on the submit button in the form, and that will give us the details of the new book. Once you're done with that, your Body Component should look like this.
Here’s the BookForm component:
FieldGroup is just a wrapper for labeled inputs. Please put this inside the field-group.js file in the utils folder. BookForm component maintains its state in the formData object. Whenever a user enters name, author or summary, it gets saved in the component state. The submit button passes the component state to the parent Body component, which then adds it to its state - booksData array.
After adding a book record, you'll see that your table is now populated with that record. But when you refresh the page, all of this is gone. We've got to fix this.
Storing Book Records in IndexedDB
IndexedDB is a structured client-side storage database. The records in IndexedDB are stored as key-value pairs. We’ll be saving the book records in IndexedDB. IndexedDB provides APIs for adding, deleting and updating the records in a database. Let’s explore these APIs by creating a wrapper in the indexeddb.js file in the utils folder.
Operations performed on IndexedDB are asynchronous in nature. So, the IndexedDB APIs provide appropriate hooks for success and error events.
First, we’ll have to create our database. Let’s write a initialize function that will handle the initialization tasks:
In the above code snippet, BooksKeep is the name of the IndexedDB database and books is an ObjectStore. ObjectStore is analogous to a table in SQL. The statement idb.open(DB, 1) is an asynchronous request to open IndexedDB database BooksKeep, and the second parameter 1 signifies the version of the database. The request variable is of type IDBOpenDBRequest.
We've defined onsuccess, onerror and onupgradeneeded functions on the request object to be called at the respective events. For example, onsuccess callback would be called when the database is opened successfully and in onsuccess method, we're caching the instance of the BooksKeep database. onupgradeneeded method is invoked whenever there is a change in the version of the database.
Currently, with version 1, we've added only one ObjectStore called as books. Let's say, at a later stage, when our application grows we decide to add one more ObjectStore. We'll have to upgrade the version of our database to 2 and add the schema of this new ObjectStore in onupgradeneeded method.
We will be writing three important methods — get, update & delete — in our IndexedDB wrapper. The general idea for performing any of these operations is to first get the instance of the store, wrap the operation in a transaction, and then write success and error event handlers for the respective asynchronous requests. A transaction is simply a wrapper around an operation to ensure data integrity. If any of the actions in a transaction fails, then no action is performed on the database.
For example, our put or update method will look something like this:
update method takes three parameters:
type is the name of the objectStore, data is the book record that we intend to add/update in our objectStore, and callback is of type function that would be called after successfully adding data in the objectStore.
transaction is defined on the IDBOpenDBRequest instance and it takes the name of the objectStore and the mode with which the operation is to be performed. In this case, the mode is readwrite since we're writing to the objectStore.
As mentioned previously, IndexedDB accepts data in the form of key-value pairs. We're using timestamp to generate a unique identifier for a particular record. store.put(data) asynchronously adds book records into the books objectStore. On the same lines, I've added get & delete methods in our wrapper. Please check the complete code of IndexedDB wrapper here.
Now that our IndexedDB wrapper is all set, it’s time to use the add/update function from our wrapper whenever a user tries to add a new book record. Let’s modify our Body Component to accommodate these changes.
First import IndexedDbWrapper in the Body component. We will be calling the initialize function of IndexedDbWrapper in componentDidMount. The initialize method takes the callback as initializeDB function, which is defined in the Body Component. initializeDB does the work of setting up the initial state of our application by fetching the stored books records from IndexedDB.
One last thing to do with IndexedDbWrapper is to call its update method on submission of a book record. We've to modify the onSubmit method of the Body component as follows:
Now, the new record will be first added to IndexedDB, and once that is done successfully, we’re updating the state of the component. Try adding a new book record and reloading the page. You will still see your book record in the table. Here’s where it is coming from!
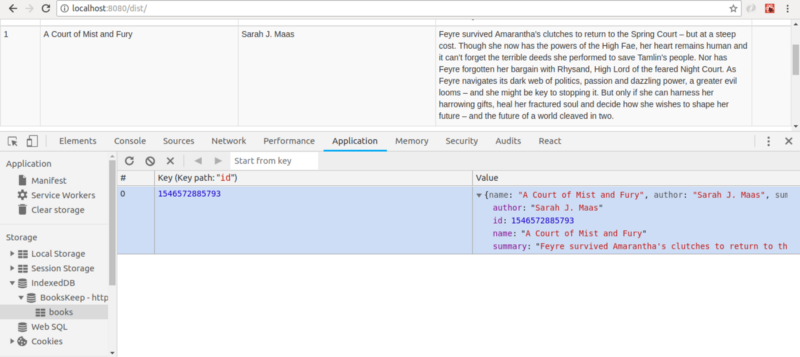
Let’s add one record and refresh the page. Data is preserved and that’s exactly what we wanted. We’ve built up a means to fetch data directly on the client-side. We’re getting closer to our goal of building a Progressive Web Application.
Adding Service Worker to Cache Static Assets
The next step is to leverage the power of Service Workers by fetching static assets from the cache. A service worker first has to be registered on a web page.
Service Worker Registration
initializeSW function is defined in the Body component, and we'll call it in componentDidMount lifecycle hook. serviceWorker is defined on navigator. According to MDN,
the Navigator interface represents the state and the identity of the user agent. It allows scripts to query it and to register themselves to carry on some activities.
A Service Worker is registered using the register method defined on navigator.serviceWorker object. The register method takes the URL of the service worker file. It returns a Promise which resolves when the service worker is registered successfully on the webpage. Once this is done, you'll see a success message in the console. By default, service workers can intercept all the fetch requests coming from the web page.
register method also takes an optional second parameter, which defines the scope of the service worker.
navigator.serviceWorker.register('./service-worker.js', { scope: '/products' })The above service worker will intercept only /products/* requests. So, something like /payments is not intercepted by the above service worker.
As said earlier, Service Workers operate as an event-driven system. After successful registration, an install event is triggered. We can make use of the install event handler for initialization tasks. In our case, we will be setting up our cache for storing static assets.
Here’s the install event handler:
event.waitUntil makes sure that the service worker is active while the URLS are getting added into the cache.
The service worker hasn’t yet started doing its magic. After getting installed successfully, an activate event is triggered and this is a good place to clear off old unused caches. Let's do our bit:
activate event handler takes care of deleting all the caches except bookskeep-cache. When a web page makes a network request to the server, the fetch event of the service worker is triggered. So, if we were to manipulate or modify the response to be sent for a particular request, we'll have to do this in the fetch event handler.
event.respondWith method lets us send a modified response back to the client. It returns a Promise that resolves to a valid response. cache.match checks if the request is a valid resource for caching (if you remember, we've added a few specific URLs to urlsToCache variable in the install event handler).
If the response to that request is present in the cache, we send it directly to the client otherwise, we request that resource from the server, put it into the cache for subsequent hits, and send it to the client.
Here’s the service worker file with the three event handlers explained above.
Adding manifest.json
short_name is used on the home screen as the name of the application. In case short_name is not provided, then the name property is used in its place. icons show up as a home screen icon for the application in the app launcher and on the splash screen. start_url tells the browser about the starting page of the app. A user will be directed to this URL when the app is launched. standalone as the display property of the app gives it the look & feel of a native application. The application runs in its own window and hides some of the browser specific elements like URL bar. background_color sets the color of the splash screen when the application is first launched and theme_color tells about the color of the toolbar.
This is it. We’ve set up our BooksKeep PWA. Let’s have a quick recap of the things we learned in this tutorial:
- The traditional web lacks some of the important features that native applications provide out of the box. Progressive Web Applications help in improving the user experience on the web tremendously. They are fast, reliable, and engaging and provide an experience similar to that of native applications.
- PWAs make use of Service Workers, IndexedDB (or any other local cache), manifest.json, and Web Push Notifications.
- Service Workers operate as an event-driven system and listen for fetch & push events.
fetchevent lets us send the response to a network request directly from the cache in case of slow or intermittent connections.pushevent lets us show push-notifications to the user and helps in engaging user by apprising them of timely updates. - IndexedDB is a key-value structure. It helps in storing a massive amount of data on the client-side.
manifest.jsoninforms the browser about some of the important properties of an application. - We learned how to get started building a Progressive Web Application.
This was a quick introduction to Progressive Web Applications. If you want to explore more, here are some of the resources:
- An Extensive Guide To Progressive Web Applications
- Check out my BooksKeep application on GitHub. I’ve added a few more features like updating book records, adding quotes & support for web push notifications. I’ll keep adding more!
- Service Workers
Please let me know if you found this tutorial to be helpful and share it with whomever you think might benefit from it.
Originally published at hashnode.com.