
by Sudheesh Shetty
How to build your own real-time chat app
Messaging apps are surging in popularity. The past few years have brought apps like WhatsApp, Telegram, Signal, and Line.
People seem to prefer chat-based applications because they allow for real-time interaction. They also add a personal touch to the experience.
I recently attended a workshop conducted by the Free Software Movement Karnataka in Bangalore where I mentored a group of college students.
During the interactions, I observed certain things:
- Despite encouraging students to interact with the mentor, communication was always one-sided.
- Students often felt too shy to ask questions during the sessions.
- They were more comfortable asking questions and getting feedback in one-on-one conversations.
So we had to find a solution to break the ice between mentors and students. A local chat application came handy in this situation. People love to be anonymous, which gives them more power to express themselves and ask anytime anywhere. This is the same mantra used by most of the popular forums on the internet, such as Reddit and 4chan. These are just a few giant examples of semi-anonymous apps.
So I started thinking about this idea. I came up with some of the basic requirements and features.
- Users register by giving a handle, which is unique to every user (a dummy name). Only the handle will be revealed to other users. So people are free to choose any handle and hence they stay anonymous.
- A member can see other members who are online. They have an option to go public, which broadcast the message to all online members in the chat.
- For private messages, the sender should first send a request to the other member. Other members upon accepting the request can have private chat with them.
Technology, Tools used
- MEAN Stack(Mongo, Express, Angular, Node).
- Sockets to enable one-on-one communication in real time
- AJAX for sign-up and login
So how do you create a simple chat application?
In this tutorial, I’m going to help you create your own chat application. You can later integrate as a widget into any project! This tutorial won’t concentrate on the complete development of a chat application. But it will help you build one.
Pre-requisite : You need to know some basic knowledge of MEAN Stack, as we are making use of it to build one.
First, create a directory structure something like this.
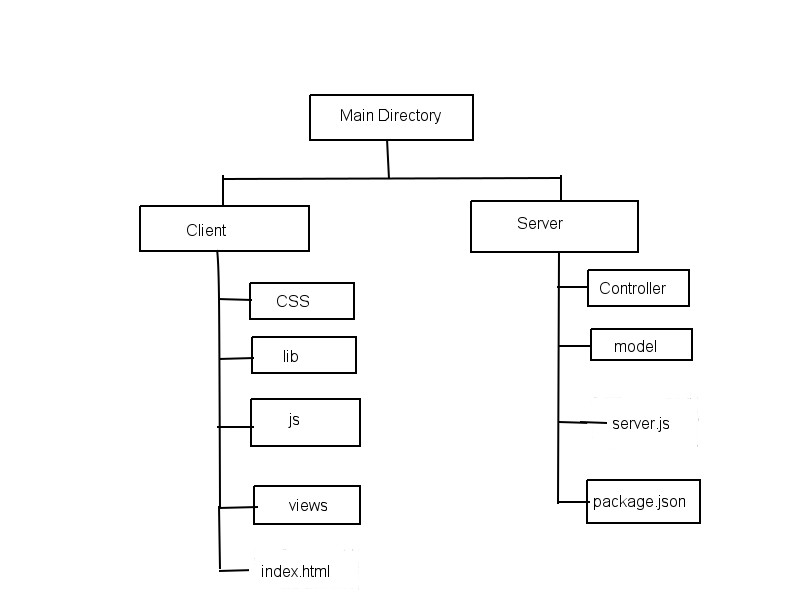
We’ll be making use of AngularJS 1 for this tutorial. Download the AngularJS library from here and copy it to the lib folder in Client directory.
If you like to beautify the application you can download any CSS libraries and copy them to lib as well.
Building the Server
Step 1 — Start the project :
Go to Server directory and run this command:
npm initThis will start a new project. Provide all the details required. The package.json will be created and will look something like this.
{
  "name": "chat",
  "version": "1.0.0",
  "description": "Chat application",
  "main": "server.js",
  "scripts": {
    "test": "echo \"Error: no test specified\" && exit 1"
  },
  "author": "Your name",
  "license": "ISC"
}
Step 2 — Install the dependencies.
- socket.io — is a javascript library for real-time web applications. It enables real-time, bi-directional communication between web clients and servers.
- express — is a Node.js web application framework. It provides the set of features to develop the web and mobile applications. One can respond to HTTP request using different middlewares and also render HTML pages.
npm install --save socket.io
npm install --save express
This will install required dependencies and add those to package.json. An extra field will be added to package.json which will look like this:
"dependencies": {
    "express": "^4.14.0",
    "socket.io": "^1.4.8"
  }
Step 3 — Creating the Server
Create a server which serves at port 3000 and will send the html when called.
Initialize a new socket connection by passing HTTP object.
Event connection will be listening for incoming sockets.
Each socket emits disconnect event which will be called whenever a client disconnects.
- socket.on waits for the event. Whenever that event is triggered the callback function is called.
- io.emit is used to emit the message to all sockets connected to it.
The syntax is:
socket.on('event', function(msg){})
io.emit('event', 'message')
Create a server with name server.js. It should:
- print a message to the console upon a user connecting
- listen for chat message events and broadcast the received message to all sockets connected.
- Whenever a user disconnects, it should print the message to the console.
The server will look something like this:
var app = require('express')();
var http = require('http').Server(app);
var io = require('socket.io')(http);

app.get('/', function(req, res){
  res.sendfile('index.html');
});

io.on('connection', function(socket){
  console.log('user connected');
  socket.on('chat message', function(msg){
    io.emit('chat message', msg);
  });
  socket.on('disconnect', function(){
    console.log('user disconnected');
  });
});

http.listen(3000, function(){
  console.log('listening on *:3000');
});
Building the Client
Create the index.html in the client directory, style.css in the css directory and app.js in js directory in the client.
index.html:
Let us write a simple HTML which can take our message and also display it.
Include socket.io-client and angular.js in your HTML script.
<script src="/path/to/angular.js"></script>
<script src="/socket.io/socket.io.js"></script>
socket.io serves the client for us. It defaults to connect to the host that serves the page. Final HTML looks something like this:
<!doctype html>
<html ng-app="myApp">
  <head>
    <title>Socket.IO chat</title>
    <link rel="stylesheet" href="/css/style.css">
    <script src="/lib/angular/angular.js"></script>
    <script src="/socket.io/socket.io.js"></script>
    <script src="http://code.jquery.com/jquery-1.11.1.js">
    </script>
    <script src="/js/app.js"></script>
  </head>
  <body ng-controller="mainController">
    <ul id="messages"></ul>
    <div>
      <input id="m" ng-model="message" autocomplete="off" />
      <button ng-click="send()">Send</button>
    </div>
  </body>
</html>
css/style.css:
Give it some styling so that it looks like a chatbox. You can make use of any libraries.
* { margin: 0; padding: 0; box-sizing: border-box; }
body { font: 13px Helvetica, Arial; }
div { background: #000; padding: 3px; position: fixed; bottom: 0; width: 100%; }
div input { border: 0; padding: 10px; width: 90%; margin-right: .5%; }
div button { width: 9%; background: rgb(130, 224, 255); border: none; padding: 10px; }
#messages { list-style-type: none; margin: 0; padding: 0; }
#messages li { padding: 5px 10px; }
#messages li:nth-child(odd) { background: #eee; }
js/app.js:
Create an angular.js app and initialize a socket connection.
- socket.on listens for a particular event. It calls a callback function whenever that event is called.
- socket.emit is used to emit the message to the particular event.
Basic syntax of both are:
socket.on(‘event name’, function(msg){});
socket.emit('event name', message);
So whenever the message is typed and the button is clicked, call the function to send the message.
Whenever the socket receives a message, display it.
The JavaScript will look something like this:
var app=angular.module('myApp',[]);

app.controller('mainController',['$scope',function($scope){
 var socket = io.connect();
 $scope.send = function(){
  socket.emit('chat message', $scope.message);
  $scope.message="";
 }
 socket.on('chat message', function(msg){
  var li=document.createElement("li");
  li.appendChild(document.createTextNode(msg));
  document.getElementById("messages").appendChild(li);
 });
}]);
Running the application
Go to server directory where our server is present. Run the server using the following command:
node server.jsThe server starts running on port 3000. Go to the browser and type the following url:
http://localhost:3000How to improve the same application
You can design a database to save user details and messages. It would be good if the design was scalable so that you could add more features later.
You need to install Mongoose or a MongoDB module to make use of a Mongo database:
npm install --save mongooseor:
npm install --save mongodbHere’s the documentation to use mongoose and the mongodb module.
Here’s what my schema design looks like:
{
 “_id” : ObjectId(“5809171b71e640556be904ef”),
 “name” : “Sudheesh Shetty”,
 “handle” : “sudheesh”,
 “password” : “556624370”,
 “phone” : “8888888888”,
 “email” : “sudheeshshetty@gmail.com”,
 “friends” : [
    {
      “name” : “abc”,
      “status” : “Friend”
    },
    {
      “name” : “xyz”,
      “status” : “Friend”
    }
 ],
 “__v” : 0
}
Here, the status of each member can be:
- Friend: Stating that the member is a friend.
- Pending: If the member has not yet accepted.
- Blocked: If the member has blocked the other member.
Suppose the member has rejected a chat request. The sender can then send a chat request again. A user can also save the messages by creating an extra collection. Each document will have the message, sender, receiver, and time.
So design your database according to your specific needs and how you want to handle messages.
2. Create REST APIs to serve the client. For example, an endpoint that sends a home page, from which users can make other requests.
Few of my API endpoints are:
app.post(‘/register’,function(req,res){})

app.post(‘/login’,function(req,res){})

app.post(‘/friend_request’,function(req,res){})

app.post(‘/friend_request/confirmed’,function(req,res){})
3. Think of some cool additional features and implement them.
I have created a chat application of my own:
sudheeshshetty/Chat
Contribute to Chat development by creating an account on GitHub.github.com
Here’s a quick glance at my chat application:
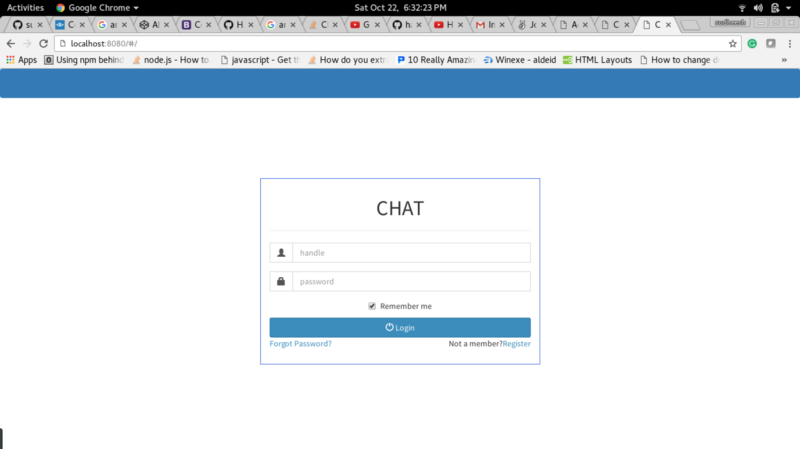
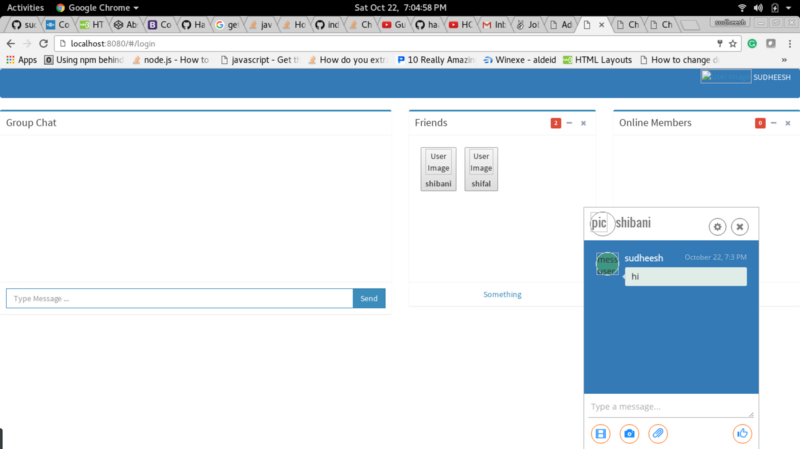
Please do look at it, and give it a star at the top right if you like it. There are many ways I could improve this application. If you have any suggestions, send them to me at sudheeshshetty@gmail.com.
You can follow me here on click the green heart if you found this helpful so that more people will see this. You can also follow me on GitHub and twitter.