
by Vaghawan Ojha
How to build a recommendation engine using Apache’s Prediction IO Machine Learning Server

This post will guide you through installing Apache Prediction IO machine learning server. We’ll use one of its templates called Recommendation to build a working recommendation engine. The finished product will be able to recommend customized products depending upon a given user’s purchasing behavior.
The Problem
You’ve got bunch of data and you need to predict something accurately so you can help your business grow its sales, grow customers, grow profits, grow conversion, or whatever the business need is.
Recommendation systems are probably the first step everyone takes toward applying data science and machine learning. Recommendation engines use data as an input and run their algorithms over them. Then they output models from which we can make prediction about what a user is really going to buy, or what a user may like or dislike.
Enter Prediction IO
“Apache PredictionIO (incubating) is an open source Machine Learning Server built on top of state-of-the-art open source stack for developers and data scientists create predictive engines for any machine learning task.” — Apache Prediction IO documentation
The very first look at the documentation makes me feel good because it’s giving me access to a powerful tech stack for solving machine learning problems. What’s more interesting is that Prediction IO gives access to many templates, which are helpful for solving the real problems.
The template gallery consists many templates for recommendation, classification, regression, natural language processing, and many more. It make use of technology like Apache Hadoop, Apache spark, ElasticSearch and Apache Hbase to make the machine learning server scaleable and efficient. I’m not going to talk much about the Prediction IO itself, because you can do that on your own here.
So back to the problem: I have a bunch of data from user purchase histories, which consists user_id, product_id and purchased_date. Using these, I need to make a customized prediction/recommendation to the user. Considering this problem, we’ll use a Recommendation Template with Prediction IO Machine Learning server. We’ll make use of Prediction IO event server as well as bulk data import.
So let’s get ahead. (Note: This guide assume that you’re using Ubuntu system for the installation)
Step# 1: Download Apache Prediction IO
Go to the home directory of your current user and Download The latest 0.10.0 Prediction IO apache incubator. I assume you’re in the following dir (/home/you/)
git clone git@github.com:apache/incubator-predictionio.gitNow go to the directory `incubator-predictionio` where we have cloned the Prediction IO repo. If you have cloned it in a different directory, make sure to be inside that dir in your terminal.
Now let’s checkout the current stable version of Prediction IO which is 0.10.0
cd incubator-predictionio # or any dir where you have cloned pio.git checkout release/0.10.0Step #2: Let’s Make A Distribution Of Prediction IO
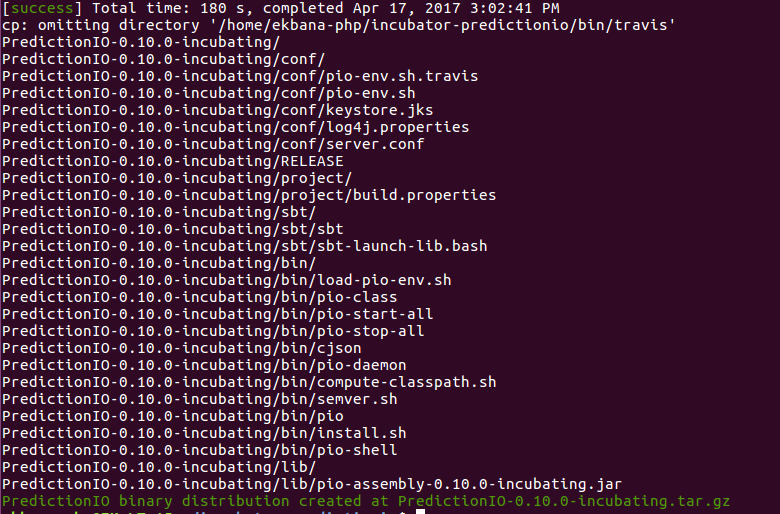
./make-distribution.shIf everything went Ok, then you will get the message like this in your console:
However if you encountered something like this:

then you would have to remove .ivy2 dir in your home directory, by default this folder is hidden. You need to remove it completely and then run the ./make-distribution.sh again for the build to successfully generate a distribution file.
Personally I’ve faced this issue many times, but I’m not sure this is the valid way to get through this problem. But removing the .ivy2 folder and again running the make-distribution command works.
Step # 3: Extract The Distribution File
After the successful build, we will have a filename called PredictionIO-0.10.0-incubating.tar.gz inside the directory where we built our Prediction IO. Now let’s extract it into a directory called pio.
mkdir ~/piotar zxvf PredictionIO-0.10.0-incubating.tar.gz -C ~/pioMake sure the tar.gz filename match the distribution file that you have inside the original predictionIo directory. If you forgot to check out the 0.10.0 version of Prediction IO, you’re sure to get a different file name, because by default the version would be the latest one.
Step #4: Prepare For Downloading Dependencies
cd ~/pio#Let’s make a vendors folder inside ~/pio/PredictionIO-0.10.0-incubating where we will save hadoop, elasticsearch and hbase.mkdir ~/pio/PredictionIO-0.10.0-incubating/vendorsStep #5: Download and Setup Spark
wget http://d3kbcqa49mib13.cloudfront.net/spark-1.5.1-bin-hadoop2.6.tgzIf your current directory is ~/pio the command will download the spark inside pio dir. Now let’s extract it. Depending upon where you downloaded it, you might want to change the below command.
tar zxvfC spark-1.5.1-bin-hadoop2.6.tgz PredictionIO-0.10.0-incubating/vendors# This will extract the spark setup that we downloaded and put it inside the vendors folder of our fresh pio installation. Make sure you had done mkdir PredictionIO-0.10.0-incubating/vendors earlier.
Step #6: Download & Setup ElasticSearch
wget https://download.elasticsearch.org/elasticsearch/elasticsearch/elasticsearch-1.4.4.tar.gz#Let’s extract elastic search inside vendors folder.tar zxvfC elasticsearch-1.4.4.tar.gz PredictionIO-0.10.0-incubating/vendorsStep #7: Download and Setup Hbase
wget http://archive.apache.org/dist/hbase/hbase-1.0.0/hbase-1.0.0-bin.tar.gz#Let’s extract it.tar zxvfC hbase-1.0.0-bin.tar.gz PredictionIO-0.10.0-incubating/vendorsNow let’s edit the hbase-site.xml to point the hbase configuration to the right dir. Considering you’re inside ~/pio dir, you could hit this command and edit the hbase conf.
nano PredictionIO-0.10.0-incubating/vendors/hbase-1.0.0/conf/hbase-site.xmlReplace the configuration block with the following configuration.
<configuration> <property> <name>hbase.rootdir</name> <value>file:///home/you/pio/PredictionIO-0.10.0-incubating/vendors/hbase-1.0.0/data</value> </property> <property> <name>hbase.zookeeper.property.dataDir</name> <value>/home/you/pio/PredictionIO-0.10.0-incubating/vendors/hbase-1.0.0/zookeeper</value> </property></configuration>Here “you” signifies to your user dir, for example if you’re doing all this as a user “tom” then it would be something like file::///home/tom/…
Make sure the right files are there.
Now let’s set up JAVA_HOME in hbase-env.sh .
nano PredictionIO-0.10.0-incubating/vendors/hbase-1.0.0/conf/hbase-env.sh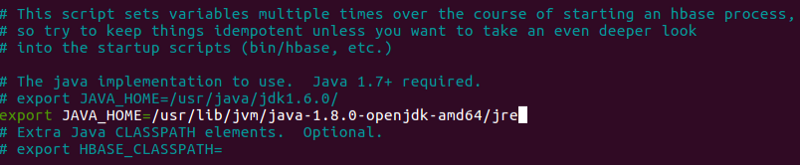
If you’re unsure about which version of JDK you’re currently using, follow these step and make necessary changes if required.
We need Java SE Development Kit 7 or greater for Prediction IO to work. Now let’s make sure we’re using the right version by running:
sudo update-alternatives — config javaBy default I’m using:
java -versionopenjdk version “1.8.0_121”OpenJDK Runtime Environment (build 1.8.0_121–8u121-b13–0ubuntu1.16.04.2-b13)OpenJDK 64-Bit Server VM (build 25.121-b13, mixed mode)If you’re using below 1.7, then you should change the java config to use a version of java that is equal to 1.7 or greater. You can change that with the update-alternatives command as given above. In my case the command sudo update-alternatives -config java outputs something like this:

If you have any trouble setting this up, you can follow this link.
Now let’s export the JAVA_HOME path in the .bashrc file inside /home/you/pio.
Considering you’re on ~/pio dir, you could do this: nano .bashrc
Don’t forget to do source .bashrc after you set up the java home in the .bashrc.
Step #8: Configure the Prediction IO Environment
Now let’s configure pio.env.sh to give a final touch to our Prediction IO Machine learning server installation.
nano PredictionIO-0.10.0-incubating/conf/pio-env.shWe’re not using ProsgesSQl or MySql for our event server, So let’s comment out that section and have a pio-env.sh something like this:
#!/usr/bin/env bash## Copy this file as pio-env.sh and edit it for your site's configuration.## Licensed to the Apache Software Foundation (ASF) under one or more# contributor license agreements. See the NOTICE file distributed with# this work for additional information regarding copyright ownership.# The ASF licenses this file to You under the Apache License, Version 2.0# (the "License"); you may not use this file except in compliance with# the License. You may obtain a copy of the License at## http://www.apache.org/licenses/LICENSE-2.0## Unless required by applicable law or agreed to in writing, software# distributed under the License is distributed on an "AS IS" BASIS,# WITHOUT WARRANTIES OR CONDITIONS OF ANY KIND, either express or implied.# See the License for the specific language governing permissions and# limitations under the License.## PredictionIO Main Configuration## This section controls core behavior of PredictionIO. It is very likely that# you need to change these to fit your site.# SPARK_HOME: Apache Spark is a hard dependency and must be configured.SPARK_HOME=$PIO_HOME/vendors/spark-1.5.1-bin-hadoop2.6POSTGRES_JDBC_DRIVER=$PIO_HOME/lib/postgresql-9.4-1204.jdbc41.jarMYSQL_JDBC_DRIVER=$PIO_HOME/lib/mysql-connector-java-5.1.37.jar# ES_CONF_DIR: You must configure this if you have advanced configuration for# your Elasticsearch setup. ES_CONF_DIR=$PIO_HOME/vendors/elasticsearch-1.4.4/conf# HADOOP_CONF_DIR: You must configure this if you intend to run PredictionIO# with Hadoop 2. HADOOP_CONF_DIR=$PIO_HOME/vendors/spark-1.5.1-bin-hadoop2.6/conf# HBASE_CONF_DIR: You must configure this if you intend to run PredictionIO# with HBase on a remote cluster. HBASE_CONF_DIR=$PIO_HOME/vendors/hbase-1.0.0/conf# Filesystem paths where PredictionIO uses as block storage.PIO_FS_BASEDIR=$HOME/.pio_storePIO_FS_ENGINESDIR=$PIO_FS_BASEDIR/enginesPIO_FS_TMPDIR=$PIO_FS_BASEDIR/tmp# PredictionIO Storage Configuration## This section controls programs that make use of PredictionIO's built-in# storage facilities. Default values are shown below.## For more information on storage configuration please refer to# http://predictionio.incubator.apache.org/system/anotherdatastore/# Storage Repositories# Default is to use PostgreSQLPIO_STORAGE_REPOSITORIES_METADATA_NAME=pio_metaPIO_STORAGE_REPOSITORIES_METADATA_SOURCE=ELASTICSEARCHPIO_STORAGE_REPOSITORIES_EVENTDATA_NAME=pio_eventPIO_STORAGE_REPOSITORIES_EVENTDATA_SOURCE=HBASEPIO_STORAGE_REPOSITORIES_MODELDATA_NAME=pio_modelPIO_STORAGE_REPOSITORIES_MODELDATA_SOURCE=LOCALFS# Storage Data Sources# PostgreSQL Default Settings# Please change "pio" to your database name in PIO_STORAGE_SOURCES_PGSQL_URL# Please change PIO_STORAGE_SOURCES_PGSQL_USERNAME and# PIO_STORAGE_SOURCES_PGSQL_PASSWORD accordingly# PIO_STORAGE_SOURCES_PGSQL_TYPE=jdbc# PIO_STORAGE_SOURCES_PGSQL_URL=jdbc:postgresql://localhost/pio# PIO_STORAGE_SOURCES_PGSQL_USERNAME=pio# PIO_STORAGE_SOURCES_PGSQL_PASSWORD=root# MySQL Example# PIO_STORAGE_SOURCES_MYSQL_TYPE=jdbc# PIO_STORAGE_SOURCES_MYSQL_URL=jdbc:mysql://localhost/pio# PIO_STORAGE_SOURCES_MYSQL_USERNAME=root# PIO_STORAGE_SOURCES_MYSQL_PASSWORD=root# Elasticsearch Example PIO_STORAGE_SOURCES_ELASTICSEARCH_TYPE=elasticsearch PIO_STORAGE_SOURCES_ELASTICSEARCH_CLUSTERNAME=firstcluster PIO_STORAGE_SOURCES_ELASTICSEARCH_HOSTS=localhost PIO_STORAGE_SOURCES_ELASTICSEARCH_PORTS=9300 PIO_STORAGE_SOURCES_ELASTICSEARCH_HOME=$PIO_HOME/vendors/elasticsearch-1.4.4# ocal File System ExamplePIO_STORAGE_SOURCES_LOCALFS_TYPE=localfsPIO_STORAGE_SOURCES_LOCALFS_PATH=$PIO_FS_BASEDIR/models# HBase ExamplePIO_STORAGE_SOURCES_HBASE_TYPE=hbasePIO_STORAGE_SOURCES_HBASE_HOME=$PIO_HOME/vendors/hbase-1.0.0Step #9: Configure cluster name in ElasticSearch config
Since this line PIO_STORAGE_SOURCES_ELASTICSEARCH_CLUSTERNAME=firstcluster points to our cluster name in the ElasticSearch configuration, let’s replace a default cluster name in ElasticSearch configuration.
nano PredictionIO-0.10.0-incubating/vendors/elasticsearch-1.4.4/config/elasticsearch.yml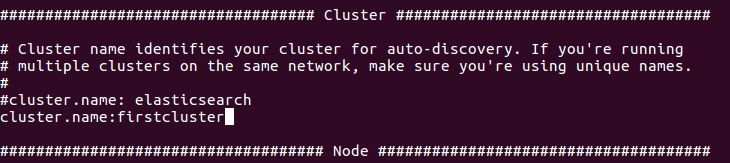
Step #10: Export The Prediction IO Path
Let’s now export the Prediction IO path so we could freely use the pio command without pointing to it’s bin every time. Run the following command in your terminal:
PATH=$PATH:/home/you/pio/PredictionIO-0.10.0-incubating/bin; export PATH
Step #11: Give Permission To Prediction IO Installation
sudo chmod -R 775 ~/pioThis is vital because if we didn’t give permission to the pio folder, the Prediction IO process won’t be able to write log files.
Step #12: Start Prediction IO Server
Now we’re ready to go, let’s start our Prediction IO server. Before running this command make sure you exported the pio path described above.
pio-start-all#if you forgot to export the pio path, it won't work and you manually have to point the pio bin path. If everything is Ok to this point, you would see the output something like this.

Note: If you forget to give permission then, there will be issues writing logs and if your JAVA_HOME path is incorrect HBASE wouldn’t start properly and it would give you the error.
Step #13: Verify The Process
Now let’s verify our installation with pio status, if everything is Ok, you will get an output like this:
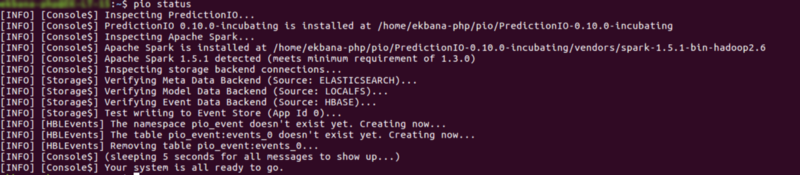
If you encounter error in Hbase or any other backend storage, make sure everything was started properly.
Our Prediction IO Server is ready to implement the template now.
Implementing the Recommendation Engine
A recommendation engine template is a Prediction IO engine template that uses collaborative filtering to make personalized recommendation to the user. It uses can be in E-commerce site, news site, or any application that collects user histories of event to give a personalized experiences to the user.
We’ll implement this template in Prediction IO with few eCommerce user data, just to do an sample experiment with Prediction IO machine learning server.
Now let’s back to our home dir cd ~
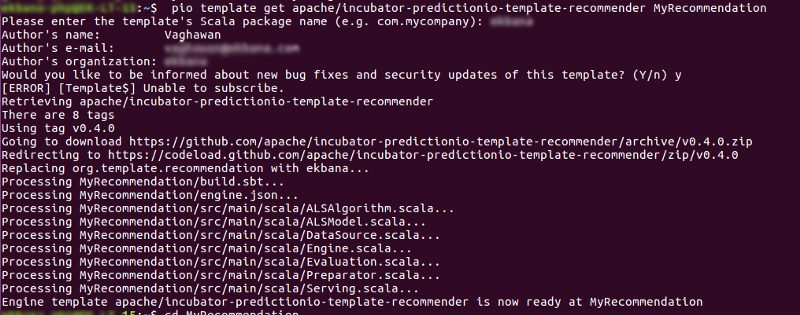
Step #14: Download the Recommendation Template
pio template get apache/incubator-predictionio-template-recommender MyRecommendationIt will ask for company name and author name, input subsequently, now we have a MyRecommendation Template inside our home dir. Just a reminder: you can put the template anywhere you want.
#15. Create Our First Prediction IO App
Now let’s go inside the MyRecommendation dir cd MyRecommendation
After you’re inside the template dir, let’s create our first Prediction IO app called ourrecommendation.
You will get output like this. Please remember that you can give any name to your app, but for this example I’ll be using the app name ourrecommendation.
pio app new ourrecommendationThis command will output something like this:

Let’s verify that our new app is there with this command:
pio app listNow our app should be listed in the list.
Step #16: Import Some Sample Data
Let’s download the sample-data from gist, and put that inside importdata folder inside MyRecommendation folder.
mkdir importdataCopy the sample-data.json file that you just created inside the importdata folder.
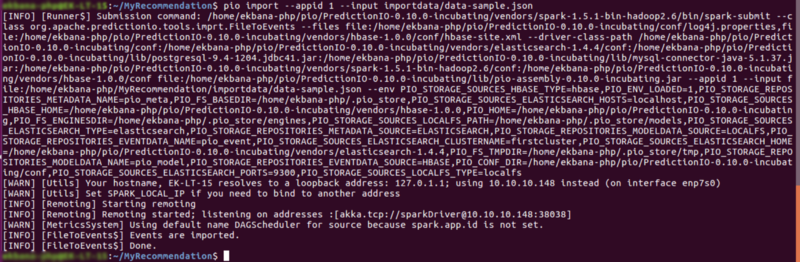
Finally let’s import the data inside our ourrecommendation app. Considering you’re inside the MyRecommendation dir you can do this to batch import the events.
pio import — appid 1 — input importdata/data-sample.json(Note: make sure the appid of ourrecommendation is same as of your appid that you just provided)
Step #17: Build The App
Before building the app, let’s edit engine.json file inside the MyRecommendation directory to replicate our app name inside it. It should look something like this:
Note: Don’t copy this, just change the “appName” in your engine.json.
{ "id": "default", "description": "Default settings", "engineFactory": "orgname.RecommendationEngine", "datasource": { "params" : { "appName": "ourrecommendation" } }, "algorithms": [ { "name": "als", "params": { "rank": 10, "numIterations": 5, "lambda": 0.01, "seed": 3 } } ]}Note: the “engineFactory” will be automatically generated when you pull the template in our step 14, so you don’t have to change that. In my case, it’s my orgname, which I put in the terminal prompt during installation of the template. In you engine.json you just need to modify the appName, please don’t change anything else in there.
In the same dir where our MyRecommendation engine template lies, let’s run this pio command to build our app.
pio build(Note: if you wanna see all the messages during the building process, you can run this pio build — verbose)
It can take sometimes to build our app, since this is the first time. From next time it takes less time. You should get an output like this:

Our engine is now ready to train our data.
Step #18: Train The dataset
pio trainIf you get an error like the one below in the middle of the training, then you may have to change number of iterations inside your engine.json and rebuild the app.

Let’s change the numItirations in engine.json which is by default 20 to 5:
“numIterations”: 5,Now let’s build the app with pio build, again do pio train. The training should be completed successfully. After finishing the training you will get the message like this:

Please note that this training works just for small data, if you however want to try with large data set then we would have to set up an standalone spark worker to accomplish the training. (I will write about this in a future post.)
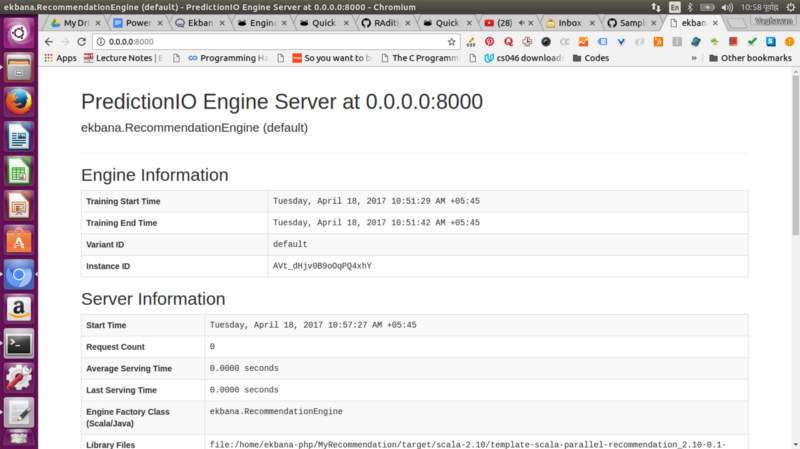
Step #19: Deploy and Serve the prediction
pio deploy#by default it will take 8000 port.We will now have our prediction io server running.
Note: to keep it simple, I’m not discussing about event server in this post, since it may get even longer, thus we’re focusing on simple use case of Prediction IO.
Now let’s get the prediction using curl.
Open up a new terminal and hit:
curl -H “Content-Type: application/json” \-d ‘{ “user”: “user1”, “num”: 4 }’ http://localhost:8000/queries.jsonIn the above query, the user signifies to the user_id in our event data, and the num means, how many recommendation we want to get.
Now you will get the result like this:
{"itemScores":[{"item":"product5","score":3.9993937903501093},{"item":"product101","score":3.9989989282500904},{"item":"product30","score":3.994934059438341},{"item":"product98","score":3.1035806376677866}]}That’s it! Great Job. We’re done. But wait, what’s next?
- Next we will use spark standalone cluster to train large dataset (believe me, its easy, if you wanna do it right now, you could follow the documenation in Prediction IO)
- We will use Universal Recommender from Action ML to build a recommendation engine.
Important Notes:
- The template we used uses ALS algorithm with explicit feedback, however you can easily switch to implicit depending upon your need.
- If you’re curious about Prediction IO and want to learn more you can do that on the Prediction IO official site.
- If your Java version is not suitable for Prediction IO specification, then you are sure to run into problems. So make sure you configure this first.
- Don’t run any of the commands described above with
sudoexcept to give permission. Otherwise you will run into problems. - Make sure your java path is correct, and make sure to export the Prediction IO path. You might want to add the Prediction IO path to your .bashrc or profile as well depending upon your need.
Update 2017/07/14: Using Spark To Train Real Data Sets
We have the spark installed inside our vendors folders, with our current installation, our spark bin in the following dir.
~/pio/PredictionIO-0.10.0-incubating/vendors/spark-1.5.1-bin-hadoop2.6/sbinFrom there we have to setup a spark primary and replica to execute our model training to accomplish it faster. If your training seems to stuck we can use the spark options to accomplish the training tasks.
#Start the Spark primary
~/pio/PredictionIO-0.10.0-incubating/vendors/spark-1.5.1-bin-hadoop2.6/sbin/start-master.shThis will start the spark primary. Now let’s browse the spark primary’s web UI by going into http://localhost:8080/ in the browser.
Now let’s copy the primary-url to start the replica worker. In our case the primary spark URL is something like this:
spark://your-machine:7077 (your machine signifies to your machine name)
~/pio/PredictionIO-0.10.0-incubating/vendors/spark-1.5.1-bin-hadoop2.6/sbin/start-slave.sh spark://your-machine:7077The worker will start. Refresh the web ui you will see the registered worker this time. Now let’s run the training again.
pio train -- --master spark://localhost:7077 --driver-memory 4G --executor-memory 6GGreat!
Special Thanks: Pat Ferrel From Action ML & Marius Rabenarivo