by Pablo Regen
The Game of Life involves a two-dimensional orthogonal grid of square cells, each of which is in one of two possible states, alive or dead. At each step, every cell interacts with its eight adjacent neighbors by following a simple set of rules resulting in births and deaths.
It’s a zero-player game. Its evolution is determined by its initial state, requiring no further input from players. One interacts with the game by creating an initial configuration and observing how it evolves, or, for advanced players, by creating patterns with particular properties.
Rules
- Any live cell with fewer than two live neighbors dies, as if by underpopulation
- Any live cell with two or three live neighbors lives on to the next generation
- Any live cell with more than three live neighbors dies, as if by overpopulation
- Any dead cell with exactly three live neighbors becomes a live cell, as if by reproduction
Although the game can be perfectly coded with vanilla JavaScript, I was happy to go through the challenge with React. So let’s start.
Setting up React
There are several ways to set up React, but if you are new to it I recommend checking out the Create React App docs and github, as well as the detailed React overview by Tania Rascia.
Designing the game
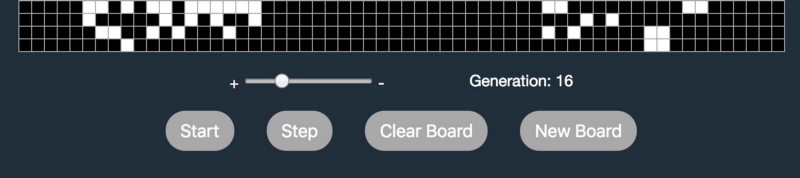
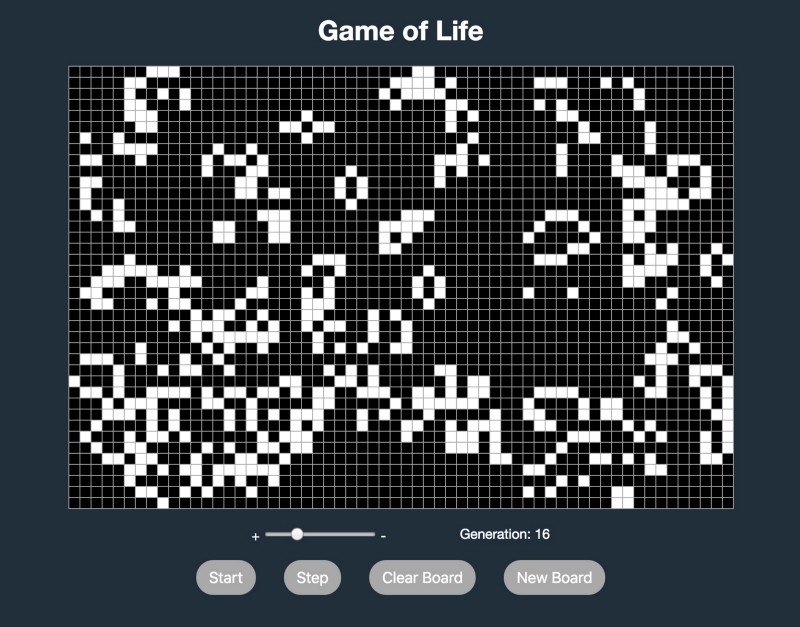
The main image at the top is my implementation of the game. The board grid containing light (alive) and dark (dead) cells displays the game’s evolution. The controllers allow you to start/stop, go one step at a time, set up a new board or clear it to experiment with your own patterns by clicking on the individual cells. The slider controls the speed, and generation informs the number of completed iterations.
In addition to the main component holding the state, I’ll separately create a function to generate all board’s cell status from scratch, a component for the board grid and another one for the slider.
Setting up App.js
First, let’s import React and React.Component from “react”. Then establish how many rows and columns the board grid has. I go with 40 by 60 but feel free to play with different numbers. Then come the separate function and function components (notice the capitalized first letter) described above as well as the class component holding the state and methods, including the render one. Finally let’s export the main component App.
import React, { Component } from 'react';

const totalBoardRows = 40;
const totalBoardColumns = 60;

const newBoardStatus = () => {};
const BoardGrid = () => {};
const Slider = () => {};

class App extends Component {
    state = {};

    // Methods ...

    render() {
        return (

        );
    }
}

export default App;
Generating a new board’s cell status
Since we need to know the status of each cell and its 8 neighbors for each iteration, let’s create a function that returns an array of arrays each containing cells with boolean values. The number of arrays within the main array will match the number of rows, and the number of values within each of these arrays will match the number of columns. So each boolean value will represent the state of each cell, “alive” or “dead”. The function’s parameter defaults to less than 30% chance of being alive, but fell free to experiment with other numbers.
const newBoardStatus = (cellStatus = () => Math.random() < 0.3) => {
    const grid = [];
    for (let r = 0; r < totalBoardRows; r++) {
        grid[r] = [];
        for (let c = 0; c < totalBoardColumns; c++) {
            grid[r][c] = cellStatus();
        }
    }
    return grid;
};

/* Returns an array of arrays, each containing booleans values
(40) [Array(60), Array(60), ... ]
0: (60) [true, false, true, ... ]
1: (60) [false, false, false, ... ]
2: (60) [false, false, true, ...]
...
*/
Generating the board grid
Let’s define a function component that creates the board grid and assigns it to a variable. The function receives the state of the whole board status and a method that allows users to toggle the status of individual cells as props. This method is defined on the main component where all the state of the application is held.
Each cell is represented by a table’s <td> and has a className attribute whose value depends on the boolean value of the corresponding board cell. The player clicking on a cell results in the method passed as props being called with the cell’s row and column location as argument.
Check out Lifting State Up for additional info on passing methods as props, and don’t forget to add the keys.
const BoardGrid = ({ boardStatus, onToggleCellStatus }) => {
    const handleClick = (r,c) => onToggleCellStatus(r,c);

    const tr = [];
    for (let r = 0; r < totalBoardRows; r++) {
        const td = [];
        for (let c = 0; c < totalBoardColumns; c++) {
            td.push(
                <td
                    key={`${r},${c}`}
                    className={boardStatus[r][c] ? 'alive' : 'dead'}
                    onClick={() => handleClick(r,c)}
                />
            );
        }
        tr.push(<tr key={r}>{td}</tr>);
    }
    return <table><tbody>{tr}</tbody></table>;
};
Creating the speed slider
This function component creates a slider to allow players change the speed of iterations. It receives the state of the current speed and a method to handle the speed change as props. You can try different minimum, maximum and step values. A speed change results in the method passed as props being called with the desired speed as argument.
const Slider = ({ speed, onSpeedChange }) => {
    const handleChange = e => onSpeedChange(e.target.value);

    return (
        <input
            type='range'
            min='50'
            max='1000'
            step='50'
            value={speed}
            onChange={handleChange}
        />
    );
};
Main component
Since it contains the state of the application let’s make it a class component. Note that I’m not using Hooks, a new addition in React 16.8 that let you use state and other React features without writing a class. I prefer to use the experimental public class fields syntax, so I don’t bind the methods within the constructor.
Let’s dissect it.
State
I define the state as an object with the properties for the board status, number of generation, game running or stopped and the speed of the iterations. When the game starts, the status of the board’s cells will be the one returned by the call to the function that generates a new board status. Generation starts at 0 and the game will only run after the user decides. The default speed is 500ms.
class App extends Component {
    state = {
        boardStatus: newBoardStatus(),
        generation: 0,
        isGameRunning: false,
        speed: 500
    };

    // Other methods ...

}
Run/Stop button
Function that returns a different button element depending on the state of the game: running or stopped.
class App extends Component {
    state = {...};

    runStopButton = () => {
        return this.state.isGameRunning ?
        <button type='button' onClick={this.handleStop}>Stop</button> :
        <button type='button' onClick={this.handleRun}>Start</button>;
    }

    // Other methods ...
}
Clear and new board
Methods to handle players request to start with a new random board’s cell status or to clear the board completely so they can then experiment by toggling individual cell status. The difference between them is that the one that clears the board sets the state for all cells to false, while the other doesn’t pass any arguments to the newBoardStatus method so the status of each cell becomes by default a random boolean value.
class App extends Component {
    state = {...};
    runStopButton = () => {...}

    handleClearBoard = () => {
        this.setState({
            boardStatus: newBoardStatus(() => false),
            generation: 0
        });
    }

    handleNewBoard = () => {
        this.setState({
            boardStatus: newBoardStatus(),
            generation: 0
        });
    }

    // More methods ...

 }
Toggle cell status

We need a method to handle players’ requests to toggle individual cell status, which is useful to experiment with custom patterns directly on the board. The BoardGrid component calls it every time the player clicks on a cell. It sets the states of the board status by calling a function and passing it the previous state as argument.
The function deep clones the previous board’s status to avoid modifying it by reference when updating an individual cell on the next line. (Using const clonedBoardStatus = […boardStatus] would modify the original status because Spread syntax effectively goes one level deep while copying an array, therefore, it may be unsuitable for copying multidimensional arrays. Note that JSON.parse(JSON.stringify(obj)) doesn’t work if the cloned object uses functions). The function finally returns the updated cloned board status, effectively updating the status of the board.
For deep cloning check out here, here and here.
class App extends Component {
    state = {...};
    runStopButton = () => {...}
    handleClearBoard = () => {...}
    handleNewBoard = () => {...}

    handleToggleCellStatus = (r,c) => {
        const toggleBoardStatus = prevState => {
            const clonedBoardStatus = JSON.parse(JSON.stringify(prevState.boardStatus));
            clonedBoardStatus[r][c] = !clonedBoardStatus[r][c];
            return clonedBoardStatus;
        };

        this.setState(prevState => ({
            boardStatus: toggleBoardStatus(prevState)
        }));
    }

    // Other methods ...

}
Generating the next step
Here is where the next game iteration is generated by setting the state of the board status to the returned value of a function. It also adds one to the generation’s state to inform the player how many iterations have been produced so far.
The function (“nextStep”) defines two variables: the board status and a deep cloned board status. Then a function calculates the amount of neighbors (within the board) with value true for an individual cell, whenever it is called. Due to the rules, there’s no need to count more than four true neighbors per cell. Lastly, and according to the rules, it updates the cloned board’s individual cell status and return the cloned board status, which is used in the setState.
class App extends Component {
    state = {...};
    runStopButton = () => {...}
    handleClearBoard = () => {...}
    handleNewBoard = () => {...}
    handleToggleCellStatus = () => {...}

    handleStep = () => {
        const nextStep = prevState => {
            const boardStatus = prevState.boardStatus;
            const clonedBoardStatus = JSON.parse(JSON.stringify(boardStatus));

            const amountTrueNeighbors = (r,c) => {
                const neighbors = [[-1, -1], [-1, 0], [-1, 1], [0, 1], [1, 1], [1, 0], [1, -1], [0, -1]];
                return neighbors.reduce((trueNeighbors, neighbor) => {
                    const x = r + neighbor[0];
                    const y = c + neighbor[1];
                    const isNeighborOnBoard = (x >= 0 && x < totalBoardRows && y >= 0 && y < totalBoardColumns);
                    /* No need to count more than 4 alive neighbors */
                    if (trueNeighbors < 4 && isNeighborOnBoard && boardStatus[x][y]) {
                        return trueNeighbors + 1;
                    } else {
			return trueNeighbors;
		    }
                }, 0);
            };

            for (let r = 0; r < totalBoardRows; r++) {
                for (let c = 0; c < totalBoardColumns; c++) {
                    const totalTrueNeighbors = amountTrueNeighbors(r,c);

                    if (!boardStatus[r][c]) {
                        if (totalTrueNeighbors === 3) clonedBoardStatus[r][c] = true;
                    } else {
                        if (totalTrueNeighbors < 2 || totalTrueNeighbors > 3) clonedBoardStatus[r][c] = false;
                    }
                }
            }

            return clonedBoardStatus;
        };

        this.setState(prevState => ({
            boardStatus: nextStep(prevState),
            generation: prevState.generation + 1
        }));
    }

    // Other methods ...
}
Handling the speed change and the start/stop action
These 3 methods only set the state value for the speed and isGameRunning properties.
Then, within the componentDidUpdate Lifecycle method, let’s clear and/or set a timer depending on different combinations of values. The timer schedules a call to the handleStep method at the specified speed intervals.
class App extends Component {
    state = {...};
    runStopButton = () => {...}
    handleClearBoard = () => {...}
    handleNewBoard = () => {...}
    handleToggleCellStatus = () => {...}
    handleStep = () => {...}

    handleSpeedChange = newSpeed => {
        this.setState({ speed: newSpeed });
    }

    handleRun = () => {
        this.setState({ isGameRunning: true });
    }

    handleStop = () => {
        this.setState({ isGameRunning: false });
    }

    componentDidUpdate(prevProps, prevState) {
        const { isGameRunning, speed } = this.state;
        const speedChanged = prevState.speed !== speed;
        const gameStarted = !prevState.isGameRunning && isGameRunning;
        const gameStopped = prevState.isGameRunning && !isGameRunning;

        if ((isGameRunning && speedChanged) || gameStopped) {
            clearInterval(this.timerID);
        }

        if ((isGameRunning && speedChanged) || gameStarted) {
            this.timerID = setInterval(() => {
                this.handleStep();
            }, speed);
        }
    }

    // Render method ...
}
The render method
The last method within the App component returns the desired structure and information of the page to be displayed. Since the state belongs to the App component, we pass the state and methods to the components that need them as props.
class App extends Component {
    // All previous methods ...

    render() {
        const { boardStatus, isGameRunning, generation, speed } = this.state;

        return (
            <div>
                <h1>Game of Life</h1>
                <BoardGrid boardStatus={boardStatus} onToggleCellStatus={this.handleToggleCellStatus} />
                <div className='flexRow upperControls'
                    <span>
                        {'+ '}
                        <Slider speed={speed} onSpeedChange={this.handleSpeedChange} />
                        {' -'}
                    </span>
                    {`Generation: ${generation}`}
                </div>
                <div className='flexRow lowerControls'>
                    {this.runStopButton()}
                    <button type='button' disabled={isGameRunning} onClick={this.handleStep}>Step</button>
                    <button type='button' onClick={this.handleClearBoard}>Clear Board</button>
                    <button type='button' onClick={this.handleNewBoard}>New Board</button>
                </div>
            </div>
        );
    }
}
Exporting the default App
Lastly, let’s export the default App (export default App;), which is imported along with the styles from “index.scss” by “index.js”, and then rendered to the DOM.
And that’s it! ?
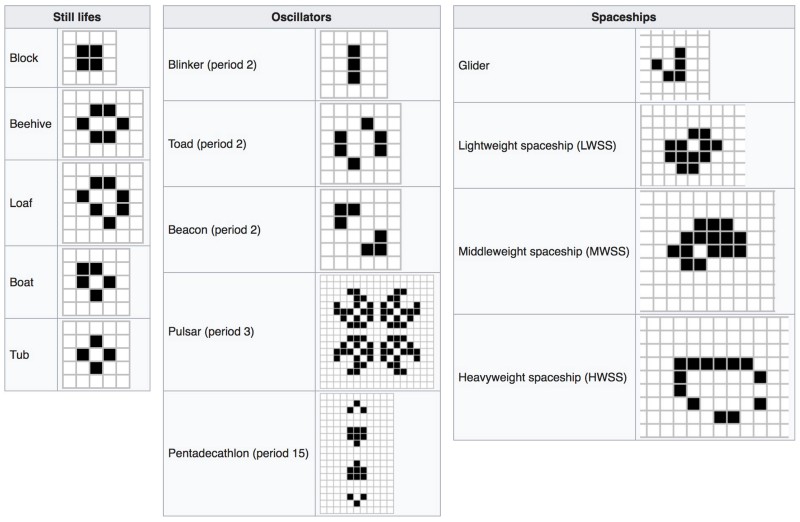
Check out the full code on github and play the game here. Try these patterns below or create your own for fun.
Thanks for reading.