
by Neo Ighodaro
How to create an iOS crypto tracking app with push notifications using Swift and Laravel
Part 2

You will need the following installed on your machine: Xcode, the Laravel CLI, SQLite and Cocoapods. Familiarity with the Xcode IDE will be helpful. You should have completed part one of the series.
In the first part of this article, we started developing our cryptocurrency alert application. We developed the backend of the application that will power the iOS application. As it stands, our backend application can return settings for a device based on its UUID, save the settings for a device based on its UUID and also figure out what devices to send push notifications to when the currencies update.
In this part, we will focus on creating the iOS application using Swift and Xcode.
Prerequisites
To follow along you need the following requirements:
- Completed part one of this article.
- Xcode installed on your machine.
- Knowledge of the Xcode IDE.
- Basic knowledge using the Laravel framework.
- Basic knowledge of the Swift programming language.
- Laravel CLI installed on your machine.
- SQLite installed on your machine. Installation guide.
- Cocoapods installed on your machine.
- Pusher Beams and Channels application.
What we will be building
We already started out by building the backend of the application using Laravel. So next, we will build the iOS application using Swift. If you want to test the push notifications then you will need to run the application on a live device.
How the client application will work
For the client app, the iOS application, we will create a simple list that will display the available currencies and the current prices to the dollar. Whenever the price of the cryptocurrency changes, we will trigger an event using Pusher Channels so the prices are updated.
From the application, you will be able to set a minimum and maximum price change when you want to be alerted. For instance, you can configure the application to send a push notification to the application when the price of one Etherium (ETH) goes below $500. You can also configure the application to receive a notification when the price of Bitcoin goes above $5000.
How the application will look
When we are done with the application, here’s how the application will look:

Let’s get started.
Setting up your client application
Launch Xcode and click Create a new Xcode project. Select Single View App and click Next. Enter your Product Name, we will call our project cryptoalat, and select Swift from the Language options. You can also change any other detail you wish to on the screen then click Next.
Installing dependencies
Now you have your Xcode project. Close Xcode and open a terminal window. cd to the iOS project directory in terminal and run the command below to create a Podfile:
$ pod initThe Podfile is a specification that describes the dependencies of the targets of one or more Xcode projects. The file should simply be named Podfile. All the examples in the guides are based on CocoaPods version 1.0 and onwards. — Cocoapods Guides
This will generate a new file called Podfile in the root of your project. Open this file in any editor and update the file as seen below:
// File: Podfile platform :ios, '11.0' target 'cryptoalat' do use_frameworks! pod 'Alamofire', '~> 4.7.2' pod 'PushNotifications', '~> 0.10.8' pod 'PusherSwift', '~> 6.1.0' pod 'NotificationBannerSwift', '~> 1.6.3' endIf you used a project name other than cryptoalat, then change it in the Podfile to match your project’s target name.
Go to terminal and run the command below to install your dependencies:
$ pod installWhen the installation is complete, you will have a *.xcworkspace file in the root of your project. Open this file in Xcode and let’s start developing our cryptocurrency alert application.
Building the iOS application
Creating our storyboard
The first thing we need to do is design our storyboard for the application. This is what we want the storyboard to look like when we are done.
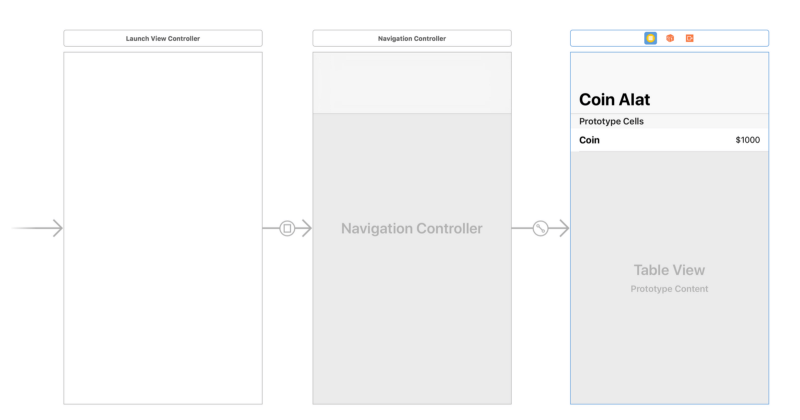
Open the Main.storyboard file and design as seen above.
Above we have three scenes. The first scene, which is the entry point, is the launch scene. We then draw a manual segue with an identifier called Main. Then we set the segue Kind to Present Modally. This will present the next scene which is a navigation view controller. Navigation controllers already have an attached root view controller by default.
We will use this attached view controller, which is a TableViewController, as the main view for our application. It’ll list the available currencies and show us a text field that allows us to change the setting for that currency when it is tapped.
On the third scene, we set the reuse identifier of the cells to coin and we drag two labels to the prototype cell. The first label will be for the coin name and the second label will be for the price.
Now that we have the scenes, let’s create some controllers and view classes and connect them to our storyboard scenes.
Creating your controllers
In Xcode, create a new class LaunchViewController and paste the contents of the file below into it:
import UIKit class LaunchViewController: UIViewController { override func viewDidAppear(_ animated: Bool) { super.viewDidAppear(animated) SettingsService.shared.loadSettings { self.routeToMainController() } } fileprivate func routeToMainController() { performSegue(withIdentifier: "Main", sender: self) } }Set the controller as the custom class for the first scene in the Main.storyboard file.In the code, we load the settings using a SettingsService class we will create later. When the settings are loaded for the device, we then call the routeToMainController method, which routes the application to the main controller using the Main segue we created earlier.
The next controller we will be creating will be the CoinsTableViewController. This will be the controller that will be tied to the third scene which is the main scene.
Create the CoinsTableViewController and replace the contents with the following code:
import UIKit import PusherSwift import NotificationBannerSwift struct Coin { let name: String let rate: Float } class CoinsTableViewController: UITableViewController { var coins: [Coin] = [] override func viewDidLoad() { super.viewDidLoad() } override func numberOfSections(in tableView: UITableView) -> Int { return 1 } override func tableView(_ tableView: UITableView, numberOfRowsInSection section: Int) -> Int { return coins.count } override func tableView(_ tableView: UITableView, cellForRowAt indexPath: IndexPath) -> UITableViewCell { let coin = coins[indexPath.row] let cell = tableView.dequeueReusableCell(withIdentifier: "coin", for: indexPath) as! CoinTableViewCell cell.name.text = "1 \(coin.name) =" cell.amount.text = "$\(String(coin.rate))" return cell } }Set the controller as the custom class for the first scene in the Main.storyboard file.Above we have defined the Coin struct and it has a name and rate property. We have the controller which we define the coins property as an array of Coins. We then have some boilerplate code that comes with creating a table view controller.
The numberOfSections method specifies how many sections the table will have. In the first tableView method, we return the number of coins available and in the second tableView method, we define how we want each row to be handled.
Creating other supporting classes
If you noticed in the code above, we referenced a CoinTableViewCell as the class for each row in the last tableView method. Let’s create that.
Create a CoinTableViewCell class and paste the following code into it:
class CoinTableViewCell: UITableViewCell { @IBOutlet weak var name: UILabel! @IBOutlet weak var amount: UILabel! }Open the Main.storyboard file and set the class as the custom class for the prototype cell in the third scene of the Main.storyboard file. When you have set the class, connect the @IBOutlets as specified in the cell class above.
The next class we need to create is the SettingsService. This class will be responsible for updating and fetching the settings for the device.
Create a new SettingsService class and replace the contents with the following code:
import Foundation import Alamofire import NotificationBannerSwift class SettingsService { static let key = "CryptoAlat" static let shared = SettingsService() var settings: Settings? { get { return self.getCachedSettings() } set(settings) { if let settings = settings { self.updateCachedSettings(settings) } } } private init() {} func loadSettings(completion: @escaping() -> Void) { fetchRemoteSettings { settings in guard let settings = settings else { return self.saveSettings(self.defaultSettings()) { _ in completion() } } self.updateCachedSettings(settings) completion() } } fileprivate func defaultSettings() -> Settings { return Settings( btc_min_notify: 0, btc_max_notify: 0, eth_min_notify: 0, eth_max_notify: 0 ) } func saveSettings(_ settings: Settings, completion: @escaping(Bool) -> Void) { updateRemoteSettings(settings, completion: { saved in if saved { self.updateCachedSettings(settings) } completion(saved) }) } fileprivate func fetchRemoteSettings(completion: @escaping (Settings?) -> Void) { guard let deviceID = AppConstants.deviceIDFormatted else { return completion(nil) } let url = "\(AppConstants.API_URL)?u=\(deviceID)" Alamofire.request(url).validate().responseJSON { resp in if let data = resp.data, resp.result.isSuccess { let decoder = JSONDecoder() if let settings = try? decoder.decode(Settings.self, from: data) { return completion(settings) } } completion(nil) } } fileprivate func updateRemoteSettings(_ settings: Settings, completion: @escaping(Bool) -> Void) { guard let deviceID = AppConstants.deviceIDFormatted else { return completion(false) } let params = settings.toParams() let url = "\(AppConstants.API_URL)?u=\(deviceID)" Alamofire.request(url, method: .post, parameters: params).validate().responseJSON { resp in guard resp.result.isSuccess, let res = resp.result.value as? [String: String] else { return StatusBarNotificationBanner(title: "Failed to update settings.", style: .danger).show() } completion((res["status"] == "success")) } } fileprivate func updateCachedSettings(_ settings: Settings) { if let encodedSettings = try? JSONEncoder().encode(settings) { UserDefaults.standard.set(encodedSettings, forKey: SettingsService.key) } } fileprivate func getCachedSettings() -> Settings? { let defaults = UserDefaults.standard if let data = defaults.object(forKey: SettingsService.key) as? Data { let decoder = JSONDecoder() if let decodedSettings = try? decoder.decode(Settings.self, from: data) { return decodedSettings } } return nil } }Above we have the SettingsService. The first method loadSettings loads the settings from the API and then saves it locally. If there is no setting remotely, it calls the defaultSettings method and saves the response to the API.
The saveSettings method saves the Settings remotely using updateRemoteSettings and then locally using updateCachedSettings. The fetchRemoteSettings gets the settings from the API and decodes the response using the Swift decodable API.
Next, let’s define the Settings struct and have it extend Codable. In the same file for the SettingsService, add this above the SettingsService class definition:
struct Settings: Codable { var btc_min_notify: Int? var btc_max_notify: Int? var eth_min_notify: Int? var eth_max_notify: Int? func toParams() -> Parameters { var params: Parameters = [:] if let btcMin = btc_min_notify { params["btc_min_notify"] = btcMin } if let btcMax = btc_max_notify { params["btc_max_notify"] = btcMax } if let ethMin = eth_min_notify { params["eth_min_notify"] = ethMin } if let ethMax = eth_max_notify { params["eth_max_notify"] = ethMax } return params } }Above we have a simple Settings struct that conforms to Codable. We also have a toParams method that converts the properties to a Parameters type so we can use it with Alamofire when making requests.
One last class we need to create is AppConstants. We will use this class to keep all the data that we expect to remain constant and unchanged throughout the lifetime of the application.
Create a AppConstants file and paste the following code:
import UIKit struct AppConstants { static let API_URL = "http://127.0.0.1:8000/api/settings" static let deviceID = UIDevice.current.identifierForVendor?.uuidString static let deviceIDFormatted = AppConstants.deviceID?.replacingOccurrences(of: "-", with: "_").lowercased() static let PUSHER_INSTANCE_ID = "PUSHER_BEAMS_INSTANCE_ID" static let PUSHER_APP_KEY = "PUSHER_APP_KEY" static let PUSHER_APP_CLUSTER = "PUSHER_APP_CLUSTER" }Replace the PUSHER_* keys with the values gotten from the Pusher Channels and Beams dashboard.Updating the settings for the device
Now that we have defined the settings service, let’s update our controller so the user can set the minimum and maximum prices for each currency.
Open the CoinsTableViewController class and add the following method:
override func tableView(_ tableView: UITableView, didSelectRowAt indexPath: IndexPath) { let coin = coins[indexPath.row] var minTextField: UITextField? var maxTextField: UITextField? let title = "Manage \(coin.name) alerts" let message = "Notification will be sent to you when price exceeds or goes below minimum and maximum price. Set to zero to turn off notification." let alert = UIAlertController(title: title, message: message, preferredStyle: .alert) alert.addTextField { textfield in minTextField = textfield textfield.placeholder = "Alert when price is below" } alert.addTextField { textfield in maxTextField = textfield textfield.placeholder = "Alert when price is above" } alert.addAction(UIAlertAction(title: "Cancel", style: .cancel, handler: nil)) alert.addAction(UIAlertAction(title: "Save", style: .default, handler: { action in guard let minPrice = minTextField?.text, let maxPrice = maxTextField?.text else { return StatusBarNotificationBanner(title: "Invalid min or max price", style: .danger).show() } var btcMin: Int?, btcMax: Int?, ethMin: Int?, ethMax: Int? switch coin.name { case "BTC": btcMin = Int(minPrice) btcMax = Int(maxPrice) case "ETH": ethMin = Int(minPrice) ethMax = Int(maxPrice) default: return } let settings = Settings( btc_min_notify: btcMin, btc_max_notify: btcMax, eth_min_notify: ethMin, eth_max_notify: ethMax ) SettingsService.shared.saveSettings(settings, completion: { saved in if saved { StatusBarNotificationBanner(title: "Saved successfully").show() } }) })) present(alert, animated: true, completion: nil) }The method above is automatically called when a row is selected. In this method, we display a UIAlertController with two text fields for the minimum price and the maximum price. When the prices are submitted, the SettingsService we created earlier takes care of updating the values both locally and remotely.
Adding realtime cryptocurrency update support
Open the CoinsTableViewController and add the pusher property to the class as seen below:
var pusher: Pusher!Then replace the viewDidLoad method with the following code:
override func viewDidLoad() { super.viewDidLoad() pusher = Pusher( key: AppConstants.PUSHER_APP_KEY, options: PusherClientOptions(host: .cluster(AppConstants.PUSHER_APP_CLUSTER)) ) let channel = pusher.subscribe("currency-update") let _ = channel.bind(eventName: "currency.updated") { data in if let data = data as? [String: [String: [String: Float]]] { guard let payload = data["payload"] else { return } self.coins = [] for (coin, deets) in payload { guard let currentPrice = deets["current"] else { return } self.coins.append(Coin(name: coin, rate: currentPrice)) } Dispatch.main.async { self.tableView.reloadData() } } } pusher.connect() }In the code above, we are using the Pusher Swift SDK to subscribe to our currency-update Pusher Channel. We then subscribe to the currency.updated event on that channel. Whenever that event is triggered, we refresh the price of the cryptocurrency in realtime.
Adding push notifications to our iOS new application
To add push notification support, open the AppDelegate class and replace the contents with the following:
import UIKit import PushNotifications @UIApplicationMain class AppDelegate: UIResponder, UIApplicationDelegate { var window: UIWindow? func application(_ application: UIApplication, didFinishLaunchingWithOptions launchOptions: [UIApplicationLaunchOptionsKey: Any]?) -> Bool { PushNotifications.shared.start(instanceId: AppConstants.PUSHER_INSTANCE_ID) PushNotifications.shared.registerForRemoteNotifications() return true } func application(_ application: UIApplication, didRegisterForRemoteNotificationsWithDeviceToken deviceToken: Data) { PushNotifications.shared.registerDeviceToken(deviceToken) { if let deviceID = AppConstants.deviceIDFormatted { try? PushNotifications.shared.subscribe(interest: "\(deviceID)_eth_changed") try? PushNotifications.shared.subscribe(interest: "\(deviceID)_btc_changed") } } } }In the class above, we use the Pusher Beams Swift SDK to register the device for push notifications. We then subscribe to the *_eth_changed and *_btc_changed interests, where * is the device’s unique UUID.
Now that we have completed the logic for the application, let’s enable push notifications on the application in Xcode.
In the project navigator, select your project, and click on the Capabilities tab. Enable Push Notifications by turning the switch ON.
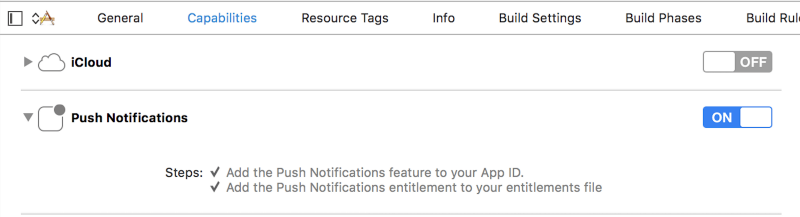
This will create an entitlements file in the root of your project. With that, you have provisioned your application to fully receive push notifications.
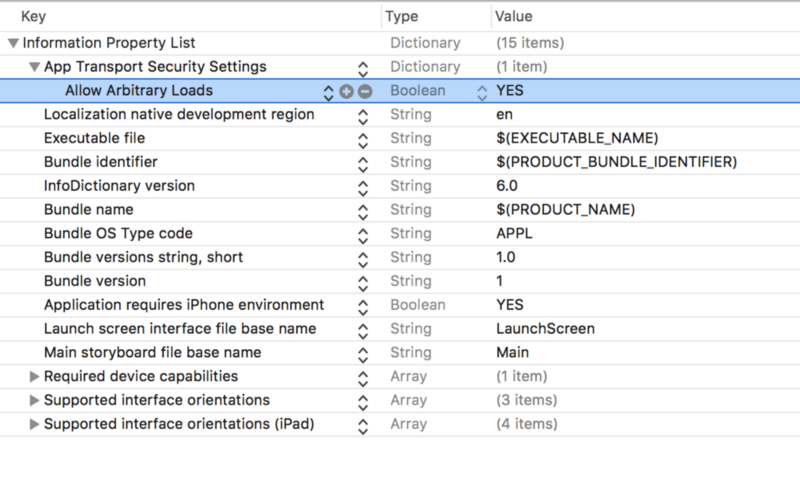
Allowing our application to connect locally
If you are going to be testing the app’s backend using a local server, then there is one last thing we need to do. Open the info.plist file and add an entry to the plist file to allow connection to our local server:
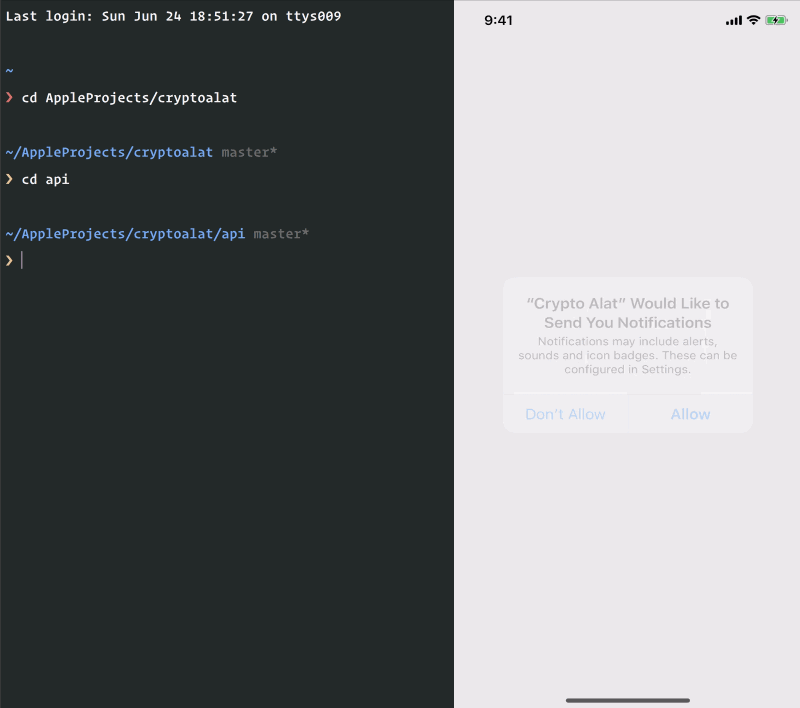
That’s all. We can run our application. However, remember that to demo the push notifications, you will need an actual iOS device as simulators cannot receive push notifications. If you are using a physical device, you’ll need to expose your local API using Ngrok and then change the API_URL in AppConstants.
Anytime you want to update the currency prices, run the command below manually in your Laravel application:
$ php artisan schedule:runHere is a screen recording of the application in action:
Conclusion
In this article, we have been able to see how easy it is to create a cryptocurrency alert website using Laravel, Swift, Pusher Channels and Pusher Beams. The source code to the application built in this article is available on GitHub.
This article was first published on Pusher.