
by João Henrique
How to create a full stack React/Express/MongoDB app using Docker

In this tutorial, I will guide you through the process of containerizing a React FrontEnd, a Node/Express API, and a MongoDB database using Docker containers in a very simple way.
I won’t go into much detail about how to work with any of the technologies. Instead, I will leave links, in case you want to learn more about any of them.
The objective is to give you a practical guide of how to containerize this simple Full-Stack App, to be used as a starting point, for you to build your own apps.
Why should you care about Docker?
Docker is simply one of the most important technologies at the moment. It lets you run apps inside containers that are mostly isolated from “everything”.
Each container is like an individual virtual machine stripped out of everything that is not needed to run your app. This makes containers very light, fast and secure.
Containers are also meant to be disposable. If one goes rogue, you can kill it and make another just like it with no effort thanks to the container images system.
Another thing that makes Docker great is that the app inside containers will run the same in every system (Windows, Mac, or Linux). This is awesome if you are developing in your machine and then you want to deploy it to some cloud provider like GCP or AWS.
Getting ready!
- Make sure you have Node and Docker running on your machine.
- I will use the React/Express app we have built in the previous tutorial called Create a React FrontEnd, a Node/Express BackEnd and connect them together. You can follow that tutorial first or you can clone this GitHub repository with the boilerplate if you’re not interested in the process of creating React and Express apps.
- If you opt for using the repo, don't forget to npm install inside the Client and API folders to install all needed dependencies.
- And… that’s about it. You’re all set to start containerizing stuff :)
Dockerfile
According to documentation:
a Dockerfile is a text document that contains all the commands a user could call on the command line to assemble an image. Docker can build images automatically by reading the instructions from a Dockerfile.
Docker containers everywhere!
Containerizing your app with Docker is as simple as creating a Dockerfile for each of your apps to first build an image, and then running each image to get your containers live.
Containerize your Client
To build our Client image you will be needing a Dockerfile. Let’s create one:
- Open the React/Express App in your favorite code editor (I’m using VS Code).
- Navigate to the Client folder.
- Create a new file named Dockerfile.
- Place this code inside it:
# Use a lighter version of Node as a parent imageFROM mhart/alpine-node:8.11.4# Set the working directory to /clientWORKDIR /client# copy package.json into the container at /clientCOPY package*.json /client/# install dependenciesRUN npm install# Copy the current directory contents into the container at /clientCOPY . /client/# Make port 3000 available to the world outside this containerEXPOSE 3000# Run the app when the container launchesCMD ["npm", "start"]This will instruct docker to build an image (using these configurations) for our Client. You can read all about Dokerfile here.
Containerize your API
To build our API image you will be needing another Dockerfile. Let’s create it:
- Navigate to the API folder.
- Create a new file named Dockerfile.
- Place this code inside it:
# Use a lighter version of Node as a parent imageFROM mhart/alpine-node:8.11.4# Set the working directory to /apiWORKDIR /api# copy package.json into the container at /apiCOPY package*.json /api/# install dependenciesRUN npm install# Copy the current directory contents into the container at /apiCOPY . /api/# Make port 80 available to the world outside this containerEXPOSE 80# Run the app when the container launchesCMD ["npm", "start"]This will instruct docker to build an image (using these configurations) for our API. You can read all about Dokerfile here.
Docker-Compose
You could run each individual container using the Dokerfiles. In our case we have 3 containers to manage, so we will use docker-compose instead. Compose is a tool for defining and running multi-container Docker applications.
Let me show you how simple it is to use it:
- Open the React/Express App in your code editor.
- On your App main folder, create a new file and name it docker-compose.yml.
- Write this code in the docker-compose.yml file:
version: "2"services: client: image: webapp-client restart: always ports: - "3000:3000" volumes: - ./client:/client - /client/node_modules links: - api networks: webappnetwork api: image: webapp-api restart: always ports: - "9000:9000" volumes: - ./api:/api - /api/node_modules depends_on: - mongodb networks: webappnetworkWhat sorcery is that?
You should read all about docker-compose here.
Basically, I’m telling Docker that I want to build a container called client, using the image webapp-client (which is the image we defined on our Client Dockerfile) that will be listening on port 3000. Then, I’m telling it that I want to build a container called api using the image webapp-api (which is the image we defined on our API Dockerfile) that will be listening on port 9000.
Keep in mind that there are many ways of writing a docker-compose.yml file. You should explore the documentation and use what better suits your needs.
Add a MongoDB database
To add a MongoDB database is as simple as adding these lines of code to your docker-compose.yml file:
mongodb: image: mongo restart: always container_name: mongodb volumes: - ./data-node:/data/db ports: - 27017:27017 command: mongod --noauth --smallfiles networks: - webappnetworkThis will create a container using the official MongoDB image.
Create a shared network for your containers
To create a shared network for your container just add the following code to your docker-compose.yml file:
networks: webappnetwork: driver: bridgeNotice that you already defined each container of your app to use this network.
In the end, your docker-compose.yml file should be something like this:
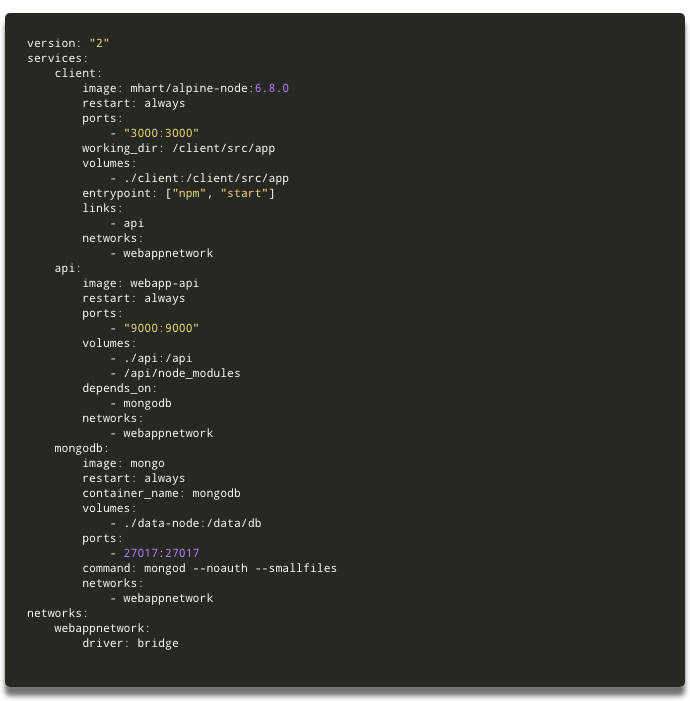
In the docker-compose.yml file, the indentation matters. Be aware of that.
Get your containers running
- Now that you have a docker-compose.yml file, let’s build your images. Go to the terminal and on your App’s main directory run:
docker-compose build2. Now, to make Docker spin up the containers, just run:
docker-compose upAnd… just like magic, you now have your Client, your API, and your Database, all running in separated containers with only one command. How cool is that?
Connect your API to MongoDB
npm install mongoose- Now create a file called testDB.js on your API routes folder and insert this code:
const express = require("express");const router = express.Router();const mongoose = require("mongoose");// Variable to be sent to Frontend with Database statuslet databaseConnection = "Waiting for Database response...";router.get("/", function(req, res, next) { res.send(databaseConnection);});// Connecting to MongoDBmongoose.connect("mongodb://mongodb:27017/test");// If there is a connection error send an error messagemongoose.connection.on("error", error => { console.log("Database connection error:", error); databaseConnection = "Error connecting to Database";});// If connected to MongoDB send a success messagemongoose.connection.once("open", () => { console.log("Connected to Database!"); databaseConnection = "Connected to Database";});module.exports = router;Ok, let’s see what this code is doing. First, I import Express, ExpressRouter, and Mongoose to be used on our /testDB route. Then I create a variable that will be sent as a response telling what happened with the request. Then I connect to the database using Mongoose.connect(). Then I check if the connection is working or not, and change the variable (I’ve created earlier) accordingly. Finally, I use module.exports to export this route so that I’m able to use it on app.js file.
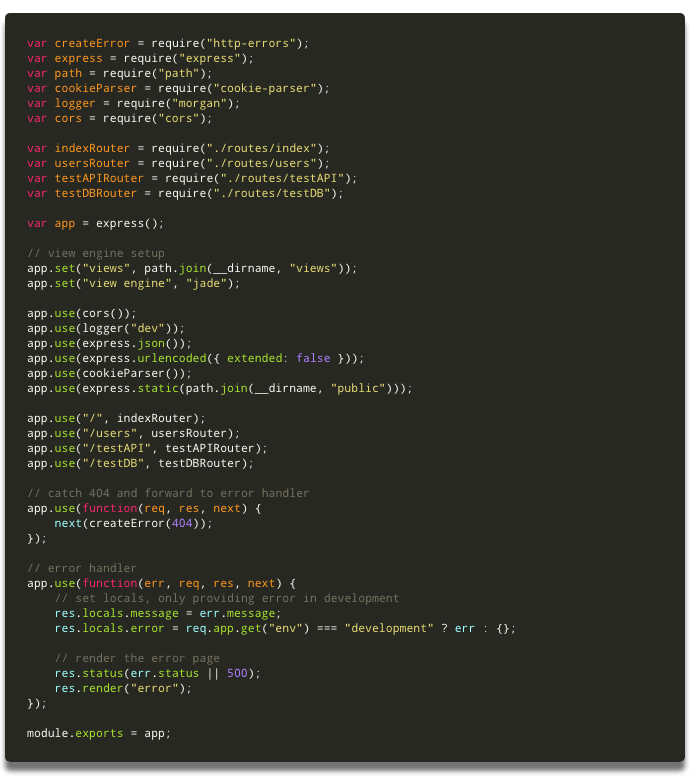
2. Now you have to “tell” Express to use that route you’ve just created. On your API folder, open the app.js file and insert this two lines of code:
var testDBRouter = require("./routes/testDB");app.use("/testDB", testDBRouter);This will “tell” Express that every time there is a request to the endpoint /testDB, it should use the instructions on the file testDB.js.
3. Now let’s test if everything is working properly. Go to your terminal and press control + C to bring your containers down. Then run docker-compose up to bring them back up again. After everything is up and running, if you navigate to http://localhost:9000/testDB you should see the message Connected to Database.
In the end, your app.js file should look like this:
Yep… it means the API is now connected to the database. But your FrontEnd doesn’t know yet. Let’s work on that now.
Make a request from React to the Database
To check if the React app can reach the Database let’s make a simple request to the endpoint you defined on the previous step.
- Go to your Client folder and open the App.js file.
- Now insert this code below the callAPI() method:
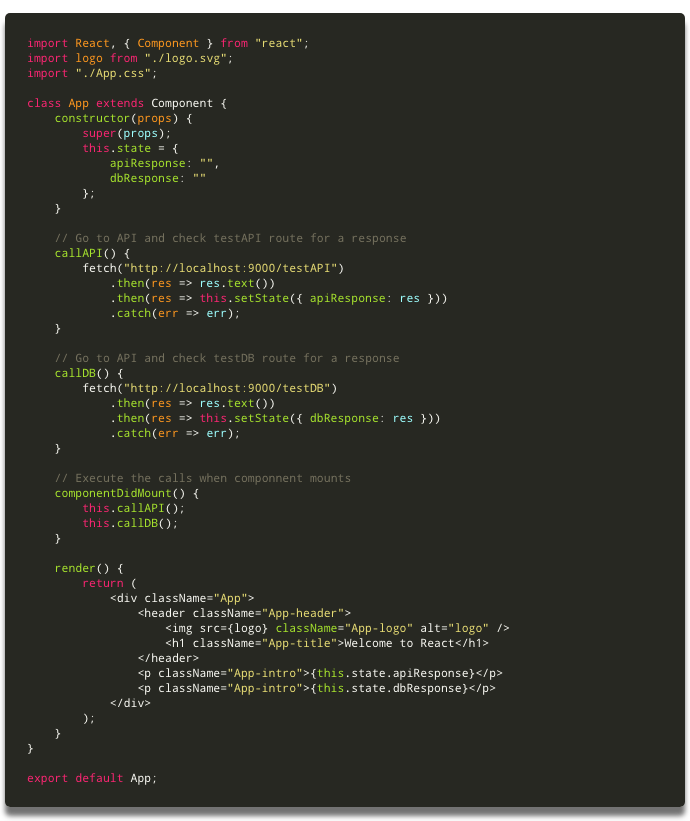
callDB() { fetch("http://localhost:9000/testDB") .then(res => res.text()) .then(res =>; this.setState({ dbResponse: res })) .catch(err => err);}This method will fetch the endpoint you defined earlier on the API and retrieve the response. Then it will store the response in the state of the component.
4. Add a variable to the state of the component to store the response:
dbResponse: ""3. Inside the lifecycle method componentDidMount(), insert this code to execute the method you’ve just created when the component mounts:
this.callDB();4. Finally, add another <;p> tag after the one you already have to display the response from the Database:
<p className="App-intro">;{this.state.dbResponse}</p>In the end, your App.js file should end up like this:
Finally, let’s see if everything is working
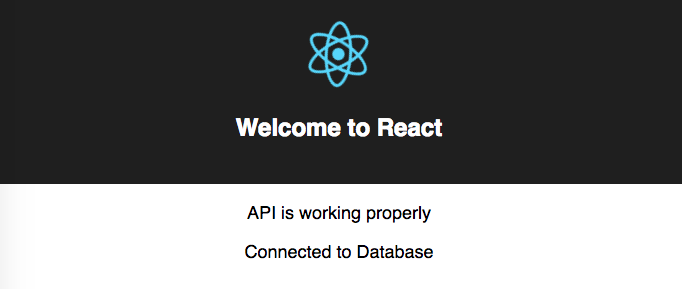
On your browser, go to http://localhost:3000/ and if everything is working properly, you should see these three messages :
- Welcome to React
- API is working properly
- Connected to Database
Something like this:
Congratulations!!!
You now have a full stack app with a React FrontEnd, a Node/Express API and a MongoDB database. All running inside individual Docker containers that are orchestrated with a simple docker-compose file.
This app can be used as a boilerplate to build your more robust app.
You can find all the code I wrote in the project repository.
Be Strong and Code On!!!
…and don’t forget to be awesome today ;)