by Kofo Okesola
How to create a Twitter bot from scratch with Golang

So a little background: I recently picked up Golang and decided to create a Twitter bot as a side project. Then came the problem. There is little to no documentation on using the Twitter API with Golang ?(particularly the oauth1 and CRC encryption parts of it). So after some days of trial and error and finally completing it, I want to share the process. Hopefully, this helps someone out there.
What are we going to build?
We will build a Twitter bot that will be served from our local machine. It will respond to any tweet that is tagged in with a “hello world”.
Here’s a brief explanation as to what this go program will do. It will:
- Listen and respond to webhook CRC validation.
- Register a webhook URL that points to it.
- Listen for tweets and respond with “hello world”.
What do you need?
- Some basic knowledge of Golang
- An approved Twitter developer account. How to apply.
- You should have an account activity API dev environment set up — call it
devfor this project - A Twitter app with generated consumer keys and access tokens (Read and write access)
- Golang installed on your development machine.
- Some determination.
Ready? Let’s Go
First things first. Create your project folder in your $GOPATH/src/ . We’ll be calling this project and our folder hellobot . In it create the intro file /hellobot.go
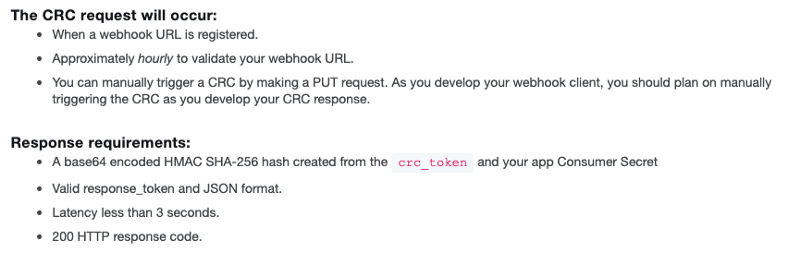
The first thing we need to do is to create an endpoint for our app to listen to CRC checks and respond. Twitter sums up the requirements for the check pretty well.
Setting up a server
The first thing we do is load the .env file. For that we are using the godotenv plugin. The .env file is usually in this format:
CONSUMER_KEY=CONSUMER_SECRET=ACCESS_TOKEN_KEY=ACCESS_TOKEN_SECRET=WEBHOOK_ENV=devAPP_URL=Note: We will be using basic go get to install all our dependencies considering the tiny size of our projectThen we set up our server using mux as our handler, and listen to the base route and webhook/twitter . If you install this using go install and run hellobot, when you run it and navigate to your localhost:9090 you should see the message

CRC validation
Now for the CRC, update your CrcCheck() function with the following code:
Here what we do in the function is:
- Set the header to ‘application/json’
- Get the crc_token URL parameter
- Encrypt it using Hmac sha256 and encode it
- Print it to the response writer
Make sure to replace the CONSUMER_SECRET with the actual consumer secret key for your app. Now if you navigate to localhost:9090/webhook/twitter?crc_token=test you should get a response similar to this:

Now that we have a working CRC route, time to register our webhook. Now a couple of things to note here. Twitter will not accept localhost based URLs nor will it accept a URL with a port number or a non-https URL as a webhook. A way around that during development is to use a service like ngrok. Simply install it and start up a dev server pointing to your 9090 port:
ngrok http 9090 You should see a response similar to this:
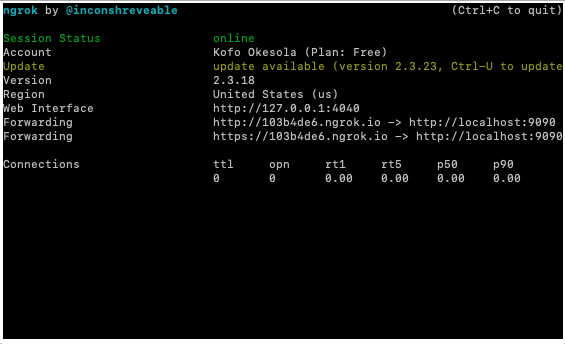
Now if you go to the <id>.ngrok.io URL you should see the same response as the localhost:9090. Don’t forget to add the URL to your .env file APP_ENV
Registering the webhook
For this tutorial we are going to check for the presence of a register flag in the arguments list. You can add this to your code:
Here our bot is checking for the presence of -register in the argument list. Then it runs registerWebhook() as a goroutine. We are defining the registerWebhook() function in a client.go file which we will use for all Twitter requests. Now, for the function’s body:
So, a break down of the new code. The first thing is to create a CreateClient() function. This function returns a pointer to an OAuth http.Client that we can then use to make all Twitter requests on behalf of our bot’s account. Remember to run go get in the project folder so it can fetch the neat go library we use for all OAuth requests. In the registerWebhook function, we:
- Fetch a client
- Pass our webhook’s URL as a parameter using
url.Values - Make a post response to the register webhook endpoint then unmarshall (decode) and read the response
Next, we need our code to subscribe our webhook to events.
Note: You can use the account-activity-dashboard app created by Twitter for managing webhooks during development
Update your client.go file as shown below:
The code above is very straightforward. Cand heck after registering, subscribe to events and check for a status code of 204 . Now if you run go install on your code and run the code as hellobot -register you should get the following response:
Starting ServerRegistering webhook...Webhook id of <hook_id> has been registeredSubscribing webapp...Subscribed successfullyListening for events
Now we need our webhook to actually to listen for events once the URL is called. Update your files as shown below:
What we are doing in the hellobot.dev is listening for post requests to our routes and passing them to the appropriate function. While in the client.go we are adding the appropriate structs we would use to parse the JSON payload to our bot.
Now update your code so it sends the tweet on the tag.
The updates we added to our source files are simply to respond to webhook events. Check if it was a tweet_create_event and send a response as a reply using the SendTweet() method in our client.go file.
Note: Any tweet being sent as a reply needs to include the handle of the user it is replying to as the initial content of the reply
Now if you run this with the appropriate credentials your bot should respond to tags and reply with “Hello World”.
Conclusion
Now that’s done, and since this is an extremely basic version of a bot, you can try adding a few things:
- Checking and ignoring retweet events
- Adding a name to the response
- Responding to the tweet in the case of an error anywhere on the app.
The code for this walkthrough is on Github here. Feel free to fork and play around with it
Cheers!