
by Zafar Saleem
How to perform CRUD operations using React

In my previous articles, we have already written the same Todo application using Vanilla JavaScript and Angular. Now it’s time to take this same example a little further and use an even more popular framework: React. This example assumes that you’ve already installed node and create-react-app on your system.
First of all, let's create a new React app with this command.
create-react-app todoGive it a few seconds and then you should have a todo folder in your file system. CD into that folder.
First thing that is created is a new file called Todo.js inside the src/ folder. Here is the code in that file:
import React, { Component } from 'react';class Todo extends Component { render() { return(<h1>This message is from Todo component</h1>) } }export default Todo;First, we are importing React and Component from the React core.
Then we are creating a Todo component which extends from Component.
The todo component has a render method which renders JSX with an h1 element and the text “This message is from Todo component”.
Finally, we are exporting this component to use it in the rest of our project.
Now open src/App.js file. We need to import our newly created Todo component after the import of the App.css file.
Once there, now use this component inside the render method of the App component.
import React, { Component } from 'react';import logo from './logo.svg';import './App.css';// import Todo component hereimport Todo from './Todo';class App extends Component {constructor(props) { super(props);this.state = { show: false }; }render() { // use Todo component inside render method. return ( <div className="App"> <Todo /> </div> ); }}export default App;Now that we have the basic Todo Component file and have imported it in the App component and used it, it’s time to add some mockData. This time we are going to use React states to work with our data. This makes things easier in order to perform CRUD operations and update the view accordingly. Add this code to the Todo component:
class Todo extends Component { state = { edit: false, id: null, mockData: [{ id: '1', title: 'Buy Milk', done: false, date: new Date() }, { id: '2', title: 'Meeting with Ali', done: false, date: new Date() }, { id: '3', title: 'Tea break', done: false, date: new Date() }, { id: '4', title: 'Go for a run.', done: false, date: new Date() }] }}State is like a data store to the ReactJS component. It is mostly used to update the component when a user performs some action likeclicking button,typing some text,pressing some key, etc.
The above state can also be placed inside the constructor. Choose whichever method you like.
As you can see, state in React is simply a javascript object with properties such as edit, id, and mockData. The edit property is a boolean. It will be used to show and hide the edit form to edit a particular item in mockData. The id property is used to set the id of the current item inside mockData to perform the update operation.
Now that we have the mockData added to the state which is also called initial state, it’s time to add JSX. If you would like to know more about JSX, then head over here for more details. It is a syntax extension to JavaScript which produces React elements to render data on pages.
JSX lists all the items in mockData, that is it performs the “R” operation of CRUD. To do that, render this code to the class.
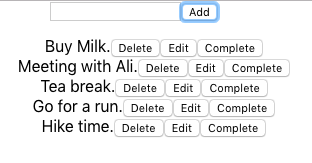
render() { return ( <div> <form onSubmit={this.onSubmitHandle.bind(this)}> <input type="text" name="item" className="item" /> <button className="btn-add-item">Add</button> </form> <ul> {this.state.mockData.map(item => ( <li key={item.id}> {item.title} <button onClick={this.onDeleteHandle.bind(this, item.id)}>Delete</button> <button onClick={this.onEditHandle.bind(this, item.id, item.title)}>Edit</button> <button onClick={this.onCompleteHandle}>Complete</button> </li> ))} </ul> </div> );}The Render method is simple. First, it has the form which is used to add a new item into the todo list. This form has an onSubmit event and it calls the onSubmitHandle method which we will write later in this component.
Then we have ul and simply map through all the items inside mockData and present the title and add same buttons as in our previous examples (Delete, Edit and Complete). Now if you run your application using the “npm start” command you should see something like this.

Now that R operation is completed, it is time to add a create operation which is the C in CRUD. Add the onSubmitHandle method to the Todo Component like below.
onSubmitHandle(event) { event.preventDefault(); this.setState({ mockData: [...this.state.mockData, { id: Date.now(), title: event.target.item.value, done: false, date: new Date() }] }); event.target.item.value = '';}The onSubmitHandle method is called when the Add button is clicked. Here we use the setState method on Todo’s state which is:
setState()schedules an update to a component’sstateobject. When state changes, the component responds by re-rendering.
Here, the setState method is called to reset the state of the Todo Component which has mockData. It simply appends the new item taken from the input field. Finally, set the value of the input field to empty.
Go ahead and refresh the app in your browser and type “Hike time” or anything you want and press the ADD button. You should be able to see the new item at the bottom of the list like above.
Now that the C is done, it’s time for D which is Delete. Simple add the onDeleteHandle method to the Todo component like below.
onDeleteHandle() { let id = arguments[0]; this.setState({ mockData: this.state.mockData.filter(item => { if (item.id !== id) { return item; } }) });}This method is triggered when the delete button is clicked. As you can see, we are binding this and item.id to onDeleteHandle. The this keyword is necessary so that we have access to the current scope to access the state of the Todo Component with the this keyword, whereas the id part is used to delete that particular item.
In order to access the item.id, we are going to use the arguments[0] object. Once we have the id, then set the state and filter through mockData. Find the item that needs to be deleted and return all the items except the one that needs to be deleted.
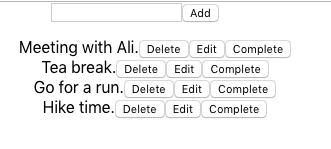
Go ahead and refresh your browser and press delete on the first item and you should see that it is deleted, like in the below screenshot.
That’s all for the delete part. The Update part, as usual, consists of 2 parts. First, show the edit form when the edit button is pressed, then perform the update operation.
To show and hide the edit form, we are going to use the edit property we added to state. So add the below renderEditForm method to the component.
renderEditForm() { if (this.state.edit) { return <form onSubmit={this.onUpdateHandle.bind(this)}> <input type="text" name="updatedItem" className="item" defaultValue={this.state.title} /> <button className="update-add-item">Update</button> </form> } }It checks the edit state, and based on that it returns editForm which is the JSX syntax of the form.
Now call the above method in the render method inside the return keyword just above the current form, like below:
{this.renderEditForm()}Now that this part is out of our way, it’s time to manipulate the edit property. Add the below onEditHandle method to the Todo Component:
onEditHandle(event) { this.setState({ edit: true, id: arguments[0], title: arguments[1] });}This method is triggered when the Edit button is pressed. We are binding three parameters: this, id, and title. The this keyword is used to reference the current component. It sets the id property to the id of the current item being edited. It sets edit to true and adds a title property to the state, which we will access later in this component.
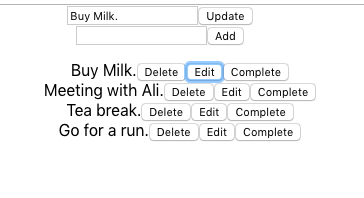
Now that we have this code in our component, go to the browser, refresh, and click on the edit button for the first item which will show the edit form like below:
This form has an input field and an update button. Now it’s time to handle the U part of CRUD. When the UPDATE button, in the edit form shown above, is pressed, the below method will be triggered:
onUpdateHandle(event) { event.preventDefault(); this.setState({ mockData: this.state.mockData.map(item => { if (item.id === this.state.id) { item['title'] = event.target.updatedItem.value; return item; } return item; }) }); this.setState({ edit: false });}Add the above method to your Todo Component. This sets the state of the component, maps through mockData inside the state, and finds the item that needs to be updated and set its title with the new title. Finally, set the edit property of the state to false to hide the form. That is it.
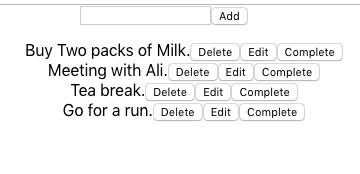
Now run your code in your browser and try to update the first item. You should be able to see the updated title.
The final method is used to set the item to a completed state. Add the below method which does exactly that.
onCompleteHandle() { let id = arguments[0]; this.setState({ mockData: this.state.mockData.map(item => { if (item.id === id) { item['done'] = true; return item; } return item; }) });}The above method sets he property of the item in mockData to true. This is pretty much the same as in our previous two examples in Vanilla JavaScript and Angular.
Now to make this work, add the below code to “li” to set its class based on the “done” property state in mockData.
className={ item.done ? 'done' : 'hidden' }Now refresh your browser and press the complete button. You should be able to see the below changes.
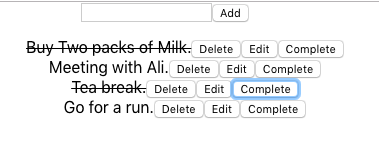
Below is the basic CSS that needs to be added to index.css file on order to display done items on the screen.
.done { text-decoration: line-through;}That is it. As you can see, Reactjs is an even more component-centric solution to modern JavaScript apps. The next task for you would be to split the form element into its own components so that we do not need to use two form elements for the update and add operations. That should be a simple and fun task for everyone.
To get the complete code, please clone the below repository.
zafar-saleem/react-todo
Contribute to zafar-saleem/react-todo development by creating an account on GitHub.github.com