
by Kangze Huang
Docker: Easy as build, run, done!
Docker has been getting a lot of buzz recently, and for good reason. The containerization service makes deploying microservices easy and stable, as each service can run an OS in its own virtual environment. That means full compatibility… no more worrying about OS versions, dependencies and differences between your development and production machines! And to top it off, it’s lightweight so you can run multiple Docker containers in the same machine (EC2 instance). Today we will learn how to setup and deploy Docker on Amazon EC2 in 3 easy steps!
Before we start, take a look at this high-level diagram (courtesy of infoworld.com).
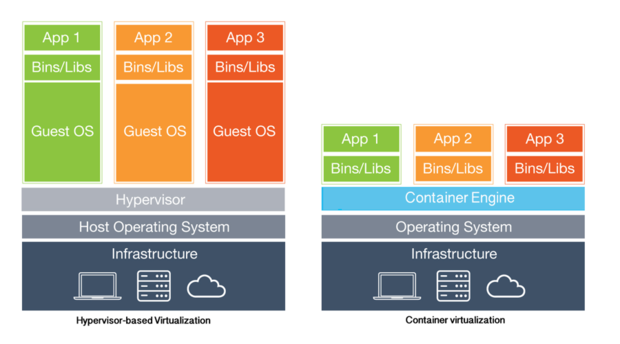
On the left side is your traditional virtual machine setup using a hypervisor. A hypervisor is simply your VM manager responsible for allocating hardware resources to each virtual OS. If each Guest OS needs 1GB of memory, and the host uses 1GB of memory, then the setup on the left would require 4GB total.
On the right side is a container setup, which would run a container engine such as Docker. The most significant difference is that a container engine is more lightweight because it can share certain hardware resources with its host OS, unlike traditional VMs that require their own separate allocation. This setup requires 1GB for the host OS and perhaps 600MB per container (because 300MB is hypothetically shared with the host OS), for a total of 2.8GB required. See those benefits? Cool, now we can start!
Getting Started
Enter your EC2 instance and clone Kangzeroos-ES6-React-Redux-Boilerplate from Github. The code you see will be for setting up this web app, but the steps are the same for any project. Once you have it downloaded, go into the folder and find the below files. These are the files we will use with Docker.
Dockerfile
build.sh
run.sh
Before we can use Docker, we must first install it. Below is the quick and simple way to install Docker, but if you want the full configuration checkout the official docs.
$ sudo apt-get update
$ sudo apt-get install docker-engine
$ sudo service docker start
$ sudo docker run hello-world
The last command checks if Docker is successfully running, and then exits. If all this works, you are ready to start Dockerizing!
Step 1: Building the Dockerfile
The first step is to configure the files required for Docker to build itself an image. Docker Images are simply blueprints of environments that you want to create while containers are the actual running and functional environments that your app will be executed in. In the root of our app directory, there is a folder called App. The web app itself resides in this App folder, whereas all the Docker-related stuff is outside. This is necessary as Docker will be containerizing everything inside App. So let’s make the first Docker file called Dockerfile (no file extension Dockerfile.sh, just Dockerfile) and walk through it line-by-line.
FROM ubuntu

# ubuntu setup
RUN apt-get update -y
RUN apt-get upgrade -y
RUN apt-get install nodejs -y && apt-get install npm -y

# install curl for n
RUN apt-get install curl -y
RUN apt-get install vim -y

# obtain latest stable version of node
RUN npm cache clean -f
RUN npm install -g n
RUN n stable

# setup working directory
# ADD /App /App
WORKDIR /App
RUN npm install

# expose port
EXPOSE 8080
The first line is FROM ubuntu. The purpose of Dockerfile is to set up the OS and programs inside the OS, so it makes sense that the first line specifies which OS version to use. ubuntu here is referring to a specific image hosted on Docker Hub, specifically the official Ubuntu OS Image.
# ubuntu setup
RUN apt-get update -y
RUN apt-get upgrade -y
RUN apt-get install curl -y
RUN apt-get install vim -y
The next set of lines is setup within Ubuntu. We want to check for Ubuntu updates with RUN apt-get update -y and upgrades with RUN apt-get upgrade -y… pretty standard stuff for setting up your environment. Also install curl RUN apt-get install curl -y and vim RUN apt-get install vim -y, both nice to have for general purposes.
# obtain latest stable version of node
RUN apt-get install nodejs -y && apt-get install npm -y
RUN npm cache clean -f
RUN npm install -g n
RUN n stable
The next set of lines is setup specific to NodeJS. Since we want to be using ES6 features, we will need the latest version of NodeJS attained via the node module n. Install NodeJS and NPM with RUN apt-get install nodejs -y && apt-get install npm -y. Then clean up npm to make way for n using RUN npm cache clean -f. Install n with RUN npm install -g n. And finally, we can run n (latest version of NodeJS) with RUN n stable.
NodeJS is for Javascript, but if you were working with other languages such as Python, you would install whatever programs you need to run your Python app.
# setup working directory
ADD /App /App
WORKDIR /App
RUN npm install

# expose port
EXPOSE 8080
The last part of Dockerfile is to set up the working directory of the app itself. ADD /App /App takes the App folder from our machine and copies it into the Docker container. Next, WORKDIR /App sets the Docker working directory to /App so that any commands you run inside Docker are executed in /App. This is needed for npm install to install in the correct place (aka /App of the Docker container).
Finally, we RUN npm install which installs our NodeJS dependencies in our machine. Last of all, we will explicitly expose port 8080 of our Docker image with EXPOSE 8080 so that the outside world can access our app. The outside world includes the internet as well as other Docker containers running on the same machine.
Step 2: The build script
docker build -t kangzeroo .Create a new file in the root directory of your app called build.sh. This is a shell file for building our Docker container. This build.sh file is not actually necessary as we can directly run this command in the terminal. However, it is really nice for simplifying the process.
Here’s the breakdown of this line: docker build is the command that tells Docker to build an image. -t kangzeroo sets the tag name of the Docker image to kangzeroo, which we can reference later. Please not that in order to have a valid tag name, it must be in lowercase and has no spaces (use snake-case naming). Finally, . tells Docker where to look for the Dockerfile that is needed for the build ( . means here).
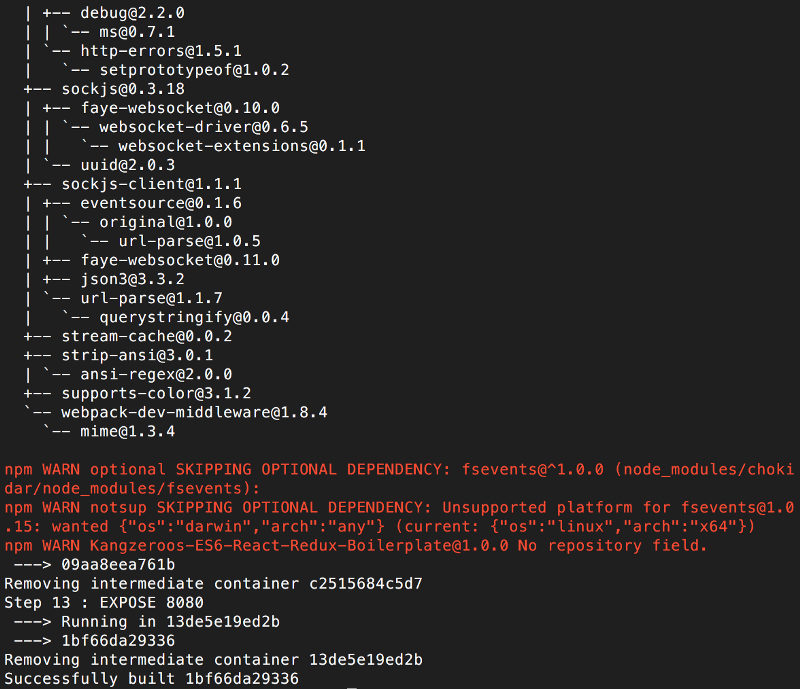
If you are in an EC2 instance, we can run bash build.sh from our project’s root directory. This will start the Docker build process as it goes through the steps in the Dockerfile we created. This might take a while… at the end it should look like this: (Don’t worry about the non-critical errors such as the optional dependency skipped in the below screenshot).
Now let’s check if our image has been created. Type docker images to see the images currently running in our machine. You should see a result like this:

If we want to delete this image, simply type docker rmi kangzeroo. If you type docker images again after deleting, you will see that the image is no longer there. For now, let’s leave the image because we’re gonna use it to build the Docker container for our app to run in.
Step 3: The run script
Now that our image has been created, let’s make run.sh. Recall that Docker Images are simply blueprints of environments that you want to create. Containers are the actual running and functional environments that your app will be executed in. So run.sh will turn our images into containers. Here is what run.sh looks like:
docker run -d -it -p 80:8080 --name=kz kangzeroo npm run ec2 -- --host=0.0.0.0Let’s walkthrough this short script. docker run is the command to run a container from an image. -d -it is the command for daemon (running tasks in the background) and interactive terminal (giving us a way to interact with the container). If you omit -d then the docker container will not run in the background and you will see log output from the app. -p 80:8080 maps port 80 of our machine to port 8080 of the container. Recall that earlier we specified EXPOSE 8080 in our Dockerfile. So now we take incoming connections on our machine’s port 80 (port 80 is the default for http) and redirect them to our container’s port 8080. If your app is not a webpage, then you can exclude this port mapping.--name=kz gives our container the name kz. Finally, kangzeroo npm run ec2 refers to our image called kangzeroo and npm run ec2 is a command specific to this boilerplate app (for starting up the app). The last part — — host=0.0.0.0 sets the boilerplate to run on 0.0.0.0 instead of localhost (This too is specific to the boilerplate). If you were running a Python backend app, it would look like docker run -d -it --name=kz kangzeroo python app.py.
Great! Save this file and run it with bash run.sh. Then check if the container is running by typing docker ps -a. This is what it should look like:

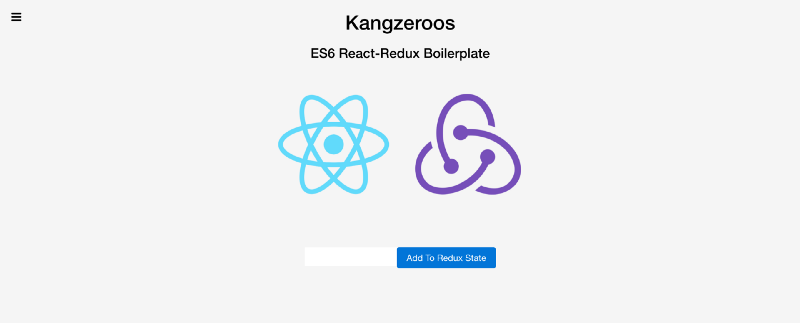
Your app is now online and running inside a Docker container! Check if it works… for this boilerplate you can check from a web browser.
And it’s working! Great, now let’s turn off our Docker container. Type docker ps -a to see all the containers again. Type docker stop kz and it stops the container. If you type docker ps you will not see the container anymore, but you will see it if you type docker ps -a ( -a means all, inclusive of running and not running container. omit -a if you only want to see running containers). To remove the container, type docker rm kz. If you type docker ps -a you won’t see the container anymore.
Conclusion
That was Docker! All things considered, Docker is a lot easier than setting up a hypervisor-based VM, and you can see how a microservice architecture becomes a lot easier to manage when you adopt containers. With our Dockerfile, build.sh and run.sh files created in EC2, we can summarize the 3 steps to running Docker from our app root directory:
$ bash build.sh
$ bash run.sh
$ exit
That’s it! Docker: easy as build, run, done!
Bonus Cheatsheet
Since this tutorial took a step-by-step approach to teaching Docker, I think it’s appropriate to leave you off with an overview of all the Docker commands you will need for general purpose use.
$ docker images                     // To view install images
$ docker rmi <IMAGE_NAME>           // To remove an installed image

$ docker ps -a                      // To view all docker containers
$ docker stop <CONTAINER_NAME>      // To stop a docker container
$ docker rm <CONTAINER_NAME>        // To remove a docker container

$ docker exec -it <CONTAINER_NAME> bash    // Execute into container and run bash

* If you want to see the log output from a docker container, omit the -d from run.sh
These methods were partially used in the deployment of renthero.ca