by Seth Alexander
Good times in Nashville: a recap of our October freeCodeCamp Meetup

On Saturday, October 7, we had our monthly freeCodeCamp Nashville meetup at Nashville Software School. As always it was good times.
We were supposed to have a guest speaker. But at the last minute they couldn’t make it. So our very own superstar and freeCodeCamp Nashville Co-Organizer Dave Harned stepped in and crushed it.
He presented a Crash Course on Node.js. You can find the repo here. Excuse the work in progress readme. Like most things, it’s not perfect. Feel free to open a Pull Request and shore up those docs!
I’m going to walk through what Dave presented so you can see what you missed out on and come to the next one ;-). Honestly, so you can benefit from a well put together intro that’ll have you up, running, and playing around in no time. Dave chose Cloud9 as his IDE so everyone could follow along without having to worry about what people might, or might not, have on their computers. This also provides a consistent user experience so debugging is easier.
So head over to Cloud9 and get signed up and logged in. Also, check out the repo from the link above and look at the readme.
Next, you’ll want to click Create a new workspace.

Your Workspace name can be whatever you want. Leave Hosted workspace selected and choose Private or Public, it doesn’t matter which. In Clone from Git or Mercurial URL input https://github.com/davi3blu3/fcc-node-crash.git. Then, under Choose a template select Node.js. Lastly, click Create Workspace.
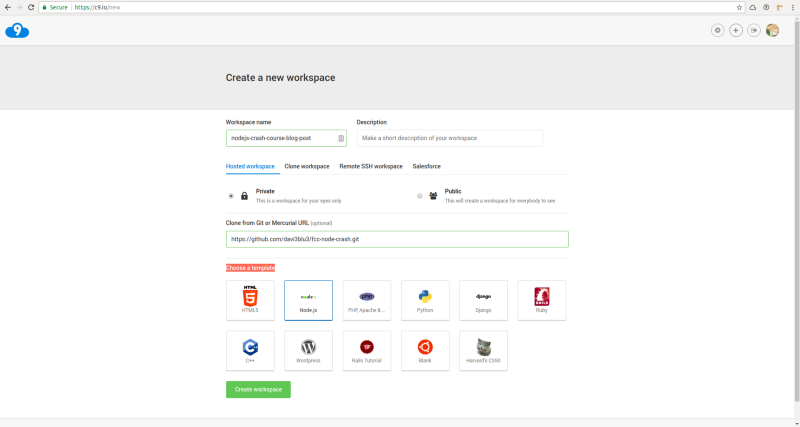
This might take a minute but eventually, you’ll have something that looks like this:
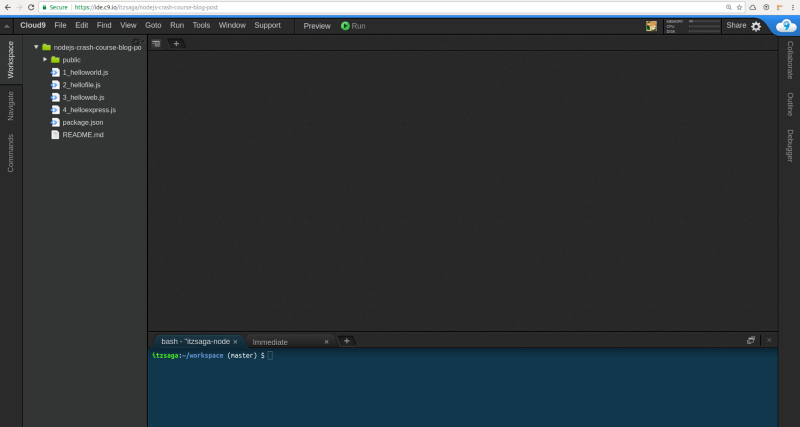
So first thing, let’s go to the terminal at the bottom of the screen and type in npm install and hit enter. That’s going to bring in all the packages at are in our package.json file. You’ll see a new folder in your file tree now called node_modules. That’s where all the packages live.
Now let’s open up 1_helloworld.js. It should look like this:
var hello = function() { console.log('Hello world');}hello();// console.log(process.argv);// var greet = process.argv[2] || "World";// var hello = function(name) {// console.log('Hello ' + name + '!');// }// hello(greet);Back in our terminal, we can run this file with node 1_helloworld.js. With the initial code, you should see “Hello World” printed in your terminal. This terminal is also our console inside Cloud9. So anything we console.log will end up here. We can see something interesting when we uncomment line 6 by taking out the //.
So line 6 should look like this now: console.log(process.argv);. When we run node 1_helloworld.js we get our “Hello World” again but then we also get an array that has two elements.
Yours should be the same as mine:
[ '/home/ubuntu/.nvm/versions/node/v6.11.2/bin/node', '/home/ubuntu/workspace/1_helloworld.js' ]These two elements are the whole command-line invocation. We can do some interesting things with this.
Let’s change our code up some:
// var hello = function() {// console.log('Hello world');// }// hello();console.log(process.argv);var greet = process.argv[2] || "World";var hello = function(name) { console.log('Hello ' + name + '!');}hello(greet);Okay, well not changed much. We only commented and uncommented stuff. So now we have our console.log from before, we set a variable, we set a function, and we call that function. So if we run node 1_helloworld.js now we’ll see our process.argv array and “Hello World”.
If we run node 1_helloworld.js “freeCodeCamp Nashville”, we’ll see an array with 3 elements and “Hello freeCodeCamp Nashville” printed. We can pass things in this way!
Let’s look at 2_hellofile.js now:
const fs = require('fs');const fileToRead = process.argv[2] || 'README.md';const lineIndex = process.argv[3] - 1 || 3;fs.readFile(fileToRead, function (err, data) { if (err) throw err; var lines = data.toString('utf-8').split("\n"); console.log(lines[lineIndex]);});Let’s run this with node 2_hellofile.js and see what we get. Whoa, where did that come from? Let’s walk through how this happened. I’m not going to walk through how fs works. It’s a module that comes with Node.js and if you want to learn more you can look here.
- Line 1 we require the module in our JavaScript file
Now we can use everything that comes with it - Line 2 we’re setting a variable equal to something we pass into our
process.argvorREADME.md - Line 3 we’re setting another variable equal to something we pass into our
process.argvor3 - Line 5 we’re using the
readFilefunction that comes withfsand passing in an argument and a callback function to handle an error or data - Line 6 we say we’ll throw an error if an error occurs
- Line 8 we set a variable that takes the data
fsgets for us and turns it into a string then splits it on “\n” so we end up with an array of strings - Line 10 we
console.logthe element from thelinesarray that is atlineIndexindex position - Line 11 we close the function
If you want to play with this try node 2_hellofile.js 'README.md' 14. We’re taking the readme and turning it into an array split at the end of each line then logging the line that we call by number.
On to 3_helloweb.js which should look like this:
const http = require('http');// on c9.io hostname must be '8080'// locally, this can be almost anythingconst port = 3000;// on c9.io hostname must be '0.0.0.0'// locally, you would use 'localhost' (a variable for '127.0.0.1')const hostname = 'localhost';const server = http.createServer(function(request, response){ response.writeHead(200, {"Content-Type": "text/plain"}); response.write("Hello Web! XOXO, Node"); response.end();});server.listen(port, hostname, function(){ console.log(`Server running at ${hostname}:${port}/`);});Once again not to go too deep into what http is but it gets our server going. This 3_helloweb.js is going to be our Node.js web server. A very simple one but one nonetheless. Dave has left some notes for us. We need to change the port variable on line 5 to 8080 and the hostname variable on line 9 to '0.0.0.0'. If you were running this code locally the settings that are here should work. However, Cloud9 has some specific restrictions to how they will allow us to run a server. So make the changes and run node 3_helloweb.jsin your terminal.
You should be greeted with a Server running at 0.0.0.0:8080/ and a green box from Cloud9 with a link to the server:

When you click that link the first time you’ll get a nasty orange screen with a red button. That’s Cloud9 telling you to not use this type of server for anything important. So click through and you should see a web page that says “Hello Web! XOXO, Node”. That text coming straight from line 18 of our 3_helloweb.js file. To kill the server click on the terminal and ctrl + c or cmd + c.
Lastly, we have 4_helloexpress.js:
// bring in dependencies / librariesvar http = require('http');var express = require('express');var app = express();var bodyParser = require('body-parser');// environment variablesvar port = 8080;var hostname = '0.0.0.0';// parses text content of a http requestapp.use(bodyParser.text({ type: 'text/html' }));// servers static files like our html $ css from public folderapp.use(express.static('public'));// this handles our post request from the front endapp.post('/', function(req, res, next) { console.log('Message from browser: ', req.body); res.end('Message received. Hello from the back end!');})// start the server and listen for requestsvar server = http.createServer(app);server.listen(port, hostname, function(){ console.log(`Server running at ${hostname}:${port}/`);});In this app, we’re going to be using Express as our web application framework. Express is super popular. Read their docs if you’re interested, I’m not going to dive into it too deep here.
I’m actually not going to get too deep into this code except to point out a few things. Let’s run our server with node 4_helloexpress.js. When we go to the website we should have a simple form.
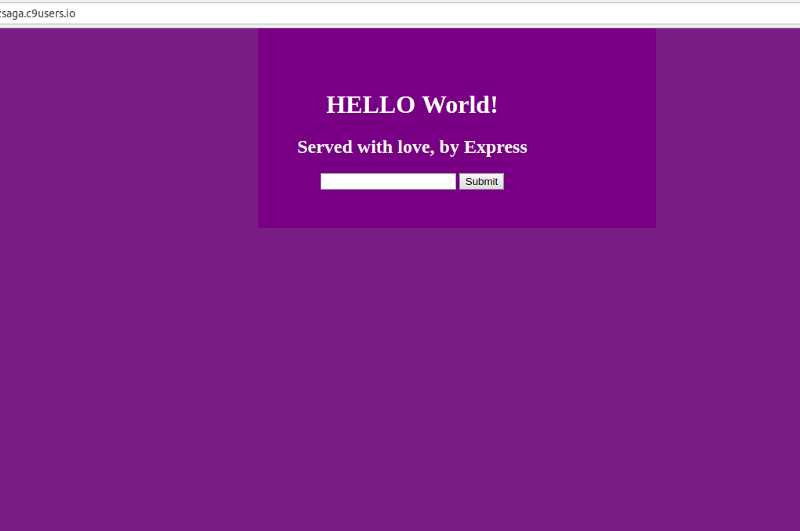
This is coming from line 15 where we tell Express to serve the files in the public folder. The public folder has three files which make up our front end. Take a look at frontend.js back in Cloud9:
var submit = document.getElementById('submit');var captureData = function(e) { var data = document.getElementById('data'); sendData(data.value);}var sendData = function(message) { var xhr = new XMLHttpRequest(); xhr.open("POST", '/', true); xhr.setRequestHeader("Content-type", "text/html"); xhr.onreadystatechange = function() { if(xhr.readyState == XMLHttpRequest.DONE && xhr.status == 200) { console.log('Sending: ' + message + '. Successful!'); console.log(xhr.response); } } xhr.send(message); }submit.addEventListener("click", captureData);Now if you’re using Chrome (which we at freeCodeCamp Nashville recommend), open up the console back on that ugly purple page. ctrl + shift + i or cmd + shift + i should do it. If not, right-click anywhere purple and choose the “Inspect” option. You’ll see an error about favicon.ico and you can ignore that.
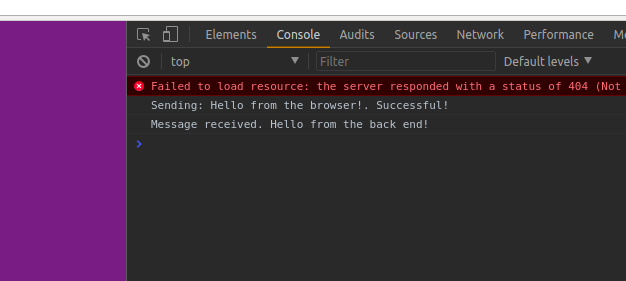
What we want to show is the front end talking to the back end server. We’re going to do this by logging to the two different consoles. So when we type something into our form and click “Submit” we should see this in our browser console:
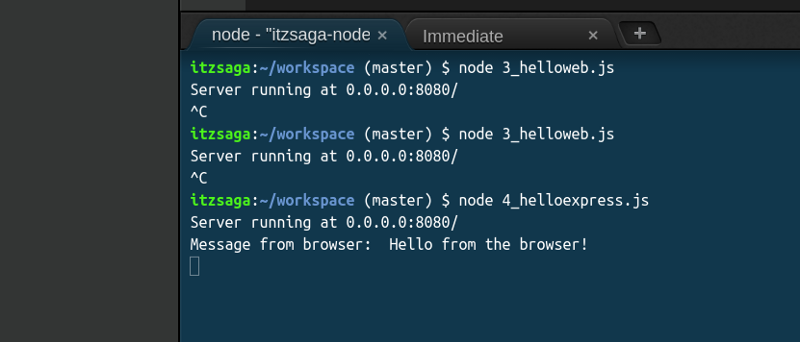
and this in our Cloud9 server terminal:
When we click “Submit” we’re doing a POST request on line 11 of frontend.js. On line 14 we’re creating that first console message we see in our Chrome console if the data is sent successfully.
Then back in our 4_helloexpress.js on line 26, we set the server up to listen. Our front end sent the POST so the server “hears” that and handles it on line 18 because it’s a POST. On line 19 it logs to the Cloud9 terminal what we saw before and on line 20 it sends some stuff back to the front end.
Line 16 in frontend.js receives the stuff the back end just sent in response and logs that to our Chrome console. That’s a lot of back and forth but illustrates how browsers and servers “talk” to each other.
Hopefully, this piqued your interest and you want to start building your own full stack JavaScript apps. Or maybe now you know just enough to start having fun and playing around.
If you want to hook up with us at freeCodeCamp Nashville, check us out on Meetup at freeCodeCamp Nashville. We also have a Free Code Camp Nashville Facebook Page.
My favorite is the #freecodecamp channel on the NashDev Slack network. If you want to join us, go to the link, and enter your email. You’ll get an invite to the network. Set up your account and once you log in you’ll jump into the #general channel by default. Type /join #freecodecamp and hit enter. Then you’ll be right there with us chatting.