
Why create a Slack Bot ?
I am an HR professional. More specifically I am a Human Resources Information System (HRIS) Consultant. I work with Application Tracking Systems, Learning Management Systems, and Core HR. But I have never had the opportunity to work with an HR Bot. Which may be the Future of HR.
I read a lot about bots on Slack and Messenger, and used some of them in my daily life — Product Hunt, GitHub and Trello. But for HR purposes, I have never had the opportunity to work with a tool tailored for my needs.
That’s why I decided to work on my own bot.

My Goals
My bot should be able to manage all the needs a small company could have on Slack:
- Onboarding
- Putting people in touch
- Reminders
- Announcements
- Birthdays /Anniversary
- And many more
Reviewing the basics
For this program, I’ll use:
- Botkit
- Node JS
- Express Server
- MongoDB
- Slack API & of course
Botkit is:
One easy way to build bot users, especially if you already work with Node.js, is Howdy’s Botkit. Botkit is a framework that takes care of most these API gymnastics, so you can focus on your bot’s behavior.
Exactly what I was looking for :-)
Botkit provides a boilerplate for Slack. But I have chosen to start from scratch to have a better understanding of my bot. However, it’s a good idea to train yourself with a bot created on Glitch.
How do Slack bots work?
I am not an expert. I have read again and again Slack and Botkit’s official documentation. I’m still not sure I understood everything. Here is my understanding of a Slack bot’s behavior:
Every App on Slack has a “scope” which is a perimeter on which an app can read or perform actions. A bot is part of an application created and installed on Slack.
Therefore, when you install an app on Slack, you give access to some information and permissions to it. For your bot, you want it to be, at least, able to send and reply to messages of other users.
There are then two cases:
- You want your bot to react to events happening directly in Slack
- You want your bot to react to events happening on your server
We will view both of them in this post!
Getting Started
Before anything else, you will need a server. In my case, Express.
Below you’ll find my server.js file:
var express = require('express');
var app = express();
var http = require('http').Server(app);
var dotenv = require('dotenv');

// configuration ===========================================
//load environment variables,
dotenv.load();

// public folder for images, css,...
app.use(express.static(__dirname + '/public'))

//parsing
app.use(bodyParser.json()); // for parsing application/json
app.use(bodyParser.urlencoded({
    extended: true
})); //for parsing url encoded

// view engine ejs
app.set('view engine', 'ejs');

// routes
require('./routes/routes')(app);

//botkit
require('./controllers/botkit')


//START ===================================================
http.listen(app.get('port'), function() {
    console.log('listening on port ' + app.get('port'));
});
This port must be public and accessible, not just on a localhost.
For the moment, this server is a blank page, showing and processing nothing.
You’ll then need a Slack App: just follow this link to create one.
Then, you’ll have to configure your controller. The controller is the brain of your bot. It contains every skill and configuration. Below is my botkit.js file. It has almost the same content found in Botkit’s Starter kit available here: https://github.com/howdyai/botkit-starter-slack
var mongoUri = 'mongodb://localhost:27017/nameofyourDB'
var database = require('../config/database')({
    mongoUri: mongoUri
})
var request = require('request')

if (!process.env.SLACK_ID || !process.env.SLACK_SECRET || !process.env.PORT) {
    console.log('Error: Specify SLACK_ID SLACK_SECRET and PORT in environment');
    process.exit(1);
}

var controller = Botkit.slackbot({
    storage: database,
    clientVerificationToken: process.env.SLACK_TOKEN
})

exports.controller = controller

//CONNECTION FUNCTIONS=====================================================

exports.connect = function(team_config) {
        var bot = controller.spawn(team_config);
        controller.trigger('create_bot', [bot, team_config]);
    }
    // just a simple way to make sure we don't
    // connect to the RTM twice for the same team
var _bots = {};

function trackBot(bot) {
    _bots[bot.config.token] = bot;
}

controller.on('create_bot', function(bot, team) {
    if (_bots[bot.config.token]) {
        // already online! do nothing.
        console.log("already online! do nothing.")
    } else {
        bot.startRTM(function(err) {
            if (!err) {
                trackBot(bot);
                console.log("RTM ok")
                controller.saveTeam(team, function(err, id) {
                    if (err) {
                        console.log("Error saving team")
                    } else {
                        console.log("Team " + team.name + " saved")
                    }
                })
            } else {
                console.log("RTM failed")
            }
            bot.startPrivateConversation({
                user: team.createdBy
            }, function(err, convo) {
                if (err) {
                    console.log(err);
                } else {
                    convo.say('I am a bot that has just joined your team');
                    convo.say('You must now /invite me to a channel so that I can be of use!');
                }
            });
        });
    }
});

//REACTIONS TO EVENTS==========================================================
// Handle events related to the websocket connection to Slack

controller.on('rtm_open', function(bot) {
    console.log('** The RTM api just connected!')
});

controller.on('rtm_close', function(bot) {
    console.log('** The RTM api just closed');
    // you may want to attempt to re-open
});
Unlocking the first case: react to the events happening on Slack

When you give the right permissions to your app, every time a message is sent on a channel, Slacks sends a request to your server with some information — the channel ID, the user, the timestamp and most importantly, the content of the message.
If we want our bot to react to a simple message like “Hi”, we have to give Slack an address to send the information to.
In a routes.js file write:
var Request = require('request')
var slack = require('../controllers/botkit')
module.exports = function(app) {
 app.post('/slack/receive', function(req,res){
//respond to Slack that the webhook has been received.
    res.status(200);
// Now, pass the webhook into be processed
    slack.controller.handleWebhookPayload(req, res)
  })
}
We now have a webhook : http://your-ip-or-domain:port/slack/receive
Once Slack is informed of this route via the Event Subscriptions page of your Slack App, it will be able to send it JSON. You will be able to receive it thanks to the parsing part of the server.js file above.
Here is a (simple) schema to explain the process behind it:
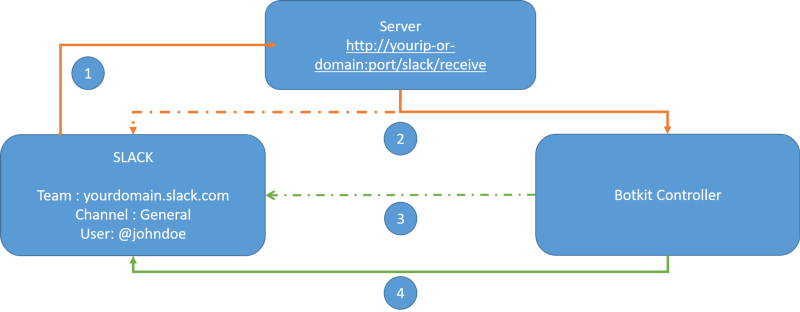
1- SLACK « Here is a JSON file with the latest event on your Slack Channel »
2- SERVER « Okay well received, I send it to Botkit»
3- BOTKIT «Here is a temporary answer, wait a second»
4- BOTKIT « Yeah! I hear a keyword, here is a JSON object with the action to perform »
If we want our bot to react every time it hears “Hello”, we can simply add this .hears() function to our controller:
controller.hears(['hello', 'hi'], 'direct_message,direct_mention,mention', function(bot, message) {
controller.storage.users.get(message.user, function(err, user) {
        if (user && user.name) {
            bot.reply(message, 'Hello ' + user.name + '!!');
        } else {
            bot.reply(message, 'Hello.');
        }
    });
});
Notice the storage.users.get() part in this snippet. Botkit is compatible with almost all the database systems available on the market. I have decided to use MongoDB because it was on my learning list for a long time. Plus the documentation with Botkit is detailed.
Now, we have to let our imagination do the work and find some fun features to create.
Second Case: initiate a conversation with your bot

For this feature, I wanted my bot to react to events which were not initiated on Slack. For example, do a daily routine. If it’s someone’s anniversary in the company, send them a survey asking their feelings about their first months/weeks.
I have decided to use node-cron: https://github.com/kelektiv/node-cron to manage the daily check.
Here is below a cronjob firing every weekday at 9:00 am. Thanks to the Date() method, the bot gets today’s date and can compare it to the “joinedDate” of the user.
To get only the right users and avoid a forEach loop, we can use a query on our Database:
var dailyCheck = new CronJob('00 00 9 * * 1-5', function() {
        /*
         * Runs every weekday (Monday through Friday)
         * at 09:00:00 AM. It does not run on Saturday
         * or Sunday.
         */
        console.log(`DailyCheck triggered ${new Date()}`)

        //Gets today's date
        let d = new Date()
        d.setUTCHours(0, 0, 0, 0)

        let threeMonthsAgo = new Date()
        threeMonthsAgo.setUTCMonth(d.getUTCMonth() - 3)
        threeMonthsAgo.setUTCHours(0, 0, 0, 0)


        let sevenDaysAgo = new Date()
        sevenDaysAgo.setUTCDate(d.getUTCDate() - 7)
        sevenDaysAgo.setUTCHours(0, 0, 0, 0)


        controller.storage.users.find({
            "joinedDate": {
                "$eq": +sevenDaysAgo
            }
        }, function(err, user) {
            user.forEach(function(member) {
                console.log(`Message was sent to ${member.name}(${member.id})`)
                bot.startPrivateConversation({
                    user: member.id
                }, Conversations.sendSurvey7)
            })
        })
    }, function() {
        /* This function is executed when the job stops */
    }, true,
    /* Start the job right now */
    timeZone = 'Europe/Paris' /* Time zone of this job. */ )
And… Tada!

Conclusion
After more than a year of being a camper and learning to code, I am really happy to be able to start and finish a project like this one. I now have a bot working and performing almost all the actions I had in mind at the design phase. And I still have a lot of ideas!
I am still working on this bot. The GitHub repository is available here: https://github.com/alexandrobin/hrbot. Some of the commits are in French, but the codebase is commented in English. :-)
Besides, it’s quite easy to deploy it on Heroku with a Mongolab database if you don’t have a server!
If you have some suggestions or are interested by this article and project, feel free to leave a comment ! I would be happy to discuss with you.