by Jonathan Baldie
How installing Arch Linux brought my old laptop back to life
Got an old computer that is too slow to run Windows? Don’t throw it away or sell it. Install Linux on it.
Never used Linux? It’s a lot of fun, as long as you’re willing to learn and to tinker.
Note that if you do not enjoy tinkering, desktop Linux might not be the best operating system for you.
The Windows and macOS operating systems make systems run slower over time. Apps get more complex as they adapt to the demands for more user-friendly features.
Windows 10 has been better on this front. Microsoft’s goal to have a universal OS across desktops, tablets, and mobile devices has encouraged them to cater to machines with lower specs.
But I’m not sure if Apple has that same goal. The new MacBook Pros are slower than many machines that are a third of the price. Many users have complained that El Capitan and Sierra drain more resources after they have upgraded their Mac’s operating systems.
That’s not inherently a bad thing. I love the care taken to enhance the usability of my Mac. And I love how fast my Windows 10 machine operates, and I’ve used Windows since I was seven years old. I consider myself a Windows power user.
Beware of fanboyhood. Always stay open-minded. It’s foolish to stick to either of these operating systems. There’s more to life than the computer you use.
But the planned obsolescence means that people needlessly throw away old Macs and Windows machines. They are too slow to use and new software cannot be installed on them.
I booted up my 2008 MacBook a few weeks ago, and it refused to install Chrome. Wouldn’t even touch it with a barge pole. Not cool!
However, I’m now writing with a 2009 Acer Aspire 5735. It has a Core 2 Duo processor, with two cores at 2.0GHz. It has 4GB of DDR2 RAM, and a 500GB HDD. I’ve installed a brand new battery, but so far that’s the only hardware upgrade.
I’m using the latest version of Google Chrome. Currently, I have six tabs open, and I have yet to experience any major slowdown to date. It also has the latest versions of PhpStorm and DataGrip.
At the time when my dad bought me this laptop, it was very popular. I loved it. It was a high-spec machine, and it ran very well. I had just started university, and this machine helped me with my studying habits. And in my my free time, it served well for browsing and consuming media. It was a fantastic portable work machine for five years.
It doesn’t make any sense to me that it just died. I didn’t do any demanding gaming on it, I just wanted to be productive on it.
I want email, I want browsing, I want PhpStorm and DataGrip on my laptop. With Linux, I can do all of those things with ease.
Even better, my activity isn’t being monitored by a corporation. My operating system isn’t listening through the microphone 24/7 and storing data in a data warehouse outside of the country.
With Linux, I have as much freedom and privacy as I want.
Installing Linux on your laptop is insanely easy, too. I’ll show you how to do that in just a second.
Remember that Linux powers the biggest servers, the most popular applications, and the most important services in the world.
But it also powers all Android smartphones. While mobiles are getting more powerful every year, they’re not as powerful as modern computers. And Android runs very smoothly on most modern phones.
That’s because Linux is simple. It uses less resources and has a rich community of developers who are keen to help each other out.
If Linux is good enough to power the most important services in the world, it’s good enough to use to browse your Facebook news feed.
Arch Linux
For my installation, I chose Arch Linux. This isn’t a distribution for the faint of heart.
The barebones installer for Arch isn’t GUI-based or even text-based. It purely uses the command line.
I like that, though. Installing an OS in this way helps me to understand its inner workings.
I have Ubuntu 16.10 “Yakkety” on my desktop, and it was a breeze to install. I downloaded the ISO, burned it to a USB, plugged it into my PC, booted from the USB, and followed the easy instructions.
Ubuntu is by far the softest introduction to Linux. I recommend it to people with no experience outside of Windows or even macOS, because it’ll be the most familiar to people.
When you dive deeper into Linux, try different things, and get used to the terminal. You’ll understand why I like the Arch installer.
I didn’t use the text-based Arch “Anywhere” installer. I just used the command line.
And although Arch has been frequently called a “text-based horror game” by some, the reality is that it’s incredibly simple to install. You will learn more about how the internals actually work later in this article.
You don’t get a desktop environment by default. It’s purely command line. This is by design. Arch is intended to be a simple barebones Linux system.
Arch is addictive. You start with nothing and install software as needed.
By contrast, Ubuntu is subtractive. You start with everything you could possibly need, and trim down until you have a lighter system.
Neither of them is “right.” Each just fits different people and use cases. The only “right” OS is the OS that best helps you to work and play.
Once again, though, it is incredibly easy to install a desktop environment to Arch. It literally takes two commands and a reboot to install an operating desktop.
And because we want a system that we can use, we’ll definitely want a desktop environment. In my installation, I chose Gnome 3. I like the look of it. Although it’s known to be resource heavy, I relish the challenge. I think my laptop is up to it.
Let’s get started.
How I installed Arch Linux on my laptop
I will now explain how I installed Arch Linux on my laptop.
You can follow along if you like. Just beware that this will erase all the data on your computer’s hard drive. Only do this if you’re absolutely sure you want to do this, so back up your important data onto another machine. Definitely don’t erase the data on a machine that isn’t yours!
1. Create the USB installer
First, I downloaded the official Arch Linux ISO from their website. I decided on the 64-bit version.
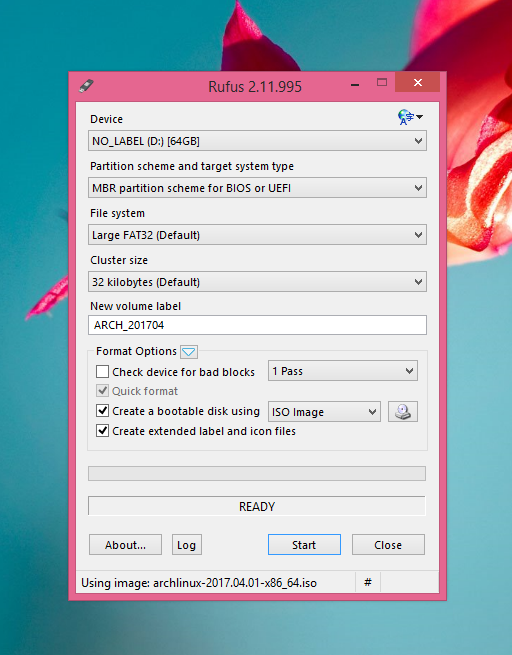
On my Windows 8 tablet, I used a program called Rufus. It allowed me to burn the ISO to a USB stick.
If you want to try this, you’ll need a USB stick with enough memory to hold the OS at least. You can buy an 8GB USB stick, which is more than enough space, at a very cheap price nowadays.
And if you’re on a Mac, you won’t be able to use Rufus, but you can use UNetbootin, which is highly rated.
Then once inside Rufus, I chose the USB stick from the list of drives. I chose the ISO image from my downloads folder, and selected Start to begin the burning process.
Warning: If you do this, it will delete everything on the USB stick.
When the process finished, I had a bootable USB stick.
2. Boot from the USB stick
I rebooted the laptop, plugged in the USB stick, and entered the BIOS. I changed the boot priority so that the USB drive controller is at the top. Then I exited the BIOS and the computer rebooted.
I was greeted by the GRUB boot loader, which took me to the Arch Linux terminal. It’s a weird, limbo-like place where you’re using the USB stick as the OS and the main filesystem. Many people actually plug the USB stick into their computer to have a portable operating system.
3. Check the network
Plugging in an Ethernet cable to my router allowed me to have internet access. I checked that the internet was up, with the code
ping google.comThis resulted in successful pings that returned a response.
The internet was a-OK!
The Ethernet is the simplest and most secure way to connect to your internet source provider. Most old laptops have an Ethernet port. I chose not to configure Wi-Fi until I had installed the Gnome desktop environment because it would be easier.
4. Partition the hard drive
At that time, I still had Windows Vista installed on the laptop’s main hard drive. To install Linux, I had to format the hard drive.
But first, I needed to set up the partition table. This, among other things, tells the boot loader which part of the hard drive is bootable.
To view the partition table, type
fdisk -lI wanted two partitions on the main hard drive:
/dev/sda1, the primary bootable with 457GB of space/dev/sda2, the primary swap space with 8GB, or double the RAM
Allocating double the RAM to swap space is a good idea for older machines with less RAM. Linux will put unused memory into the swap space to free up RAM for more immediate tasks.
I typed this into the terminal to action the partition:
cfdiskThis program provides a user interface for creating and managing partitions.
It should look something like this:
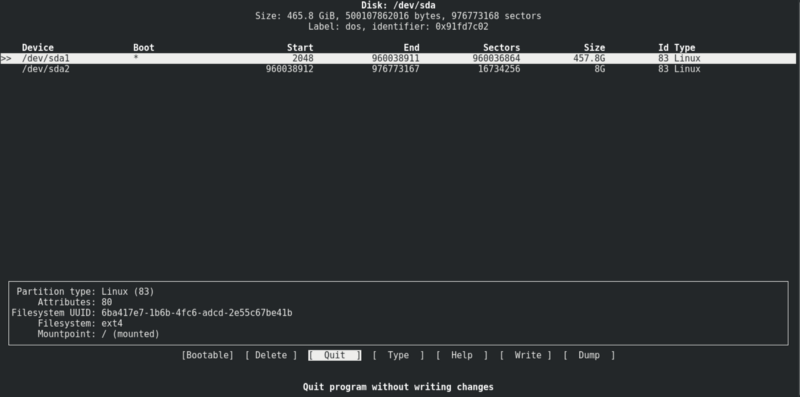
I highlighted the existing partitions and selected DELETE. Then I selected NEW and entered 457G as the space, marking it as primary.
Next, I selected BOOTABLE on that partition.
Then I selected the FREE SPACE in the line below, clicked NEW again, and created the swap partition with 8G of space. This was double the laptop’s RAM, marking it as primary. Linux should automatically recognize this as swap space.
I then selected WRITE and typed yes to confirm. This installed the new partitions.
Warning: Beware if you do this yourself. This might erase data and will definitely mess up your existing installation. So only follow this if you’re committed to trying out Arch Linux.
To verify the partitions, type
fdisk -l5. Format the partitions
I created the primary partitions, but they weren’t formatted yet. I used this command to format the main partition as EXT4:
mkfs.ext4 /dev/sda1Then to format and activate the swap partition:
mkswap /dev/sda2swapon /dev/sda2The hard drive has been completely formatted, and the swap partition activated.
6. Installing the base Arch Linux system
To install the Arch Linux base system, I mounted the laptop’s new primary /dev/sda1 partition onto my USB’s filesystem.
Remember that the USB is acting as “the computer” in this situation. Unix system have one tree for the filesystem. It doesn’t matter if it’s running off a USB stick or an RPi or a powerful server, all Unix systems are like this.
Mounting a drive into the filesystem is sort of like docking a filesystem onto the main one. We’re temporarily “plugging” the hard drive’s primary partition’s filesystem into the USB’s filesystem.
mount /dev/sda1 /mntpacstrap /mnt base base-develThis didn’t take too long, but I did have time to make myself a cup of tea and check my emails on my tablet.
When it was done I patted myself on the back, and ran the next command to create the fstab. This is a file which contains information about the system’s partitions.
genfstab /mnt >> /mnt/etc/fstabThe file can be read to verify:
cat /mnt/etc/fstab7. Configure Arch Linux
I needed to log into the new Arch Linux install to configure a few things. I needed to set the root password and time zone, and create my user account.
arch-chroot /mnt /bin/bashThen I edited the locale file:
vi /etc/locale.genI found my locale en_GB.UTF-8 and uncommented it. Then I pressed ESCAPE and typed :x to write and exit the file.
To activate the locale, I entered:
locale-genNext, I created another locale file:
vi /etc/locale.confI added the following line and saved the file as above.
LANG=en_GB.UTF-8Then I set the correct time zone.
In the UK we have a variable time zone. In the summer we use British Summer Time (BST), which is one hour ahead of UTC. The rest of the time we’re on Greenwich Mean Time (GMT), which is the same as UTC. It will probably be simpler for you if you’re elsewhere in the world.
To find the right time zone, I entered:
ls /usr/share/zoneinfo/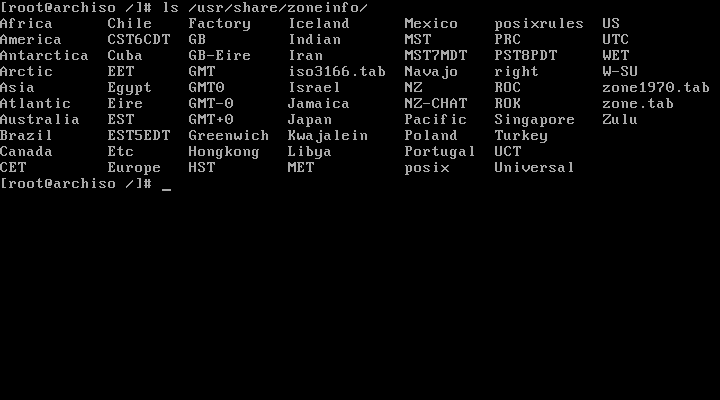
I saw GB and knew that was the right one. The system will automatically adjust to BST/GMT when necessary. So to set this as the system’s time zone, I entered:
ln -s /usr/share/zoneinfo/GB /etc/localtime8. Configure passwords and user account
The system logged me in as root. To enter the root password for later logins, I typed:
passwdIt then prompted me to type my password and to confirm it.
Then it prompted me to create my user account:
useradd jonmkdir /home/jonchown -R jon:jon /home/jonThen I typed:
passwd jonI typed my password for my account as I did with root.
My account was created, but I couldn’t do very much. I had no permissions. I had to create the “sudo” group and add my user to it.
groupadd sudousermod -aG sudo jonTo ensure the sudo-ers group had the right permissions:
vi /etc/sudoersThen I uncommented this line and saved the file:
# %sudo ALL=(ALL) ALLNow I was able to use the sudo (pronouned “soo-doo,” short for “super user do”) command as my user, so I could install new packages and access restricted parts of the filesystem.
9. Configure the network
Now I needed to set the laptop’s hostname in two files: /etc/hostname and /etc/hosts. So I ran the next command and typed laptop:
vi /etc/hostnameThen I entered the host’s file:
vi /etc/hostsAt the bottom I typed the following line:
127.0.0.1 laptopThis told my system to route all requests for the hostname laptop to itself.
The network still didn’t work as planned, so I needed to activate it. I did this by typing:
systemctl enable dhcpcd10. Install GRUB bootloader onto the hard drive
We’re almost done! Now I needed to install GRUB loader onto the new Arch Linux system, so that it could boot from the hard drive.
To do that, I ran these commands:
pacman -S grub os-probergrub-install /dev/sdagrub-mkconfig -o /boot/grub/grub.cfgIf the first pacman command doesn’t work, try this command to synchronize the system’s core database:
pacman -SsyI then exited from the hard drive’s system and back into the USB:
exitAnd then I unmounted the hard drive’s filesystem from the USB:
umount /mntAnd that’s it!
The hard drive had a fresh Arch Linux install ready to use. So I rebooted the laptop and unplugged the USB stick.
This then booted successfully into the terminal, but this time it was on the hard drive’s new Arch system, not on the USB stick.
11. Install the Gnome desktop environment
We have the new operating system, but it was still 100% terminal. I want a desktop environment to interact with my laptop, so I can browse web pages, read documents, and use modern apps.
There are many desktop environments for Linux. I chose Gnome because I like it, but if I wanted to, Linux allows the installation of more than one desktop environment.
Luckily, it only takes one command to install the Gnome desktop ennvironment:
pacman -S gnomeIt prompted me a few times to check which versions of extra packages I want. I just clicked ENTER to select the defaults.
So the Gnome desktop environment is installed, but the system doesn’t know to load it at the boot. So I typed this to ensure it did:
systemctl enable gdm.serviceThis sets up the symlink, and we’re ready to reboot the laptop into Gnome!
rebootThen when the laptop booted, it loaded Gnome, and I was able to log in with my new user account.
The system was now ready for me to use. It was far from complete though, because I wanted to install some of my favourite programs:
- Fish shell, it makes the terminal much faster and easier to use
- htop, for system activity monitoring
- Git, for installing packages via the AUR and for work
- Google Chrome, it’s my favourite browser
- Spotify, so I can listen to my favourite tunes!
- PhpStorm, so I can work
- DataGrip, so I can access my databases
With Linux, and especially Arch, we can’t just download an installer or a .dmg file like we can on Windows or macOS. We need to use both of Arch’s installer programs to install them. So let’s learn how to do that!
How to install programs on Arch Linux using pacman and the AUR
Installing programs on Arch Linux might seem tricky at first. It was tricky for me the first time too, even though I had experience with Ubuntu Linux.
Arch uses pacman, short for package manager, and the Arch User Repository (AUR) to install programs.
Installing packages via pacman is super easy. To install the fish shell, htop, and Git, I just used:
sudo pacman -S fish htop gitInstalling via the AUR is trickier, especially if you’re newer to Unix-like systems.
We’ll install the Google Chrome browser and Spotify to show you how to do this.
First, make sure that build essentials are installed:
sudo pacman -S file base-devel absGo into your user’s downloads folder:
cd ~/DownloadsGo here and copy the Git Clone URL.
Then run the following command:
git clone [the Git Clone URL]Then entercd into the google-chrome directory that it just created, and run the following command:
makepkg -AcsThis may take a while, depending on your system.
Time for another cup of tea!
Once that’s done, install the package. The makepkg command should create a file with the file type pkg.tar.xz. Install this package by using the -U option with pacman.
sudo pacman -U x.pkg.tar.xzReplace x.pkg.tar.xz with the name of the actual file. It will be a long, scary filename. Just copy and paste it into the command above.
That’s it!
Now in Gnome, if you hit the super key (Windows key on a Windows machine), type Chrome and the Chrome app icon should appear on the screen. Super easy!
We can use the same commands for every other AUR package we want to install. We can certainly do the same for Spotify by using the URL here.
Remember, these are the steps to install programs from the AUR:
- Find the package’s Git clone URL here.
git clone [the URL]cd [package name]makepkg -Acssudo pacman -U x.pkg.tar.xz
Yaourt
An easier way to install AUR packages is using Yaourt. It allows you to automatically install from the AUR with one line, much like pacman.
Open up /etc/pacman.conf and add the following lines of code to the bottom:
[archlinuxfr]SigLevel = NeverServer = http://repo.archlinux.fr/$archThen, in the terminal run this:
sudo pacman -Sy yaourtNow you can install any package using Yaourt. The usage is similar to pacman:
yaourt <operation> [options] [packages]yaourt <search pattern|package file>yaourt -Syu # Updates the Arch systemyaourt -S <package> # Install a packageyaourt -U <package> # Upgrade a packageyaourt -R <package> # Remove a packageyaourt -P <directory> # Install from a PKGBUILD in the directoryyaourt --stats # Show stats on all your packagesI hope I have shown that it’s easier than it looks to use the AUR. It’s super easy to install with pacman too.
I thought it was important to share Arch’s core skills, because with Arch, very few programs are pre-installed. So you’ll need to use these core skills a lot if you want to install the programs you need.
That is what I like about Arch Linux. You can create the computer you want, instead of just being given a bloated system that has more than you could possibly want or use.
That is also why Arch Linux is perfect for older laptops and PCs. It is so lightweight that it runs below 5% CPU with multiple programs on at the same time. Here’s a screenshot of my laptop’s desktop with htop:
Yes, I love 90s music. Sue me! It was one of the best decades for music!
I chose the Gnome desktop environment as well, which many experienced readers will notice is quite heavy as far as desktop environments go.
That’s true. I took a gamble by using it over a lighter DE like XFCE4.
But I’m used to the Ubuntu Unity desktop environment, which is similar to Gnome. I like that it is so user-friendly. It does come with a lot of packages that XFCE leaves out.
And as you can see from the screenshot above, it didn’t take a toll on my 2009 laptop.
I’d call this project a success.
Those are all the steps I used to install Arch Linux on my laptop. I hope it helps if you’re thinking of installing a new OS on your old laptop or old PC.
Now I have one question for you.
What do you think of this post? I’d like to hear your thoughts.
Did you try to do this install? Awesome. I’d love to hear about your experience.
Hit the comment button below, and write your thoughts so I can read them.
I have another quick question for you, since you’re probably a developer if you’re reading this.
Are you making the most common mistakes that most developers make in SQL queries? Want my 2-step algorithm on the perfect index?
Download my free report, MySQL Worst Practices.