
by Domenico Angilletta
In my experience as a Ruby on Rails Developer, I often had to deal with adding search functionality to web applications. In fact, almost all applications I worked on at some point needed search engine capabilities, while many of them had a search engine as the most important core functionality.
Many applications we use everyday would be useless without a good search engine at their core. For example, on Amazon, you can find a particular product among the more than 550 million products available on the site in a matter of a few seconds — all thanks to a fulltext search combined with category filters, facets, and a recommendation system.
On Airbnb, you can search for an apartment by combining a geospatial search with filters on house characteristics, like dimension, price, available dates, and so on.
And Spotify, Netflix, Ebay, Youtube…all of them rely heavily on a search engine.
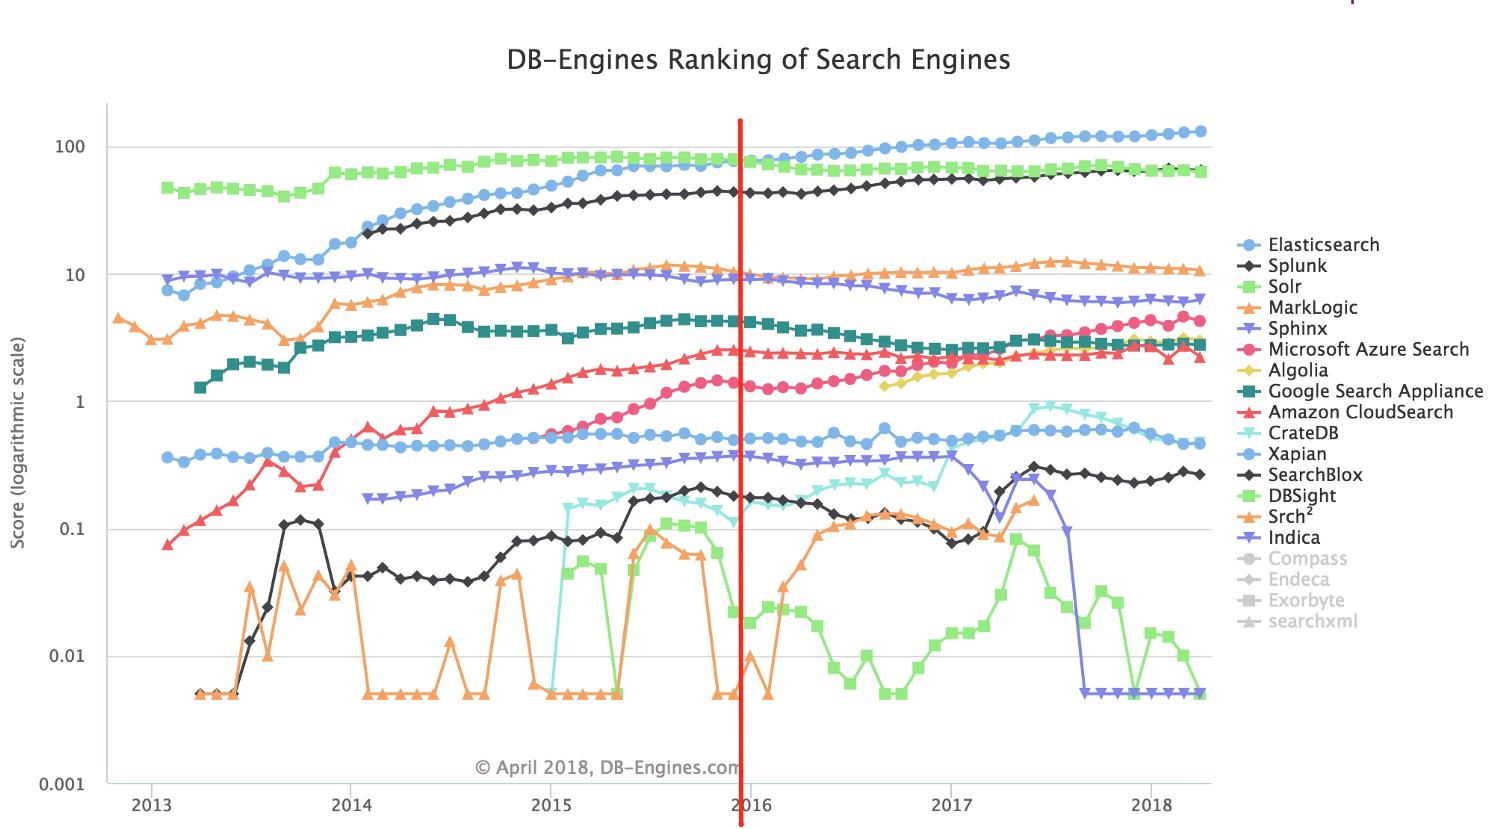
In this article, I will describe how to develop a Ruby on Rails 5 API backend with Elasticsearch. According to DB Engines Ranking, Elasticsearch is currently the most popular open source search platform.
This article will not go into the details of Elasticsearch and how it compares to its competitors like Sphinx and Solr. Instead, it will be a step-by-step guide on how to implement a JSON API Backend with Ruby on Rails and Elasticsearch, using a Test Driven Development approach.
This article will cover:
- Elasticsearch Setup for test, development, and production enviornments
- Ruby on Rails Test Environment Setup
- Model indexing with Elasticsearch
- Search API endpoint
As in my previous article, How to boost your performance with serverless architecture, I will cover everything in a step-by-step tutorial. Then you can try it out yourself and have a simple working example on which to build something more complex.
The example application will be a Movie search engine. It will have a single JSON API endpoint that allows you to make a fulltext search on Movie titles and overviews.
1. Elasticsearch Setup
Elasticsearch is a distributed, RESTful search and analytics engine capable of solving a growing number of use cases. As the heart of the Elastic Stack, it centrally stores your data so you can discover the expected and uncover the unexpected. — www.elastic.co/products/elasticsearch
According to DB-Engines’ Ranking of Search Engines, Elasticsearch is by far the most popular search engine platform today (as of April 2018). And it has been since the end of 2015, when Amazon announced the launch of AWS Elasticsearch Service, a way to start an Elasticsearch cluster from the AWS Management console.
Elasticsearch is opensource. You can download your preferred version from their website and run it wherever you want. While I suggest using the AWS Elasticsearch Service for production environments, I prefer having Elasticsearch running on my local machine for testing and developing.
Let’s begin by downloading the (currently) most recent Elasticsearch Version (6.2.3) and unzip it. Open a terminal and run
$ wget https://artifacts.elastic.co/downloads/elasticsearch/elasticsearch-6.2.3.zip

$ unzip elasticsearch-6.2.3.zip
Alternatively, you can download Elasticsearch from your browser here and unzip it with your preferred program.
2. Test Environment Setup
We are going to build a backend application with Ruby on Rails 5 API. It will have one model that represents Movies. Elasticsearch will index it, and that will be searchable through an API endpoint.
First of all, let’s create a new rails application. In the same folder you downloaded Elasticsearch before, run the command for generating a new rails app. If you are new to Ruby on Rails, please refer to this starting guide to setup your environment first.
$ rails new movies-search --api; cd movies-searchWhen using the “api” option, all the middleware used primarily for browser applications is not included. Exactly what we want. Read more about it directly on the ruby on rails guide.
Now let’s add all the Gems we will need. Open your Gemfile and add the following code:
# Gemfile

...
# Elasticsearch integration
gem 'elasticsearch-model'
gem 'elasticsearch-rails'

group :development, :test do
  ...
  # Test Framework
  gem 'rspec'
  gem 'rspec-rails'
end

group :test do
  ...
  # Clean Database between tests
  gem 'database_cleaner'
  # Programmatically start and stop ES for tests
  gem 'elasticsearch-extensions'
end
...
We are adding two Elasticsearch Gems that will provide all necessary methods to index our model and run search queries on it. rspec, rspec-rails, database_cleaner, and elasticsearch-extensions are used for testing.
After saving your Gemfile, run bundle install to install all added Gems.
Now let’s configure Rspec by running the following command:
rails generate rspec:installThis command will create a spec folder and add spec_helper.rb and rails_helper.rb to it. They can be used to customize rspec to your application needs.
In this case, we will add a DatabaseCleaner block to rails_helper.rb so that each each test will run in an empty database. Moreover we will modify spec_helper.rb in order to start an Elasticsearch test server each time the test suite is started, and shut it down again once the test suite has finished.
This solution is based on Rowan Oulton’s article Testing Elasticsearch in Rails. Many claps for him!
Let’s start with DatabaseCleaner. Inside spec/rails_helper.rb add the following code:
# spec/rails_helper.rb
...
RSpec.configure do |config|
  ...

config.before(:suite) do
    DatabaseCleaner.strategy = :transaction
    DatabaseCleaner.clean_with(:truncation)
  end

config.around(:each) do |example|
    DatabaseCleaner.cleaning do
      example.run
    end
  end
end
Next, let’s think about the Elasticsearch test server setup. We need to add some configuration files so that Rails knows where to find our Elasticsearch executable. It will also tell it on which port we want it to run, based on the current environment. To do so, add a new configuration yaml to your config folder:
# config/elasticsearch.yml

development: &default
  es_bin: '../elasticsearch-6.2.3/bin/elasticsearch'
  host: 'http://localhost:9200'
  port: '9200'
test:
  es_bin: '../elasticsearch-6.2.3/bin/elasticsearch'
  host: 'http://localhost:9250'
  port: '9250'
staging:
  <<: *default
production:
  es_bin: '../elasticsearch-6.2.3/bin/elasticsearch'
  host: 'http://localhost:9400'
  port: '9400'
If you did not create the rails application in the same folder where you downloaded Elasticsearch, or if you are using a different version of Elasticsearch, you will need to adjust the es_bin path here.
Now add a new file to your initializers folder that will read from the configuration we just added:
# config/initializers/elasticsearch.rb

if File.exists?("config/elasticsearch.yml")
   config = YAML.load_file("config/elasticsearch.yml")[Rails.env].symbolize_keys
   Elasticsearch::Model.client = Elasticsearch::Client.new(config)
end
And finally let’s change spec_helper.rb to include the Elasticsearch test setup. This means start and stop an Elasticsearch test server and create/delete Elasticsearch indexes for our Rails model.
# spec/spec_helper.rb

require 'elasticsearch/extensions/test/cluster'
require 'yaml'

RSpec.configure do |config|
  ...
  # Start an in-memory cluster for Elasticsearch as needed
  es_config = YAML.load_file("config/elasticsearch.yml")["test"]
  ES_BIN = es_config["es_bin"]
  ES_PORT = es_config["port"]

config.before :all, elasticsearch: true do
    Elasticsearch::Extensions::Test::Cluster.start(command: ES_BIN, port: ES_PORT.to_i, nodes: 1, timeout: 120)  unless Elasticsearch::Extensions::Test::Cluster.running?(command: ES_BIN, on: ES_PORT.to_i)
  end

# Stop elasticsearch cluster after test run
  config.after :suite do
    Elasticsearch::Extensions::Test::Cluster.stop(command: ES_BIN, port: ES_PORT.to_i, nodes: 1) if Elasticsearch::Extensions::Test::Cluster.running?(command: ES_BIN, on: ES_PORT.to_i)
  end

# Create indexes for all elastic searchable models
  config.before :each, elasticsearch: true do
    ActiveRecord::Base.descendants.each do |model|
      if model.respond_to?(:__elasticsearch__)
        begin
          model.__elasticsearch__.create_index!
          model.__elasticsearch__.refresh_index!
        rescue => Elasticsearch::Transport::Transport::Errors::NotFound
          # This kills "Index does not exist" errors being written to console
        rescue => e
          STDERR.puts "There was an error creating the elasticsearch index for #{model.name}: #{e.inspect}"
        end
      end
    end
  end

# Delete indexes for all elastic searchable models to ensure clean state between tests
  config.after :each, elasticsearch: true do
    ActiveRecord::Base.descendants.each do |model|
      if model.respond_to?(:__elasticsearch__)
        begin
          model.__elasticsearch__.delete_index!
        rescue => Elasticsearch::Transport::Transport::Errors::NotFound
          # This kills "Index does not exist" errors being written to console
        rescue => e
          STDERR.puts "There was an error removing the elasticsearch index for #{model.name}: #{e.inspect}"
        end
      end
    end
  end

end
We have defined four blocks:
- a before(:all) block that starts an Elasticsearch test server, unless it is already running
- an after(:suite) block that stops the Elasticsearch test server, if it is running
- a before(:each) block that creates a new Elasticsearch index for each model that is configured with Elasticsearch
- an after(:each) block that deletes all Elasticsearch indexes
Adding elasticsearch: true ensures that only tests tagged with elasticsearch will run these blocks.
I find that this setup works great when you run all your tests once, for example before a deploy. On the other hand, if you’re using a test driven development approach and you run your tests very often, then you will probably need to modify this configuration slightly. You do not want to start and stop your Elasticsearch test server at each test run.
In this case, you could comment out the after(:suite) block where the Test Server is stopped. You can shut it down manually, or using a script, whenever you don’t need it anymore.
require 'elasticsearch/extensions/test/cluster'
es_config = YAML.load_file("config/elasticsearch.yml")["test"]
ES_BIN = es_config["es_bin"]
ES_PORT = es_config["port"]
Elasticsearch::Extensions::Test::Cluster.stop(command: ES_BIN, port: ES_PORT.to_i, nodes: 1)
3. Model indexing with Elasticsearch
Now we start implementing our Movie Model with search capabilities. We use a Test Driven Development approach. This means that we write tests first, see them fail, and then write code to make them pass.
First we need to add the movie model which has four attributes: a title (String), an overview (Text), an image_url(String), and an average vote value (Float).
$ rails g model Movie title:string overview:text image_url:string vote_average:float

$ rails db:migrate
Now it’s time to add Elasticsearch to our model. Let’s write a test that checks that our model is indexed.
# spec/models/movie_spec.rb
require 'rails_helper'

RSpec.describe Movie, elasticsearch: true, :type => :model do
  it 'should be indexed' do
     expect(Movie.__elasticsearch__.index_exists?).to be_truthy
  end
end
This test will check if an elasticsearch index was created for Movie. Remember that before tests begin, we automatically create an elasticsearch index for all models that respond to the __elasticsearch__ method. That means for all models that include the elasticsearch modules.
Run the test to see it fail.
bundle exec rspec spec/models/movie_spec.rb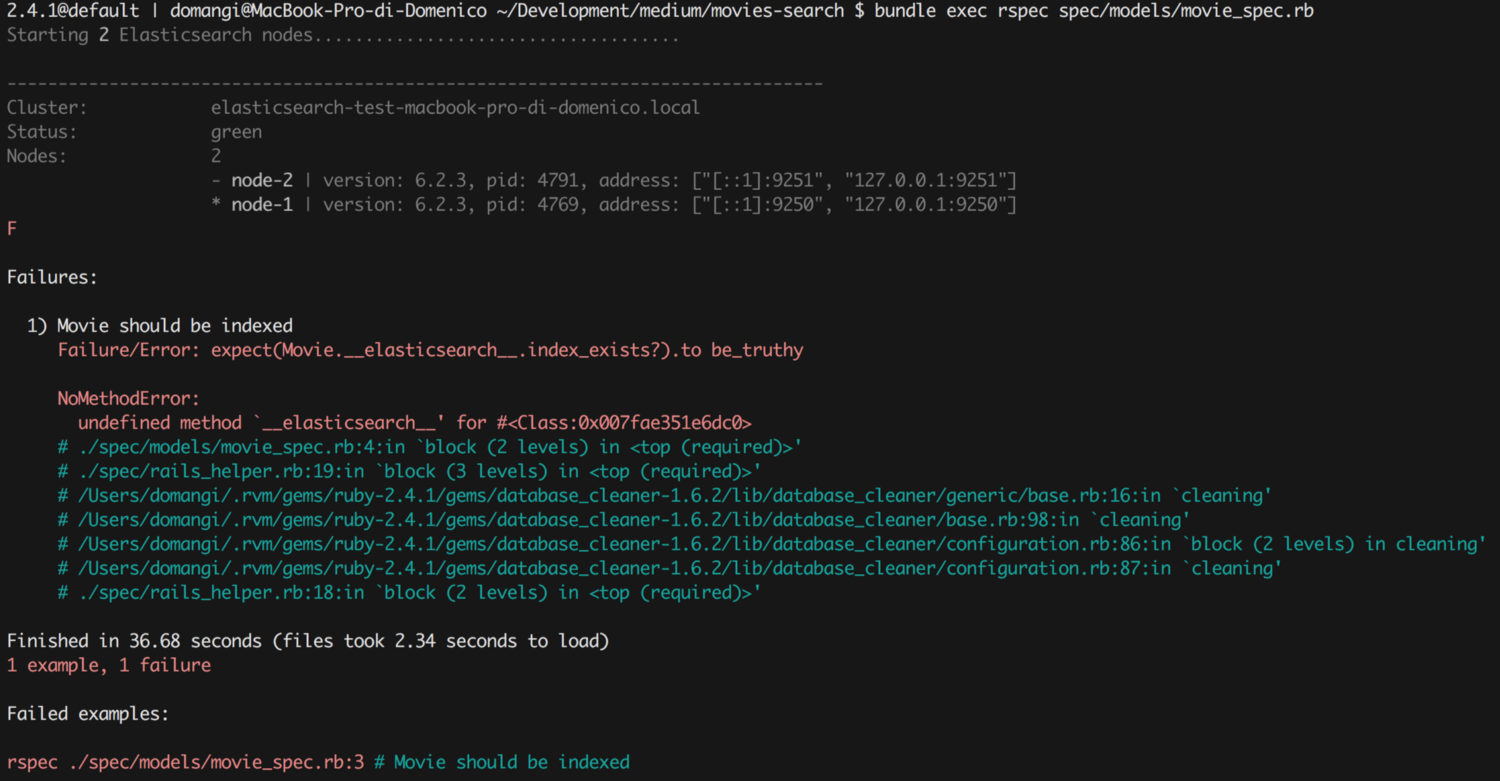
The first time you run this test, you should see that the Elasticsearch Test Server is starting. The test fails, because we didn’t add any Elasticsearch module to our Movie model. Let’s fix that now. Open the model and add the following Elasticsearch to include:
# app/models/movie.rb

class Movie < ApplicationRecord
  include Elasticsearch::Model
end
This will add some Elasticsearch methods to our Movie model, like the missing __elasticsearch__ method (which generated the error in the previous test run) and the search method we will use later.
Run the test again and see it pass.
bundle exec rspec spec/models/movie_spec.rb
Great. We have an indexed movie model.
By default, Elasticsearch::Model will setup an index with all attributes of the model, automatically inferring their types. Usually this is not what we want. We are now going customize the model index so that it has the following behavior:
- Only title and overview should be indexed
- Stemming should be used (which means that searching for “actors” should also return movies that contain the text “actor,” and vice-versa)
We also want our index to be updated each time a Movie is added, updated, or deleted.
Let’s translate this into tests by adding the following code to movie_spec.rb
# spec/models/movie_spec.rb
RSpec.describe Movie, elasticsearch: true, :type => :model do
  ...

describe '#search' do
    before(:each) do
      Movie.create(
        title: "Roman Holiday",
        overview: "A 1953 American romantic comedy films ...",
        image_url: "wikimedia.com/Roman_holiday.jpg",
        vote_average: 4.0
      )
      Movie.__elasticsearch__.refresh_index!
    end
    it "should index title" do
      expect(Movie.search("Holiday").records.length).to eq(1)
    end
    it "should index overview" do
      expect(Movie.search("comedy").records.length).to eq(1)
    end
    it "should not index image_path" do
      expect(Movie.search("Roman_holiday.jpg").records.length).to eq(0)
    end
    it "should not index vote_average" do
      expect(Movie.search("4.0").records.length).to eq(0)
    end
  end

end
We create a Movie before each test, because we configured DatabaseCleaner so that each test is isolated. Movie.__elasticsearch__.refresh_index! is needed to be sure that the new movie record is immediately available for search.
As before, run the test and see it fail.
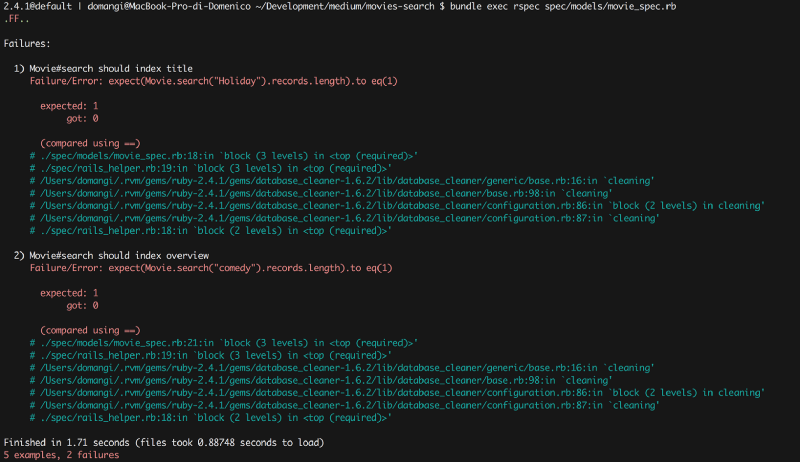
Seems that our movie is not being indexed. That’s because we didn’t yet tell our model what to do when the movie data changes. Thankfully, this can be fixed by adding another module to our Movie model:
class Movie < ApplicationRecord
  include Elasticsearch::Model
  include Elasticsearch::Model::Callbacks
end
With Elasticsearch::Model::Callbacks, whenever a movie is added, modified, or deleted, its document on Elasticsearch is also updated.
Let’s see how the test output changes.
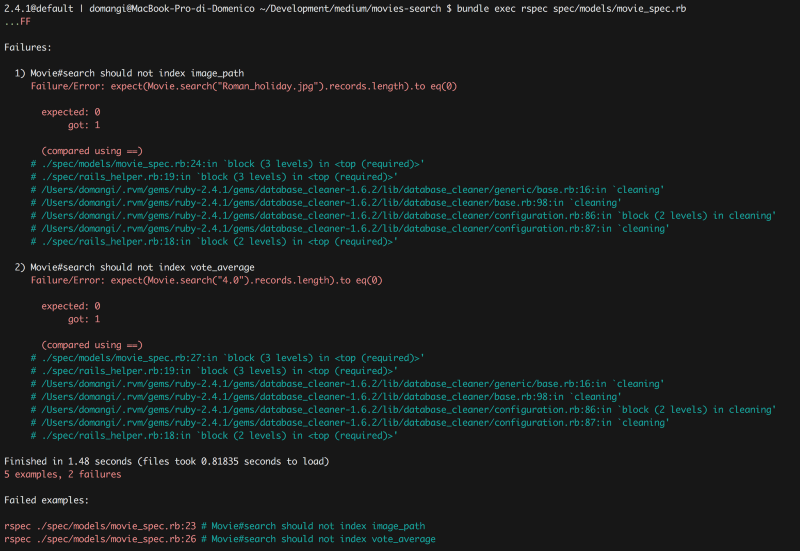
Ok. Now the problem is that our search method also returns queries that match on the attributes vote_average and image_url. To fix that we need to configure the Elasticsearch index mapping. So we need to tell Elasticsearch specifically which model attributes to index.
# app/models/movie.rb

class Movie < ApplicationRecord
  include Elasticsearch::Model
  include Elasticsearch::Model::Callbacks

# ElasticSearch Index
  settings index: { number_of_shards: 1 } do
    mappings dynamic: 'false' do
      indexes :title
      indexes :overview
    end
  end
end
Run the test again and see it pass.

Cool. Now let’s add a stemmer so that there is no difference between “actor” and “actors.” As always, we will first write the test and see it fail.
describe '#search' do
    before(:each) do
      Movie.create(
        title: "Roman Holiday",
        overview: "A 1953 American romantic comedy films ...",
        image_url: "wikimedia.com/Roman_holiday.jpg",
        vote_average: 4.0
      )
      Movie.__elasticsearch__.refresh_index!
    end

...

it "should apply stemming to title" do
      expect(Movie.search("Holidays").records.length).to eq(1)
    end

it "should apply stemming to overview" do
      expect(Movie.search("film").records.length).to eq(1)
    end
end
Note that we are testing both ways: Holidays should return also Holiday, and Film should also return Films.

To make these tests pass again, we need to modify the index mapping. We’ll do that this time by adding an English analyzer to both fields:
class Movie < ApplicationRecord
  include Elasticsearch::Model
  include Elasticsearch::Model::Callbacks

# ElasticSearch Index
  settings index: { number_of_shards: 1 } do
    mappings dynamic: 'false' do
      indexes :title, analyzer: 'english'
      indexes :overview, analyzer: 'english'
    end
  end
end
Run your tests again to see them pass.

Elasticsearch is a very powerful search platform, and we could add a lot of functionalities to our search method. But this is not within the scope of this article. So we will stop here and move on to building the controller part of the JSON API through which the search method is accessed.
4. Search API endpoint
The Search API we are building should allow users to make a fulltext search on the Movies Table. Our API has a single endpoint defined as follows:
Url:
 GET /api/v1/movies

Params:
 * q=[string] required

Example url:
 GET /api/v1/movies?q=Roma

Example response:
[{"_index":"movies","_type":"movie","_id":"95088","_score":11.549209,"_source":{"id":95088,"title":"Roma","overview":"A virtually plotless, gaudy, impressionistic portrait of Rome through the eyes of one of its most famous citizens.", "image_url":"https://image.tmdb.org/t/p/w300/rqK75R3tTz2iWU0AQ6tLz3KMOU1.jpg","vote_average":6.6,"created_at":"2018-04-14T10:30:49.110Z","updated_at":"2018-04-14T10:30:49.110Z"}},...]
Here we are defining our endpoint according to some best practices RESTful API Design:
- The URL should encode the object or resource, while the action to take should be encoded by the HTTP method. In this case, the resource is the movies (collection) and we are using the HTTP method GET (because we are requesting data from the resource without producing any side effect). We use URL parameters to further define how this data should be obtained. In this example, q=[string], which specifies a search query. You can read more about how to design RESTful APIs on Mahesh Haldar’s article RESTful API Designing guidelines — The best practices.
- We also add versioning to our API by adding v1 to our endpoint URL. Versioning your API is very important, because it allows you to introduce new features that are not compatible with previous releases without breaking all clients that were developed for previous versions of your API.
Ok. Let’s start implementing.
As always, we begin with failing tests. Inside the spec folder, we will create the folder structure that reflects our API endpoint URL structure. This means controllers →api →v1 →movies_spec.rb
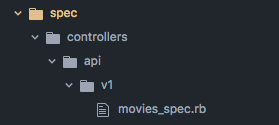
You can do this manually or from your terminal running:
mkdir -p spec/controllers/api/v1 &&
touch spec/controllers/api/v1/movies_spec.rb
The tests we are going to write here are controller tests. They do not need to check the search logic defined in the model. Instead we will test three things:
- A GET request to /api/v1/movies?q=[string] will call Movie.search with [string] as parameter
- The output of Movie.search is returned in JSON format
- A success status is returned
A controller test should test controller behavior. A controller test should not fail because of problems in the model .
(Prescription 20 — Rails 4 Test Prescriptions. Noel Rappin)
Let’s transform this into code. Inside spec/controllers/api/v1/movies_spec.rb add the following code:
# spec/controllers/api/v1/movies_spec.rb
require 'rails_helper'
RSpec.describe Api::V1::MoviesController, type: :request do
  # Search for movie with text movie-title
  describe "GET /api/v1/movies?q=" do
    let(:title) { "movie-title"}
    let(:url) { "/api/v1/movies?q=#{title}"}

it "calls Movie.search with correct parameters" do
      expect(Movie).to receive(:search).with(title)
      get url
    end

it "returns the output of Movie.search" do
      allow(Movie).to receive(:search).and_return({})
      get url
      expect(response.body).to eq({}.to_json)
    end

it 'returns a success status' do
      allow(Movie).to receive(:search).with(title)
      get url
      expect(response).to be_successful
    end
  end
end
The test will immediately fail because Api::V1::MoviesController is not defined, so let’s do that first. Create the folder structure as before and add the movies controller.
mkdir -p app/controllers/api/v1 &&
touch app/controllers/api/v1/movies_controller.rb
Now add the following code to app/controllers/api/v1/movies_controller.rb:
# app/controllers/api/v1/movies_controller.rb
module Api
  module V1
    class MoviesController < ApplicationController
      def index;end
    end
  end
end
It’s time to run our test and see it fail.
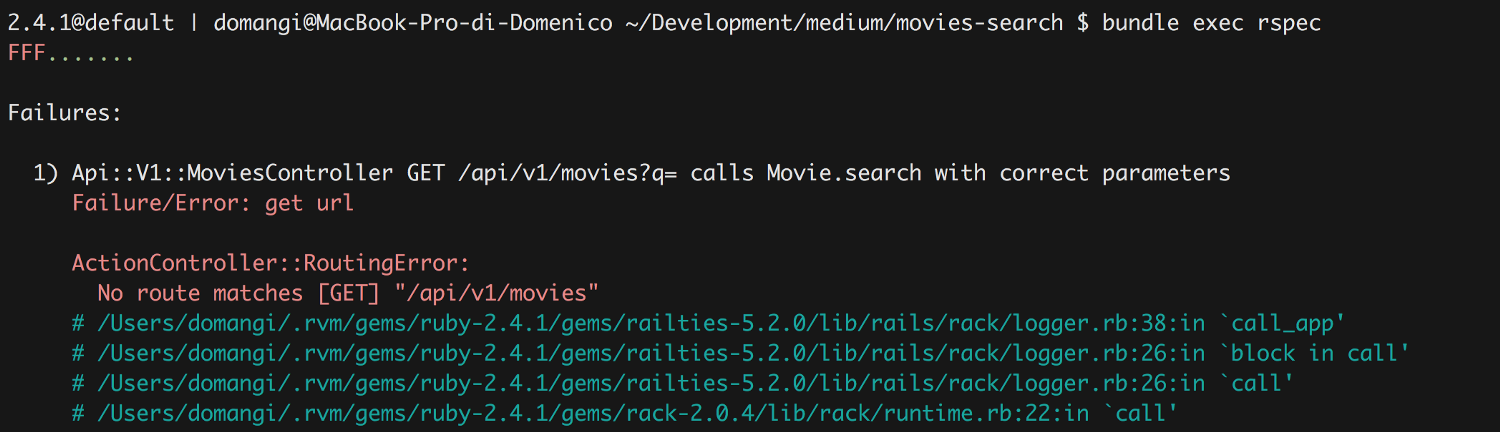
All tests fail because we still need to add a route for the endpoint. Inside config/routes.rb add the following code:
# config/routes.rb
Rails.application.routes.draw do
  namespace :api do
    namespace :v1 do
      resources :movies, only: [:index]
    end
  end
end
Rerun your tests and see what happens.
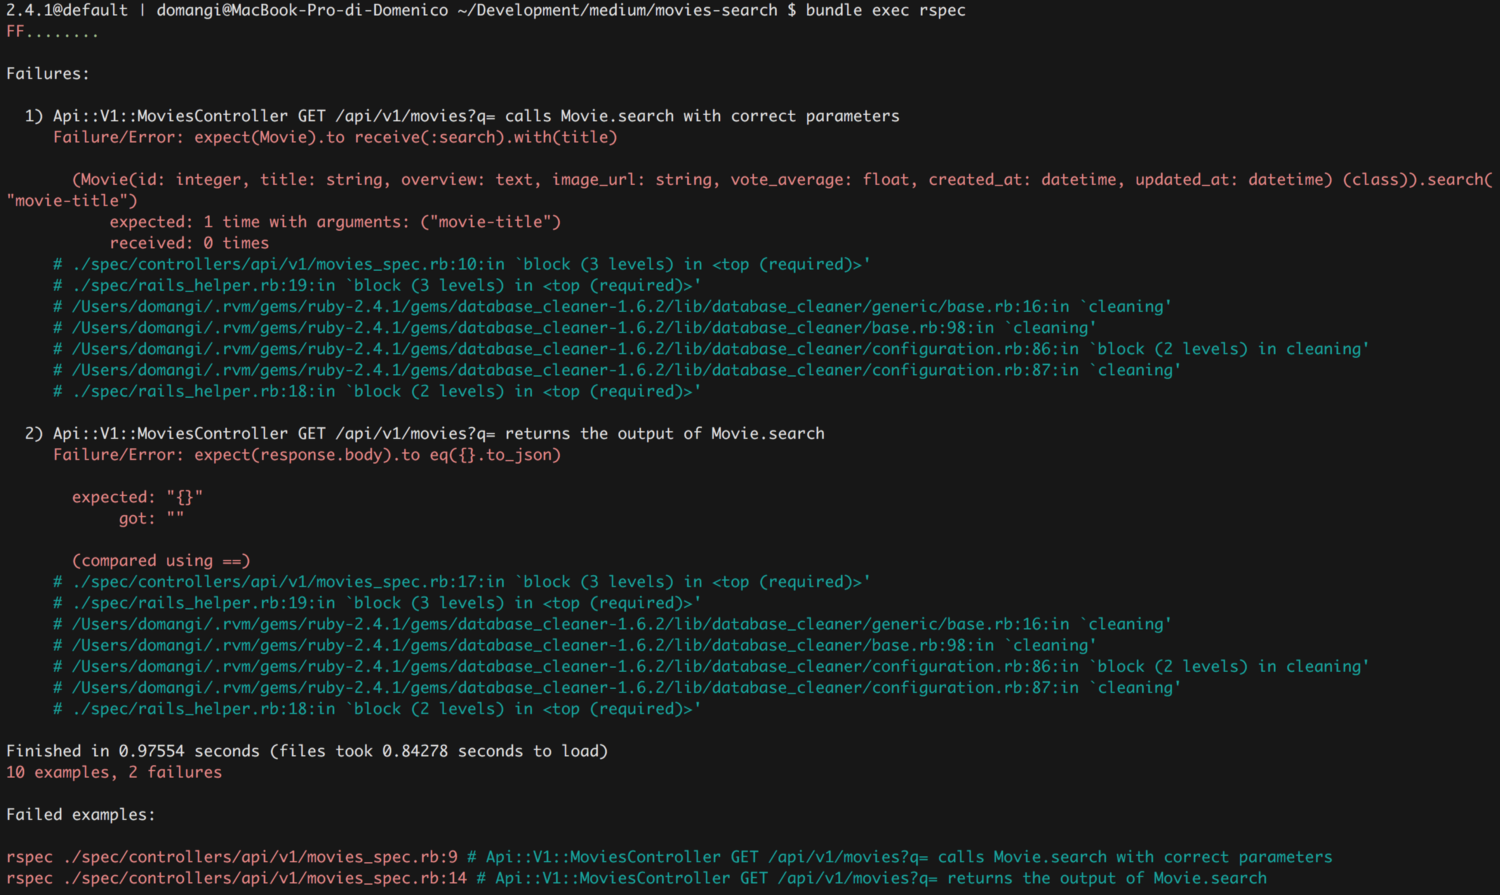
The first error tells us we need to add a call to Movie.search inside our controller. The second one complains about the response. Let’s add the missing code to the movies_controller:
# app/controllers/api/v1/movies_controller.rb
module Api
  module V1
    class MoviesController < ApplicationController
      def index
        response = Movie.search params[:q]
        render json: response
      end
    end
  end
end
Run the test and see if we are done.

Yup. That’s all. We have completed a really basic backend application that allows users to search a model through API.
You can find the complete code on my GitHub repo here. You can populate your Movie table with some data by running rails db:seed so that you can see the application in action. This will import circa 45k Movies from a Dataset downloaded from Kaggle. Take a look at the Readme for more details.
If you enjoyed this article, please share it on social media. Thank you!