by Srushtika Neelakantam
How to build a multiplayer VR web app
In this article, we’ll learn about three great frameworks/libraries that allow any web developer to build a VR app that works on any device in minutes. It will also allow networked realtime interaction by peers from all over the world.
Virtual reality (VR) has come to an amazing level where it does not need any introduction. However, from a developer’s perspective, building simple VR apps still seems to be a complex task, let alone networked multiplayer ones.
What will we build?
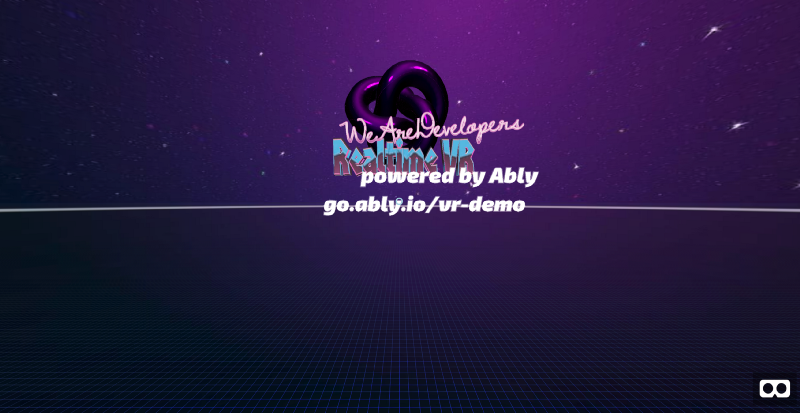
By the end of this tutorial, you will have a VR app similar to the one seen in the above picture. It will have a basic VR scene where multiple users can connect to your app from their mobile phones by simply hitting a URL on their mobile phone’s browsers.
Don’t know or understand a lot of the terms I just used? Don’t worry, we’ll have a look at all of it shortly, and it will all start to make sense soon!
Basically, for every user who joins your application, a new avatar will appear in your VR scene (Note: I’m just using a fancy term ‘avatar’ for that set of boxes which barely resembles a real human :P ). These avatars will rotate/move in realtime, according to the movement of users’ phones in real life.
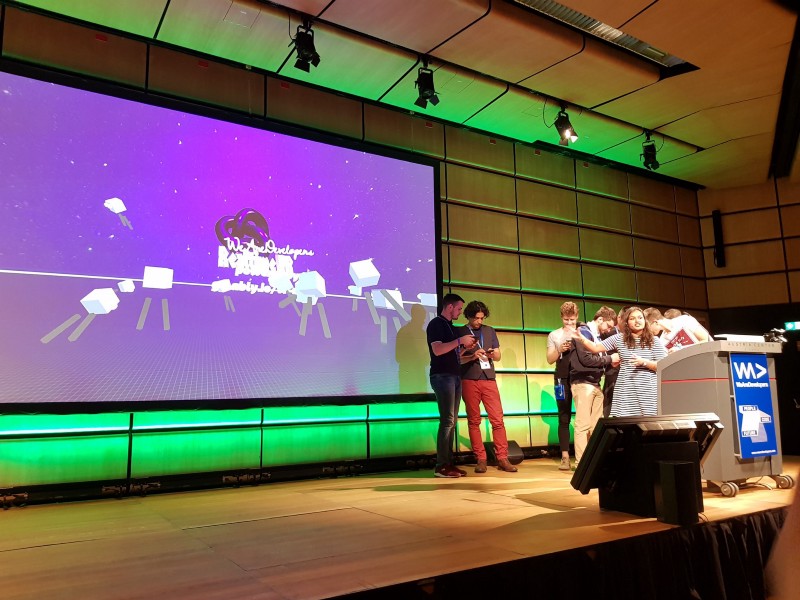
This app was demo-ed during my talk at WeAreDevelopers World Congress 2018. You can check out the slides below.
Skip to live demo
The complete project is hosted on Glitch — I think it’s the easiest way to host your community projects or demos. It also allows multiple developers to collaborate on a project remotely. You should totally check it out.
Instructions for the live demo:
- open up the link in a browser window on your computer/mobile.
- open up another instance of the application in another browser window/mobile.
You can see the avatar of each of these instances in the other. Try moving the mobile phone in the air and you’ll see that the corresponding avatar seen on the computer browser moves as well. If you have two VR headsets (even cardboards are fine), you and a friend can put them on and see each other’s avatars move in the scene as you are moving your head in real life.
Play around a bit or read on further to understand what’s happening and how. You can also check out the complete code, hosted on GitHub. Make sure to read the readme file:
Jump to the complete source code on GitHub.
What will we use?
As mentioned before, our aim is to access VR directly in the browsers, without having to download anything. We shall use the WebVR library in order to achieve this.
WebVR is a web framework that allows us to build VR applications which are accessible directly on the web. This completely eliminates heavy downloads and installs, as well as making the VR app device-independent.

However, even though WebVR gives us the ability to leverage the many advantages of the web, it still requires a considerable amount of complex work. This may, in fact, require knowledge of WebGL and other libraries to be able to build a smooth experience.
A-Frame
This, again, tends to be a bottleneck for the developers of the web to build something that will be eventually served on the web itself. And so, Mozilla’s VR team built a framework on top of WebVR called A-Frame.
A-Frame completely eliminates WebVR’s boilerplate code and allows developers to build VR apps with simple HTML custom tags. With, of course, JavaScript making various bits and piece work together, as always.

Ably
Further, we’ll use Ably Realtime to implement all the realtime —and multiplayer — functionality in the application. Ably is a realtime data delivery platform that solves the realtime message delivery problem by offering features like Pub/Sub and Presence out of the box.

Note: The limits for an Ably free account (that is used in the Live Demo) allow you to have a maximum of two instances of the app running at any time. If you wish to have more instances running, have a look at the Ably self-service package and buy more messages accordingly.
Glitch
As you know by now, every WebVR application can be accessed from just a browser. This means we’ll need to host our files in order to be able to access them on a mobile device using a URL.
Glitch is a very convenient way of doing this. You can simply create a new project. When you are done, a URL is readily available for use on any platform or device instantly.
Authentication and assigning unique ids
First things first. We’ll need to setup an auth server that verifies our users’ credentials and authenticates them with Ably, while also assigning a random clientId to each of those. This clientId will serve as a way to identify each of these avatars separately, and handle information such as their respective position updates, and appearance/disappearance as per user login/logout. We’ll set up a simple express server for this, as shown below:
If you observe closely, this express server serves the files present in the root directory of the project. So make sure the “index.html” file that you build further on is in the same folder as the “auth-server”.
If you wish to serve these files locally, rather than on Glitch, replace the code for the listener variable with the following:
Since this is only a tutorial, we are not actually checking any credentials before authenticating the clients. Ideally, the auth server would have a validation step.
The project structure is simple, with the following files all in the same parent folder:
- auth_server.js
- index.html
- main.js
Getting started
Let’s start by building the basic VR setup for the application. We’ll use A-Frame’s entity-component-system (ECS). ECS makes it easy to build any objects in the scene. Every object is treated as an entity which differs from other entities by the various components (or attributes) that are attached to it.
In your HTML file, start off by adding the HTML skeleton code:
The references refer to the following, respectively:
- Ably’s JS client library
- JQuery Framework
- A-Frame’s JS build
- A local JS file (“main.js”) where we’ll add the logic of the app
- A-frame’s community contributed text component to conveniently add stylised text to our VR scene.
All the objects we wish to include in our VR scene must go within the a-scene tag in our HTML file, as scene above (pun intended)! This is analogous to the body tag in regular HTML documents.
Next, we will add all the assets we wish to use within the a-assets tag. Adding all the resources under this tag makes sure that all your assets are pre-loaded before your app shows up. This prevents a crappy first look due to slow loading of part of the resources.
Feel free to use your own resources to give the app a customised feel! You can see that we have added two new tags in the above code snippet, let’s dig into them:
a-asset-item — invokes the three.js file loaders. You can use this to load all file types.
a-mixin — is a very useful tag that allows code reuse by letting you specify a set of properties (components) to be applied to a single entity. You can give it an id and reference it multiple times as we’ll see. We will have three mixins, each specifying certain attributes for the avatar that we intend to create — the eyes, pupils, and arms.
Now, let’s add all the static visual elements in our VR scene.
As you can see, we have implemented the complete app using ECS. However, this is not the only way that you can add objects to the scene. A-Frame comes with a few custom entities such as box, sphere, and so on. These custom entities are called primitives.
The code contains very easy to follow comments that explain what each of the entity-component sets is trying to implement in our app.
For VR newbies, here’s something interesting — a sky is like a layer that covers your 360 deg sphere inside which you assume yourself to be standing while experiencing a VR app. It is generally analogous to the sky in real-life which can be seen on the top and appears to drop down near the horizon. We use a-sky in A-Frame to add a sky and the resource to be used can be either a 360 deg image or just a solid colour.
Now comes another interesting part. We require a camera entity. This is a special entity offered by A-Frame. It grabs the continuously changing position as well as rotation values of your mobile phone while you are using an A-Frame powered VR app in the browser. The entity takes advantage of the various gyro sensors in your phone to achieve this under-the-hood. In a computer, the camera entity follows the WASD controls to capture the position and rotation.
Here’s how we can add a camera entity. We can optionally give it a shape and animation, which helps us track its movement by serving as a cursor.
By the end of this section, your VR app should ideally look like what’s shown below. But only if you haven’t switched the resources with your custom ones, of course!
Voilà! We just finished setting up the basic VR scene.
It’s now time to add some functionality to it — to make the avatars appear, disappear, and move around in realtime as the users log in and out of your application, or simply move their phone around.
Adding realtime functionality
It’s time to spin up some magic into our VR scene. Using Ably, it is very easy to implement this. We’ll use Pub/Sub and Presence, which are both offered as direct use out-of-the-box features by Ably.
Start by connecting your client/user to Ably. Since we are using Token Authentication, we’ll simply add a route to the auth server, as shown below:
Note: we have specified echoMessage: false. This prevents your client from being subscribed to messages published by itself, ensuring lower message count/usage on the whole app. By default, this option is always true.
After successfully authenticating the client, we’ll store the id returned by the auth server in a variable so we can use it later on.
Next, let’s set up the first function that initialises our application. In this function, we set an initial position of the avatar. For simplicity, we’ll restrict the avatar’s rotation/movement to x-axis only, while keeping the coordinates on the other two planes as zero. The initial position on the x-axis is chosen randomly so that multiple avatars do not clutter at the same point in the scene as soon as they appear. We also set some initial attributes such as colour and dimensions.
In order to send this data to Ably, we need to create a channel. I’ve called it vr-channel. After that’s done, we can publish the initial attributes on this channel.
However, we want to continuously publish this data so all the other users are able to receive it in realtime. In other words, we want to publish data as the position and rotation attributes are changing. This data is directly handed to us by the camera entity in A-Frame. We just need to publish this data on the same channel at a high frequency. In this case, I’m publishing at every 100ms.
a-box is a primitive in A-Frame that can be conveniently used to create a 3D box with basic attributes such as dimensions, position, rotation, color, and so on.
You can see that there are three subfunctions within the above function that we have not yet discussed. Presence is a common term in the realtime world which gives you the information about a user/device’s online or connection status. In our case, we would:
- create and make the avatar appear in the scene only when a user comes online (hits the URL)
- and, likewise, make it disappear as soon as a user quits the app (closes the browser window on their phone or browser).
Additionally, Ably allows you to subscribe to presence events. A callback is fired every time a new user logs in or an existing user logs out. This is exactly what we require for our app.
Using channel.presence.get() you can get a list of all the members currently connected to Ably (are online).
Using channel.presence.subscribe('enter') you can get notified whenever a user becomes connected to Ably (comes online).
Using channel.presence.subscribe('leave') you can get notified whenever a user becomes disconnected from Ably (goes offline).
As soon as a user comes online, we need to subscribe everyone else to the attribute changes of the new user’s avatar. These changes, as you can observe, will be in the attr object due to changing position and rotation. Our goal is to update the avatar as these attributes update.
Before that, we need to ensure that the avatar exists at all, or if a new one needs to be created. We do this by using a simple map of avatars where we store the IDs of all the existing avatars, as shown:
Next, we need to make all the users subscribe to changes in the attributes of everyone else, apart from themselves. We do so by making them subscribe to the specific event on the same channel to which it is being published, like so:
When a new user enters, we need to create a new avatar with all the necessary attributes. The following function gets all the initial attributes over Ably. It creates a new avatar with these attributes, and attaches other parts like eyes, pupils, and arms relative to the position of the main box (representing the head of the avatar). This manual positioning becomes easier with the use of a visual inspector tool that comes with A-Frame.
After we have built all the different parts of an avatar, we bind them all together by attaching them to a root avatar. This gives us a way to perform actions like position updates and so on on the avatar as a whole. You wouldn’t want a zombie-like situation with the head moving in one direction and eyes moving in the other, right? ;) This also makes it easy to delete the whole avatar when a user logs out.
If an avatar already exists, we simply update its position and rotation from the continually updating data in the attrobject of the respective users.
Scroll back up to the subscribeToAvatarChanges() function. You will observe that the updateAvatar() is a callback function to a channel subscription which is invoked when the attributes of an existing avatar change. This makes it very easy for us to continually update the actual avatar as well, according to the changing data. We simply update the position and rotation with new values, as shown below:
Finally, we need to ensure that the avatar is removed from the scene whenever a user logs out/ goes offline. This can be done using presence again, by handling the leave event mentioned earlier. Here are a few things you need to do when a user logs out:
We start by deleting the corresponding entry in our array and follow it by deleting the complete avatar from the scene.
That’s it!
We have now successfully implemented a Multiplayer VR app that runs on the web and works in realtime. Go ahead and test it out with your friends and let them witness the magic! If you have been working in a local envrironment, you might need a local server to host your files, as mentioned above. I personally use Glitch for all my VR projects.
You now know the basics of both A-Frame and Ably, allowing you to build both VR apps and realtime apps or — even better — a collaborative app, like the one we just did.
Ideas are already brewing in your mind? Go ahead and build that app you’ve always wanted to! Here’s the complete source code for this application. Feel free to give a shout to me on Twitter if you get stuck or would like to know more about something.