by Moses Soh
I built a serverless Telegram bot over the weekend. Here’s what I learned.

I built a Telegram chatbot that sends out a SOS to rescuers when someone is stranded in the rain. It’s written in Python using AWS Lambda, Zappa and Flask.
You can try it here. I haven’t added in persistence yet ? but I think some of this here might be useful to anyone else interested in a similar project.
I normally have a hard time getting my fiancée to discuss technology. It’s come to a point where she can’t help but stifle a yawn once I say “code”.
Imagine my surprise this weekend when she asked me — pretty much out of the blue — how much it would cost to make a mobile app.
After losing it for a bit, here’s what I found out.
The problem
My fiancée’s workplace is close to two MRT stations but there aren’t any covered paths from the MRT stations to her building. When it rains, people without umbrellas get stranded at the stations. She and her colleagues often head down to help friends out, but there are often more people stranded there than they expected.
Her colleagues were discussing if an app could help solve this. Well, I thought that a chatbot might be able to have the same functions (such as sending out request for umbrellas, location sharing, getting replies). And you could avoid convincing people to download another app.
Since I’d been meaning to try out Telegram’s bot APIs for awhile now, I volunteered to help build out a prototype so we could see how interesting this might actually be.
The chatbot
I started working on this on Saturday afternoon and went to bed at 2am on Sunday. But I’m really happy to have gone from knowing nothing about the bot APIs to being able to make something like this.
Anyone can request an umbrella. The bot asks where the person is, how many umbrellas he/she might need, and when they’d like to be picked up (the options are limited so we don’t tax our rescuers too much).
People can register to be rescuers. A little good karma goes a long way ?
Rescuers get notified whenever someone near them is stranded in the rain. I wanted to make it clear to rescuers whether they were responsible for the request once they had pressed “Yes”.
In the process I learned a few tricks about making the development a lot faster. I spent almost six hours before I managed to find the right tools and a development workflow that worked for me. Building the bot logic took me a much shorter time.
What I used
AWS Lambda
Instead of running a server 24/7, you can host functions in Lambda so that the server only lasts for the lifecycle of the request. It’s great for prototypes since you get 1 million free requests a month.
Zappa
This automates the steps needed to get your local Python code onto AWS Lambda. It also configures Amazon’s API Gateway so you have a nice HTTPS endpoint to host your chatbot functions.
ngrok
This makes any local servers reachable via the internet. It’s a great way to prototype web-hooks before actually deploying them to the cloud.
These tools helped me avoid a lot of the headache that goes into making a chatbot (e.g. renting a server, configuring it for HTTPS, figuring out how to make the server non-blocking since this is a chatbot).
Today I’ll show you how I used these tools to develop the chatbot above. Hope this will help someone else on a similar journey.
Walkthrough
This tutorial assumes that you’re making a chatbot with no knowledge of how Telegram’s bot API works, but with a working knowledge of Flask and Python. If anything seems too simple for you, feel free to skip ahead!
Create a Telegram bot
Visit the Botfather. Type /newbot and follow his instructions to set up a new bot.

⚡ Pro tip: save the token somewhere, we’ll be using it soon!
Feel free to play around with the bot’s profile picture, about text, and description to give it whatever personality you want. Typing /help with the Botfather gives you the full list of settings you can tweak for your bot.
Set up a development server with Flask
I worked with pipenv to manage my project’s Python dependencies. If you’re still using pip and virtualenv I encourage you guys to give this a try. There’s installation instructions at the link.
Next we’ll install Flask. We’ll also use the awesome requests library. In your command line type:
pipenv install flaskpipenv install requestsAfter flask is installed, we’ll set up a basic server to test our bot. Copy the following text into a file called server.py .
⚡ Pro tip: Make sure you replace <your-bot-token> with the API token we got from the Botfather.
Let’s break down what this is doing. Telegram’s API works this way. Firstly, when someone sends your bot a message, that message gets sent to Telegram’s servers. Telegram then forwards us that message to whatever we specify as our web-hook as a POST request.
The function process_update() and the decorator above it says that when anyone POSTs to the domain http://127.0.0.1:5000/<your-bot-token> , we will extract the JSON data from it. If it’s a normal text message, it will have the key message in the JSON. We check for that and if it’s a normal message, we reply using process_message(update) .
The function process_message() constructs the payload that the Telegram API is expecting if we want to reply to the message. We basically need to specify our reply text in data["text"] and the chat we’re replying to in data["chat_id"] .
Finally, we send a POST request with this payload to the Telegram API endpoint for the sendMessage method. This allows us to send a message programmatically.
Time to run the server. Now in your command prompt type:
pipenv shellThis activates the virtual environment and gives us access to Flask. Now we need to run the server locally. Type in the command prompt:
export FLASK_APP=server.pyflask runWe have a running server! If you didn’t mess with the defaults, this is running at http://127.0.0.1:5000/.
Read more at the Flask documentation and quick-start.
But this is running locally, and Telegram’s bot API can’t send its POST requests to a local URL. Hence we’ll use ngrok to expose this local server to the internet.
Use ngrok to make the local server accessible on the internet
Get the package for your operating system from this link on the ngrok website. Once you’ve downloaded and installed it, go to the directory that you unzipped the file into and run the following command in the command prompt.
./ngrok http 5000You’ll see something similar in your command prompt. Now whatever server you’re running on localhost:5000 is exposed at the following URLs.
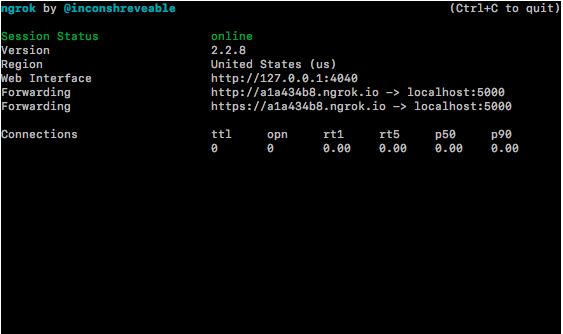
⚡ Pro tip: Copy the https url, we’re going to use it soon.
Time to let Telegram know what our web-hook address is. We’ll use the Telegram API again to set our web-hook.
Create a file called webhook.py with the following content:
⚡ Pro tip: Remember to replace <your-bot-token>; and <your-https-url> !
pprint lets us print out nicely formatted JSON data. We send our web-hook URL as a POST request to the setWebhook endpoint of the Telegram API. Now run the following lines in your command prompt:
pipenv install pprintpython webhook.pyYou should see 200 and a JSON block with 'ok': True .
Test out your chatbot
Now we’re done with setting up our server. Head over to your bot in Telegram, and say hello! If everything’s been set up correctly, you’ll see it reply I can hear you!
In the next part of this tutorial, we’ll learn how to deploy this server onto the internet using Zappa and AWS Lambda. Give this a couple of claps if this was helpful for you — I’d love to know if it was. Thanks ?