
by Jake Lumetta
How to build a serverless CMS-powered Vue.js application

Vue.js is getting a lot of love and exploding in popularity for good reason. As a progressively adoptable framework, it’s lightweight, reactive, and component-based, allowing you to create pluggable components you can add to any project.
The progressive framework of Vue.js is well-suited to serverless application architectures. Developers are increasingly turning to serverless architectures, because serverless allows them to create and fine-tune products more quickly without having to bear the burdens (server maintenance, outages, and scaling bottlenecks) of traditional server-based architecture.
Vue.js and its hallmark incremental adoptability allows you to try Vue without putting your existing code base at risk.
In this article, you’ll learn how to build a serverless Vue.js application using ButterCMS. ButterCMS is a headless CMS and blogging platform that lets you build CMS-powered apps using any programming language. This tutorial will show you how to add performant content APIs to your Vue.js application. These APIs are easy to navigate even for the non-technical members of your team, enabling you to enjoy agile content management without having to spin up and maintain your own CMS infrastructure.
Specifically, we’ll cover three use cases: marketing pages, blogging, and knowledge bases with code samples. The finished code for this tutorial is available on GitHub.
Getting Started
First, install the ButterCMS JS SDK. We’ll be using this to query the content API.
npm install buttercms — save
Once installed, you can follow the tutorials below for creating three types of content: marketing pages, blogging, and knowledge bases (For example, an FAQ).
Add Marketing Pages
Let’s say you want to enable a non-technical person on your team to add customer case study pages to your marketing site. To do this, we’ll create a case study page as an example. Using the dashboard on ButterCMS, you can create a “page type” titled “Customer Case Study” and define the fields.
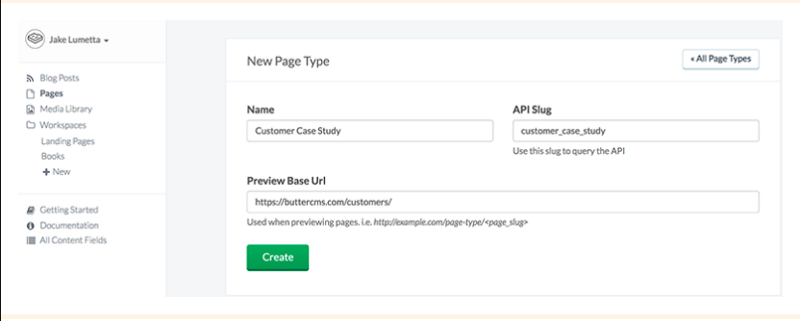
Once you’ve done this, you can create your first page. Specify the name and URL of the page using Butter’s dashboard and populate the content of the page. Once this is all done, ButterCMS’s API will return your defined page in JSON format. It should look something like this:
{ “data”: { “slug”: “acme-co”, “fields”: { “facebook_open_graph_title”: “Acme Co loves ButterCMS”, “seo_title”: “Acme Co Customer Case Study”, “headline”: “Acme Co saved 200% on Anvil costs with ButterCMS”, “testimonial”: “<p>We’ve been able to make anvils faster than ever before! — <em>Chief Anvil Maker</em></p>\r\n<p><img src=\”https://cdn.buttercms.com/NiA3IIP3Ssurz5eNJ15a\” alt=\”\” caption=\"false\" width=\”249\” height=\”249\” /></p>”, “customer_logo”: “https://cdn.buttercms.com/c8oSTGcwQDC5I58km5WV", } }}Next, open your code editor and create a file called buttercms.js in your /src directory.
If you don’t have an existing project, create one by entering the following:
vue init webpack buttercms-projectcd buttercms-projectnpm inpm i -S buttercmsnpm run devThen, in src/buttercms.js :
import Butter from ‘buttercms’;const butter = Butter(‘your_api_token’);Now, update the routes in your app. Access router/index.js and
import Vue from ‘vue’import Router from ‘vue-router’import CustomersHome from ‘@/components/CustomersHome’import CustomerPage from ‘@/components/CustomerPage’Vue.use(Router)export default new Router({ mode: ‘history’, routes: [ { path: ‘/customers/’, name: ‘customers-home’, component: CustomersHome }, { path: ‘/customers/:slug’, name: ‘customer-page’, component: CustomerPage } ] })Now, to set up a “customers” page to list all your customers, we’re going to define a getpages() method to get all customer pages. In the components/CustomersHome.vue file, we add the following:
<script> // import ButterCMS from import { butter } from ‘@/buttercms’ export default { name: ‘customers-home’, data() { return { page_title: ‘Customers’, // Create array to hold the pages from ButterCMS API pages: [] } }, methods: { // Get List of Customer Pages getPages() { butter.page.list(‘customer_case_study’) .then((res) => { // console.log(res.data.data) // Check the results in the console this.pages = res.data.data }) } },created() { // Fire on page creation this.getPages() } }</script>Display the results:
<template> <div id=”customers-home”> <h1>{{ page_title }}</h1> <div v-for=”(page,index) in pages” :key=”page.slug + ‘_’ + index”> <router-link :to=”’/customers/’ + page.slug”> <div> <img :src=”page.fields.customer_logo” alt=””> <h2>{{ page.fields.headline }}</h2> </div> </router-link> </div> </div></template>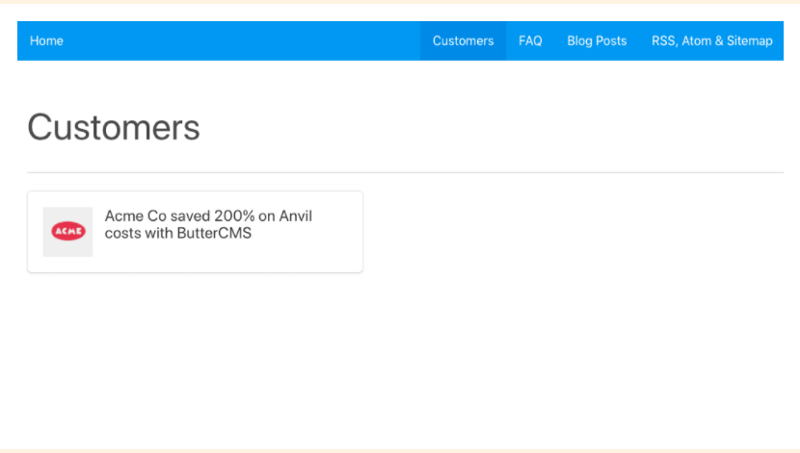
Now, we’re going to set up the customer page to view a single customer. To do so, in components/CustomerPage.vue we define a getPage() method to get a particular customer page based on its slug:
<script> import { butter } from ‘@/buttercms’ export default { name: ‘customer-page’, data() { return { slug: this.$route.params.slug, page: { slug: ‘’, fields: {} } } }, methods: { getPage() { butter.page.retrieve(‘customer_case_study’, this.slug) .then((res) => { console.log(res.data.data) this.page = res.data.data }).catch((res) => { console.log(res) }) } }, created() { this.getPage() } }</script>When you display the result, you should get:
<template> <div id=”customer-page”> <figure> <img :src=”page.fields.customer_logo”> </figure> <h1>{{ page.fields.headline }}</h1> <h3>Testimonials</h3> <div v-html=”page.fields.testimonial”></div> <div v-html=”page.fields.body”></div> </div></template>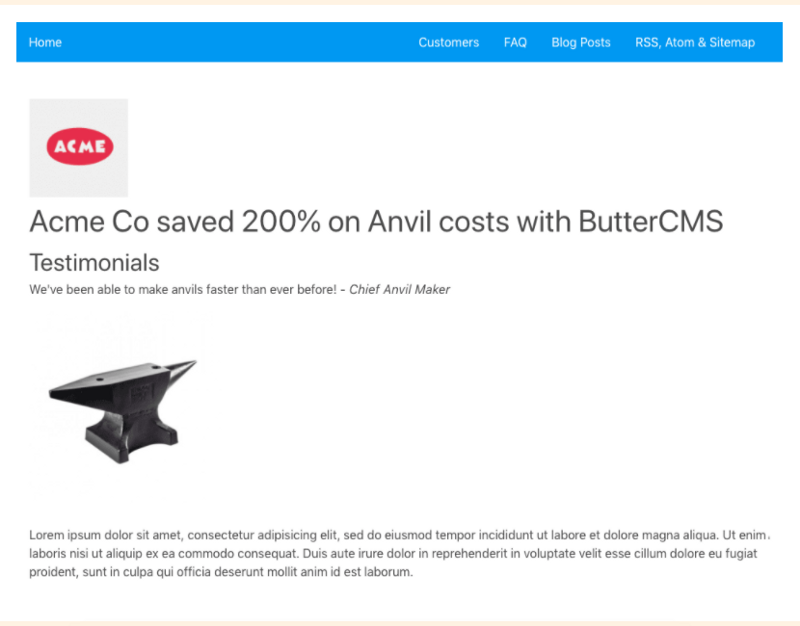
Success! Now you can navigate to the Customer Page you created in your Butter dashboard via the list of all Customer Pages or directly via the URL.
Add a knowledge base
The tutorial below will take you through the creation of a knowledge base for your Vue.js app. We’ll be using ButterCMS’ “Content Fields” for this. Content fields are simply global pieces of content that can be managed by your team. This content can span multiple pages and each content field has a unique ID that can be queried, as you’ll see below.
Setup Content Fields
First, you’ll need to set up some custom content fields. Using the dashboard, you can set up a workspace to organize content fields. Workspaces will allow content editors to curate content without affecting development or API.

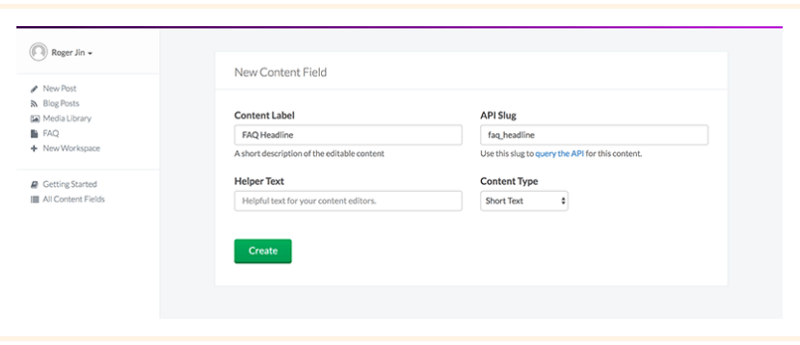
Once you’re in a workspace, click the button to create a new content field. Choose the “Object” type and name the field “FAQ Headline”. It will have an API slug of “faq_headline”.
After saving, add another field — but this time choose the “Collection” type and name the field FAQ Items. It will have an API slug of “faq_items”. On the next screen, set up two properties for items in the collection. Now, go back to your workspace and update your heading and add some FAQ items.
Integrating Your App
Now that you’ve created dynamic content, it’s time to display the dynamic content in your app. To do this, you’ll fetch the fields with an API call and reference them in your view. First, set up a route to your FAQ page:
We’ll add FAQ routes in router/index.js:
import Vue from ‘vue’import Router from ‘vue-router’import FAQ from ‘@/components/FAQ’Vue.use(Router)export default new Router({ mode: ‘history’, routes: [ { path: ‘/faq’, name: ‘faq’, component: FAQ } ]})Then create components/FAQ.vue with a call to get the FAQ’s from the API:
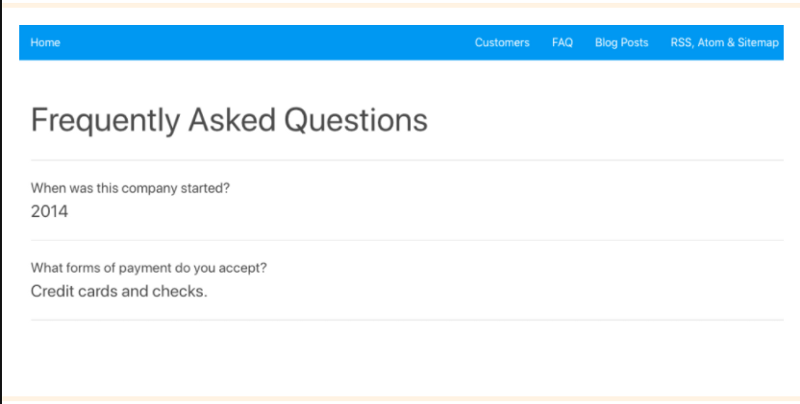
<script> import { butter } from ‘@/buttercms’ export default { name: ‘faq’, data() { return { page_title: ‘FAQ’, faq_items: [] } }, methods: { getFaqs() { butter.content.retrieve([‘faq_headline’, ‘faq_items’]) .then((res) => { console.log(res.data.data) this.page_title = res.data.data.faq_headline this.faq_items = res.data.data.faq_items }) } }, created() { this.getFaqs() } }</script>Notice that we predefined page_title as “FAQ” and then updated it with the API call to “Frequently Asked Questions”.
<template> <div id=”faq”> <h1>{{ page_title }}</h1> <div v-for=”(faq, index) in faq_items” :key=”index”> <p>{{ faq.question }}</p> <p>{{ faq.answer }}</p> </div> </div></template>Your displayed result should look like this:
Now your team can update the values from the Butter dashboard, and the corresponding content in your app will automatically update.
Blog Engine
Last, we’ll tackle adding a blog engine. You can quickly create a CMS-powered blog using Vue.js.
Displaying Posts
We’ll start out by creating a blog route using vue-router. To display posts, we create a simple /blog route in our app and fetch blog posts, as well as a /blog/:slug route to handle individual posts.
In router/index.js:
import Vue from ‘vue’import Router from ‘vue-router’import BlogHome from ‘@/components/BlogHome’import BlogPost from ‘@/components/BlogPost’Vue.use(Router)export default new Router({ mode: ‘history’, routes: [ { path: ‘/blog/’, name: ‘blog-home’, component: BlogHome }, { path: ‘/blog/:slug’, name: ‘blog-post’, component: BlogPost } ]})To create your blog homepage that will display your most recent posts, you’ll create components/BlogHome.vue:
<script> import { butter } from ‘@/buttercms’ export default { name: ‘blog-home’, data() { return { page_title: ‘Blog’, posts: [] } }, methods: { getPosts() { butter.post.list({ page: 1, page_size: 10 }).then((res) => { // console.log(res.data) this.posts = res.data.data }) } }, created() { this.getPosts() } }</script>You need to display the content by defining the template and calling the fields in the same component file:
<template> <div id=”blog-home”> <h1>{{ page_title }}</h1>// Create v-for and apply a key for Vue. Example is using a combination of the slug and index <div v-for=”(post,index) in posts” :key=”post.slug + ‘_’ + index”> <router-link :to=”’/blog/’ + post.slug”> <article class=”media”> <figure>// Bind results using a ‘:’ // Use a v-if/else if their is a featured_image <img v-if=”post.featured_image” :src=”post.featured_image” alt=””> <img v-else src=”http://via.placeholder.com/250x250" alt=””> </figure> <h2>{{ post.title }}</h2> <p>{{ post.summary }}</p> </article> </router-link> </div> </div></template>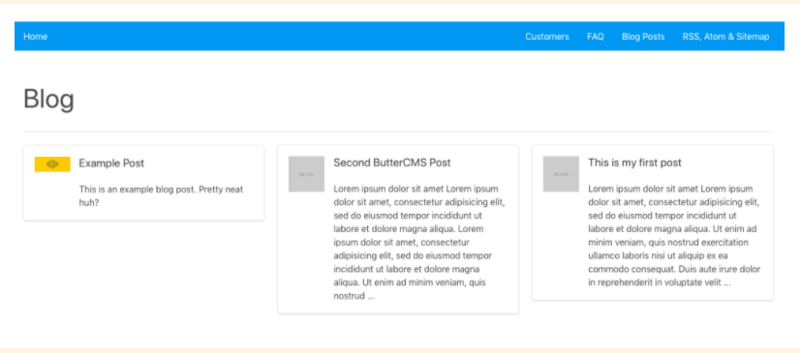
Next, create components/BlogPost.vue which will be your Blog Post page to list a single post.
<script> import { butter } from ‘@/buttercms’ export default { name: ‘blog-post’, data() { return { post: {} } }, methods: { getPost() { butter.post.retrieve(this.$route.params.slug) .then((res) => { // console.log(res.data) this.post = res.data }).catch((res) => { console.log(res) }) } }, created() { this.getPost() } }</script>You now need to define the template and make a call to the blog post content fields:
<template> <div id=”blog-post”> <h1>{{ post.data.title }}</h1> <h4>{{ post.data.author.first_name }} {{ post.data.author.last_name }}</h4> <div v-html=”post.data.body”></div> <router-link v-if=”post.meta.previous_post” :to=”/blog/ + post.meta.previous_post.slug” class=”button”> {{ post.meta.previous_post.title }} </router-link> <router-link v-if=”post.meta.next_post” :to=”/blog/ + post.meta.next_post.slug” class=”button”> {{ post.meta.next_post.title }} </router-link> </div></template>
At this point, your app is pulling all blog posts, allowing you to navigate to individual posts. But you will notice the next/previous buttons aren’t working. Why? When using routes with params, when the user navigates from /blog/foo to /blog/bar, the same component instance will be reused.
Since both routes render the same component, this is more efficient than destroying the old instance and creating a new one. But this also means that the lifecycle hooks of the component will not be called.
There is a fix for this. We need to watch the $route object and call getPost() when the route changes. To do this, you need to update the script section in components/BlogPost.vue:
<script> import { butter } from ‘@/buttercms’ export default { name: ‘blog-post’, data() { return { post: {} } }, methods: { getPost() { butter.post.retrieve(this.$route.params.slug) .then((res) => { // console.log(res.data) this.post = res.data }).catch((res) => { console.log(res) }) } }, watch: { $route(to, from) { this.getPost() } }, created() { this.getPost() }}</script>At this point, your app has a working blog that can be updated easily from the CMS dashboard.
You can also use APIs to filter and feature content on your blog with categories, tags, and authors. In fact, there’s a lot you can do with an API in terms of managing different aspects of your blog, including RSS, Atom, and Sitemap markup, and content styling via CSS.
Wrap Up
Congrats! You’ve built a serverless Vue.js application with performant content APIs. Your development team can get back to coding, and non-technical members of your team now have an easy way to manage content without getting into the weeds of coding. And you’ve created a responsive app that will seamlessly adopt changes to your website.