
by Jennifer Bland
How to build an SPA using Vue.js, Vuex, Vuetify, and Firebase: use Vuex and access the API
Part 3: learn how to use Vuex and access the API to get your recipes
Learn how to create a meal delivery website using Vue.js, Vuex, Vue Router, and Firebase.
This is part three of my four-part series on building a Vue application. Here is a list of all the parts:
Part 1: Installing Vue and Building an SPA using Vuetify and Vue Router
Part 3: Using Vuex and accessing API
Part 4: Using Firebase for Authentication
Recap
In the first part of this series, we created our Vue application using the Vue CLI. Also, we added Vuetify to the app. We used Vuetify to style our home page.
In the second part, we used Vue Router to add navigation between the different pages of our app. We added components for all the pages in our application.
Accessing the API
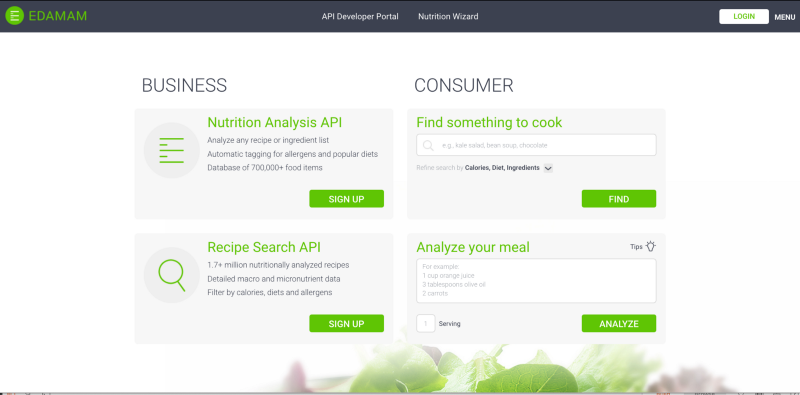
We are building an SPA e-commerce website that sells meal delivery services. In order for this website to work, then we need recipes to create our meals. To generate our recipes we will use the API from Edamam. The Edamam recipe API contains 1.7+ million nutritionally analyzed recipes. The API allows you to filter recipes by diets. This is what we need since we will want to show recipes based on which diet the user has selected.
Create an account with Edamam
The first step is to create your account with edamam. They provide a free account and that is what you want to sign up for. Click this link to go to the Edamam website. Click the sign up button for the Recipe Search API.
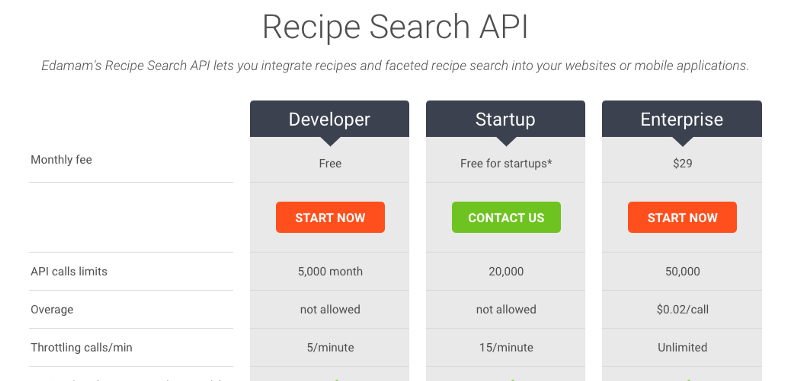
Next, you will be presented with three different levels that you can sign up for. We are going to use the free Developer tier. Click the start now button in the developer option.
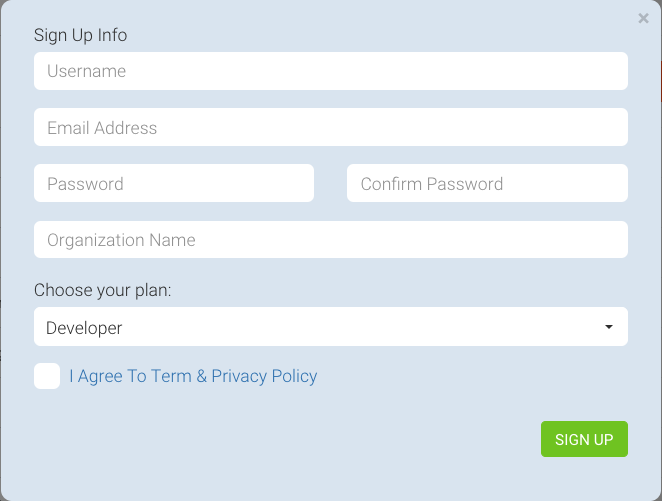
You will be presented with a sign-up form. Complete the form.
After completing the form you will be prompted to log in to your account. When you are logged in to your account, you will be asked to choose the API you need. Instead of clicking on any of the selection, instead, go to the menu and select Get an API key now!
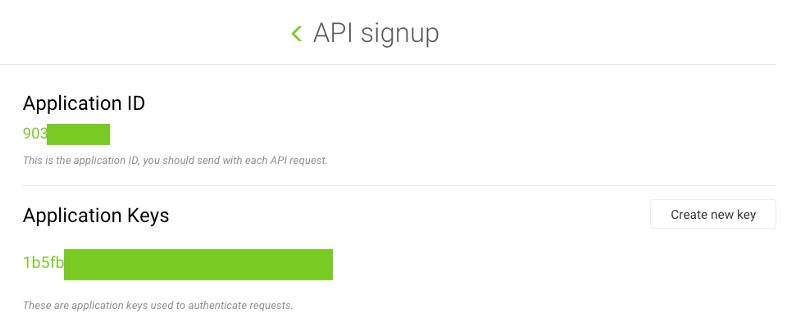
You should see your Recipe Search API key. (NOTE: if you do not have a key then click the create a new application button to create one.) Click on the view button to see the details of your API key. You will have an Application ID and Application Keys. You will need these to access the API for your website.
Creating Menu Page
The menu page is where we will show recipes for each of the three diets we are supporting. These recipes will be retrieved from the Edamam API service.
The first thing we want to do is for the user to select a diet. We can do this by re-using the HomePlans component. We will modify the component to add a button to each diet for users to select. When visitors to the website click on a button they will see the recipes for that diet. But we do not want these buttons to be shown when the component is shown on the home page. So we are going to take care of this.
Open up the HomePlans component. Below the v-card-text section, we are going to add a v-card-actions section. This section will contain the button for users to select the plan. Here is what we are adding to each v-card in this component.
<v-card-actions v-if="['menu'].includes($route.name)"> <v-btn outline block color="green" @click="showRecipes('vegan')">Select This Plan</v-btn></v-card-actions>For each v-card-actions section, we will have a button. The button has the props of outline and block set. The button will call the method showRecipes when you click on the button. The method is passed a parameter with the text for the selected diet. Make sure you change this to reflect the selected diet. Here is what the template for the HomePlans component looks like now:
<template> <v-container grid-list-lg> <v-layout row> <v-flex xs12 class="text-xs-center display-1 font-weight-black my-5">Available Meal Plans</v-flex> </v-layout> <v-layout row wrap> <v-flex xs12 sm12 md4> <v-card> <v-responsive> <v-img src="http://source.unsplash.com/hjCA3ecCXAQ" height="500px"> <v-container fill-height fluid> <v-layout fill-height> <v-flex xs12 align-end flexbox> <span class="headline white--text">KETO</span> </v-flex> </v-layout> </v-container> </v-img> </v-responsive> <v-card-text> <div> <h3 class="headline mb-0">Keto</h3> <div>The Keto diet is a high-fat, adequate-protein, low-carbohydrate diet. The diet forces the body to burn fats rather than carbohydrates by putting the body into ketosis. </div> </div> </v-card-text> <v-card-actions> <v-btn outline block color="green" @click="showRecipes('keto')">Select This Plan</v-btn> </v-card-actions> </v-card> </v-flex> <v-flex xs12 sm12 md4> <v-card> <v-responsive> <v-img src="http://source.unsplash.com/6S27S6pZ6o0" height="500px"> <v-container fill-height fluid> <v-layout fill-height> <v-flex xs12 align-end flexbox> <span class="headline white--text">PALEO</span> </v-flex> </v-layout> </v-container> </v-img> </v-responsive> <v-card-text> <div> <h3 class="headline mb-0">Paleo</h3> <div>The Paleo diet requires the sole or predominant consumption of foods presumed to have been the only foods available to or consumed by humans during the Paleolithic era. </div> </div> </v-card-text> <v-card-actions> <v-btn outline block color="green" @click="showRecipes('paleo')">Select This Plan</v-btn> </v-card-actions> </v-card> </v-flex> <v-flex xs12 sm12 md4> <v-card> <v-responsive> <v-img src="http://source.unsplash.com/1SPu0KT-Ejg" height="500px"> <v-container fill-height fluid> <v-layout fill-height> <v-flex xs12 align-end flexbox> <span class="headline white--text">VEGAN</span> </v-flex> </v-layout> </v-container> </v-img> </v-responsive> <v-card-text> <div> <h3 class="headline mb-0">Vegan</h3> <div>The vegan diet abstains from the use of animal products. The vegan diet does not consume meat, diary products, eggs or any all other animal-derived ingredients. </div> </div> </v-card-text> <v-card-actions> <v-btn outline block color="green" @click="showRecipes('vegan')">Select This Plan</v-btn> </v-card-actions> </v-card> </v-flex> </v-layout> </v-container></template>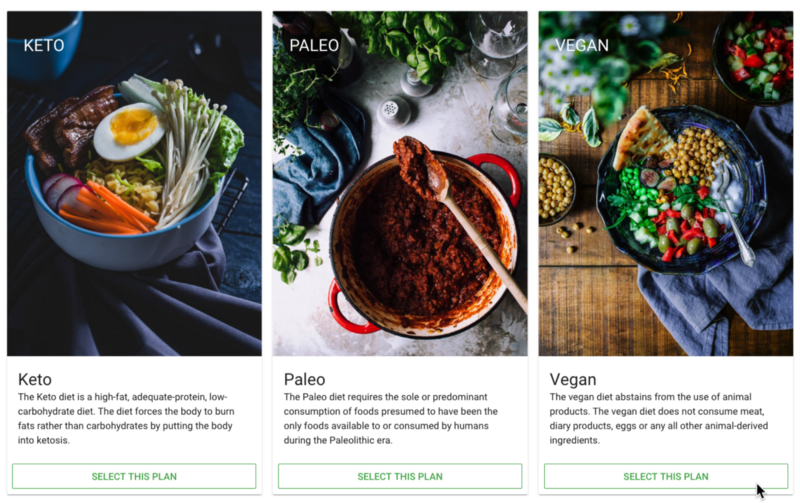
Now that we have added the button, we want to hide it on the home page and show it on the menu page. To do this we are going to combine the v-if directive and the name we assigned to each route.
In the router.js file, we added our routes. Routes is an array of objects. Each object has a path, name and component. We can use the array includes method to check if the current route is home. Here is what we will add to each v-card-actions sections:
<v-card-actions v-if="['menu'].includes($route.name)"> <v-btn outline block color="green" @click="showRecipes('vegan')">Select This Plan</v-btn></v-card-actions>Here is what the template for the HomePlans component looks like now:
<template> <v-container grid-list-lg> <v-layout row> <v-flex xs12 class="text-xs-center display-1 font-weight-black my-5">Available Meal Plans</v-flex> </v-layout> <v-layout row wrap> <v-flex xs12 sm12 md4> <v-card> <v-responsive> <v-img src="http://source.unsplash.com/hjCA3ecCXAQ" height="500px"> <v-container fill-height fluid> <v-layout fill-height> <v-flex xs12 align-end flexbox> <span class="headline white--text">KETO</span> </v-flex> </v-layout> </v-container> </v-img> </v-responsive> <v-card-text> <div> <h3 class="headline mb-0">Keto</h3> <div>The Keto diet is a high-fat, adequate-protein, low-carbohydrate diet. The diet forces the body to burn fats rather than carbohydrates by putting the body into ketosis. </div> </div> </v-card-text> <v-card-actions v-if="['menu'].includes($route.name)"> <v-btn outline block color="green" @click="showRecipes('keto')">Select This Plan</v-btn> </v-card-actions> </v-card> </v-flex> <v-flex xs12 sm12 md4> <v-card> <v-responsive> <v-img src="http://source.unsplash.com/6S27S6pZ6o0" height="500px"> <v-container fill-height fluid> <v-layout fill-height> <v-flex xs12 align-end flexbox> <span class="headline white--text">PALEO</span> </v-flex> </v-layout> </v-container> </v-img> </v-responsive> <v-card-text> <div> <h3 class="headline mb-0">Paleo</h3> <div>The Paleo diet requires the sole or predominant consumption of foods presumed to have been the only foods available to or consumed by humans during the Paleolithic era. </div> </div> </v-card-text> <v-card-actions v-if="['menu'].includes($route.name)"> <v-btn outline block color="green" @click="showRecipes('paleo')">Select This Plan</v-btn> </v-card-actions> </v-card> </v-flex> <v-flex xs12 sm12 md4> <v-card> <v-responsive> <v-img src="http://source.unsplash.com/1SPu0KT-Ejg" height="500px"> <v-container fill-height fluid> <v-layout fill-height> <v-flex xs12 align-end flexbox> <span class="headline white--text">VEGAN</span> </v-flex> </v-layout> </v-container> </v-img> </v-responsive> <v-card-text> <div> <h3 class="headline mb-0">Vegan</h3> <div>The vegan diet abstains from the use of animal products. The vegan diet does not consume meat, diary products, eggs or any all other animal-derived ingredients. </div> </div> </v-card-text> <v-card-actions v-if="['menu'].includes($route.name)"> <v-btn outline block color="green" @click="showRecipes('vegan')">Select This Plan</v-btn> </v-card-actions> </v-card> </v-flex> </v-layout> </v-container></template>Getting Recipes
When a user clicks on the Add This Plan button it calls the method showRecipes. Let's create this method now. This method will retrieve recipes from the Edamam API. First, we need to install axios by entering this command at the terminal:
npm install axiosTo use axios we will need to import it. In the script section of the HomePlans component import it with this command:
import axios from 'axios';Next, in the export default section of the HomePlans component, we will add our method.
NOTE: I am going to show you how to use axios in a component to get data from an API. BUT then we are going to ditch this code and use Vuex. So from here to the title Using Vuex is code that we will not use it in the final version of our application — but I wanted to show it so you understand it.
The method is called showRecipes and takes one parameter called plan. In this method, I will use axios to get 10 recipes from Edamam based on the diet plan selected. The axios call will be a GET to the URL https://api.edamam.com/search.
According to the Edamam API documentation, we are required to use a param called q that contains our query string. We will set this value to the plan parameter that is passed into our method. The documentation also requires us to supply params for app_id and app_key. You will need to set these values to your keys you were assigned when you signed up for the Edamam API.
There are two more params we will use. They are to and from. These params specify the start and end of the number of recipes that are returned. For demo purposes, we will limit it to return just the first 10 recipes.
Our axios call will either succeed or fail. Axios provides a promise so we can use .then and .catch to handle both success and failure. If the call succeeds we want to set the recipes data value equal to the hits array that is returned from Edamam. All responses from axios are contained in the data object. We account for this by first assigning response to response.data. Next, we assign recipes to response.hits.
What if the axios call fails? Well, we use the .catch of the promise to handle a failure. In this case, all we want to do is set recipes to an empty array.
Here is what the method looks like:
export default { name: 'HomePlans', data() { return { recipes: [] }; }, methods: { showRecipes(plan) { axios .get('https://api.edamam.com/search', { params: { q: plan, app_id: '5b6623d5', app_key: '46674aa2193dbb7b88ffd897331e661a', from: 0, to: 9 } }) .then(response => { response = response.data; this.recipes = response.hits; }) .catch(() => { this.recipes = []; }); } }};Using Vuex
Now we have worked ourselves into a pickle with our code. We originally had a component that showed a picture, title and short description of a diet. We added a button to it to get recipes. Now if we keep going then we will need to add functionality to display the recipes that we retrieved from the Edamam API.
I really don’t want all this functionality placed into this component. I want it to just display the image, title, short description and button. But by having the button in the component, I need a way to handle when the user clicks the button. I also need a way to display recipes. To do this I am going to move the functionality of handling the button click to Vuex.
Vuex is a state management library for Vue.js applications. It serves as a centralized store for all the components in an application, with rules ensuring that the state can only be mutated in a predictable fashion. Vuex consists of:
- The state, which is the source of truth that drives our app;
- The mutations, which change the value of the state;
- The actions, which are the possible ways the state could change in reaction to user inputs from the view.
When we created our application using the Vue CLI 3 we specified that we would be using Vuex. As a result, the CLI created the file store.js in the src folder for us.
State will contain the recipes. We will use an actions to make the API call to retrieve recipes. A mutations will be used to update the variable recipe in state with the recipes returned from the actions call.
Open up the store.js file. First, add a new recipes variable in state and assign it to an empty array. Also add a variable called apiUrl. This variable will contain the url for our API call. It should look like this:
export default new Vuex.Store({ state: { recipes: [], apiUrl: 'https://api.edamam.com/search' }, mutations: {}, actions: {}});Next, we are going to create an action called getRecipes. This action will use axios to get recipes from the API. To use axios we will need to import it. At the top of the file, there are two import commands. Place this after them:
import axios from 'axios';Earlier I showed you using promises with the axios call. Now I am going to show you how to do the same call using async / await. The method getRecipes will have to be prefixed with async. Inside the method, we have a try catch block. Inside the try block, we will set a variable response to the data returned from the axios call. We put await in front of the axios call. If the call succeeds we will call the mutation setRecipes. SetRecipes will change the state to set recipes to the array of recipes returned from the API call.
If the API call fails it will end up in the catch block. In this scenario, we call the same mutation but pass it an empty array. Here is what the store.js should look like:
import Vue from 'vue';import Vuex from 'vuex';import axios from 'axios';Vue.use(Vuex);export default new Vuex.Store({ state: { recipes: [], apiUrl: 'https://api.edamam.com/search' }, mutations: { setRecipes(state, payload) { state.recipes = payload; } }, actions: { async getRecipes({ state, commit }, plan) { try { let response = await axios.get(`${state.apiUrl}`, { params: { q: plan, app_id: '<yourAppIdHere>', app_key: '<yourAppKeyHere>', from: 0, to: 9 } }); commit('setRecipes', response.data.hits); } catch (error) { commit('setRecipes', []); } } }});Updating HomePlans Component
Let’s go back to our HomePlans component and clean it up. We can remove the import axios line of code. We can remove the data() object. In the showRecipes method, you can delete all of the code. We now need just one line of code to call our action in our Vuex store. To call an action in Vuex you use a dispatch. This is the one line of code for our showRecipes method:
this.$store.dispatch('getRecipes', plan);Here is what our HomePlans component looks like:
<template> <v-container grid-list-lg> <v-layout row> <v-flex xs12 class="text-xs-center display-1 font-weight-black my-5">Available Meal Plans</v-flex> </v-layout> <v-layout row wrap> <v-flex xs12 sm12 md4> <v-card> <v-responsive> <v-img src="http://source.unsplash.com/hjCA3ecCXAQ" height="500px"> <v-container fill-height fluid> <v-layout fill-height> <v-flex xs12 align-end flexbox> <span class="headline white--text">KETO</span> </v-flex> </v-layout> </v-container> </v-img> </v-responsive> <v-card-text> <div> <h3 class="headline mb-0">Keto</h3> <div>The Keto diet is a high-fat, adequate-protein, low-carbohydrate diet. The diet forces the body to burn fats rather than carbohydrates by putting the body into ketosis. </div> </div> </v-card-text> <v-card-actions v-if="['menu'].includes($route.name)"> <v-btn outline block color="green" @click="showRecipes('keto')">Select This Plan</v-btn> </v-card-actions> </v-card> </v-flex> <v-flex xs12 sm12 md4> <v-card> <v-responsive> <v-img src="http://source.unsplash.com/6S27S6pZ6o0" height="500px"> <v-container fill-height fluid> <v-layout fill-height> <v-flex xs12 align-end flexbox> <span class="headline white--text">PALEO</span> </v-flex> </v-layout> </v-container> </v-img> </v-responsive> <v-card-text> <div> <h3 class="headline mb-0">Paleo</h3> <div>The Paleo diet requires the sole or predominant consumption of foods presumed to have been the only foods available to or consumed by humans during the Paleolithic era. </div> </div> </v-card-text> <v-card-actions v-if="['menu'].includes($route.name)"> <v-btn outline block color="green" @click="showRecipes('paleo')">Select This Plan</v-btn> </v-card-actions> </v-card> </v-flex> <v-flex xs12 sm12 md4> <v-card> <v-responsive> <v-img src="http://source.unsplash.com/1SPu0KT-Ejg" height="500px"> <v-container fill-height fluid> <v-layout fill-height> <v-flex xs12 align-end flexbox> <span class="headline white--text">VEGAN</span> </v-flex> </v-layout> </v-container> </v-img> </v-responsive> <v-card-text> <div> <h3 class="headline mb-0">Vegan</h3> <div>The vegan diet abstains from the use of animal products. The vegan diet does not consume meat, diary products, eggs or any all other animal-derived ingredients. </div> </div> </v-card-text> <v-card-actions v-if="['menu'].includes($route.name)"> <v-btn outline block color="green" @click="showRecipes('vegan')">Select This Plan</v-btn> </v-card-actions> </v-card> </v-flex> </v-layout> </v-container></template><script>export default { name: 'HomePlans', methods: { showRecipes(plan) { this.$store.dispatch('getRecipes', plan); } }};</script><style scoped></style>Displaying Recipes
We have used Vuex to get recipes from the API. We store the array of recipes in the Vuex store. Now we need a new component that will be used to display the recipes. Inside your components folder create a new file called MealRecipes.vue.
In this new component, we will add a computed value for recipes. This computed variable will get its value from Vuex store. Its value will be set to the value of recipes in state. This is what it looks like:
<script>export default { name: 'MealRecipes', computed: { recipes() { return this.$store.state.recipes; } }};</script>We need to update the template in this component to display our recipes. Vuetify provides a grid-list which creates spacing between items displayed on the page. We will use this functionality by placing it on the v-container that is the root element in our template. Like this:
<v-container grid-list-lg></v-container>Inside the v-container we will have a v-layout. Inside the v-layout we will have a v-flex. We set the layout on the v-layout to be row. We will also add wrap. On the v-flex we will loop through all the recipes in the array and display them. So we need a v-for . Vue now requires you to have an index for every v-for loop. We add an idx and set that to the key. Here is what our MealRecipes component looks like so far.
<v-container grid-list-lg> <v-layout row wrap> <v-flex xs12 sm6 md6 lg4 v-for="(item, idx) in recipes" :key="idx"> </v-flex> </v-layout><v-container>We will use the Vuetify v-card to display each recipe. This is very similar to the layout we used for the HomePlans component. We will display an image for the recipe, a title and a list of ingredients.
The API call returns an array of recipes. If you look at one entry in the array you will notice that it has a recipe object. Inside that object, we will find a URL for the recipe image, title, and list of ingredients. The API returns two different arrays for the ingredients. The one we will use is the one in the ingredientLines array.
Here is what the MealRecipes component looks like:
<template> <v-container grid-list-lg> <v-layout row wrap> <v-flex xs12 sm6 md6 lg4 v-for="(item, idx) in recipes" :key="idx"> <v-card> <v-responsive> <v-img :src="item.recipe.image"></v-img> </v-responsive> <v-card-text> <div class="title">{{item.recipe.label}}</div> <div class="subheading">Ingredients</div> <ul> <li v-for="(ingredient, i) in item.recipe.ingredientLines" :key="i">{{ingredient}}</li> </ul> </v-card-text> </v-card> </v-flex> </v-layout> </v-container></template><script>export default { name: 'MealRecipes', computed: { recipes() { return this.$store.state.recipes; } }};</script><style scoped></style>Now that we have the component finished, we need to use it inside the Menu.vue component. Open the Menu.vue component. Import the MealRecipes component with this command:
import MealRecipes from '@/components/MealRecipes';Add it to the components like this:
export default { name: 'Menu', components: { HomePlans, MealRecipes }};In the template add mealRecipes below homePlans. Here is what Menu.vue should look like:
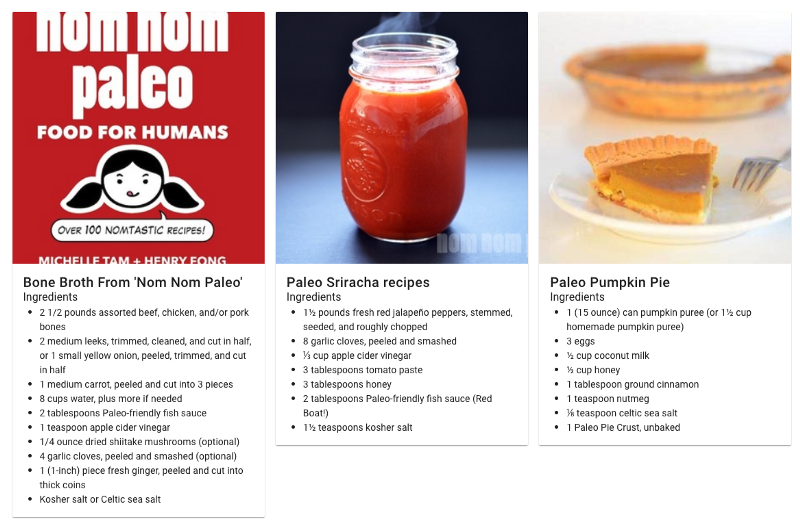
<template> <div> <home-plans></home-plans> <meal-recipes></meal-recipes> </div></template><script>import HomePlans from '@/components/HomePlans';import MealRecipes from '@/components/MealRecipes';export default { name: 'Menu', components: { HomePlans, MealRecipes }};</script><style scoped></style>Start the application with the command npm run serve in the terminal. Open your browser to http://localhost:8080 and you will see the application running. Click on menu in the navigation. Then click on any of the diet plans. You should see a list of recipes like this:
I want to make two quick changes to how the recipes are styled. First I want to add some more spacing between the recipe title and ingredients. Second I want to add a button to the bottom of every recipe for a person to order.
So open up the MealRecipes component. For the title, I already have a class of title. I am going to add to that a value of my-3. This is equivalent to adding margin-top and margin-bottom to the title. This lets the title offset from the image and the ingredients.
Last change I want to make is to add a button. Inside the v-card and below the v-card-text we will add a v-card-actions. Inside that, we will add a button. We will use the default button with a green color. By default, Vuetify makes the text in buttons black in color. We can change that to white by adding the dark directive. Here is our button:
<v-card-actions> <v-btn color="green" dark>Order</v-btn></v-card-actions>Here is our MealRecipes component:
<template> <v-container grid-list-lg> <v-layout row wrap> <v-flex xs12 sm6 md6 lg4 v-for="(item, idx) in recipes" :key="idx"> <v-card> <v-responsive> <v-img :src="item.recipe.image"></v-img> </v-responsive> <v-card-text> <div class="title my-5">{{item.recipe.label}}</div> <div class="subheading">Ingredients</div> <ul> <li v-for="(ingredient, i) in item.recipe.ingredientLines" :key="i">{{ingredient}}</li> </ul> </v-card-text> <v-card-actions> <v-btn color="green" dark>Order</v-btn> </v-card-actions> </v-card> </v-flex> </v-layout> </v-container></template><script>export default { name: 'MealRecipes', computed: { recipes() { return this.$store.state.recipes; } }};</script><style scoped></style>Get the Code
Even though this is a 4-part series, you can get the finished code in my GitHub account. Please help me out and star the repo when you get the code.
Summary
In this part of this series, you have learned:
- What is Vuex
- How to get recipes from an API
- How to use Axios with promises and async / await
- How to call actions in Vuex store
- How to mutate state in Vuex
What’s Next
In the next part of this series, we will cover Firebase for authentication. Firebase allows you to develop an application without having to write server-side code.
If you enjoyed this article please clap for it. If you think somebody else would benefit from this article please share it with them.
If you have any questions or find anything wrong with the code, please leave a comment. If there are other topics you would like for me to write about, please leave a comment.
Other Articles
Here are other articles I have written that you might want to read.
Here are 5 Layouts That You Can Make With FlexBox
The CSS Flexible Box Layout — Flexbox — provides a simple solution to the design and layout problems designers and…hackernoon.comThink outside the box with CSS shape-outside
CSS is based off a box model. If you have an image that is a circle that you want to wrap text around, it will wrap…hackernoon.comWhy Company Culture is Important to Your Career as a Software Engineer
The impact of a company’s culture is reflected in a company’s ability to achieve their goals and productivity levels…medium.freecodecamp.org