


I previously wrote an article called “How to conquer Webpack 4 and build a sweet React app.” Soon after I wrote the article, babel swooped in with a major breaking change and many of the packages got deprecated. So I decided to write a new tutorial.
I will focus on setting up webpack with react which will have .scss support along with code splitting
The purpose for writing this again is simple: I want everyone to feel comfortable. Because setting up webpack can be really daunting. Especially for new developers out there. Follow along, and what seemed difficult and maybe scary will seem like a piece of cake.
Before we start, here is the source code. I know this has loads of things in it. I plan to use the same code base to talk about webpack, react, SCSS, hot module replacement, testing with jest and enzyme, linting code, and adding a code formatter like prettier in other articles to come, so I will continuously keep on updating this code base. I will not bloat this code base — I promise.
Note: If you feel like making a PR for the repository, you are more than welcome :) So let’s get started.
For simplicity sake, this article is only going to focus on;
- Setting up Webpack 4 with Babel 7 for React
- Support for .SCSS
- Code Splitting
- Development environment with HMR (Hot Module Replacement)
- Production configuration
- Dividing your Webpack configuration into chunks
- Handling staging, demo, production, test and other environments in code
- Generating a visualizer in production build to check which chunk of code took how much size and what are the dependencies of the chunks. Super useful.
Prerequisite
You need to have node installed in order to use npm (node package manager).
First things first, create a folder called app then open up your terminal and go into that app folder and type:
npm init -yThis will create a package.json file for you.
Second create a folder called src in your app folder. Inside app/src create a file called index.js and write the following code.
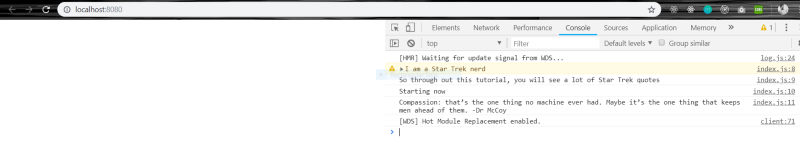
console.warn('I am a Star Trek nerd');
console.log('So through out this tutorial, you will see a lot of Star Trek quotes');
console.log('Starting now');
console.log("Compassion: that’s the one thing no machine ever had. Maybe it’s the one thing that keeps men ahead of them. -Dr McCoy");
You can write anything above of course. I chose Star Trek.

Next we need to install a couple of dependencies. You can just copy the dependencies & devDependencies from the package.json below into your own and do an npm install:
{
  "name": "react-boiler-plate",
  "version": "1.0.0",
  "description": "A react boiler plate",
  "main": "src/index.js",
  "author": "Adeel Imran",
  "license": "MIT",
  "scripts": {
    "start": "a script will come here"
  },
  "dependencies": {
    "react": "^16.5.2",
    "react-dom": "^16.5.2"
  },
  "devDependencies": {
    "@babel/core": "^7.0.0",
    "@babel/plugin-proposal-class-properties": "^7.0.0",
    "@babel/plugin-proposal-export-namespace-from": "^7.0.0",
    "@babel/plugin-proposal-throw-expressions": "^7.0.0",
    "@babel/plugin-syntax-dynamic-import": "^7.0.0",
    "@babel/polyfill": "^7.0.0-beta.51",
    "@babel/preset-env": "^7.0.0-beta.51",
    "@babel/preset-react": "^7.0.0-beta.51",
    "babel-loader": "^8.0.0-beta.0",
    "copy-webpack-plugin": "^4.5.1",
    "css-loader": "^0.28.11",
    "html-webpack-plugin": "^3.2.0",
    "mini-css-extract-plugin": "^0.4.3",
    "node-sass": "^4.8.3",
    "optimize-css-assets-webpack-plugin": "^4.0.0",
    "sass-loader": "^7.0.3",
    "style-loader": "^0.21.0",
    "uglifyjs-webpack-plugin": "^1.2.5",
    "webpack": "^4.12.0",
    "webpack-cli": "^3.0.8",
    "webpack-dev-server": "^3.1.4",
    "webpack-merge": "^4.1.3",
    "webpack-visualizer-plugin": "^0.1.11"
  }
}
Yes I know, I know! That’s a lot to create a hello world react app. But wait, this is all you will need. Even if you want to create a enterprise level app. (Maybe one or two more things depending on your requirements, but this is the backbone for it.)
So let’s talk about each and everyone of them before we dive deep into the code.
webpack: We need Webpack to bundle our code.
webpack-cli: We will be using some CLI features of Webpack to make our lives easier while writing some scripts.
webpack-dev-server: I will create a server using the webpack-dev-server package. This is only meant to be used in the development environment, and not for production. This means while developing and working on my code, I don’t need a separate server like NodeJS to setup manually.
webpack-merge: To divide our configuration into chunks, more on this later
webpack-visualizer-plugin: To see a visual representation of each of our bundle size — how much space they are taking and what are their dependencies.
style-loader: This adds CSS to the DOM by injecting a <script /> tag in the header
sass-loader: For SCSS support
node-sass: A dependency for sass-loader
css-loader: To convert our .scss files into .css
mini-css-extract-plugin: This plugin extracts CSS into separate files. It creates a CSS file per JS file which contains CSS.
uglifyjs-webpack-plugin: To minify JavaScript code for production
optimize-css-assets-webpack-plugin To minify CSS code for production
html-webpack-plugin: This does more then generate an HTML file, it supports on demand .css and .js files automatically added to your HTML files on demand
copy-webpack-plugin: Copies files/folders to your build folder.
babel-loader: This is the loader that helps webpack compile .js files
@babel/core: Babel core compiler, this is a dependency that lets you use babel-loader
@babel/preset-react Babel preset for React code
@babel/preset-env: Babel preset that allows you to use the latest JavaScript
@babel/pollyfill: Babel includes a polyfill that includes a custom regenerator runtime and core-js. This will emulate a full ES2015+ environment. This means support for async/await type of cool syntax sugar.
Up till now this is pretty much what I wrote in How to conquer Webpack 4 and build a sweet React app.
So what changed?
Well! Babel introduced a breaking change (for the greater good, believe me) which you can read more here: Removing Babel’s Stage Preset. What this meant was that before if you included babel-preset-stage-2 let’s say, it would include all proposals related to stage-2, which would bloat your code. But you just might need one specific feature of stage-2.
So in order to combat this, babel deprecated all those preset plugins and shipped individual features. You now have to set those up manually. Cool right? So let’s talk a bit about those individual packages and what they do.
@babel/plugin-proposal-class-properties: Coverts your class syntax into a function for browsers that don’t support class syntax
@babel/plugin-proposal-export-namespace-from Supports syntax like import * as ns from '../path/to/module';
@babel/plugin-proposal-throw-expressions New syntax to throw exceptions from within an expression context. I love this feature :D
@babel/plugin-syntax-dynamic-import This is what helps with code splitting. Webpack ships with code splitting by default (Since webpack 1). But when you want to code split in webpack while you are using babel, then you need to use this plugin.
Note: for this tutorial you won’t need@babel/plugin-proposal-export-namsespace-from & @babel/plugin-proposal-throw-expressions
Also here is a list of all babel plugins. I mean all of them. Check out the list here.
And now that you know why we need what we need — nothing extra — you’ll feel more confident implementing the webpack configuration.
Let’s start by adding a .babelrc file in the root of out app folder:
{
  "presets": [
    "@babel/preset-env",
    "@babel/preset-react"
  ],
  "plugins": [
    "@babel/plugin-syntax-dynamic-import",
    "@babel/plugin-proposal-class-properties",
    "@babel/plugin-proposal-export-namespace-from",
    "@babel/plugin-proposal-throw-expressions"
  ]
}
We have 2 main presets preset-env & preset-react . The rest are our plugins to add “wings” to our code.
And to quote Captain Kirk from Star Trek (because why not):
Perhaps man wasn’t meant for paradise. Maybe he was meant to claw, to scratch all the way. Captain Kirk
In his defense, Captain Kirk was up against the likes of General Change, Khan, The Borg and so many dangerous foes. All we are up against is the beautiful Webpack and Babel. So perhaps we developers are meant for paradise.
So let’s set our webpack up.
Create a config folder in your app . If you feel lost you can at any time refer to the GitHub repository for this. Now inside our config folder let’s create a file called webpack.base.config.js The reason I call this base is because it is going to be used for our development and for production. Because why write the same thing twice? Again if this isn’t making much sense, just bear with me a few more minutes.
In your config/webpack.base.config.js write this:
module.exports = {
  module: {
    rules: [
      {
        test: /\.js$/,
        exclude: /node_modules/,
        use: {
          loader: 'babel-loader'
        }
      },
    ]
  }
}
Once you have it in place, run this command in your root app directory. (I’ll tell you what this command does a bit later with the code we wrote above, I promise.)
$ node_modules/.bin/webpack-dev-server --mode development --config config/webpack.base.config.js --open --hot --history-api-fallbackOnce you run this command, you will see this screen:
So what happened here? Well when we ran the webpack command, it did find our index.js file that we wrote earlier in app/src/index.js — but it didn’t have a .html to run it in. So let’s create an index.html file in our app/src folder:
<!DOCTYPE HTML>

<html>

<head>
  <meta http-equiv="Content-Type" content="text/html; charset=UTF-8" />
  <base href="/">
  <title>Tutorial</title>
</head>

<body>
  <div id="app"></div>
</body>

</html>
Let’s update our webpack.base.config.js as well:
var HtmlWebpackPlugin = require('html-webpack-plugin');

module.exports = {
  module: {
    rules: [
      {
        test: /\.js$/,
        exclude: /node_modules/,
        use: {
          loader: 'babel-loader'
        }
      }
    ]
  },
  plugins: [
    new HtmlWebpackPlugin({
      template: './src/index.html',
      filename: './index.html'
    })
  ]
}
Let’s run that command again now:
$ node_modules/.bin/webpack-dev-server --mode development --config config/webpack.base.config.js --open --hot --history-api-fallbackYour browser will open up. If you are using Google Chrome, press ctrl+shift+j and your browser console will open up. You will see something like this:
So let’s talk what happened here. Our webpack.base.config.js has two main things: modules and plugins. A module can have multiple rules, and each rule is applied to certain file type. The certain file type that we want to apply that rule to is in test of that rule:
rules: [
  {
    test: /\.js$/,
    exclude: /node_modules/,
    use: {
      loader: 'babel-loader'
    }
  },
]
Here by saying test: /\.js$./, we are telling webpack to apply this rule only for .js files. The other thing is exclude which also takes in a regex expression of what not not to include. This is where we tell it not to compile node_modules because this will compile all of it, and there are loads of dependencies installed. Check the node_modules yourself. The last part is use.
Now webpack knows where to apply the rule using test and where not to apply the rule using exclude — but what is the rule exactly? That is where use comes into play: here we specify loader: 'babel-loader'. Now what babel-loader does is that it looks for .babelrc file that we wrote earlier. And all the presets & plugins we wrote there. It takes all of them and applies those to our .js files.
Which brings us to the next question: how does Webpack 4 find those files? Well Webpack 4 ships with loads of default stuff already set up for you. Two of those are entry and output .
entry point by default is the src directory that we wrote in our app folder.
output point is where all the compiled bundled code is generated, which is going to be dist folder in out app folder. (You won’t see that now, because we haven’t compiled our code yet for production.)
Next we’ll talk about html-webpack-plugin The purpose of this plugin is simple as the name suggests. It creates HTML files to serve all of your bundled files. (All of it — .js, .css, .scss, .img etc)

Let’s talk about when we run the following:
$ node_modules/.bin/webpack-dev-server --mode development --config config/webpack.base.config.js --open --hot --history-api-fallbackThis command will open up port http://localhost:8080 or another port if 8080 is taken. (I’ll talk more about what this command does later — for now let’s move on).
The index.html that is generated looks like this:
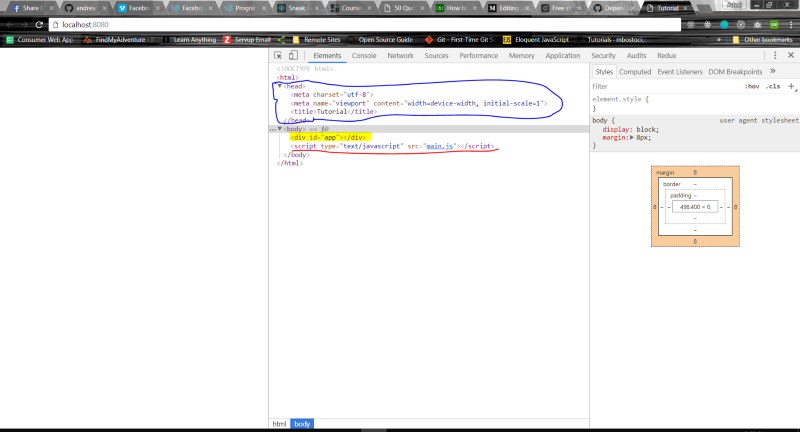
Blue part: The blue part is simply where I put in my meta tags and defined a title for the app.
Yellow part: The yellow part highlighted is the hard coded part that we wrote in our index.html file. This is where our future React app will reside.
Red Part: The part I underlined in red is the most interesting part. We never wrote this in our index.html file, so where did it come from?
Webpack is very smart. It took that file in your index.js , bundled it all up nicely, and added it up all neatly in the file called main.js . Then it injected it in our index.html file. Super Cool!
We are almost 60% done! Believe me the hard part is over…
Let’s Add React
The cool thing is, all our dependencies are already installed. And everything is already configured. So in your app/src/index.js remove all the code and replace it with this:
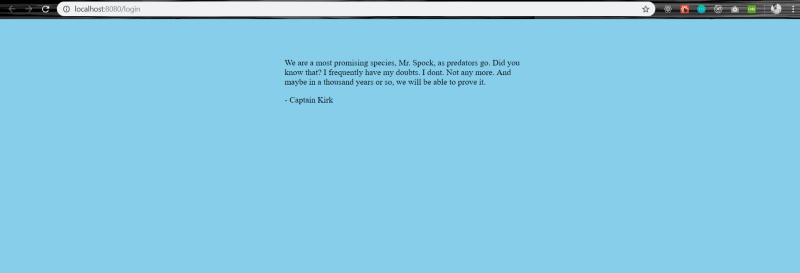
import React from 'react';
import ReactDOM from 'react-dom';

const App = () => {
  return (
    <div>
      <p>
        We are a most promising species, Mr. Spock, as predators go. Did you know that? I frequently
        have my doubts. I dont. Not any more. And maybe in a thousand years or so, we will be able
        to prove it.
      </p>
      <p>- Captain Kirk</p>
    </div>
  );
};

ReactDOM.render(<App />, document.getElementById('app'));
Now if your terminal is still running the webpack-dev-server script, just check the browser out. If not, here is the script. I don’t want you to scroll all the way up again.
$ node_modules/.bin/webpack-dev-server --mode development --config config/webpack.base.config.js --open --hot --history-api-fallbackThis is what you will see:

Now make sure you don’t close the terminal, and go in your app/src/index.js and make some changes to your <App /> component. Try changing the sentence in the paragraph. Once changed, go back to your browser and the content is already there updated. How cool is that? :D
This sums up 70% of our tutorial — only 30% more to go. You are doing great.
Let’s Add SCSS Support
Let’s start by updating our config/webpack.base.config.js by adding another rule for .scss files
var HtmlWebpackPlugin = require('html-webpack-plugin');

module.exports = {
  module: {
    rules: [
      {
        test: /\.js$/,
        exclude: /node_modules/,
        use: {
          loader: 'babel-loader'
        }
      },
      {
        test: /\.scss$/,
        use: [
          'style-loader',
          'css-loader',
          'sass-loader'
        ]
      },
    ]
  },
  plugins: [
    new HtmlWebpackPlugin({
      template: './src/index.html',
      filename: './index.html'
    }),
  ]
}
So the use I use here takes an array instead of an object like what I did for the .js files. This is because we need to apply a set of rules here:
use: [ 'style-loader','css-loader','sass-loader' ]So let’s read the use array from right to left — this is important. What we are telling Webpack is to take any .scss files it finds and parse it for its own understanding using the sass-loader. Once it has converted it into sass, we then ask Webpack to convert the sass into CSS. For that we apply css-loader.
As of this point we have converted the .scss into .css. But there is no way for us to add the converted files into our .html. For this we use the last loader called style-loader which takes all the converted .css and injects it into our index.html file.
So let’s add some .scss to test this out. In your src/ folder add a file called myStyles.scss Mine looks like the one below:
body {
  background-color: skyblue;
  color: black;
}

.app {
  width: 450px;
  margin: 0 auto;
  padding-top: 50px;
}
And my src/index.js file looks like this:
import React from 'react';
import ReactDOM from 'react-dom';

import './myStyles.scss';;

const App = () => {
  return (
    <div className="app">
      <p>
        We are a most promising species, Mr. Spock, as predators go. Did you know that? I frequently
        have my doubts. I dont. Not any more. And maybe in a thousand years or so, we will be able
        to prove it.
      </p>
      <p>- Captain Kirk</p>
    </div>
  );
};

ReactDOM.render(<App />, document.getElementById('app'));
Restart your webpack-dev-server by running this command again:
$ node_modules/.bin/webpack-dev-server --mode development --config config/webpack.base.config.js --open --hot --history-api-fallbackThis was the last time I’ll make you manually write that script up. After this we will move this command into ourscriptssection in ourpackage.json.
Your browser will open up, this is what it looks like now:
Now in your myStyles.scss file, try making some changes. Like make the font-size: white; come back to your browser. It reflects those changes. You don’t have to restart your server again — just for the .scss to compile.
With this, most of our development configuration is done. Our React application is live, and has hot module replacement for .js files as well as .scss files
So before we move further, let’s add the webpack-dev-server script in our package.json. In your scripts section, add the following code:
"scripts": {
    "start": "webpack-dev-server --mode development --config config/webpack.base.config.js --open --hot --history-api-fallback --env.PLATFORM=local --env.VERSION=stag",
    "prebuild": "webpack --mode production --config config/webpack.prod.config.js --env.PLATFORM=production --env.VERSION=stag --progress",
    "build": "node server",
},
For now I’ll talk about the start command. I’ll talk about the prebuild and build scripts later in the production configuration section.
So what does this command do: npm run start
"start": "webpack-dev-server --mode development --config config/webpack.base.config.js --open --hot --history-api-fallback"Let’s break this down. When we run npm run start we’re telling it to run a package called webpack-dev-server. Then we pass it some configurations.
webpack-dev-serverserves a webpack app and updates the browser on changes.--mode developmenttellswebpackto compile the code in development mode. This is basically to make the compilation time faster.--config config/webpack.base.config.jsSo by default if you havewebpack.config.jsfile in your rootappfolder, you don’t have to supply the--configflag to it. But since I want to explicitly add all my webpack related configurations in theconfigfolder, I pass in--configoption that tells webpack where to look for the configuration--opencommand opens the browser, when webpack is done with its compilation.--hotflag tells webpack to actively watch for code changes in thesrcfolder. If any changes happen, it reloads the browser.--history-api-fallbackThis option enables History API Fallback support inwebpack-dev-server, effectively asking the server to fallback toindex.htmlin the event that a requested resource cannot be found.--env.PLATFORM&--env.VERSIONare custom flags that I pass in my configuration (more on this later).
Now that we are done, let move onto our production configurations.
But before we do that, let’s talk about webpack-merge. Now this is a real winner. It takes in one configuration and another one and merges them both together to give us one. The way it works is you need to wrap your configuration with merge like the one below. Let’s start off by making our webpack.base.config.js file into a webpack-merge usable chunk:
const webpack = require('webpack');
const merge = require("webpack-merge");

const HtmlWebpackPlugin = require('html-webpack-plugin');

module.exports = env => {
  const { PLATFORM, VERSION } = env;
  return merge([
      {
        module: {
          rules: [
            {
              test: /\.js$/,
              exclude: /node_modules/,
              use: {
                loader: 'babel-loader'
              }
            },
            {
              test: /\.scss$/,
              use: [
                'style-loader',
                'css-loader',
                'sass-loader'
              ]
            }
          ]
        },
        plugins: [
          new HtmlWebpackPlugin({
            template: './src/index.html',
            filename: './index.html'
          }),
          new webpack.DefinePlugin({
            'process.env.VERSION': JSON.stringify(env.VERSION),
            'process.env.PLATFORM': JSON.stringify(env.PLATFORM)
          }),
        ],
    }
  ])
};
Previously where we where exporting an object, now we are exporting a function which returns merge and takes in the configuration.
Let’s break this down as to what this is doing.The first thing we talk about is this:
module.exports = function(env) {}The new flags added in our start command — env.PLATFORM=local — env.VERSION=stag are passed to our webpack configurations, which we can access with the env param in module.exports = function (env) {}. So what can we do with this?
- We can set up a conditional statement in our webpack configuration, that if a certain condition is met, then do this or that (more on this later). Basically we will change our configuration on compile time to cater to whichever environment is being run — production or development.
- The other thing that we can do here is pass them in our code as well. So what do I mean by pass in our code? One new plugin I added for this is called
new webpack.DefinePlugin. (Also that is why I had to include webpack at the top ofwebpack.base.config.js.) What this does is: “TheDefinePluginallows you to create global constants which can be configured at compile time.” You can read more about this here.
Next we return a configuration inside the function like this:
return merge({
   // our webpack configuration here
});
Well not much has changed here. All we did was wrap our configuration in merge. This gives us the ability to merge this entire configuration into the other one that we will create.
One thing added is a new plugin called DefinePlugin which I already talked about.
If you are a nerd like me and want to dig deeper intowebpack-mergeI suggest you dive in here — this was developed by the cool folks atSurviveJS.
Before moving to the production settings, let’s check if our base configurations are working.
In your src/index.js file add this somewhere:
console.log('process.env.VERSION', process.env.VERSION);console.log('process.env.PLATFORM', process.env.PLATFORM);console.log('process.env.NODE_ENV', process.env.NODE_ENV);In your terminal run npm run start. Wait for your browser to load up. Open up your terminal.
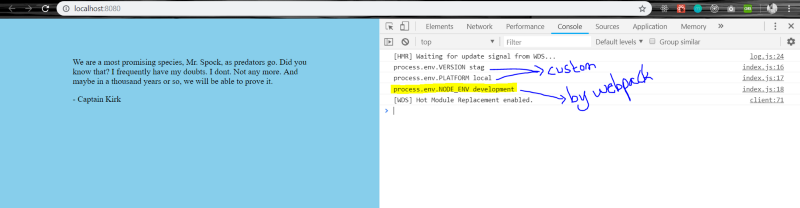
The first two you see in the console is the result of us passing the --env flags from our script to our webpack configuration and setting it with DefinePlugin. The third one is with the --mode flag that we pass in our script. If mode is development or production, then that is set up in our process.env.NODE_ENV flag.
Now that that’s cleared up, let’s move on.
In your config folder, create a new file called webpack.prod.config.js and add the following code into it as shown below:
var merge = require('webpack-merge');

// Plugins
var OptimizeCssAssetsPlugin = require('optimize-css-assets-webpack-plugin');
var UglifyJsPlugin = require('uglifyjs-webpack-plugin');
var Visualizer = require('webpack-visualizer-plugin');

var baseConfig = require('./webpack.base.config');

const prodConfiguration = env => {
  return merge([
    {
      optimization: {
        runtimeChunk: 'single',
        splitChunks: {
          cacheGroups: {
            vendor: {
              test: /[\\/]node_modules[\\/]/,
              name: 'vendors',
              chunks: 'all'
            }
          }
        },
        minimizer: [new UglifyJsPlugin()],
      },
      plugins: [
        new OptimizeCssAssetsPlugin(),
        new Visualizer({ filename: './statistics.html' })
      ],
    },
  ]);
}

module.exports = env => {
  return merge(baseConfig(env), prodConfiguration(env));
}
Let’s start from the bottom with module.exports = env => {}
We merge two configurations: one is our baseConfig and the other is prodConfiguration . The --env flags we pass in our scripts are passed on as an object in the env => {} params in our function. We then pass them onto both the baseConfig & prodConfig.
So what is prodConfig ?It is basically a list of the optimizations we want to perform when our code goes up for production.
The optimization.minimizer takes in a new UglifyJsPlugin. What this does is uglify and minify our .js files.
The optimization.splitChunks actually takes all of your common code and creates a vendor.bundle.js file. It is not going to make one now. But as our code base grows, we have multiple routes, and there are different modules being used like date-fns moment lodash material-ui etc. It will take all the common code from entire app and make a common file called vendor.bundle.js . This way, the repeated code isn’t used again & again. (I am against this approach, but for educational purposes I described it here.)
Going forward I’ll comment the optimization.splitChunks but, it will exist there in the code repository if you want to use it. You just have to uncomment this section. I prefer to split my code based on routes. Having common code chunked out into a separate module means that your entire common code is going to be loaded first. This can be huge, and as a result the user’s first time interaction will take longer (because now all of these dependencies are being loaded, which might not need to be in the respective page that the user is seeing/viewing).
Next up, we have a couple of plugins. One of them happens to be new OptimizeCssAssetsPlugin(). All it does is take all of our generated .css and minify/optimize it. This doesn’t work right now, because we are using style-loader and style loader directly injects the generated .css into the DOM.
First, we need tell webpack to extract all the generated .css into a separate file, and then the optimizations added by this plugin are applied. (We’ll do this a bit later.)
The other plugin added here is called new Visualizer({ filename: ‘./statistics.html’ }) .This plugin is awesome: it generates a statistics.html file in the dist/ folder for you. Open the file, and you’ll see a graphic like the one below.

Right now we only have a single module called main.js. But with time, as we add more modules, and have code splitting added to it. More modules will start showing up here and we can actually see what modules take what size. This can be really useful when you are trying to reduce the size of your application.
Coming back to OptimizeCssAssetsPlugin() . In order to optimize the .css generated, we need to move this into a separate module. For that I am going to use mini-css-extract-plugin This will require us to make changes in both of our webpack files, the .base and .prod files.
// webpack.base.config.js
const webpack = require('webpack');
const merge = require("webpack-merge");

const MiniCssExtractPlugin = require("mini-css-extract-plugin");
const HtmlWebpackPlugin = require('html-webpack-plugin');

module.exports = env => {
  const { PLATFORM, VERSION } = env;
  return merge([
      {
        module: {
          rules: [
            {
              test: /\.js$/,
              exclude: /node_modules/,
              use: {
                loader: 'babel-loader'
              }
            },
            {
              test: /\.scss$/,
              use: [
                PLATFORM === 'production' ? MiniCssExtractPlugin.loader : 'style-loader',
                'css-loader',
                'sass-loader'
              ]
            }
          ]
        },
        plugins: [
          new HtmlWebpackPlugin({
            template: './src/index.html',
            filename: './index.html'
          }),
          new webpack.DefinePlugin({
            'process.env.VERSION': JSON.stringify(env.VERSION),
            'process.env.PLATFORM': JSON.stringify(env.PLATFORM)
          }),
        ],
    }
  ])
};// webpack.prod.config.js
/* eslint-disable */
const merge = require('webpack-merge');
// Plugins
const MiniCssExtractPlugin = require("mini-css-extract-plugin");
const OptimizeCssAssetsPlugin = require('optimize-css-assets-webpack-plugin');
const UglifyJsPlugin = require('uglifyjs-webpack-plugin');
const Visualizer = require('webpack-visualizer-plugin');
// Configs
const baseConfig = require('./webpack.base.config');
const prodConfiguration = env => {
return merge([
{
optimization: {
// runtimeChunk: 'single',
// splitChunks: {
// cacheGroups: {
// vendor: {
// test: /[\\/]node_modules[\\/]/,
// name: 'vendors',
// chunks: 'all'
// }
// }
// },
minimizer: [new UglifyJsPlugin()],
},
plugins: [
new MiniCssExtractPlugin(),
new OptimizeCssAssetsPlugin(),
new Visualizer({ filename: './statistics.html' })
],
},
]);
}
module.exports = env => {
return merge(baseConfig(env), prodConfiguration(env));
}Let’s talk about the changes I made in webpack.base.config.js .Only one module was added called const MiniCssExtractPlugin = require(“mini-css-extract-plugin”);. Then in our .scss rules we checked if the PLATFORM flag passed has the value production. If so, we add MiniCssExtractPlugin.loader, and otherwise we add the style-loader.
style-loader is used to actively watch and change our compiled .css in development mode, while MiniCssExtractPlugin.loader is used when we need to extract that generated CSS into a separate module. This is only for production.
In the other file webpack.prod.config.js we have these two plugins added:
new MiniCssExtractPlugin(),
new OptimizeCssAssetsPlugin(),The first will extract this into a separate module called main.css and the other will minify/uglify the generated CSS.
Having done this, we are almost 90% done. If you have stayed this far, kudos to you.

Before we proceed further, here is what Captain Kirk has to say
You know the greatest danger facing us is ourselves, and irrational fear of the unknown. There is no such thing as the unknown. Only things temporarily hidden, temporarily not understood.
- James T. Kirk, The Corbomite Maneuver
Let’s add more functionality, to our code. Now there are two ways to add files in your code. One is by using another loader called file-loader which will help you add files of any type into your .js files like we did with .scss files.
I want to talk about another approach here, because I think assets like fonts, images and others should be loaded in parallel rather than in your .js files. This helps provide a better experience for the user. So for that propose we will load our images statically.
For this we will use a plugin called copy-webpack-plugin. The best thing about all this is you already have this installed. In your webpack.base.config.js add another plugin, like the below:
const CopyWebpackPlugin = require('copy-webpack-plugin'); // Add this in top

module.exports = env => {
  return merge([
      {
        module: {},
        plugins: [
          new CopyWebpackPlugin([ { from: 'src/static' } ]), // Add this in the plugins section
        ],
    }
  ])
};The copy-webpack-plugin takes in an argument called from. This tells the plugin where to locate the static files and then copy them in the dist folder. Here I am telling it to look for a folder called src/static and copy all of its content in the dist/ folder.
Once you have added this and set it up, all you have to do is, in your app/src folder, create a new folder called static . In this folder, create another folder called images so your folder will have a directory like this: app/src/static/images
I am going to put an image here called header.jpg, but you can call it whatever you like. This is the image I am using: https://unsplash.com/photos/Idi6I490p7I (Photo by Felix Mittermeier on Unsplash).
Now in order for this to work, you need to run the npm run prebuild command (I’ll talk more about npm run prebuild & npm run build later when we set up our NodeJS server with ExpressJS) because we need our static files to be copied. The npm run start command won’t copy this to the dist/ folder because it doesn’t compile code to the dist/ folder.
Once you have run the npm run prebuild command this is what you will see:
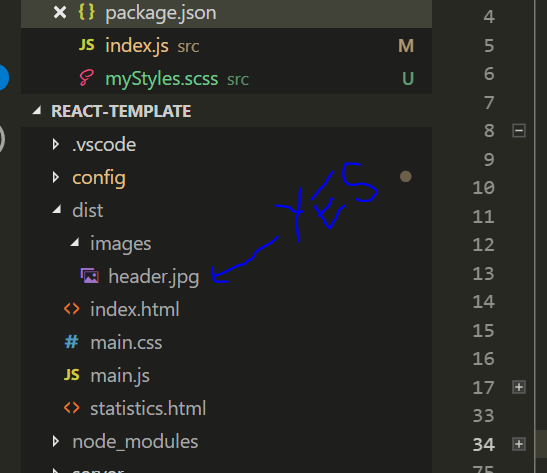
header.jpg fileSo how can we access this file in our code?
I am going to make some changes in my index.js file along with myStyles.scss .You can follow along as well — we’re just adding an <img /> along with some .scss
import React from 'react';
import ReactDOM from 'react-dom';
import './myStyles.scss';
const App = () => {
return (
<div className="app">
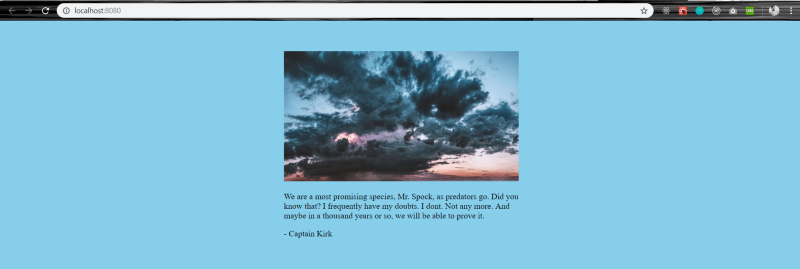
<img alt="header" src="/dist/images/header.jpg" className="app-header" />
<p>
We are a most promising species, Mr. Spock, as predators go. Did you know that? I frequently
have my doubts. I dont. Not any more. And maybe in a thousand years or so, we will be able
to prove it.
</p>
<p>- Captain Kirk</p>
</div>
);
};
ReactDOM.render(<App />, document.getElementById('app'));body {
background-color: skyblue;
color: black;
}
.app {
width: 450px;
margin: 0 auto;
padding-top: 50px;
& .app-header {
height: 250px;
width: inherit;
object-fit: cover;
}
}The only thing to note here is in the index.js file where I add an image:
<img
  alt="header"
  src="/dist/images/header.jpg"
  className="app-header"
/>
The main thing is the path we give in the src.
Once you have added this, let’s check how this looks in the browser. Go and run npm run start command.
Let’s recap what we have accomplished so far
- Setting up Webpack 4 with Babel 7 for React
- Support for .SCSS
- Development environment with HMR [For both .js & .scss]
- Production configuration
- Dividing your Webpack configuration into chunks
- Generating a visualizer in production build to check which chunk of code is how big and what are the dependencies of the chunks. Super useful.
- Support for static files
Things We Still Need To Accomplish
- Add support for
async/awaitin our code - Create a NodeJS server using ExpressJS for our production build
- Code Splitting
Let’s start with async/await first. For this purpose I am going to make a smart <App /> component. Inside this component I am going to call an API that gets me information about Captain Kirk, because he is awesome. So in our index.js add the following code:
import React from 'react';
import ReactDOM from 'react-dom';
import './myStyles.scss';
class App extends React.Component {
state = {
CaptainKirkBio: {},
};
componentDidMount() {
this.onGetKirkBio();
}
onGetKirkBio = async () => {
try {
const URL = 'http://stapi.co/api/v1/rest/character/search';
const result = await fetch(URL, {
method: 'POST',
headers: {
'Content-Type': 'application/x-www-form-urlencoded',
},
body: {
title: 'James T. Kirk',
name: 'James T. Kirk',
},
});
const resultJSON = await result.json();
const character = resultJSON.characters[0];
this.setState({ CaptainKirkBio: character });
} catch (error) {
console.log('error', error);
}
};
render() {
const { CaptainKirkBio } = this.state;
return (
<div className="app">
<img alt="header" src="/dist/images/header.jpg" className="app-header" />
<p>
We are a most promising species, Mr. Spock, as predators go. Did you know that? I
frequently have my doubts. I dont. Not any more. And maybe in a thousand years or so, we
will be able to prove it.
</p>
<p>- Captain Kirk</p>
<section>
{Object.values(CaptainKirkBio).length === 0 ? (
<p>Loading User Information</p>
) : (
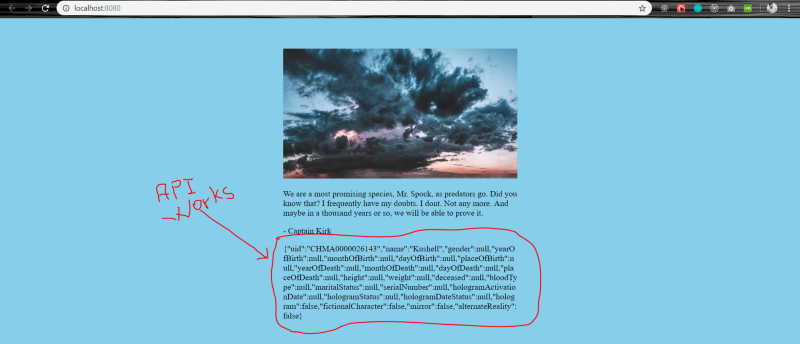
<p style={{ wordBreak: 'break-all' }}>{JSON.stringify(CaptainKirkBio)}</p>
)}
</section>
</div>
);
}
}
ReactDOM.render(<App />, document.getElementById('app'));All I am doing here is calling an API using try/catch async/await and getting information about Captain Kirk. Simple right? This should work. Let’s fire this up in the browser.
Run the command:
npm run start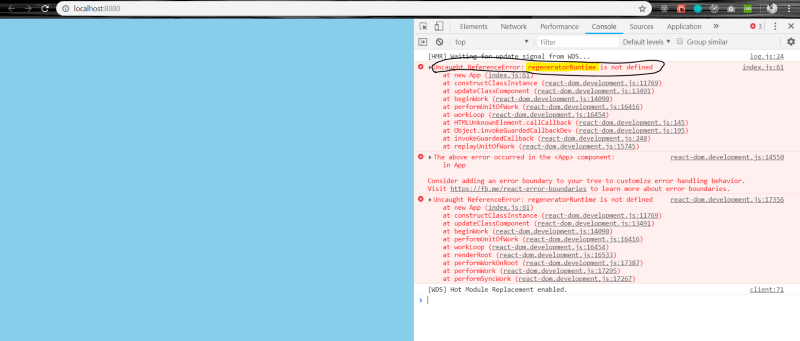
If you hit ctrl+shift+j your console will open up, and you will see an error there called regeneratorRuntime . So what is this error and how do we get rid of it?
This error gets thrown when the browser doesn’t support async/await or generators for that matter.
But Adeel! That’s the only reason we are using babel right?
Yes! Here’s what Henry Zhu, the awesome dude behind babel, has to say about this:
If you are using generators/async and the environment doesn’t support it natively we compile using regenerator which uses a runtime. So you’ll have to include regeneratorRuntime either yourself or use babel-polyfill.
Reference taken from an issue.
Now you know why this exists, so let’s solve it. We need to make some changes to our webpack.base.config.js:
const path = require('path');
const webpack = require('webpack');
const merge = require("webpack-merge");

const MiniCssExtractPlugin = require("mini-css-extract-plugin");
const HtmlWebpackPlugin = require('html-webpack-plugin');
const CopyWebpackPlugin = require('copy-webpack-plugin');

const APP_DIR = path.resolve(__dirname, '../src'); // <===== new stuff added here

module.exports = env => {
  const { PLATFORM, VERSION } = env;
  return merge([
      {
        entry: ['@babel/polyfill', APP_DIR], // <===== new stuff added here
        module: {
          rules: [
            {
              test: /\.js$/,
              exclude: /node_modules/,
              use: {
                loader: 'babel-loader'
              }
            },
            {
              test: /\.scss$/,
              use: [
                PLATFORM === 'production' ? MiniCssExtractPlugin.loader : 'style-loader',
                'css-loader',
                'sass-loader'
              ]
            }
          ]
        },
        plugins: [
          new HtmlWebpackPlugin({
            template: './src/index.html',
            filename: './index.html'
          }),
          new webpack.DefinePlugin({
            'process.env.VERSION': JSON.stringify(env.VERSION),
            'process.env.PLATFORM': JSON.stringify(env.PLATFORM)
          }),
          new CopyWebpackPlugin([ { from: 'src/static' } ]),
        ],
    }
  ])
};
Check line no.8 and line no.14 in the snippet added above.
By default Webpack 4 takes in entry point of src/. But if we want to have multiple entry points, we can customize the entry point as well. In my entry point I am just telling it two things:
entry: ['@babel/polyfill', APP_DIR],@babel/polyfillBabel plugin that includes a polyfill that includes a custom regenerator runtime and core-js.APP_DIRthe path to oursrc/folder which I wrote online no.8const APP_DIR = path.resolve(__dirname, ‘../src’);All this line is doing is pointing to the path ofsrc/folder in ourapp/folder.
So the entry just takes in “points” as to what to compile.
Now that this is cleared up, let’s run the npm run start command again.
So far so good!
Now that everything is set up, let’s create a NodeJS server using ExpressJS.

The first thing we have to install is Express, so in your terminal write this:
npm install express --save Or if you use yarn (like I do):
yarn add expressNext in the root app folder create a new folder called server. Inside the folder create a index.js file like the one shown below:
const express = require('express');
const path = require('path');
const http = require('http');

const app = express();

// Point static path to dist
app.use('/', express.static(path.join(__dirname, '..', 'dist')));
app.use('/dist', express.static(path.join(__dirname, '..', 'dist')));

const routes = require('./routes');

app.use('/', routes);

/** Get port from environment and store in Express. */
const port = process.env.PORT || '3000';
app.set('port', port);

/** Create HTTP server. */
const server = http.createServer(app);
/** Listen on provided port, on all network interfaces. */
server.listen(port, () => console.log(`Server Running on port ${port}`));Let’s discuss this code before we proceed further.
We instantiate our app with express() and then set up a static public folder called dist. This is the same folder created by Webpack when we run our production command.
We include our routes file — we will create that in a second — and set the routes file to the / directory.
Next we set up a port. If none is provided via the node CLI, we use port 3000. After that, we create an HTTP server and listen on that server via the port. At the very last, we console to our terminal that we are running the server on that certain port.
Let’s create our last file called routes/index.js:
const path = require('path');
const router = require('express').Router();

router.get('*', (req, res) => {
  const route = path.join(__dirname, '..', '..', 'dist', 'index.html');
  res.sendFile(route);
});

module.exports = router;
Here we check that whatever the user comes on, the path redirects the user to the dist/index.html where our React application lives.
And that’s it. We are done.
Now go in your terminal and type:
npm run buildThis will take a moment. It will show you the progress while it compiles. After that, it consoles a message that it is listening to port 3000 if no port is provided.
Now go to your browser http:localhost:3000/ and your application is alive.
Since we are at it, let’s talk in detail about what npm run prebuild and npm run build do.
Basically if we write the word pre for a script, in this case prebuild, every time we run our command npm run build it will first execute npm run prebuild and then run the script npm run build .
All npm run build does is run node server/index.js (You don’t have to write /index.js) in the command. NodeJS is smart enough to know it needs to run the index.js inside the server folder.
This sums up our NodeJS application setup as well.
One last topic to go. I’ll give a very brief overview on code splitting, and how you can achieve it.
Code Splitting
At the start of this tutorial, we added @babel/plugin-syntax-dynamic-import This gives us the ability to lazily load our code inside our application.
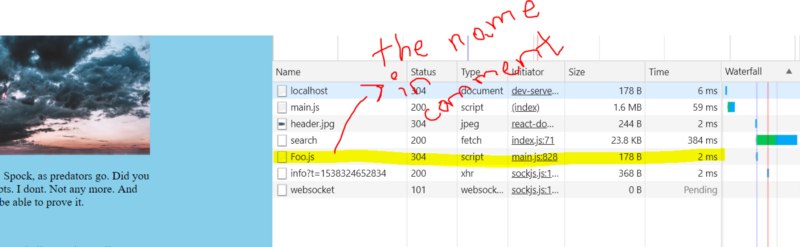
Inside my src/ folder, I am going to create a component called Foo.js which looks something like this.
import React from 'react';

export default () => (
  <div>
    <p>I am Foo! Pleasure to meet you.</p>
  </div>
);Nothing special about Foo here.
The special thing starts when we include this component in our src/index.js file.
You might be thinking something like this:
import Foo from './Foo';
class App extends React.Component {
   state = {};
   render() {
      return (
        <div>
          <p>I am App</p>
          <Foo />
        </div>
      )
   }
}
Well no, for a dynamic import we have to do this:
import React from 'react';
import ReactDOM from 'react-dom';

import './myStyles.scss';

class App extends React.Component {
  state = {
    CaptainKirkBio: {},
    Foo: null, // Foo is out component
  };

  componentDidMount() {
    this.onGetKirkBio();
    import(/* webpackChunkName: 'Foo' */ './Foo').then(Foo => {
      this.setState({ Foo: Foo.default });
    });
  }

  onGetKirkBio = async () => {
    try {
      const result = await fetch('http://stapi.co/api/v1/rest/character/search', {
        method: 'POST',
        headers: {
          'Content-Type': 'application/x-www-form-urlencoded',
        },
        body: {
          title: 'James T. Kirk',
          name: 'James T. Kirk',
        },
      });
      const resultJSON = await result.json();
      const character = resultJSON.characters[0];
      this.setState({ CaptainKirkBio: character });
    } catch (error) {
      console.log('error', error);
    }
  };

  render() {
    const { CaptainKirkBio, Foo } = this.state;
    return (
      <div className="app">
        <img alt="header" src="/dist/images/header.jpg" className="app-header" />
        <p>
          We are a most promising species, Mr. Spock, as predators go. Did you know that? I
          frequently have my doubts. I dont. Not any more. And maybe in a thousand years or so will
          be able to prove it.
        </p>
        <p>- Captain Kirk</p>
        <section>
          {Object.values(CaptainKirkBio).length === 0 ? (
            <p>Loading User Information</p>
          ) : (
            <p style={{ wordBreak: 'break-all' }}>{JSON.stringify(CaptainKirkBio)}</p>
          )}
        </section>
        {Foo ? <Foo /> : <p>Foo is loading</p>}
      </div>
    );
  }
}

ReactDOM.render(<App />, document.getElementById('app'));Things to note here are in line 9 line 14, 15, 16 line 40 line 57:
Line 9: We SetFooasnullLine 14, 15, 16: As soon as our component mounts, we import our<Foo/> component
Let’s talk more about this:
import(/* webpackChunkName: 'Foo' */ './Foo').then(Foo => {
   this.setState({Foo: Foo.default });
})
Let’s break this down even more.
import(/* webpackChunkName: ‘Foo’ */ ‘./Foo’) : This has 2 parts to it, we set a chunk name called Foo in /* webpackChunkName: ‘Foo’ */. You can call this whatever you want. What this does is when your application loads the ./Foo file, it will get loaded by the name of Foo as defined in /* webpackChunkName: ‘Foo’ */
/* webpackChunkName: ‘Foo’ */ Try changing Foo to something else in the /* */ commentThis feature is called magic comments in webpack, because it’s lets you name the file when you load it in your code.
The other part of import(/* webpackChunkName: ‘Foo’ */ ‘./Foo’) is the ‘./Foo’ at the very end of the statement. This is the path from where we include our file.
This returns us a promise .then(Foo => {}). Since our export of <Foo /> was export default when we set our state of Foo we set it to this.setState({Foo: Foo.default }); in order to assign the Foo component to the state variable Foo.
line 57 : This is where we display our <Foo /> component. Unless it is not loaded i.e, it is null, we show a loading message. And once we have the <Foo /> component we show it.
And that, my friends, is code splitting.
I really do hope this was helpful for you. If it was please do let me know so that I can write more stuff like this. You can always reach me out on Twitter and again if you followed along till the end, I am really proud of you guys. YOU GUYS ARE ROCKING IT!

This article was originally published in Freecodecamp publication previously on Medium. Read here