by Changhui Xu
How to Compose Canvas Animations in TypeScript
Today we are going to create a canvas animation with pretty blooming flowers, step by step. You can follow along by playing StackBlitz projects in this blog post, and you are welcome to check out the source code in this GitHub repo.
In my recent blog post, I described a high level view of composing canvas animations using TypeScript. Here I will present a detailed process of how to model objects and how to animate them on canvas.
Table of Contents
Draw Flowers
First things first, we need to have a function to draw flowers on canvas. We can break the parts of a flower down into petals and center (pistil and stamen). The flower center can be abstracted as a circle filled with some color. The petals grow around the center, and they can be drawn by rotating canvas with a certain degree of symmetry.
Notice that the bold nouns (flower, petal, center) imply models in the code. We are going to define these models by identifying their properties.
Let’s first focus on drawing one petal with some abstractions. Inspired by this tutorial, we know that petal shape can be represented by two quadratic curves and two Bézier curves. And we can draw these curves using the quadraticCurveTo() and bezierCurveTo() methods in the HTML canvas API.
As shown in Figure 1 (1), a quadratic curve has a starting point, an end point, and one control point which determines the curve’s curvature. In Figure 1 (2), a Bézier curve has a starting point, an end point, and two control points.
In order to smoothly connect two curves (any two curves, either quadratic or Bézier, or other), we need to make sure that the connection point and the two nearby control points are on the same line, so that these two curves have the same curvature at the connection point.
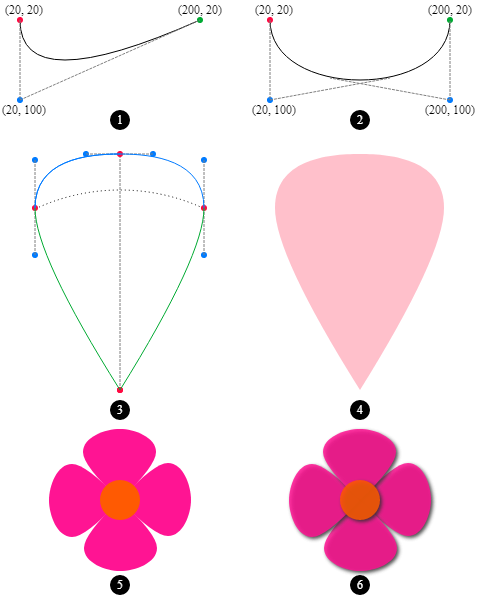
Figure 1 (3) shows a basic petal shape consisting of two quadratic curves (green) and two Bézier curve (blue). There are 4 red points representing petal vertices and 6 blue points representing control points of curves.
The bottom red vertex is the flower’s center point and the top red vertex is the flower petal tip. The middle two red vertices represent the petal’s radius. And the angle between these two vertices against the center point is named petal angle span. You can play with this StackBlitz project about petal shape.
After the petal shape is defined, we can fill the shape with a color and get a petal, as shown in Figure 1 (4). With the information above, we are good to write up our first object model: Petal.
export class Petal {
  private readonly vertices: Point[];
  private readonly controlPoints: Point[][];

  constructor(
    public readonly centerPoint: Point,
    public readonly radius: number,
    public readonly tipSkewRatio: number,
    public readonly angleSpan: number,
    public readonly color: string
  ) {
    this.vertices = this.getVertices();
    this.controlPoints = this.getControlPoints(this.vertices);
  }

  draw(context: CanvasRenderingContext2D) {
    // draw curves using vertices and controlPoints
  }

  private getVertices() {
    // compute vertices' coordinates
  }
  private getControlPoints(vertices: Point[]): Point[][] {
    // compute control points' coordinates
  }
}
The auxiliary Point class in Petal is defined as follows. Coordinates are using integers (via Math.floor()) to save some computing power.
export class Point {
  constructor(public readonly x = 0, public readonly y = 0) {
    this.x = Math.floor(this.x);
    this.y = Math.floor(this.y);
  }
}
The representation of a Flower Center can be parameterized by its center point, circle radius, and color. Thus, the skeleton of the FlowerCenter class is as follows:
export class FlowerCenter {
  constructor(
    private readonly centerPoint: Point,
    private readonly centerRadius: number,
    private readonly centerColor: string
  ) {}

  draw(context: CanvasRenderingContext2D) {
    // draw the circle
  }
}
Since we have a petal and a flower center, we are ready to move forward to draw a flower, which contains a center circle and several petals with the same shape.
From an Object Oriented perspective, Flower can be constructed as new Flower(center: FlowerCenter, petals: Petal[]) or as new Flower(center: FlowerCenter, numberOfPetals: number, petal: Petal). I use the second way, because no array is needed for this scenario.
In the constructor, you can add some validations to ensure data integrity. For example, throw an error if center.centerPoint doesn’t match petal.centerPoint.
export class Flower {
  constructor(
    private readonly flowerCenter: FlowerCenter,
    private readonly numberOfPetals: number,
    private petal: Petal
  ) {}

  draw(context: CanvasRenderingContext2D) {
    this.drawPetals(context);
    this.flowerCenter.draw(context);
  }

  private drawPetals(context: CanvasRenderingContext2D) {
    context.save();
    const cx = this.petal.centerPoint.x;
    const cy = this.petal.centerPoint.y;
    const rotateAngle = (2 * Math.PI) / this.numberOfPetals;
    for (let i = 0; i < this.numberOfPetals; i++) {
      context.translate(cx, cy);
      context.rotate(rotateAngle);
      context.translate(-cx, -cy);
      this.petal.draw(context);
    }
    context.restore();
  }
}
Pay attention to the drawPetals(context) method. Since the rotation is around the flower’s center point, we need to first translate the canvas to move the origin to flower center, then rotate the canvas. After rotation, we need to translate the canvas back so that the origin is the previous (0, 0).
Using these models (Flower, FlowerCenter, Petal), we are able to obtain a flower looks like Figure 1 (5). To make the flower more concrete, we add some shadow effects so that the flower looks like the one in Figure 1 (6). You can also play with the StackBlitz project below.
Animate Flowers
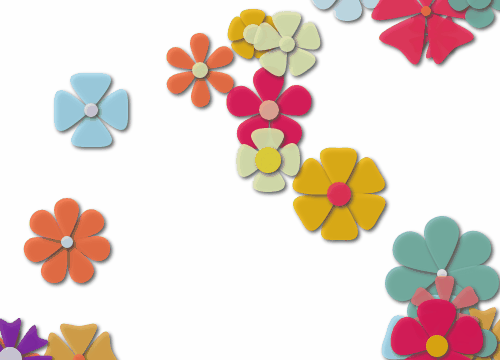
In this section, we are going to animate the flower blooming process. We will simulate the blooming process as increasing petal radius as time passes. Figure 2 shows the final animation in which the flowers’ petals are expanding at each frame.
Before we do the actual animations, we may want to add some varieties to the flowers so that they are not boring. For example, we can generate random points on the canvas to scatter flowers, we can generate random shapes/sizes of flowers, and we can paint random colors for them. This kind of work usually is done in a specific service for the purpose of centralizing logic and reusing code. We then put randomization logic into the FlowerRandomizationService class.
export class FlowerRandomizationService {
  constructor(){}
  getFlowerAt(point: Point): Flower {
    ... // randomization
  }
  ...  // other helper methods
}
Then we create a BloomingFlowers class to store an array of flowers generated by FlowerRandomizationService.
To make an animation, we define a method increasePetalRadius() in Flower class to update the flower objects. Then by calling window.requestAnimationFrame(() => this.animateFlowers()); in BloomingFlowers class, we schedule a redraw on canvas at each frame. And flowers are updated via flower.increasePetalRadius(); during each redraw. The code snippet below shows a bare minimum animation class.
export class BloomingFlowers {
  private readonly context: CanvasRenderingContext2D;
  private readonly canvasW: number;
  private readonly canvasH: number;
  private readonly flowers: Flower[] = [];

  constructor(
    private readonly canvas: HTMLCanvasElement,
    private readonly nFlowers: number = 30
  ) {
    this.context = this.canvas.getContext('2d');
    this.canvasWidth = this.canvas.width;
    this.canvasHeight = this.canvas.height;
    this.getFlowers();
  }

  bloom() {
    window.requestAnimationFrame(() => this.animateFlowers());
  }

  private animateFlowers() {
    this.context.clearRect(0, 0, this.canvasW, this.canvasH);
    this.flowers.forEach(flower => {
      flower.increasePetalRadius();
      flower.draw(this.context);
    });
    window.requestAnimationFrame(() => this.animateFlowers());
  }

  private getFlowers() {
    for (let i = 0; i < this.nFlowers; i++) {
      const flower = ... // get a randomized flower
      this.flowers.push(flower);
    }
  }
}
Notice that the call back function in window.requestAnimationFrame(() => this.animateFlowers()); is using Arrow Function syntax, which is needed to preserve this context of the current object class.
The above code snippet would result in the flower petal length increasing continually, because it doesn’t have a mechanism to stop that animation. In the demo code, I use a setTimeout() callback to terminate animation after 5 seconds. What if you want to recursively play an animation? A simple solution is demoed in the StackBlitz project below, which utilizes a setInterval() callback to replay the animation every 8 seconds.
That’s cool. What else can we do on canvas animations?
Add Interactions to Animation
We want the canvas to be responsive to keyboard events, mouse events, or touch events. How? Right, add event listeners.
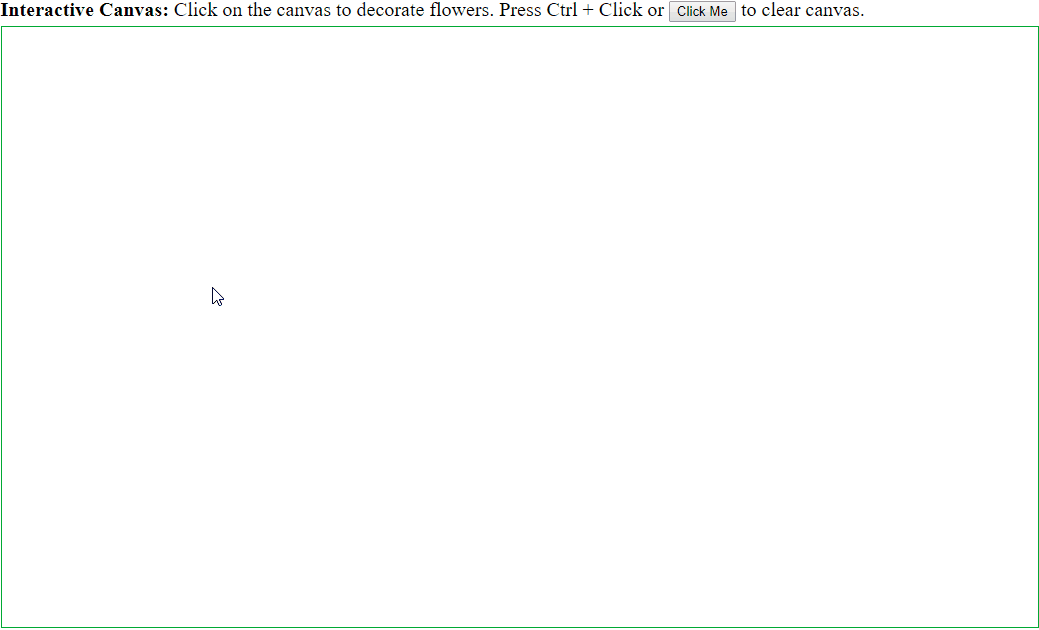
In this demo, we are going to create an interactive canvas. When the mouse clicks on the canvas, a flower blooms. When you click at another point on the canvas, another flower blooms. When holding the CTRL key and clicking, the canvas will clear. Figure 3 shows the final canvas animation.
As usual, we create a class InteractiveFlowers to hold an array of flowers. The code snippet of the InteractiveFlowers class is as follows.
export class InteractiveFlowers {
  private readonly context: CanvasRenderingContext2D;
  private readonly canvasW: number;
  private readonly canvasH: number;
  private flowers: Flower[] = [];
  private readonly randomizationService =
               new FlowerRandomizationService();
  private ctrlIsPressed = false;
  private mousePosition = new Point(-100, -100);

  constructor(private readonly canvas: HTMLCanvasElement) {
    this.context = this.canvas.getContext('2d');
    this.canvasW = this.canvas.width;
    this.canvasH = this.canvas.height;

    this.addInteractions();
  }

  clearCanvas() {
    this.flowers = [];
    this.context.clearRect(0, 0, this.canvasW, this.canvasH);
  }

  private animateFlowers() {
    if (this.flowers.every(f => f.stopChanging)) {
      return;
    }
    this.context.clearRect(0, 0, this.canvasW, this.canvasH);
    this.flowers.forEach(flower => {
      flower.increasePetalRadiusWithLimit();
      flower.draw(this.context);
    });
    window.requestAnimationFrame(() => this.animateFlowers());
  }

  private addInteractions() {
    this.canvas.addEventListener('click', e => {
      if (this.ctrlIsPressed) {
        this.clearCanvas();
        return;
      }
      this.calculateMouseRelativePositionInCanvas(e);
      const flower = this.randomizationService
                         .getFlowerAt(this.mousePosition);
      this.flowers.push(flower);
      this.animateFlowers();
    });

    window.addEventListener('keydown', (e: KeyboardEvent) => {
      if (e.which === 17 || e.keyCode === 17) {
        this.ctrlIsPressed = true;
      }
    });
    window.addEventListener('keyup', () => {
      this.ctrlIsPressed = false;
    });
  }

  private calculateMouseRelativePositionInCanvas(e: MouseEvent) {
    this.mousePosition = new Point(
      e.clientX +
        (document.documentElement.scrollLeft ||
         document.body.scrollLeft) -
        this.canvas.offsetLeft,
      e.clientY +
        (document.documentElement.scrollTop ||
         document.body.scrollTop) -
        this.canvas.offsetTop
    );
  }
}
We add an event listener to track the mouse click events and mouse position(s). Every click will add a flower to the flowers array. Since we don’t want to let the flowers expand to infinity, we define a method increasePetalRadiusWithLimit() in the Flower class to increase the petal radius until an increment of 20. In this way, each flower will bloom by itself and will stop blooming after its petal radius has increased 20 units.
I set a private member stopChanging in flower to optimize the animation, so that the animation will stop when all flowers have finished blooming.
We can also listen to keyup/keydown events and add keyboard controls to the canvas. In this demo, the canvas content will be cleared when the user holds the CTRL key and clicks the mouse. The key press condition is tracked by the ctrlIsPressed field. Similarly, you can add other fields to track other keyboard events to facilitate granular controls on the canvas.
Of course, the event listeners can be optimized using Observables, especially when you’re using Angular. You can play with the StackBlitz project below.
What’s next? We can brush up the interactive flowers demo by adding some sound effects and some animation sprites. We can study how to make it run smoothly across all platforms and make a PWA or mobile app out of it.
I hope this article adds some value to the topic of Canvas Animations. Again, the source code is in this GitHub repo and you can also play with this StackBlitz project and visit a demo site. Feel free to leave comments below. Thank you.
Cheers!