
The Discord API provides you with an easy tool to create and use your own bots and tools.
In this tutorial, you'll learn how you can create a basic music bot and add it to your server. The bot will be able to play, skip, and stop the music, and will also support queuing functionality.
Table of Contents
- Prerequisites
- How to Set Up a Discord Bot
– How to add the bot to your server
– How to create your project
– Discord.js basics - Discord Bot Version 0.13
– How to create the Discord player
– How to add slash commands
– How to implement interactions
– How to play songs
– How to skip songs
– How to stop songs
– Complete source code for index.js - Discord Bot Version 0.12
– How to read messages
– How to add songs
– How to play songs
– How to skip songs
– How to stop songs
– Complete source code for index.js - Conclusion
Prerequisites
Before we get started creating the bot, make sure that you have installed all the tools you'll need:
After you've installed these, you can continue by setting up your discord bot.
How to Set Up a Discord Bot
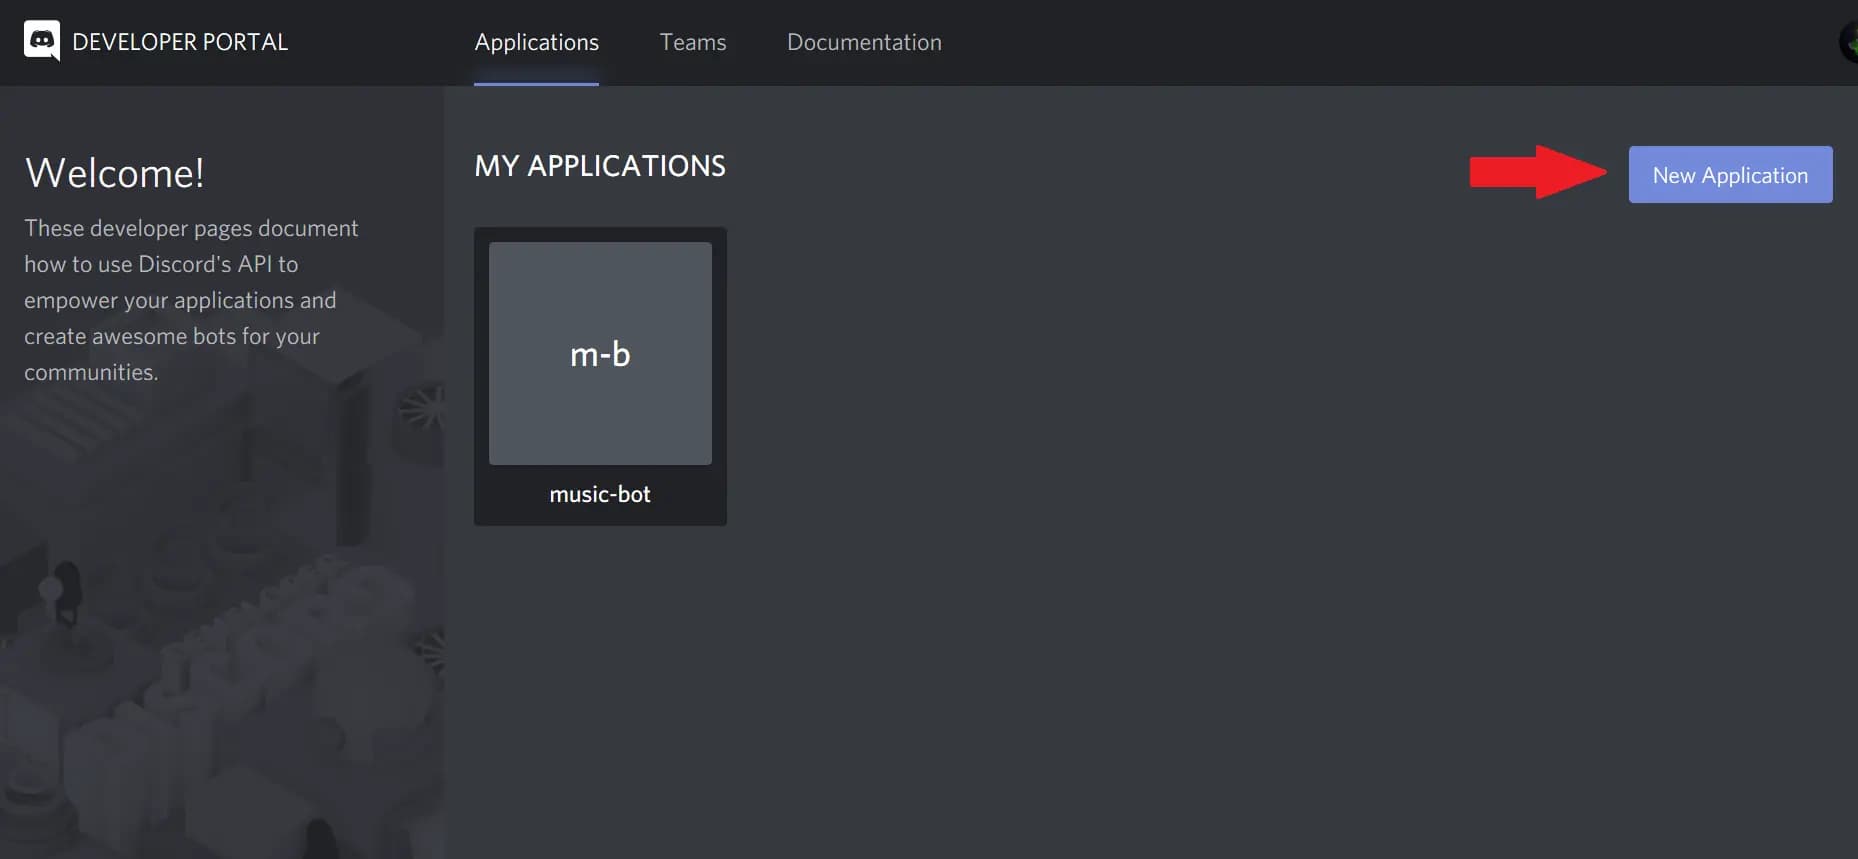
First, you need to create a new application on the discord development portal.
You can do so by visiting the portal and clicking on New Application.
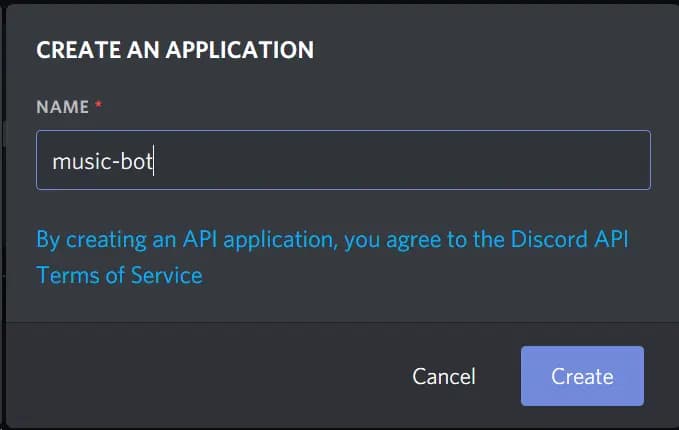
After that, you need to give your application a name and click the Create button.
After that, select the bot tab and click on Add Bot.
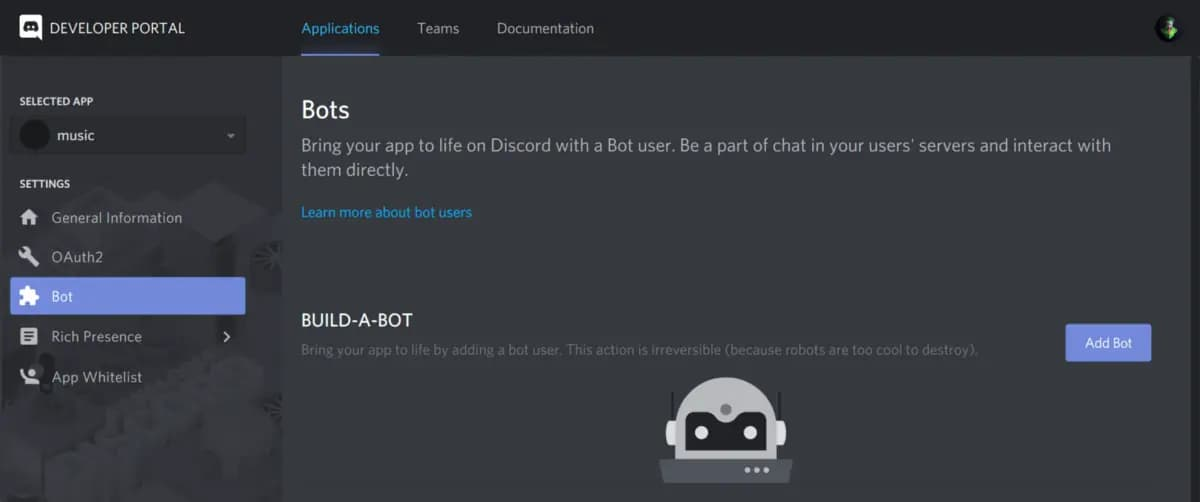
Now your bot is created and you can continue with inviting it to your server.
How to add the bot to your server
After creating your bot, you can invite it using the OAuth2 URL Generator.
For that, you need to navigate to the OAuth2 page and select bot in the scope tap.
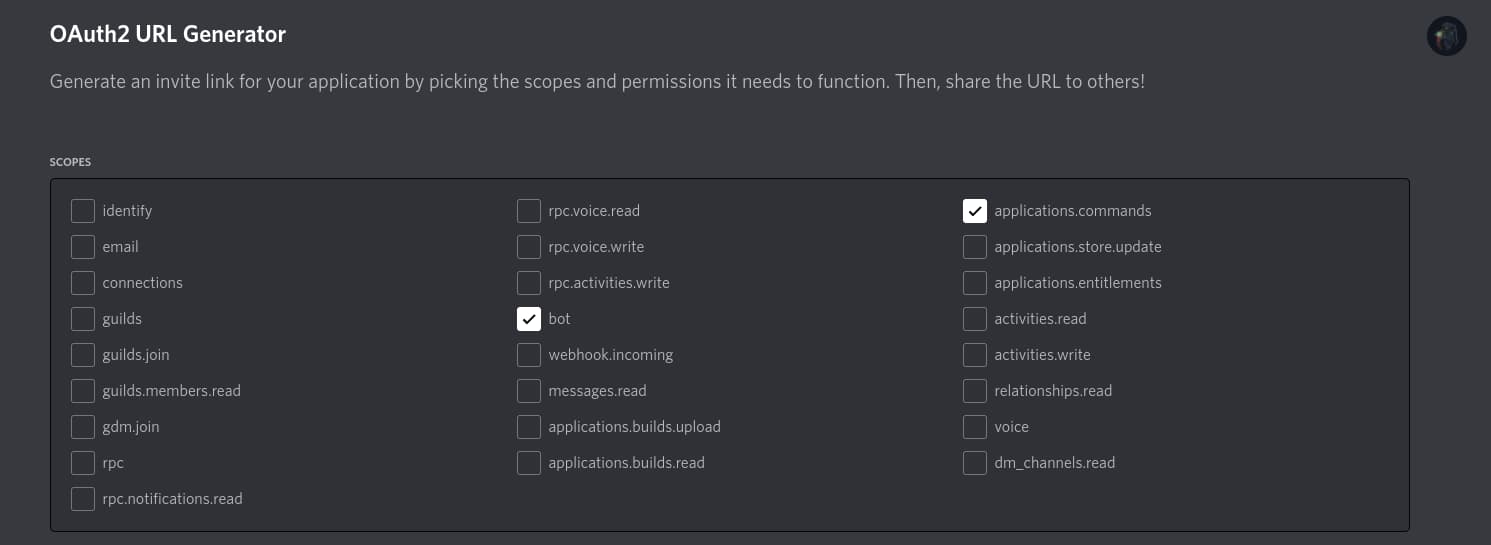
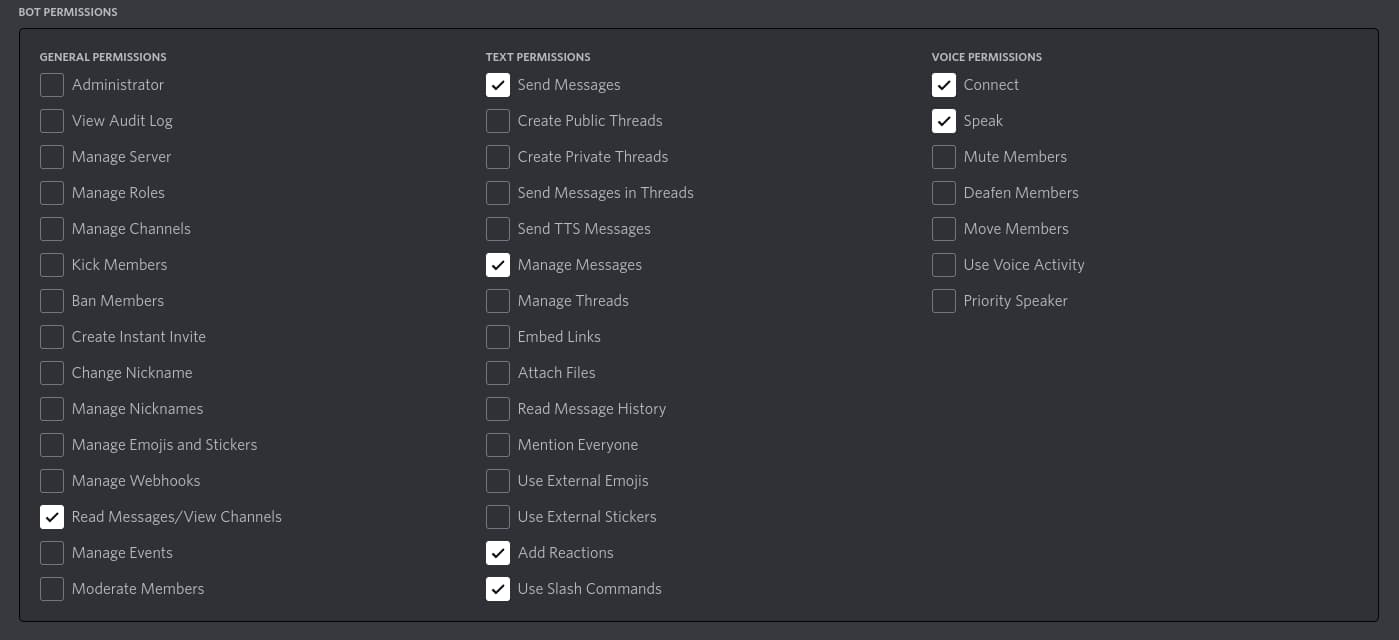
After that, you need to select the needed permissions to play music and read messages.
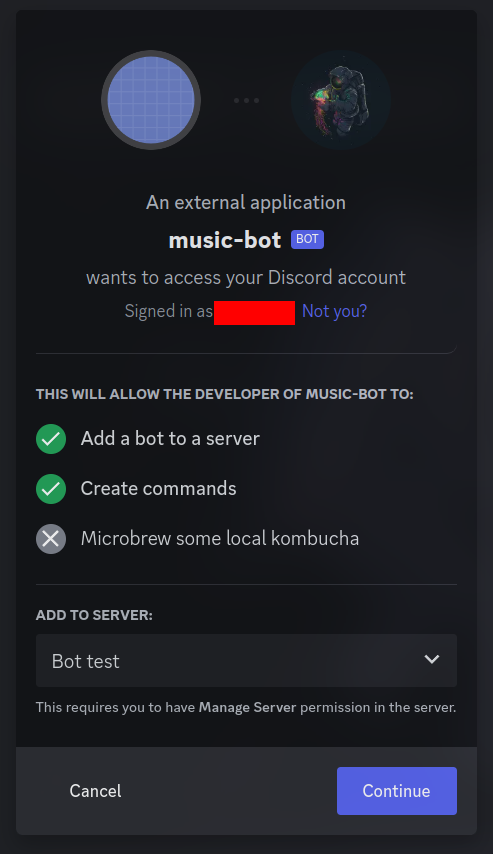
Then you can copy your generated URL and paste it into your browser.

After pasting it, add it to your server by selecting the server and clicking the authorize button.
How to create your project
Now you can start creating your project using the terminal.
First, create a directory and move into it. You can do so by using these two commands:
mkdir musicbot && cd musicbotAfter that, create your project modules using the npm init command. After entering the command, you will be asked some questions – just answer them and continue.
Then you just need to create the two files you will work in.
touch index.js && touch config.jsonNow, open your project in your text editor. I personally use VS Code and can open it with the following command:
code .Discord.js basics
Now you need to install some dependencies before we can get started.
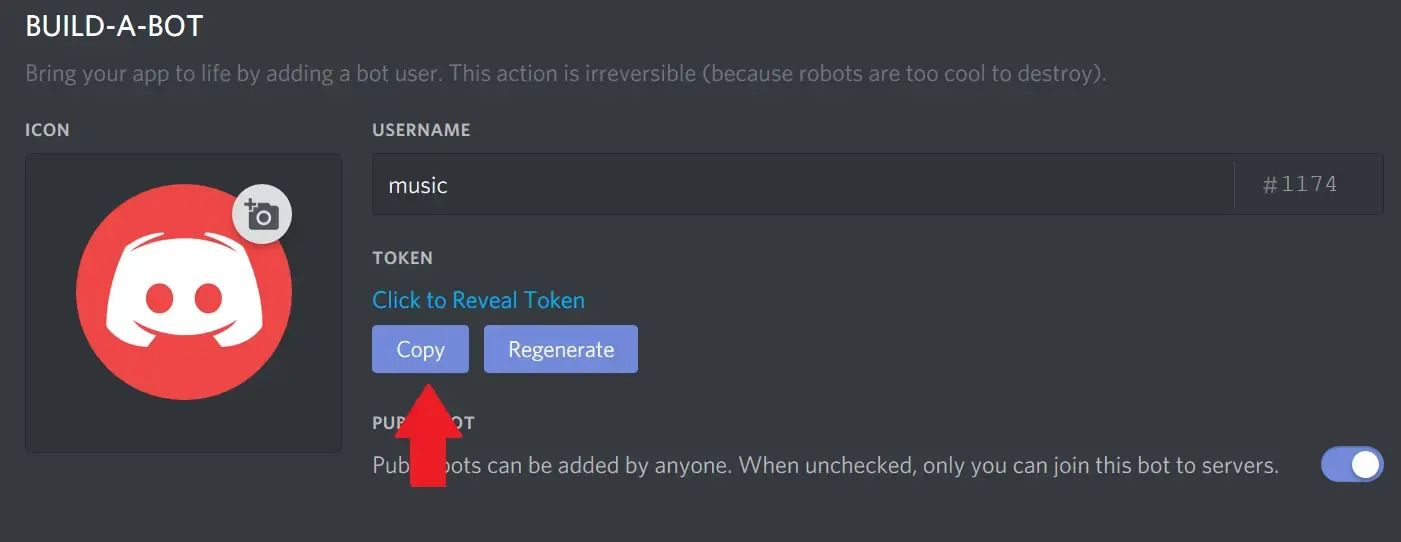
npm install discord.js@^12.5.3 ffmpeg fluent-ffmpeg @discordjs/opus ytdl-core --saveAfter the installation finishes, you can continue with writing your config.json file. Here, save the token of your bot and the prefix it should listen for.
{
"prefix": "!",
"token": "your-token"
}
To get your token, you need to visit the discord developer portal again and copy it from the bot section.
Those are the only things you need to do in your config.json file. So now it's time to start writing your JavaScript code.
The article includes two versions: one for the new discord.js v13, which uses slash commands combined with the discord-player library to implement the music functionality, and one for discord.js v12.5.3, which implements the functionality without a library.
The older version is better for learning purposes, and the newer version works with the current discord.js and is a lot easier to implement – so choose which you prefer.
Discord Bot Version 0.13
Now you just need to install some more dependencies before we can get started.
npm install discord.js discord-player @discordjs/opusAfter installing the dependencies, import them in your dependencies.
const { Client, GuildMember, Intents } = require("discord.js");
const { Player, QueryType } = require("discord-player");
const config = require("./config.json");
After that, create your client and log in using your token.
const client = new Client({
    intents: [Intents.FLAGS.GUILD_VOICE_STATES, Intents.FLAGS.GUILD_MESSAGES, Intents.FLAGS.GUILDS]
});
client.login(config.token);
Now add some basic listeners that console.log when they get executed.
client.once('ready', () => {
 console.log('Ready!');
});

client.on("error", console.error);
client.on("warn", console.warn);
After that, you can start your bot using the node command and the bot should be online on Discord and print “Ready!” in the console.
node index.jsHow to create the Discord player
Now that you've created the client for the discord bot, you can continue by initializing your player. This will allow you to play and manage music in your Discord channel.
const player = new Player(client);You can also add some error handlers that will be called if an error occurs.
player.on("error", (queue, error) => {
    console.log(`[${queue.guild.name}] Error emitted from the queue: ${error.message}`);
});
player.on("connectionError", (queue, error) => {
    console.log(`[${queue.guild.name}] Error emitted from the connection: ${error.message}`);
});
The last thing you need to do is add listeners for the different player events like a song starting or being added.
player.on("trackStart", (queue, track) => {
    queue.metadata.send(`🎶 | Started playing: **${track.title}** in **${queue.connection.channel.name}**!`);
});

player.on("trackAdd", (queue, track) => {
    queue.metadata.send(`🎶 | Track **${track.title}** queued!`);
});

player.on("botDisconnect", (queue) => {
    queue.metadata.send("❌ | I was manually disconnected from the voice channel, clearing queue!");
});

player.on("channelEmpty", (queue) => {
    queue.metadata.send("❌ | Nobody is in the voice channel, leaving...");
});

player.on("queueEnd", (queue) => {
    queue.metadata.send("✅ | Queue finished!");
});
In most cases, you just send a message into the Discord text channel using the send() function.
How to add slash commands
After you've set up the player successfully, you can continue by adding your Slash commands to your client. This step lets Discord know which commands the bot can execute.
client.on("messageCreate", async (message) => {
		if (message.author.bot || !message.guild) return;
    if (!client.application?.owner) await client.application?.fetch();
});
You can do this by implementing a simple !deploy command that saves your commands in the guild.commands variable of a message.
A slash command has a name, a description, and an optional options field that contains the command’s parameters. For example, the play command takes a song query as an argument.
client.on("messageCreate", async (message) => {
		...

		if (message.content === "!deploy" && message.author.id === client.application?.owner?.id) {
        await message.guild.commands.set([
            {
                name: "play",
                description: "Plays a song from youtube",
                options: [
                    {
                        name: "query",
                        type: "STRING",
                        description: "The song you want to play",
                        required: true
                    }
                ]
            },
            {
                name: "skip",
                description: "Skip to the current song"
            },
            {
                name: "queue",
                description: "See the queue"
            },
            {
                name: "stop",
                description: "Stop the player"
            },
        ]);

        await message.reply("Deployed!");
    }
});
After entering !deploy in your Discord text chat, the slash commands will be added to your application. When typing / into the chat you should see something similar to this:

How to implement interactions
Once the interactions (slash commands) are defined, now you'll need to implement them.
All slash commands trigger the interactionCreate event and can be implemented inside the async function below. Before executing any functionality, run a few conditionals to check if the user is allowed to perform the given functionality.
client.on("interactionCreate", async (interaction) => {
    if (!interaction.isCommand() || !interaction.guildId) return;

    if (!(interaction.member instanceof GuildMember) || !interaction.member.voice.channel) {
        return void interaction.reply({ content: "You are not in a voice channel!", ephemeral: true });
    }

    if (interaction.guild.me.voice.channelId && interaction.member.voice.channelId !== interaction.guild.me.voice.channelId) {
        return void interaction.reply({ content: "You are not in my voice channel!", ephemeral: true });
    }
});
After that, check which command is being executed by matching the commandName with the name of the commands you defined above.
client.on("interactionCreate", async (interaction) => {
    ...

		if (interaction.commandName === "play") {
			// TODO: Implement play command
		}
});
You can then add the implementation inside of the if statement.
How to play songs
The play command requires you to search for the provided song and add the result to the current queue of songs.
Let’s start by retrieving the user-provided query using the options.get() function. After that you can use the player.search() function to search for the desired song.
if (interaction.commandName === "play") {
    await interaction.deferReply();

    const query = interaction.options.get("query").value;
    const searchResult = await player
        .search(query, {
            requestedBy: interaction.user,
            searchEngine: QueryType.AUTO
        })
        .catch(() => {});
    if (!searchResult || !searchResult.tracks.length) return void interaction.followUp({ content: "No results were found!" });
}
Now that you have the song, you can create a queue for the songs (if there is already a queue, the createQueue function will return the existing one).
Once the queue is created, you can try joining the user’s voice channel. If that is successful, add the song to the current queue using the addTracks function.
if (interaction.commandName === "play") {
    ...

		const queue = await player.createQueue(interaction.guild, {
        metadata: interaction.channel
    });

    try {
        if (!queue.connection) await queue.connect(interaction.member.voice.channel);
    } catch {
        void player.deleteQueue(interaction.guildId);
        return void interaction.followUp({ content: "Could not join your voice channel!" });
    }

    await interaction.followUp({ content: `⏱ | Loading your ${searchResult.playlist ? "playlist" : "track"}...` });
    searchResult.playlist ? queue.addTracks(searchResult.tracks) : queue.addTrack(searchResult.tracks[0]);
    if (!queue.playing) await queue.play();
}
Lastly, if the queue isn’t already playing, let’s start it using the play() function.
How to skip songs
Skipping is quite easy – you can do it by calling the skip() function on the queue.
if (interaction.commandName === "skip") {
    await interaction.deferReply();
    const queue = player.getQueue(interaction.guildId);
    if (!queue || !queue.playing) return void interaction.followUp({ content: "❌ | No music is being played!" });
    const currentTrack = queue.current;
    const success = queue.skip();
    return void interaction.followUp({
        content: success ? `✅ | Skipped **${currentTrack}**!` : "❌ | Something went wrong!"
    });
}
If the action is successful, you can write a message to the Discord text channel using interaction.followUp().
How to stop songs
The stop functionality will remove all the songs from the queue and the bot will leave the voice channel. You can do this by destroying the current queue which automatically makes the bot leave the voice channel (unless you configure it otherwise in the player configuration).
else if (interaction.commandName === "stop") {
        await interaction.deferReply();
        const queue = player.getQueue(interaction.guildId);
        if (!queue || !queue.playing) return void interaction.followUp({ content: "❌ | No music is being played!" });
        queue.destroy();
        return void interaction.followUp({ content: "🛑 | Stopped the player!" });
    }
Complete source code for the index.js:
Here you can get the complete source code for the music bot:
const { Client, GuildMember, Intents } = require("discord.js");
const { Player, QueryType } = require("discord-player");
const config = require("./config.json");

const client = new Client({
    intents: [Intents.FLAGS.GUILD_VOICE_STATES, Intents.FLAGS.GUILD_MESSAGES, Intents.FLAGS.GUILDS]
});

client.on("ready", () => {
    console.log("Bot is online!");
    client.user.setActivity({
        name: "🎶 | Music Time",
        type: "LISTENING"
    });
});
client.on("error", console.error);
client.on("warn", console.warn);

const player = new Player(client);

player.on("error", (queue, error) => {
    console.log(`[${queue.guild.name}] Error emitted from the queue: ${error.message}`);
});
player.on("connectionError", (queue, error) => {
    console.log(`[${queue.guild.name}] Error emitted from the connection: ${error.message}`);
});

player.on("trackStart", (queue, track) => {
    queue.metadata.send(`🎶 | Started playing: **${track.title}** in **${queue.connection.channel.name}**!`);
});

player.on("trackAdd", (queue, track) => {
    queue.metadata.send(`🎶 | Track **${track.title}** queued!`);
});

player.on("botDisconnect", (queue) => {
    queue.metadata.send("❌ | I was manually disconnected from the voice channel, clearing queue!");
});

player.on("channelEmpty", (queue) => {
    queue.metadata.send("❌ | Nobody is in the voice channel, leaving...");
});

player.on("queueEnd", (queue) => {
    queue.metadata.send("✅ | Queue finished!");
});

client.on("messageCreate", async (message) => {
    if (message.author.bot || !message.guild) return;
    if (!client.application?.owner) await client.application?.fetch();

    if (message.content === "!deploy" && message.author.id === client.application?.owner?.id) {
        await message.guild.commands.set([
            {
                name: "play",
                description: "Plays a song from youtube",
                options: [
                    {
                        name: "query",
                        type: "STRING",
                        description: "The song you want to play",
                        required: true
                    }
                ]
            },
            {
                name: "skip",
                description: "Skip to the current song"
            },
            {
                name: "stop",
                description: "Stop the player"
            },
        ]);

        await message.reply("Deployed!");
    }
});

client.on("interactionCreate", async (interaction) => {
    if (!interaction.isCommand() || !interaction.guildId) return;

    if (!(interaction.member instanceof GuildMember) || !interaction.member.voice.channel) {
        return void interaction.reply({ content: "You are not in a voice channel!", ephemeral: true });
    }

    if (interaction.guild.me.voice.channelId && interaction.member.voice.channelId !== interaction.guild.me.voice.channelId) {
        return void interaction.reply({ content: "You are not in my voice channel!", ephemeral: true });
    }

    if (interaction.commandName === "play") {
        await interaction.deferReply();

        const query = interaction.options.get("query").value;
        const searchResult = await player
            .search(query, {
                requestedBy: interaction.user,
                searchEngine: QueryType.AUTO
            })
            .catch(() => {});
        if (!searchResult || !searchResult.tracks.length) return void interaction.followUp({ content: "No results were found!" });

        const queue = await player.createQueue(interaction.guild, {
            metadata: interaction.channel
        });

        try {
            if (!queue.connection) await queue.connect(interaction.member.voice.channel);
        } catch {
            void player.deleteQueue(interaction.guildId);
            return void interaction.followUp({ content: "Could not join your voice channel!" });
        }

        await interaction.followUp({ content: `⏱ | Loading your ${searchResult.playlist ? "playlist" : "track"}...` });
        searchResult.playlist ? queue.addTracks(searchResult.tracks) : queue.addTrack(searchResult.tracks[0]);
        if (!queue.playing) await queue.play();
    } else if (interaction.commandName === "skip") {
        await interaction.deferReply();
        const queue = player.getQueue(interaction.guildId);
        if (!queue || !queue.playing) return void interaction.followUp({ content: "❌ | No music is being played!" });
        const currentTrack = queue.current;
        const success = queue.skip();
        return void interaction.followUp({
            content: success ? `✅ | Skipped **${currentTrack}**!` : "❌ | Something went wrong!"
        });
    } else if (interaction.commandName === "stop") {
        await interaction.deferReply();
        const queue = player.getQueue(interaction.guildId);
        if (!queue || !queue.playing) return void interaction.followUp({ content: "❌ | No music is being played!" });
        queue.destroy();
        return void interaction.followUp({ content: "🛑 | Stopped the player!" });
    } else {
        interaction.reply({
            content: "Unknown command!",
            ephemeral: true
        });
    }
});

client.login(config.token);
Discord Bot Version 0.12
Now you'll just need to install some dependencies before we can get started.
npm install discord.js ffmpeg fluent-ffmpeg @discordjs/opus ytdl-core --saveAfter installing the dependencies, import them in your dependencies.
const Discord = require('discord.js');
const {
	prefix,
	token,
} = require('./config.json');
const ytdl = require('ytdl-core');
After that, create your client and login using your token.
const client = new Discord.Client();
client.login(token);
Now let’s add some basic listeners that console.log when they get executed.
client.once('ready', () => {
 console.log('Ready!');
});
client.once('reconnecting', () => {
 console.log('Reconnecting!');
});
client.once('disconnect', () => {
 console.log('Disconnect!');
});
After that, you can start your bot using the node command and it should be online on Discord and print “Ready!” in the console.
node index.jsHow to read messages
Now that your bot is on your server and able to go online, you can start reading chat messages and responding to them.
To read messages, you only need to write one simple function:
client.on('message', async message => {

}
Here, you're creating a listener for the message event, getting the message, and saving it into a message object if it's triggered.
Now you need to check if the message is from your own bot and ignore it if it is.
if (message.author.bot) return;In this line, you're checking if the author of the message is your bot and returning if it is.
After that, check if the message starts with the prefix you defined earlier and return if it doesn’t.
if (!message.content.startsWith(prefix)) return;After that, you can check which command you need to execute. You can do so using some simple if statements:
const serverQueue = queue.get(message.guild.id);

if (message.content.startsWith(`${prefix}play`)) {
    execute(message, serverQueue);
    return;
} else if (message.content.startsWith(`${prefix}skip`)) {
    skip(message, serverQueue);
    return;
} else if (message.content.startsWith(`${prefix}stop`)) {
    stop(message, serverQueue);
    return;
} else {
    message.channel.send("You need to enter a valid command!");
}
In this code block, you're checking which command to execute and calling the command. If the input command isn’t valid, you're writing an error message into the chat using the send() function.
Now that you know which command you need to execute, you can start implementing these commands.
How to add songs
Let’s start by adding the play command. For that, you'll need a song and a guild (a guild represents an isolated collection of users and channels and is often referred to as a server). You'll also need the ytdl library you installed earlier.
First, create a map with the name of the queue where you save all the songs you type in the chat.
const queue = new Map();After that, create an async function called execute and check if the user is in a voice chat and if the bot has the right permissions. If not, write an error message and return.
async function execute(message, serverQueue) {
  const args = message.content.split(" ");

  const voiceChannel = message.member.voice.channel;
  if (!voiceChannel)
    return message.channel.send(
      "You need to be in a voice channel to play music!"
    );
  const permissions = voiceChannel.permissionsFor(message.client.user);
  if (!permissions.has("CONNECT") || !permissions.has("SPEAK")) {
    return message.channel.send(
      "I need the permissions to join and speak in your voice channel!"
    );
  }
}
Now you can continue with getting the song info and saving it into a song object. For that, use your ytdl library which gets the song information from the YouTube link.
const songInfo = await ytdl.getInfo(args[1]);
const song = {
 title: songInfo.title,
 url: songInfo.video_url,
};
This will get the information of the song using the ytdl library you installed earlier. Then, save the information you need into a song object.
After saving the song info, you just need to create a contract you can add to your queue.
To do so, first check if your serverQueue is already defined which means that music is already playing. If so, add the song to your existing serverQueue and send a success message. If not, create it and try to join the voice channel and start playing music.
if (!serverQueue) {

}else {
 serverQueue.songs.push(song);
 console.log(serverQueue.songs);
 return message.channel.send(`${song.title} has been added to the queue!`);
}
Here, check if the serverQueueis empty and add the song to it if it’s not. Now you just need to create your contract if the serverQueue is null.
// Creating the contract for our queue
const queueContruct = {
 textChannel: message.channel,
 voiceChannel: voiceChannel,
 connection: null,
 songs: [],
 volume: 5,
 playing: true,
};
// Setting the queue using our contract
queue.set(message.guild.id, queueContruct);
// Pushing the song to our songs array
queueContruct.songs.push(song);

try {
 // Here we try to join the voicechat and save our connection into our object.
 var connection = await voiceChannel.join();
 queueContruct.connection = connection;
 // Calling the play function to start a song
 play(message.guild, queueContruct.songs[0]);
} catch (err) {
 // Printing the error message if the bot fails to join the voicechat
 console.log(err);
 queue.delete(message.guild.id);
 return message.channel.send(err);
}
In this code block, you created a contract and added your song to the songs array. After that, you tried to join the voice chat of the user and called your play() function you'll implement after that.
How to play songs
Now that you can add our songs to your queue and create a contract if there isn’t one yet, you can implement the play functionality.
First, create a function called play which takes two parameters (the guild and the song you want to play) and checks if the song is empty. If so, just leave the voice channel and delete the queue.
function play(guild, song) {
  const serverQueue = queue.get(guild.id);
  if (!song) {
    serverQueue.voiceChannel.leave();
    queue.delete(guild.id);
    return;
  }
}
After that, start playing your song using the play() function of the connection and passing the URL of your song.
const dispatcher = serverQueue.connection
    .play(ytdl(song.url))
    .on("finish", () => {
        serverQueue.songs.shift();
        play(guild, serverQueue.songs[0]);
    })
    .on("error", error => console.error(error));
dispatcher.setVolumeLogarithmic(serverQueue.volume / 5);
serverQueue.textChannel.send(`Start playing: **${song.title}**`);
Here, you created a stream and passed it the URL of our song. You also added two listeners that handle the end and error events.
Note: This is a recursive function which means that it calls itself over and over again. We're using recursion so it plays the next song when the song is finished.
Now you're ready to play a song by just typing the !play URL in the chat.
How to skip songs
Now you can implement the skipping functionality. For that, you just need to end the dispatcher you created in your play() function so it starts the next song.
function skip(message, serverQueue) {
  if (!message.member.voice.channel)
    return message.channel.send(
      "You have to be in a voice channel to stop the music!"
    );
  if (!serverQueue)
    return message.channel.send("There is no song that I could skip!");
  serverQueue.connection.dispatcher.end();
}
Here, you're checking if the user that typed the command is in a voice channel and if there is a song to skip.
How to stop songs
The stop() function is almost the same as skip(), except that you clear the songs array which will make your bot delete the queue and leave the voice chat.
function stop(message, serverQueue) {
  if (!message.member.voice.channel)
    return message.channel.send(
      "You have to be in a voice channel to stop the music!"
    );
  serverQueue.songs = [];
  serverQueue.connection.dispatcher.end();
}
Complete source code for the index.js:
Here you can get the complete source code for the music bot:
const Discord = require("discord.js");
const { prefix, token } = require("./config.json");
const ytdl = require("ytdl-core");

const client = new Discord.Client();

const queue = new Map();

client.once("ready", () => {
  console.log("Ready!");
});

client.once("reconnecting", () => {
  console.log("Reconnecting!");
});

client.once("disconnect", () => {
  console.log("Disconnect!");
});

client.on("message", async message => {
  if (message.author.bot) return;
  if (!message.content.startsWith(prefix)) return;

  const serverQueue = queue.get(message.guild.id);

  if (message.content.startsWith(`${prefix}play`)) {
    execute(message, serverQueue);
    return;
  } else if (message.content.startsWith(`${prefix}skip`)) {
    skip(message, serverQueue);
    return;
  } else if (message.content.startsWith(`${prefix}stop`)) {
    stop(message, serverQueue);
    return;
  } else {
    message.channel.send("You need to enter a valid command!");
  }
});

async function execute(message, serverQueue) {
  const args = message.content.split(" ");

  const voiceChannel = message.member.voice.channel;
  if (!voiceChannel)
    return message.channel.send(
      "You need to be in a voice channel to play music!"
    );
  const permissions = voiceChannel.permissionsFor(message.client.user);
  if (!permissions.has("CONNECT") || !permissions.has("SPEAK")) {
    return message.channel.send(
      "I need the permissions to join and speak in your voice channel!"
    );
  }

  const songInfo = await ytdl.getInfo(args[1]);
  const song = {
    title: songInfo.title,
    url: songInfo.video_url
  };

  if (!serverQueue) {
    const queueContruct = {
      textChannel: message.channel,
      voiceChannel: voiceChannel,
      connection: null,
      songs: [],
      volume: 5,
      playing: true
    };

    queue.set(message.guild.id, queueContruct);

    queueContruct.songs.push(song);

    try {
      var connection = await voiceChannel.join();
      queueContruct.connection = connection;
      play(message.guild, queueContruct.songs[0]);
    } catch (err) {
      console.log(err);
      queue.delete(message.guild.id);
      return message.channel.send(err);
    }
  } else {
    serverQueue.songs.push(song);
    return message.channel.send(`${song.title} has been added to the queue!`);
  }
}

function skip(message, serverQueue) {
  if (!message.member.voice.channel)
    return message.channel.send(
      "You have to be in a voice channel to stop the music!"
    );
  if (!serverQueue)
    return message.channel.send("There is no song that I could skip!");
  serverQueue.connection.dispatcher.end();
}

function stop(message, serverQueue) {
  if (!message.member.voice.channel)
    return message.channel.send(
      "You have to be in a voice channel to stop the music!"
    );
  serverQueue.songs = [];
  serverQueue.connection.dispatcher.end();
}

function play(guild, song) {
  const serverQueue = queue.get(guild.id);
  if (!song) {
    serverQueue.voiceChannel.leave();
    queue.delete(guild.id);
    return;
  }

  const dispatcher = serverQueue.connection
    .play(ytdl(song.url))
    .on("finish", () => {
      serverQueue.songs.shift();
      play(guild, serverQueue.songs[0]);
    })
    .on("error", error => console.error(error));
  dispatcher.setVolumeLogarithmic(serverQueue.volume / 5);
  serverQueue.textChannel.send(`Start playing: **${song.title}**`);
}

client.login(token);
Conclusion
You made it all the way until the end! Hope that this article helped you understand the Discord API and how you can use it to create a simple bot.
If you want to see an example of a more advanced discord bot, you can visit my GitHub repository.
If you have found this useful, please consider recommending and sharing it with other fellow developers.
If you have any questions or feedback, let me know and I'd be happy to help.