

An introduction to VuePress and how to use it
Creating documentation website for your newest project can be daunting and can take a lot of time. Most often you just want to have a website ready to go so other people can look at and/or use your project.
VuePress makes it easy to create documentation websites without writing a lot of code.
What is VuePress?
VuePress is a Vue-powered static site generator which generates HTML pages from markdown files. These allows you to focus on writing the documentation instead of working on perfecting your website.
In VuePress each page has its own pre-rendered static HTML, so it provides great loading performance and it also is really SEO (Search Engine Optimization) friendly.
It also provides a default theme that can kickstart your development process by providing you a nice out of the box theme to work with. These are also used for the official VuePress documentation website.
Installing VuePress and creating a project
Installing VuePress and creating a project or adding VuePress to an existing project is really easy. You can install VuePress using NPM:
npm install -g vuepressor by using yarn:
yarn global add vuepressYou can also add VuePress to an existing project. For this purpose I recommend yarn, because if the project has Webpack 3.x as an dependency, Npm fails to generate the correct dependency tree.
For adding VuePress to an existing project use:
yarn add -D vuepressRunning the project
To run a project, open a command line, go into your working directory and type vuepress dev to start the development server.
At first we will get an 404 error saying that there’s nothing here. That’s because we haven’t created any markdown file yet, so let’s just quickly use the command line to create our first markdown file:
echo '# Hello VuePress' > README.mdAfter typing this you will see the page refreshing, showing you a search-bar as well as the text we specified in the echo command. VuePress automatically lets users search for all h2 and h3 tags contained in the website.
You can see an image of the page below:

Adding a config file
Without any configuration the page doesn’t offer a lot of functionality and the user has no way of navigating around the site. To add custom configurations we need to create a config.js file which we need to put into a .vuepress folder, which will contain all VuePress-specific files.
So our new project structure will look like this:
|-- Project
   |-- README.md
   |-- .vuepress
      |-- config.js
Now we will create a Javascript object which we can use for specifying our configurations. In it we will specify a title and a description:
module.exports = {

 title: 'Hello VuePress',

 description: 'Just playing around'
}
If you take a look at the website now, you should see that it has a header with a title in it. If you inspect the website using the developer-tools you should see a meta description tag in the header.
Default theme
As mentioned at the beginning of the article, VuePress comes with a default theme for things like the homepage, navbar, sidebar and many more.
The default theme has a classic documentation site look (at least to me) and is really helpful for providing a starting point for your website’s style.
You can get the default theme from the VuePress documentation.
For styling the homepage, YAML front matter is used, and the only thing we need to do is to copy and paste it into our root README.md file.
So now our root README.md file looks something like:
---
home: true
heroImage: https://vuepress.vuejs.org/hero.png
actionText: Get Started →
actionLink: /guide/
features:
- title: Simplicity First
details: Minimal setup with markdown-centered project structure helps you focus on writing.
- title: Vue-Powered
details: Enjoy the dev experience of Vue + webpack, use Vue components in markdown, and develop custom themes with Vue.
- title: Performant
details: VuePress generates pre-rendered static HTML for each page, and runs as an SPA once a page is loaded.
footer: MIT Licensed | Copyright © 2018-present Evan You
---
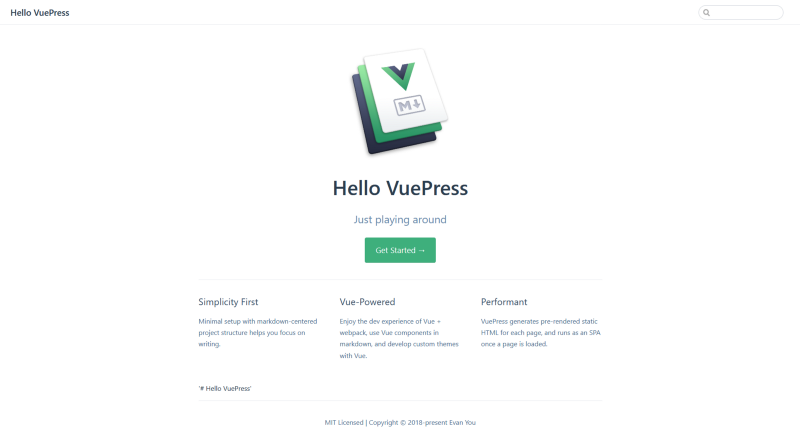
'# Hello VuePress'You can see the new homepage design in the image below:
Creating a Navbar
VuePress allows you to add a navbar by specifying a themeConfig object inside the config.js file and passing it an array of nav objects.
Just like in the official documentation we will add a link to a guide page, which hasn’t been created as of now, as well as a link to google.com.
module.exports = {
   title: 'Hello VuePress',
   description: 'Just playing around',
   themeConfig: {
       nav: [
         { text: 'Home', link: '/' },
         { text: 'Guide', link: '/guide/' },
         { text: 'External', link: 'https://google.com' },
       ]
   }
}
Creating routes
Now that we have a Navbar which lets us move between different pages, we need to create the guide page.
VuePress implements an easy to use routing system. For the /guide/ route it searches for a README.md file inside a guide directory.
After we have created the directory and file, our project structure looks like:
|-- Project
|-- README.md
|-- .vuepress
|-- config.js
|-- guide
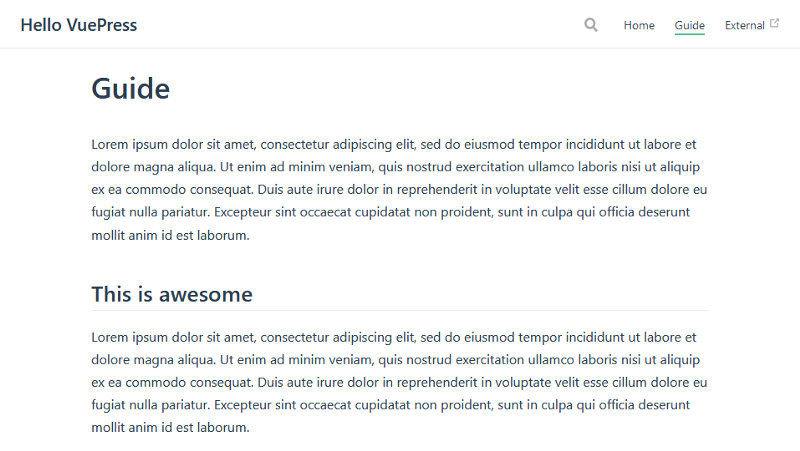
|-- README.mdAs the content of the README.md file, we will just enter some headlines and lorem ipsum text.
# Guide

Lorem ipsum dolor sit amet, consectetur adipiscing elit, sed do eiusmod tempor incididunt ut labore et dolore magna aliqua. Ut enim ad minim veniam, quis nostrud exercitation ullamco laboris nisi ut aliquip ex ea commodo consequat. Duis aute irure dolor in reprehenderit in voluptate velit esse cillum dolore eu fugiat nulla pariatur. Excepteur sint occaecat cupidatat non proident, sunt in culpa qui officia deserunt mollit anim id est laborum.

## This is awesome

Lorem ipsum dolor sit amet, consectetur adipiscing elit, sed do eiusmod tempor incididunt ut labore et dolore magna aliqua. Ut enim ad minim veniam, quis nostrud exercitation ullamco laboris nisi ut aliquip ex ea commodo consequat. Duis aute irure dolor in reprehenderit in voluptate velit esse cillum dolore eu fugiat nulla pariatur. Excepteur sint occaecat cupidatat non proident, sunt in culpa qui officia deserunt mollit anim id est laborum.
Now if we navigate to the guide page we see:
Creating a Sidebar
Most documentation websites offer a sidebar for easy navigation between different sections of a single side.
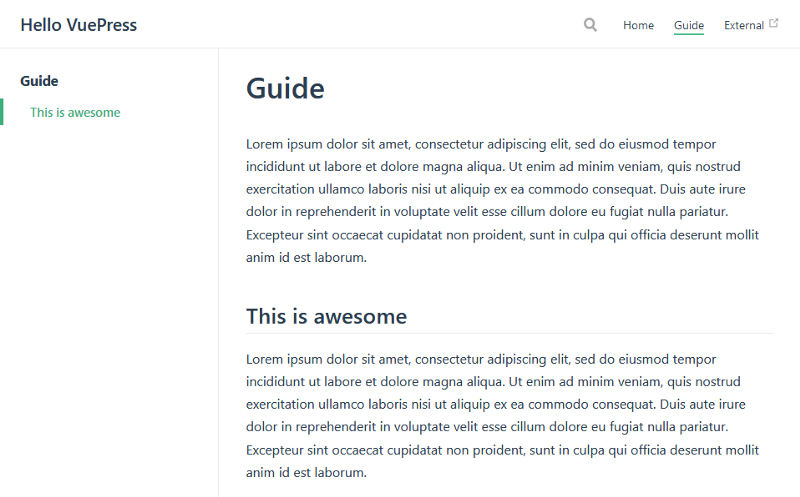
The simplest way to create such an sidebar is by specifying sidebar: ‘auto’ inside our themeConfig.
Code:
module.exports = {
   title: 'Hello VuePress',
   description: 'Just playing around',
   themeConfig: {
       nav: [
         { text: 'Home', link: '/' },
         { text: 'Guide', link: '/guide/' },
         { text: 'External', link: 'https://google.com' },
       ],
       sidebar: 'auto'
   }
}
This generates a sidebar:
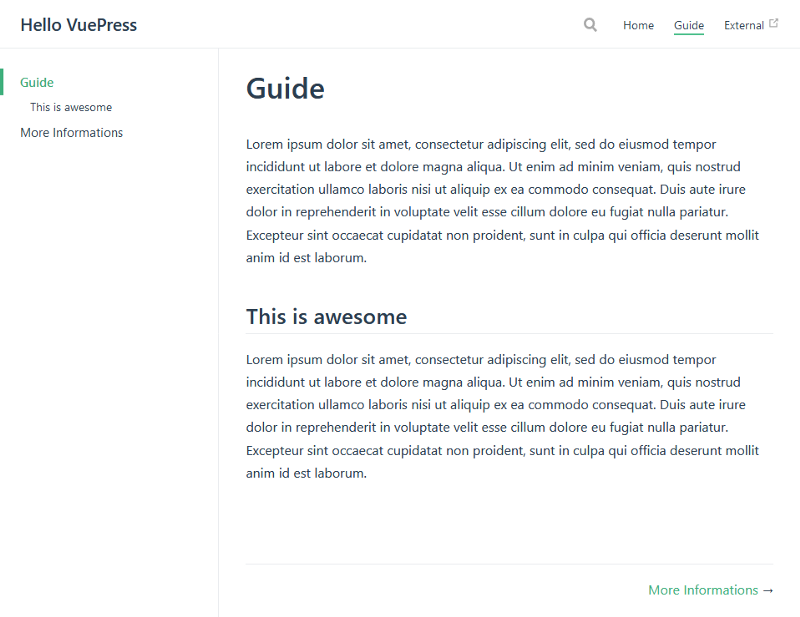
This is awesome in our use-case but doesn’t work well if you have additional markdown files. For this case you need to specify a sidebar object containing arrays for each “main” page.
For this example I will create another markdown file called “More Informations.md”, which is also positioned in the guide directory.
The file just contains some text:
# More Informations

More Informations about our awesome project
If you take a look at the sidebar again you see that nothing changed. So the auto setting doesn’t work for additional markdown files. For this we need to change our sidebar code as follows:
module.exports = {
   title: 'Hello VuePress',
   description: 'Just playing around',
   themeConfig: {
       nav: [
         { text: 'Home', link: '/' },
         { text: 'Guide', link: '/guide/' },
         { text: 'External', link: 'https://google.com' },
       ],
       sidebar: {
           '/guide/': [
               '',
               'More Informations'
           ]
       }
   }
}
As you can see we added an array of sidebar links for the guide/ route so we can navigate to the more information page.
Conclusion
VuePress is an convenient tool for creating documentation websites without writing a lot of code. It has a lot of features available that make it easy to build a great user experience.
I could only cover a very minimal amount of features in this post. If you are interested in learning more about VuePress and its features check out the official documentation and leave a comment down below if you want another article regarding VuePress.
If you liked this article consider subscribing on my Youtube Channel and following me on social media.
The code covered in this article is available as a Github Repository.
If you have any questions or critiques, I can be reached via Twitter or the comment section.