
by Timber.io
How to create a real-world Node CLI app with Node

The command line is a user interface that doesn’t get enough attention in the world of JavaScript development. The reality is that most dev tools should have a CLI to be utilized by nerds like us, and the user experience should be on par with that of your meticulously-created web app. This includes a nice design, helpful menus, clean error messages and outputs, loading indicators and progress bars, and so on.
There aren’t many real-world tutorials out there when it comes to building command-line interfaces with Node, so this is the first of a series that will go beyond a basic “hello world” CLI app. We’ll be creating an app called outside-cli, which will give you the current weather and 10-day forecast for any location.
Note: There are several libraries out there which aid in creating complex CLI’s such as oclif, yargs and commander, but we’ll be keeping our dependencies slim for the sake of this example so you can better understand how things are working under the hood. This tutorial assumes you have a basic working knowledge of JavaScript and Node.
Getting started
As with all JavaScript projects, creating a package.json and an entry file is the best way to kick things off. We can keep it simple — no dependencies are needed yet.
{
  "name": "outside-cli",
  "version": "1.0.0",
  "license": "MIT",
  "scripts": {},
  "devDependencies": {},
  "dependencies": {}
}module.exports = () => {
console.log('Welcome to the outside!')
}We’ll need a way to invoke our newly minted app and show the welcome message, as well as add it to the system path so it can be called from anywhere. A bin file is the way to do that.
#!/usr/bin/env node
require('../')()Never seen #!/usr/bin/env node before? It's called a shebang. It basically tells the system this isn't a shell script and it should use a different interpreter.
It’s important to keep the binary file slim, as it’s only purpose is to invoke the app. All our code should live outside the binary so it can remain modular and testable. It will also help if we want to provide programmatic access to our library in the future.
In order to run the bin file directly, we’ll need to give it the correct filesystem permissions. If you’re on UNIX, this is as easy as running chmod +x bin/outside. If you're on Windows, do yourself a favor and use the Linux Subsystem.
Next, we’ll add our binary to the package.json file. This will automatically place it onto the user’s system path when they install our package as a global (npm install -g outside-cli).
{
  "name": "outside-cli",
  "version": "1.0.0",
  "license": "MIT",
  "bin": {
    "outside": "bin/outside"
  },
  "scripts": {},
  "devDependencies": {},
  "dependencies": {}
}We can now call our bin file directly by running ./bin/outside. You should see the welcome message. Running npm link in the root of your project will symlink your binary file to the system path, making it accessible from anywhere by running outside.
When you run a CLI app, it consists of arguments and commands. Arguments (or “flags”) are the values prepended with one or two hyphens (such as -d, --debug or --env production) and are useful for passing options to our app. Commands are all the other values that don't have a flag.
Unlike commands, arguments don't need to be specified in any particular order. For example, we could run outside today Brooklyn and just assume that the second command will always be the location--but wouldn't it be better to run outside today --location Brooklyn in case we want to add more options in the future?
In order for our app to be useful at all, we’ll need to parse those commands and arguments, and turn them into an object. We could always jump into process.argv and try to do it ourselves, but let's install our first dependency called minimist to take care of this one for us.
npm install --save minimistconst minimist = require('minimist')
module.exports = () => {
const args = minimist(process.argv.slice(2))
console.log(args)
}Note: The reason we remove the first two arguments with .slice(2) is because the first arg will always be the interpreter followed by the name of the file being interpreted. We only care about the arguments after that.
Now running outside today should output { _: ['today'] }. If you run outside today --location "Brooklyn, NY", it should output { _: ['today'], location: 'Brooklyn, NY' }. We'll go more in-depth with arguments later when we actually use the location, but for now this is enough to set up our first command.
Argument Syntax
To better understand how argument syntax works, you can read this. Basically, a flag can be single or double hyphened, and will take the value immediately following in the command or will equal true when there is no value. Single-hyphen flags can also be combined for short-handed booleans (-a -b -c or -abc would give you { a: true, b: true, c: true }.)
It’s important to remember that values must be quoted if they contain special characters or a space. Running --foo bar baz would give you `{ : ['baz'], foo: 'bar' }, but running--foo "bar baz"would give you{ foo: 'bar baz' }`._
It’s a good idea to split up the code for each command and only load it into memory when it is called. This creates faster startup times and prevents unnecessary modules from loading. Easy enough with a switch statement on the main command given to us by minimist. Using this setup, each command file should export a function, and in this case, we’re passing the arguments to each command so we can use them later.
const minimist = require('minimist')

module.exports = () => {
  const args = minimist(process.argv.slice(2))
  const cmd = args._[0]

  switch (cmd) {
    case 'today':
      require('./cmds/today')(args)
      break
    default:
      console.error(`"${cmd}" is not a valid command!`)
      break
  }
}module.exports = (args) => {
console.log('today is sunny')
}Now if you run outside today, you'll see the message "today is sunny", and if you run outside foobar, it will tell you that "foobar" is not a valid command. We do still need to query a weather API to get real data, but this is a good start.
There are a few commands and arguments that are expected to be in every CLI: help, --help and -h, which should show help menus, and version, --version and -v which should output the current app version. We should also default to a main help menu if no command is specified.
This can be easily implemented in our current setup by adding two cases to our switch statement, a default value for the cmd variable, and implementing some if statements for the help and version argument flags. Minimist automatically parses arguments to key/values, so running outside --version will make args.version equal true.
const minimist = require('minimist')

module.exports = () => {
  const args = minimist(process.argv.slice(2))

  let cmd = args._[0] || 'help'

  if (args.version || args.v) {
    cmd = 'version'
  }

  if (args.help || args.h) {
    cmd = 'help'
  }

  switch (cmd) {
    case 'today':
      require('./cmds/today')(args)
      break

    case 'version':
      require('./cmds/version')(args)
      break

    case 'help':
      require('./cmds/help')(args)
      break

    default:
      console.error(`"${cmd}" is not a valid command!`)
      break
  }
}
To implement our new commands, follow the same format as the today command.
const { version } = require('../package.json')

module.exports = (args) => {
  console.log(`v${version}`)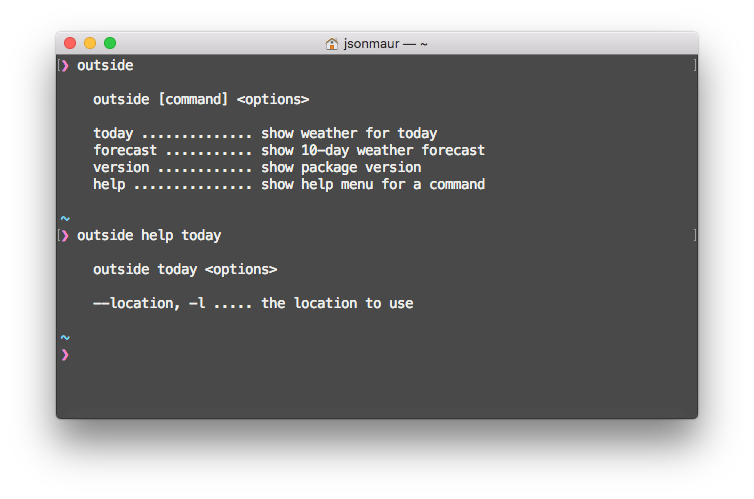
}const menus = {
main: `
outside [command] <options>
today .............. show weather for today
version ............ show package version
help ............... show help menu for a command`,
today: `
outside today <options>
--location, -l ..... the location to use`,
}
module.exports = (args) => {
const subCmd = args._[0] === 'help'
? args._[1]
: args._[0]
console.log(menus[subCmd] || menus.main)
}Now if you run outside help today or outside today -h, you should see the help menu for the today command. Running outside or outside -h should show you the main help menu.
This project setup is really awesome because if you need to add a new command, all you need to do is create a new file in the cmds folder, add it to the switch statement, and add a help menu if it has one.
module.exports = (args) => {
  console.log('tomorrow is rainy')
}// ...
case 'forecast':
require('./cmds/forecast')(args)
break
// ...const menus = {
main: `
outside [command] <options>
today .............. show weather for today
forecast ........... show 10-day weather forecast
version ............ show package version
help ............... show help menu for a command`,
today: `
outside today <options>
--location, -l ..... the location to use`,
forecast: `
outside forecast <options>
--location, -l ..... the location to use`,
}
// ...Sometimes a command can take a long time to run. If you’re fetching data from an API, generating content, writing files to the disk, or any other process that takes more than a few milliseconds, you want to give the user some feedback that your app hasn’t frozen and is simply working hard. Sometimes you can measure the progress of your operation and it makes sense to show a progress bar, but other times it’s more variable and makes sense to show a loading indicator instead.
For our app, we can’t measure the progress of our API requests, so we’ll use a basic spinner to show something is happening. Install two more dependencies for our network requests and our spinner:
npm install --save axios oraFetching data from the API
Now let’s create a utility that will make a request to the Yahoo weather API for the current conditions and forecast of a location.
Note: The Yahoo API uses “YQL” syntax, and it’s a little funky — don’t try to understand it, just copy and paste. This was the only weather API I could find that didn’t require an API key.
const axios = require('axios')

module.exports = async (location) => {
  const results = await axios({
    method: 'get',
    url: 'https://query.yahooapis.com/v1/public/yql',
    params: {
      format: 'json',
      q: `select item from weather.forecast where woeid in
        (select woeid from geo.places(1) where text="${location}")`,
    },
  })

  return results.data.query.results.channel.item
}const ora = require('ora')
const getWeather = require('../utils/weather')
module.exports = async (args) => {
const spinner = ora().start()
try {
const location = args.location || args.l
const weather = await getWeather(location)
spinner.stop()
console.log(`Current conditions in ${location}:`)
console.log(`\t${weather.condition.temp}° ${weather.condition.text}`)
} catch (err) {
spinner.stop()
console.error(err)
}
}Now if you run outside today --location "Brooklyn, NY", you'll see a quick spinner while it makes the request, followed by the current weather conditions.
Since the request happens so fast, it can be difficult to see the loading indicator. If you want to manually slow it down for the purpose of seeing it, you can add this line to the beginning of your weather util function: await new Promise(resolve => setTimeout(resolve, 5000)).
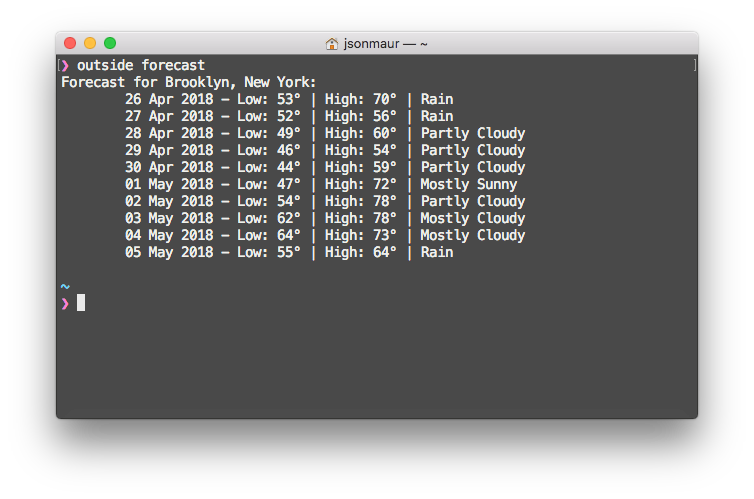
Great! Now let’s copy that code over to our forecast command, and change the formatting a bit.
const ora = require('ora')
const getWeather = require('../utils/weather')

module.exports = async (args) => {
  const spinner = ora().start()

  try {
    const location = args.location || args.l
    const weather = await getWeather(location)

    spinner.stop()

    console.log(`Forecast for ${location}:`)
    weather.forecast.forEach(item =>
      console.log(`\t${item.date} - Low: ${item.low}° | High: ${item.high}° | ${item.text}`))
  } catch (err) {
    spinner.stop()

    console.error(err)
  }
}You can now see a 10-day weather forecast when you run outside forecast --location "Brooklyn, NY". Looks good! Let's add one more utility to automatically get our location based off our IP address if no location is specified in the command.
const axios = require('axios')

module.exports = async () => {
  const results = await axios({
    method: 'get',
    url: 'https://api.ipdata.co',
  })

  const { city, region } = results.data
  return `${city}, ${region}`
}// ...
const getLocation = require('../utils/location')
module.exports = async (args) => {
// ...
const location = args.location || args.l || await getLocation()
const weather = await getWeather(location)
// ...
}Now if you simply run outside forecast without a location, you'll see the forecast for your current location.

Error handling
I didn’t go into a lot of detail on how to best handle errors (this will come in a later tutorial), but the most important thing to remember is to use the correct exit codes.
If your CLI ever has a critical error, you should exit with process.exit(1). This lets the terminal know that the program did not exit cleanly, which will notify you from a CI service, for example.
Let's create a quick utility that does this for us, so we can get the correct exit code when a non-existant command is run.
module.exports = (message, exit) => {
  console.error(message)
  exit && process.exit(1)
}// ...
const error = require('./utils/error')
module.exports = () => {
// ...
default:
error(`"${cmd}" is not a valid command!`, true)
break
// ...
}Finishing up
The last step to getting our library out into the wild is to publish it to a package manager. Since our app is written in JavaScript, it makes sense to publish to NPM. Let’s fill out our package.json a bit more:
{
  "name": "outside-cli",
  "version": "1.0.0",
  "description": "A CLI app that gives you the weather forecast",
  "license": "MIT",
  "homepage": "https://github.com/timberio/outside-cli#readme",
  "repository": {
    "type": "git",
    "url": "git+https://github.com/timberio/outside-cli.git"
  },
  "engines": {
    "node": ">=8"
  },
  "keywords": [
    "weather",
    "forecast",
    "rain"
  ],
  "preferGlobal": true,
  "bin": {
    "outside": "bin/outside"
  },
  "scripts": {},
  "devDependencies": {},
  "dependencies": {
    "axios": "^0.18.0",
    "minimist": "^1.2.0",
    "ora": "^2.0.0"
  }
}- Setting
enginewill ensure anyone installing our app has an updated version of Node. Since we are using async/await syntax without transpilation, we are requiring Node 8.0 or above. - Setting
preferGlobalwill warn the user if installing withnpm install --saverather thannpm install --global.
That’s it! You can now run npm publish and your app will be available for download. If you want to take this a step further and release on other package managers (such as Homebrew), you can check out pkg or nexe, which help you bundle your app into a self-contained binary.
Summary
This is the structure we follow for all of our CLI apps here at Timber, and it helps keep things organized and modular.
Some key takeaways from this tutorial for those who only skimmed it:
- Bin files are the entry point for any CLI app, and should only invoke the main function
- Command files shouldn’t be required until they are needed
- Always include
helpandversioncommands - Keep command files slim — their main purpose is to call functions and show user messages
- Always show some kind of activity indicator
- Exit with the correct error codes
I hope you now have a better understanding of how to create and organize CLI apps in Node. This is the first part of a series of tutorials, so come back later as we go more in-depth on adding design, ascii art and color, accepting user input, writing integration tests, and more. You can see all the source code we wrote today on GitHub.
We’re a cloud-based logging company here @ Timber. We’d love it if you tried out our product (it’s seriously great! — you can create a free account here), but that’s all we’re going to advertise our product … you guys came here to learn about building a CLI App in Node and hopefully this guide helped you get started.
Originally published at timber.io.