by George Gally
Learn how to dynamically inject JavaScript into webpages
For years I’ve been using the browser for my performances and installations using my own simple homegrown VJ engine. And now, after you learn a few simple tricks, you can too…
A quick intro
Firstly, what is a VJ engine? you might ask. And maybe even: what is a VJ? Here's a basic definition of the characteristics of VJing:
The creation or manipulation of imagery in realtime through technological mediation and for an audience, in synchronization to music.
And a VJ engine is simply the software used for VJing.
But why would I build my own when there are so many VJ engines out there?
I never really loved VJ software — they always felt bloated and made everyone’s stuff look kinda the same. It’s kind of like when you first got your hands on Photoshop, and just blended a bunch of stuff together, added some filters, and it was cool (because it was the 90s). But most of all, I wanted tighter and better integration between developing content and the sound input frequencies.
I rarely VJ these days, but it still drives most of my installations and performances — anywhere I need multiple visualisations I use RBVJ (the RB is for Radarboy — that’s me) as a wrapper/player.
RBVJ has gone through a number of iterations over the years, as I’ve bounced from Flash, to Processing, and finally now to JavaScript, all using the same simple system.
I had previously open sourced it and my content (before the days of Git and not really knowing there was a thing called open-source). It won a bunch of awards, and I saw my content being used in a whole bunch of places which was nice. So I thought it was time to make it available for others again, along with a bunch of content to show how I go about creative coding.
Ok, that’s a long enough introduction. Show me the money, you say!
1. Structuring the Content
Essentially, a VJ engine is just a fancy content browser and player. So what we really need is a way to retrieve and play our content.
You could just dump all your content in a folder, but this system is what has worked best for me, allowing a simple structure for keyboard control:
- Shift 0–9 to change sets
- Keys 0–9 to change banks
- Keys a-z to choose content within the bank.
This gives you 2,700 files to work with. If you really (really!?) wanted more, you could also double that by accessing another 26 files per bank with shift A-Z).
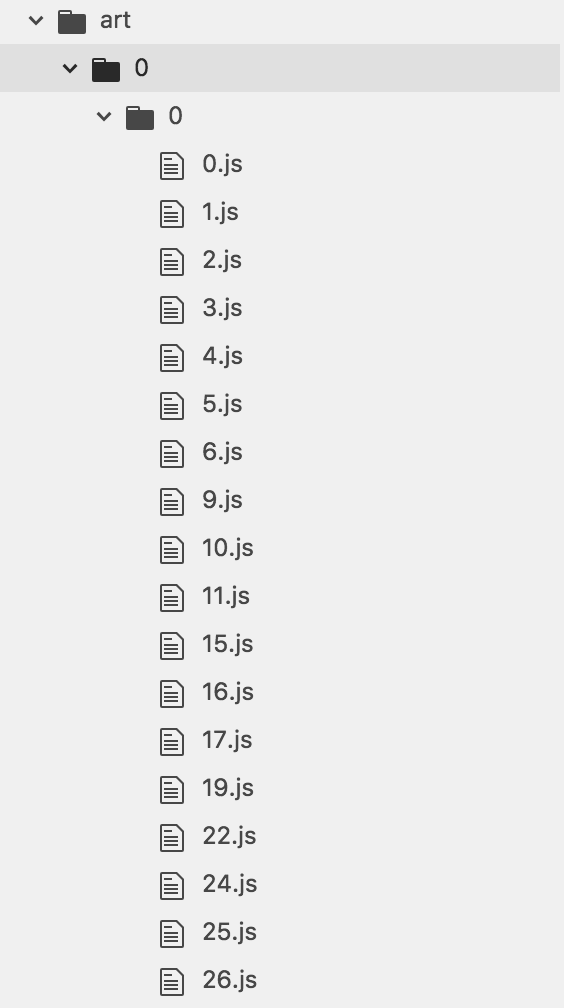
Like most HTML projects, I have a simple top-level structure, and keep the VJ content in a numbered structure inside the art folder, like so:
index.html/css/js/art <- content goes hereMy content folder (/art) contains 10 numbered folders, which I refer to as sets. Inside each set are another 10 numbered folders representing banks. And inside each bank are 27 individual numbered content files, like so:
2. Retrieving and Playing the Content
Now we just need a way to access our files, which is done by injecting content into our index page.
And it’s pretty simple to do this.
The magic happens in a function called I’ve loadJS(). It creates a script tag within the page’s head and then injects some JavaScript into it (which would be our content). We trigger this function via a keypress (but could also be a midi or OSC signal) and pass the filename of the content we want into it. Then the script is available on the page.
// INJECT JS ONTO PAGEvar my_script;function loadJS(filename) { // delete injected JavaScript if there’s been some loaded in before if (my_script != undefined) document.getElementsByTagName("head")[0].removeChild(my_script); // create a script element my_script = document.createElement(’script’); my_script.setAttribute("type", "text/javascript"); // Load the file in and insert it into the page’s head tag my_script.setAttribute("src", filename); document.getElementsByTagName("head")[0].appendChild(my_script);}We listen for keypresses with an event listener, which calls a function called onKeyDown(), like so:
window.addEventListener( ’keydown’, function( event ) { onKeyDown( event ); });The listener passes the event object to the function, which contains a bunch of useful stuff. Here what we’re interested in: the event.keycode. Pressing the ‘a’ key gives us a keycode of 65, and pressing us a ‘z’ gives us a keycode of 90. So we simply subtract 65 from the keycode to give us the required file number and pass this value into a changeFile() function, which I’ll show in a bit.
Similarly we want keys 0–9 (keycodes 48 to 57, so subtract 48 ) to change banks. We also want test to see whether the shift key has been pressed to load sets. The event object has a handy event.shiftKey variable for this, so our onKeyDown function will look like so:
// KeyPress Stufffunction onKeyDown( event ) { var keyCode = event.keyCode; // CHANGE FILE // keys a-z if ( keyCode >= 65 && keyCode <= 90 ) { changeFile(keyCode - 65); // CHANGE SET AND BANK // keys 0-9 } else if ( keyCode >= 48 && keyCode <= 57 ) { // Test whether the shift key is also being pressed if( event.shiftKey ) { changeBank( keyCode-48 ); } else { changeSet( keyCode-48 ); } }}The changeFile() function basically just takes the keypress and converts it into a URL. It calls our loadJS() function to inject the content into the page, and boom we’re away...
So our changeFile() function would look like this:
var current_file = 0;var current_set = 0;var current_bank = 0;var art_location = "art/";// FILE LOADER FUNCTIONSfunction changeFile(file) { current_file = file; var loc = current_set + '/' + current_bank + '/' + current_file; var filename = contentLocation + loc + '.js'; loadJS(filename); document.location.hash = loc; //console.log("File: " + loc);}I also have an art_location variable in case I want to have different collections of visuals (so I can have different folders for different shows and installations). I also add the filename as a hash (https://127.0.0.1/#set/bank/file) to the browser’s URL to make it easy to see where I am.
Our changeBank() and changeSet() functions set the current_bank and current_set variables. Then they just call the changeFile() function to pull up the correct file.
For housekeeping, I also reset all the counters — setting current_file back to 0 when I change banks, and the current_bank back to 0 when I change sets. This is so I know that when I change banks, the file playing will be the first file in the bank. Similarly, when I change sets, the file playing will reset to be be the first file from the first bank of the current set (current_set/0/0.js).
A bit of a mouthful, but the functions are actually super simple:
function changeSet(set) { current_set = set; console.log("changeSet: " + current_set); // reset bank number changeBank(0);}function changeBank(bank) {current_bank = bank; console.log("changeBank: " + current_bank); // reset file number and load new file changeFile(0);}And so the complete code for your basic VJ engine looks like this:
// FILE LOADER FUNCTIONSvar art_location = "/art";var fileref;var current_file = 0;var current_set = 0;var current_bank = 0;function changeFile( file ) { reset() current_file = file; var loc = current_set + '/' + current_bank + '/' + current_file; var filename = 'art/' + loc + '.js'; loadJS( filename ); document.location.hash = loc; //console.log("File: " + loc);}function changeSet( set ) { current_set = set; current_bank = 0; console.log( "changeSet: " + current_bank ); // reset changeFile( 0 );}function changeBank( bank ) { current_bank = bank; console.log( "changeBank: " + current_bank ); changeFile( 0 );}function reset(){ ctx.clearRect( 0, 0, w, h ); ctx2.clearRect( 0, 0, w, h ); ctx3.clearRect( 0, 0, w, h ); ctx.lineCap = "butt";}// INJECT JS ONTO PAGEfunction loadJS( filename ) {if ( fileref != undefined ) document.getElementsByTagName( "head" )[ 0 ].removeChild( fileref ); fileref = document.createElement( 'script' ); fileref.setAttribute( "type", "text/javascript" ); fileref.setAttribute( "src", filename ); document.getElementsByTagName( "head" )[ 0 ].appendChild( fileref );}
All that’s left to show you is how I structure the actual content files, which use an encapsulated function like so:
// RBVJ artrbvj = function() { draw = function() { // do some creative coding here }}();The function rbvj() is what gets injected into the page. It’s reused, so that every time a new file is inserted into my page, the memory gets flushed from all previous content.
By encapsulating the code (see the ‘()’ after the function), any code inside the rbvj() function will run automatically when the file is injected into the page.
You’ll notice that inside the content, I have a draw() function (this one from my own creative_coding.js utility script). It’s just a simple loop that uses JavaScript’s requestAnimationFrame() and is able to vary the frame rate.
var frame_number = 0;var frame_rate = 60;var last_update = Date.now();function loop() {var now = Date.now(); var elapsed_mils = now - last_update;if ((typeof window.draw == 'function') && (elapsed_mils >= (1000 / window.frame_rate))) { window.draw(); frame_number++; last_update = now - elapsed_mils % (1000 / window.frame_rate); } requestAnimationFrame(loop);};And that’s pretty much it. You now have a working VJ engine in the bowser.
3. Some other things to know that may be helpful
I normally just plug my computer’s sound input straight into an input from the venue’s mixer or amp (I use a version of my standard microphone input mic.js file, which you can read more about here). And I have keys setup (in my case, the plus and minus keys) to adjust the input levels up or down, so I don’t have to keep accessing the mixer.
Also note that for sound input, you’ll need a secure HTTPS connection — or if you use something like Atom’s Live Server, then that’s built in.
I also have a bunch of other keys set up for simple audio and visual filters (see how to make a pixelation filter here).
I mostly don’t use a preview screen/interface, but it’s easy enough to build one. Just create a new HTML page and let the pages talk to each other through a socket.
And finally, one last tip: when developing content, simply make a function to read in the current hash value of the browser, and call the loadFile() function on page load. That way, when you’re working on a file and you reload the page, that file is automatically displayed.
And that’s pretty much it. Hope this helps you get out there and show more of your content. As I mentioned previously, I’ve included a whole bunch of content for you to play around with and test so you can get a feel of how I create my stuff. If you use or alter any of it, I’d love to see how, where, and what you did with it. So please drop me a line.
Happy coding. And thanks for reading!
As usual the full code is available on Github.
This article is part of an ongoing series of tutorials on learning creative coding in pure JavaScript. As yes, I should be doing this in ES6, but wanted to keep this as simple as possible to understand.
You can see previous all my previous creative coding tutorials here.
And follow me here for updates, techniques and eye candy:
@radarboy3000 * Instagram photos and videos
3,960 Followers, 843 Following, 1,082 Posts - See Instagram photos and videos from @radarboy3000www.instagram.comGeorge Gally (@radarboy_japan) | Twitter
The latest Tweets from George Gally (@radarboy_japan). Media artist, technologist, tinkerer, dreamer. Motion reaction…twitter.comRadarboy
Radarboy. 130 likes · 7 talking about this. Art, design visualisation, hackswww.facebook.com