
by Prateek Mishra
How to create Angular 6 Custom Elements and Web Components
6 Steps to create Angular elements using Angular CLI

Angular elements are Angular components that carry the minified version of the whole framework. They allow you to create custom elements (one of the web components) in a framework-agnostic way. They can be used in simple web projects but with the powers of Angular within.
After reading the official documentation for Angular elements I realized that it lacks the implementation part in a structured manner. That is the reason I am stating the steps to get going!
1. Install Angular CLI 6 and create a new project
npm i -g @angular/cli

ng new angular-custom-elements
As Angular introduced the concept of custom elements in Angular 6 we must have v6 or later installed. You can also add the--style flag to set the default style extension.
2. Add elements package
Custom elements are not completely implemented by all the browsers. Hence we require Polyfills to get them working. With the new CLI command ng add you can add the Angular library and the required polyfills:
ng add @angular/elements3. Create a component
Let’s create a component that will act as a custom element by the end of this post:
ng g component button --inline-style --inline-template -v NativeWe are using ViewEncapsulation.Native to prevent the styles of component from bleeding out and affect other elements. This will render our component in browser’s native implementation of shadow DOM (v0; for v1 we use ViewEncapsulation.ShadowDOM) by bundling all the styles, template and component class code in a single file.
4. Add properties to the component
After making a few changes our button component looks like:
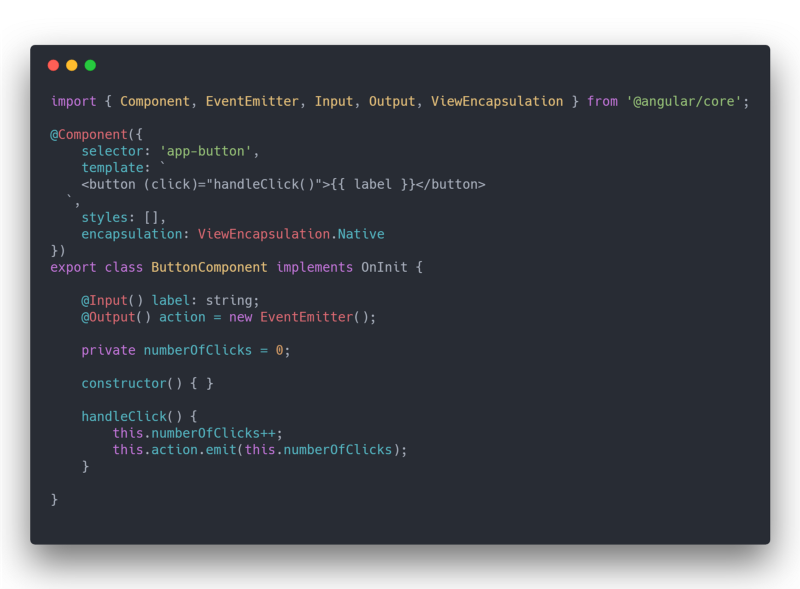
According to the official docs:
The creation API parses the component looking for input properties, and defines corresponding attributes for the custom element.
It transforms the property names to make them compatible with custom elements, which do not recognize case distinctions. The resulting attribute names use dash-separated lowercase. For example, for a component with@Input('myInputProp') inputProp, the corresponding custom element defines an attribute ‘‘my-input-prop”.
And also:
Component outputs are dispatched as HTML Custom Events, with the name of the custom event matching the output name.
For example, for a component with@Output() valueChanged = new EventEmitter(), the corresponding custom element will dispatch events with the name "valueChanged". The emitted data will be stored on the event’sdetailproperty. If you provide an alias, that value is used. For example,@Output('myClick') clicks = new EventEmitter<string>(); results in dispatch events with the name "myClick".
5. Update NgModule
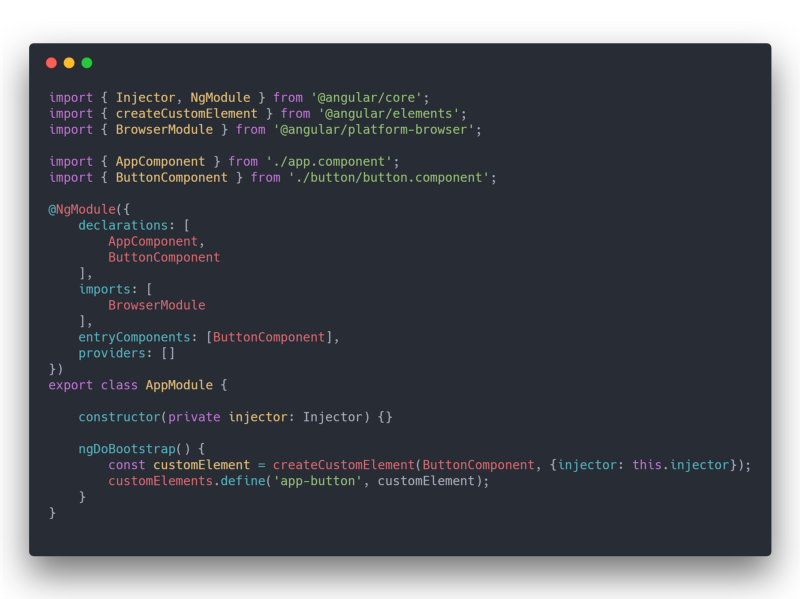
Following are the major steps that need to be followed in app.module.ts:
- Remove the default
bootstraparray which is set toAppComponent - Since our
ButtonComponentis not a part of any other component, and is also not a root of an Angular application, we need to tell Angular to compile it specifically. For this we put it on theentryComponentslist. Otherwise Angular tree shaking will drop this component from the prod bundle. - Add
ngDoBootstrap()to tell Angular to use this module for bootstrapping. - Angular provides the
createCustomElement()function for converting an Angular component, together with its dependencies, to a custom element. ThecreateCustomElement()function is expecting to get two parameter:
- First, the Angular component which should be used to create the element.
- Second, a configuration object. This object needs to include the injector property which is set to the current Injector instance.
5. The next step is to register the newly created custom element in the browser. This is done by calling customElements.define(). Please note that this is not Angular. The customElements read-only property belongs to the Window interface. It returns a reference to the CustomElementRegistry object. This object can be used to register new custom elements. It can also get information about previously registered custom elements in the browser.
The customElements.define() method needs two parameter:
- The first parameter is of type string and contains the name of the element. Passing the string ‘app-button’ means that the custom element <app-button> will be registered and can be used in the HTML code.
- The second parameter is the custom element which has been created before.
6. Now replace target value in tsconfig.json from es5 to es2015 as in browsers that support Custom Elements natively, the specification requires developers to use ES2015 classes to define Custom Elements.
6. Build and run
In order to build we will use a standard ng build command. But since it outputs four files (runtime.js , scripts.js, polyfills.js and main.js) and we’d like to distribute our component as a single js file, we need to turn hashing file names off. Let’s modify the scripts in package.json and add package entry:
"scripts": {
    …,

"build": "ng build --prod --output-hashing=none",

// For Windows:
"package": "jscat ./dist/angular-custom-elements/runtime.js ./dist/angular-custom-elements/polyfills.js ./dist/angular-custom-elements/scripts.js ./dist/angular-custom-elements/main.js > custom-button-element.js",

// For Mac or Linux:
"package": "cat ./dist/angular-custom-elements/runtime.js ./dist/angular-custom-elements/polyfills.js ./dist/angular-custom-elements/scripts.js ./dist/angular-custom-elements/main.js > custom-button-element.js",

…,

}
Since Windows OS has no cat command run npm i jscat.
Save all and finally run:
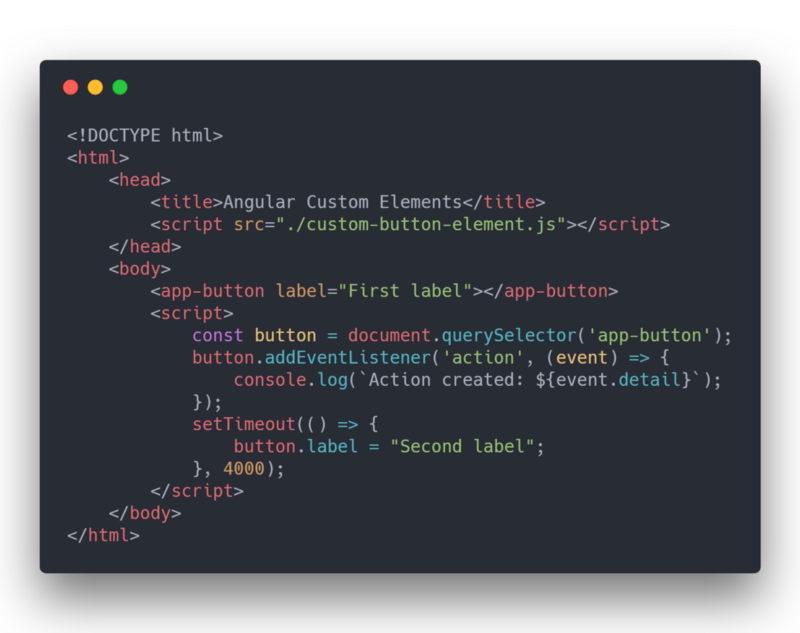
npm run build && npm run packageThe command generates custom-button-element.js that you can include in <script> of an HTML page to see our custom element working.
Here is an example:
Summary
In summary we’ve:
- Added important libraries for implementation
- Registered the component in browser’s CustomElementRegistry
- Combined the build artifacts to a single file
Complete source code can be found here.
Did you learn something new? If so please clap ? button below️ so more people can see this.