by Andreas Remdt
How to create email chips in pure React

Imagine that you, the good-looking developer (yes, I’m talking to you!), want to build an invitation form where users can add one or more email addresses to a list and send a message to all of them.
Thinking about how this could be solved the best way possible, I looked at what Google does in their Gmail application. In the “New Message” overlay you can enter an email address and press “Return”, “Tab” or a comma to add it to the list of recipients. You can even paste a bunch of email addresses and the app will go ahead and parse and add them to your list. Pretty neat, isn’t it?

These visual components are commonly called Chips or Badges and can be found in frameworks like Materialize, Bootstrap or Material UI.
What We Will be Building
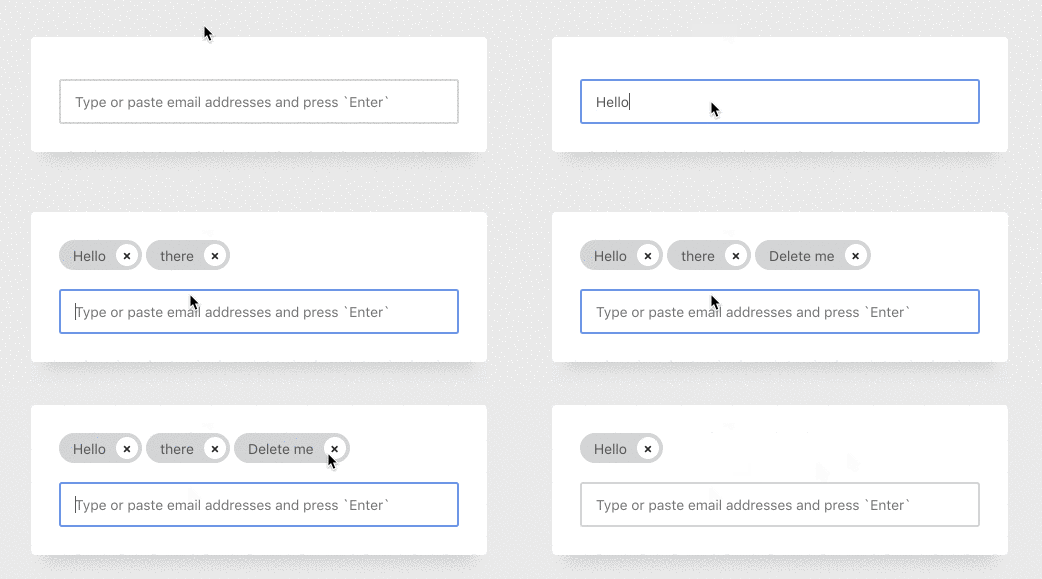
In this tutorial, I want to build such a feature in pure React, without the use of any other library or framework. We’ll create an input field which only accepts email addresses. The user can type them one by one or paste a bunch of them, which will create the chips as you can see and try in the example below:
Disclaimer: there are already various npm packages out there that do the same job, however, I like to implement such small features from scratch as I don’t enjoy depending on (sometimes huge) 3rd party scripts. Also, it’s a good exercise to practice your React skills.
Scaffolding the Project
Since we don’t need anything special to get started, let’s just use create-react-app. In case you haven’t installed it on your computer already, open your terminal and enter npm install -g create-react-app.
After the command has run, create-react-app should be installed (if you get an error during installation, you might need to run it with administrator privileges: sudo npm install -g create-react-app) and ready for use.
Go into your workspace and type create-react-app chips. In my case, I’m going to name my folder chips, but you can choose whatever name you prefer.
create-react-app will go ahead and do its thing, installing all the dependencies that we need to get started. After this has been done, you can type cd chips to go into our newly created directory and npm start to boot up the development server. If everything went well, you should be greeted by the default React App screen.

Project Organization
In our chips directory we have a bunch of folders and files that were created for our convenience. We’ll be working in src/App.js for the most time, so open this file in your favorite code editor.
Delete all the code that you see inside of App.js. Next, let’s add a basic React class component:
import React from 'react';

class App extends React.Component {
  render() {
    return <p>Hello World</p>;
  }
}
After saving App.js, you should see your browser refreshing automatically. The once dark page with the React logo is gone, instead, we have the simple text “Hello World” put onto the screen. Great start!
The Input Field and State
As the next step, we’ll replace the not-so-useful “Hello World” text in our JSX with something more suited: an input element.
return (
  <input
    placeholder="Type or paste email addresses and press `Enter`"
    value={this.state.value}
    onChange={this.handleChange}
  />
);
We now have an HTML input element with a placeholder attribute, which will show as long as the user hasn’t entered anything.
Below the placeholder attribute you’ll notice something that’s quite common in the React world, known as a Controlled Component. Normally, HTML form elements like input or textarea have their own state, which we can read and write with DOM methods like document.getElementById('input').value.
Using Controlled Components, the idea is that our React component’s state is the single source of through, meaning that the inputs value and our state are synced.
This allows us to manipulate the entered data on the fly and to add certain functionality that we’ll need later on.
If you would save and run this in your browser, you’d see the error message TypeError: Cannot read property 'value' of null. If you look at the code snippet it makes sense, because we are trying to access value from this.state, but we haven’t set up the state yet, nor do we have the handleChange method to control our state. Let’s add them.
class App extends React.Component {
  state = {
    value: ''
  }

  handleChange = (evt) => {
    this.setState({
      value: evt.target.value
    });
  };

  render() { ... }
}
First, we initialize a state object which contains an empty value property. Below that, we define the method handleChange which is going to be called each time the change event on the input element is fired. handleChange then runs and updates the state using setState.
evt.target.value is nothing React provides us with; it comes out of the box with JavaScript. evt.target is the input that we typed in, value is the entered value (how surprising).
Go ahead and try it out: in your browser you should be able to type something into the input. What you don’t see is that behind the scenes, your typed in data is synced with the state of your React component. Such magic!
Adding Emails as Chips
The next step is to enable the user to add emails to a list by pressing “Return”, “Tab” or the comma key on their keyboard. Before we can do such a thing, we need a list (or rather array) in our state to where we can add emails:
state = {
  value: '',
  emails: []
}
Now that we have an array to work with, we need to react (pun intended) on users pressing these special keys. The best way to do so is the keydown event:
return (
  <input
    placeholder="Type or paste email addresses and press `Enter`"
    value={this.state.value}
    onChange={this.handleChange}
    onKeyDown={this.handleKeyDown}
  />
);
Notice how I added the onKeyDown event listener, which refers to the following method:
handleKeyDown = (evt) => {
  if (['Enter', 'Tab', ','].includes(evt.key)) {
    evt.preventDefault();

    var email = this.state.value.trim();

    if (email) {
      this.setState({
        emails: [...this.state.emails, email],
        value: ''
      });
    }
  }
};
Wow, there’s so much going on here, right? Don’t worry, let’s go through the changes step by step:
if (['Enter', 'Tab', ','].includes(evt.key))is where the magic begins: inside this condition, we check if the pressed key (evt.key) is one of our triggers. I have created an array with these three keys (you could easily add another key like “Space”). Using theincludesmethod we check if our pressed key part of the array. That said, if a user presses “Tab” thenevt.keywould beTabwhich exists inside the array, therefore the condition is true.- If the condition is true, we’ll prevent the default from happening. Normally, by pressing the “Tab” key while being inside of an input element, you would focus on another element on the page or the browser (keyboard navigation), meaning that we’d leave our current input. But using
evt.preventDefault(), you can override the default browser behavior. - Below, we save the input that we have got so far.
this.state.valuealways contains what the user has typed in, that’s what ourhandleChangemethod is for. Usingtrimjust allows us to remove whitespace before or after the input. - Next, we check if the user has actually entered some data. If not, we don’t want to do anything.
- However, if
emailactually contains some data (which could really be anything as of right now), we append it into theemailsarray in our state. - At last, we reset the
valueproperty in our state, which means that our input field will be cleared and the user can start typing a new email address (if he wants to). That’s the beauty of controlled components!
You might wonder what [...this.state.emails, email] does, right? Well, it’s a quite new JavaScript feature called spread syntax. The 3 dots mean that we extract all of the emails from this.state.emails. Now that we have them extracted, we can merge them together with our new email into a new array. Finally, we override our current emails property by assigning the newly created array to it. If you want to read more about this technique and why we can’t use array.push(), have a look at this Stack Overflow thread.
Go ahead and try it out. Enter something into the input field and press any of our 3 triggers. Wait, nothing fancy happens you say? Well, that’s kind of expected, because although we add each input to our emails array we really don’t do anything with it, do we? Time to print them out:
return (
  <React.Fragment>
    {this.state.emails.map(email => <div key={email}>{email}</div>)}

    <input
      placeholder="Type or paste email addresses and press `Enter`"
      value={this.state.value}
      onChange={this.handleChange}
      onKeyDown={this.handleKeyDown}
    />
  </React.Fragment>
);
If you look at the JSX above you’ll see that I have wrapped our entire output with a React fragment and put an expression above the input field.
The fragment is so that I don’t have to render an unnecessary HTML element into the DOM.
The expression on line 3 is another typical React pattern that you will find in almost all applications: in here, we loop (or map, to be more concise) over the emails array from our state and output a div for every single item. The div has the email address as text content (and don’t forget the key prop, or else React will be mad at you).
Let’s see what we have achieved so far:

Removing Emails from the List
That’s great and all, but what if you added someone that — let’s say you don’t really like? We need a feature to remove already added emails from the list!
{this.state.emails.map(email => (
<div key={email}>
{email}
<button
type="button"
onClick={() => this.handleDelete(email)}
>
×
</button>
</div>
))}Look at the code above. Remember when we added the JSX to loop over all emails and print them out? This is the same code block, but now I have added a button inside our div that has a click event listener. This listener is going to call handleDelete as soon as a user presses the button.
Notice how this function call is different, though. It’s actually an arrow function that gets called and in return calls the handleDelete method with a parameter, in this case, our email.
This is a different approach from what you have seen so far, where we just did something like onChange={this.handleChange}. The reason is that this time, we need to pass the email that the user wants to get rid of into our method as a parameter, otherwise we wouldn’t be able to know which email to delete. If you want to know more details, this article has you covered.
Let’s implement the handleDelete method:
handleDelete = (toBeRemoved) => {
  this.setState({
    emails: this.state.emails.filter(email => email !== toBeRemoved)
  });
};
All we do in here is to set our state again, but this time we filter out the email address that was passed as a parameter. The filter method in JavaScript comes quite handy in cases like this.
We don’t have to use the weird spread syntax that you saw earlier ([...array1, newItem]), because filter returns a new array which doesn’t include the value that we just filtered out. We can then set this new array as our emails list.

Making it pretty
If you are like me, you might be cringing right now about the amount of unstyled content. Let’s make this bad boy pretty:
return (
<main className="wrapper">
{this.state.emails.map(email => (
<div className="email-chip" key={email}>
{email}
<button
type="button"
className="button"
onClick={() => this.handleDelete(email)}
>
×
</button>
</div>
))}
<input
className="input"
placeholder="Type or paste email addresses and press `Enter`"
value={this.state.value}
onChange={this.handleChange}
onKeyDown={this.handleKeyDown}
/>
</main>
);- The first thing you’ll notice is that I have replaced the
React.Fragmentwith<main className="wrapper">. This is just for styling purposes, I want to center the wrapper on my page. - I also have added some classes to the input, button and chips itself, which will receive a nice styling from our CSS file.
- On top of the file, below
import React from 'react', I have added another import:import './app.css'. If you have used create-react-app, you’ll most likely find aApp.cssin yoursrcdirectory. I have just renamed mine to a lowercase app.css and imported it.
You can find the CSS here, I won’t show it in this place as it would add too much bloat to this already long article.
Let’s have a look at what our app looks like now:

Validation
Our component is taking shape, but you might begin to wonder what will happen if a user enters some gibberish instead of an actual email address, right? RIGHT?
Currently, our component accepts all kinds of input, which we should fix as the next step. Let’s add an isValid method first:
isValid(email) {
  var error = null;

  if (!this.isEmail(email)) {
    error = `${email} is not a valid email address.`;
  }

  if (this.isInList(email)) {
    error = `${email} has already been added.`;
  }

  if (error) {
    this.setState({ error });

    return false;
  }

  return true;
}
The isValid method receives a single parameter, which is the input (in the best case an email address) that we want to validate. It initializes an error variable with null, meaning that we don’t have any errors yet.
We then see 2 if-conditions. The first one is checking if the value is a valid email utilizing the isEmail method:
isEmail(email) {
  return /[\w\d\.-]+@[\w\d\.-]+\.[\w\d\.-]+/.test(email);
}
In here, we receive a single parameter which should, but might not be the email that we want to add. Using a regular expression and the test method, we check if it’s actually a valid email address.
Disclaimer: I don’t guarantee that provided regular expression is the best one for validating emails. This is a difficult topic and there are many different variations out there, also things can get pretty complicated. But I’ll stick to this one, as it does the job.
The second method isInList also receives a single parameter (the email) and checks if it has already been added to our emails array in the state. Again, the awesome includes method is used:
isInList(email) {
  return this.state.items.includes(email);
}
All that our isValid method does is to use the other two methods to check if the given value is a valid email address and not yet part of our list. If neither of those conditions is true, we don’t set any error message and return true.
Otherwise, if one of these conditions is actually truthy, meaning that the email is invalid or already in the list, we set an error message and return false. The error lives on our component state, so we need to add the property it:
class App extends React.Component {
  state = {
    value: '',
    emails: [],
    error: null
  }

  // ...
}
Notice that the error property is initialized with null, because when we initially load the app there’s no error, of course.
Two things are still missing: in our handleKeyDown method we need to actually use the isValid method. And we should display the error to the user, otherwise having an error message in the first place would be rather pointless.
handleKeyDown = (evt) => {
  if (['Enter', 'Tab', ','].includes(evt.key)) {
    evt.preventDefault();

    var email = this.state.value.trim();

    if (email && this.isValid(email)) {
      this.setState({
        emails: [...this.state.emails, email],
        value: ''
      });
    }
  }
};
Remember the handleKeyDown method? I sure hope you do, because you need to change it in order to get validation. On line 7, notice that I have added && this.isValid(email) inside the condition. This means that we are now using our validation, passing it the value that the user has typed in. Only if email has an actual value and it’s a valid email address we continue by setting the state.
The last part of the puzzle is to show the error message to the user.
return (
  <main className="wrapper">
    {this.state.emails.map(email => (
      // Hidden...
    ))}

    <input
      className={'input' + (this.state.error && ' has-error')}
      placeholder="Type or paste email addresses and press `Enter`"
      value={this.state.value}
      onChange={this.handleChange}
      onKeyDown={this.handleKeyDown}
    />

    {this.state.error &&
      <p className="error">{this.state.error}</p>}
  </main>
);
Two things have changed:
- Below the
input, we conditionally render a paragraph with our error message as text content. - The
classNameof our input is no longer a simple string, but a JSX expression which appendshas-errorto the class name iferroris true. This is useful to give our input some custom styling if it’s invalid.
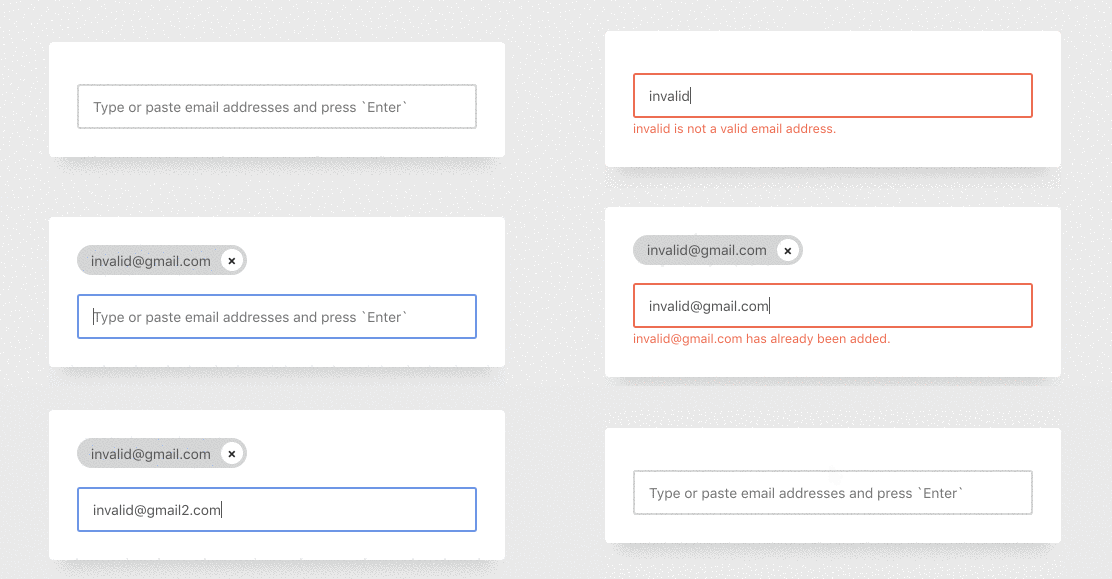
Go ahead and try the result in your browser. Try to enter an invalid email address or one that already is part of the list. You should see that the error message is displayed below the input.
There’s one issue though: if you made the error message appear, it will stay forever, even if you add a valid email address afterward. We need to reset the error after the user starts typing again:
handleChange = (evt) => {
  this.setState({
    value: evt.target.value,
    error: null
  });
};
Our handleChange method is the best place to do so! It gets called each time the user changes the input’s value, meaning that we can set the error to null again. If the user didn’t learn his lesson and tries to add an invalid email address again, then… well, the error message will re-appear.

Handling Pasting from the Clipboard
Our little component has grown quite a bit and became somewhat useful, but one important feature is still missing: pasting in email addresses from the clipboard.
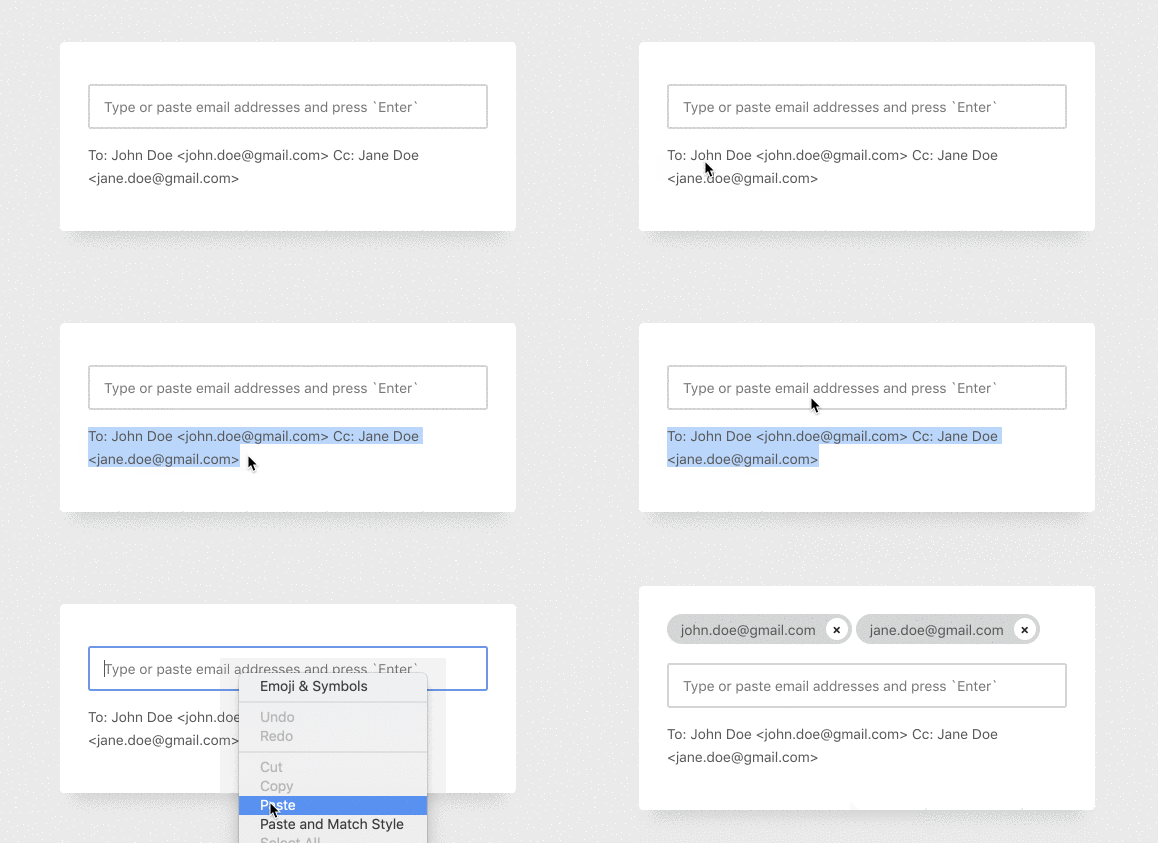
This one can be rather interesting because users might want to copy a bunch of email addresses from their mail app and paste them all at once. Different mail apps, however, have different formats. If you copy a bunch of emails from the Apple Mail app, for example, it looks like this:
To: John Doe <john.doe@gmail.com> Cc: Jane Doe <jane.doe@gmail.com>Your app might handle it differently. So, how do we parse these strings to only get the part we want?
handlePaste = (evt) => {
  evt.preventDefault();

  var paste = evt.clipboardData.getData('text');
  var emails = paste.match(/[\w\d\.-]+@[\w\d\.-]+\.[\w\d\.-]+/g);

  if (emails) {
    var toBeAdded = emails.filter(email => !this.isInList(email));

    this.setState({
      emails: [...this.state.emails, ...toBeAdded]
    });
  }
};
The above method is a lot to digest, so let’s dive right in.
- On line 2, we prevent the default, meaning that the text is not actually pasted into the input field. We’ll process it on our own.
- On line 4, we get the clipboard data that the user was about to paste using the Clipboard API.
pasteis a string. - Below, on line 5, we use the
matchmethod to apply a regex on our clipboard data. Thematchmethod will look through our entire string and get all parts that match with our regular expression (it’s the same one we used for the validation part). The result is an array of matches orundefinedif nothing matched. - On line 7, we check if there are any actual emails. If so, we will filter them on line 8 to exclude emails that are already in our list.
filteris our friend, once again. The variabletoBeAddedshould now be an array with emails that are not part of our list yet. Notice how we nicely reused ourisInListmethod. - On line 10, we use the spread syntax again to merge our current
emailsarray with the newly createdtoBeAddedarray.
Notice how we didn’t validate the emails using isEmail. This step is implicitly done because we relied on the same regular expression to get all valid email addresses. If a user pasted an invalid email address, it would never make it.
All that’s missing is the connection between our input and the handlePaste method:
<input
  className={'input' + (this.state.error && ' has-error'}
  placeholder="Type or paste email addresses and press `Enter`"
  value={this.state.value}
  onChange={this.handleChange}
  onKeyDown={this.handleKeyDown}
  onPaste={this.handlePaste}
/>
Thankfully, the paste event has you covered.

Conclusion
There you have it, our finished component that accepts multiple email addresses and even lets you paste them in.
Of course, if you could add more features and improvements, here are a few examples:
- If a user enters an email address but doesn’t press “Enter” or “Tab”, what should happen? You could attach a blur event to the input that tries to validate and add the content if the user clicks on something else on the page, like a submit button.
- You could make the chips clickable so that a user could select them to edit the email address.
- Accessibility could surely be improved, making it easier for screen readers to understand.
I hope you enjoyed this tutorial, feel free to tell me your suggestions or feedback. Happy coding!