
This article serves as a “how-to” guide for using Selenium Docker images alongside CodeceptJS and an Express server.
In it, we will cover:
- What is E2E acceptance testing?
- Why use Docker?
- Loosely coupled testing tools
- Layers of testing tools
- Creating a test project
E2E Acceptance Testing
Acceptance testing is a phase in a typical software development process. It covers tests to see if the product has met the overall requirement specifications, and if it is “accepted” as ready for delivery. It is typically the last phase of testing before releasing the product to production. This could include user-based acceptance tests, business-based acceptance tests, or even alpha/beta testing.
End-to-End (E2E) testing is one implementation of acceptance testing. It is an approach to acceptance testing, but the terms are not synonymous. It allows testing the flow of an application from start to finish to see if it is performing as designed. In the case of a web application, it would involve determining a user scenario and testing each of the steps the user would take in order. The test fails if the scenario is not completed successfully.
Various tools exist to automate this process, simulating user interaction with the application.
Why Docker?
Creating and running E2E tests is often considered a flaky and complex process. It requires a lot of set up that can still easily fail when run on different machines or in a CI (continuous integration) environment. Installing and maintaining different browsers and WebDrivers both for local tests and CI tests takes time. And even when done, it can still fail because of simple issues such as if the screen resolution on developer’s local machines, or in CI, is different.
The standard advantages of Docker also apply: not having to deal with OS compatibility or having dependancies installed. To run the Selenium Server you would need Java installed (or at least be started/stopped explicitly). To run Express you would need Node.js, and for Chrome you’d need Chrome itself as well as ChromeDriver.
When using Docker these dependancies are eliminated. You simply use different containers that already contain these, which will function precisely the same no matter on which machine they are run. When you then think how easy it is to build Docker into your CI, Dockerizing your test process becomes an obvious choice.
Loosely coupled testing tools
There are several frameworks available when writing E2E tests, and for a newcomer it can be hard to know which to choose and invest time into. If you choose the wrong one, you’ll have wasted a lot of time.
This is where CodeceptJS comes into the picture. CodeceptJS is a testing framework that takes a scenario-driven, behaviour driven development (BDD) approach, with an API language that is easy for non-engineers to understand and use. However, perhaps even more importantly, it is backend agnostic. It is written on top of several popular testing libraries (WebDriverIO or Puppeteer, for example) and its single high level API communicates to whichever one you choose. It’s creators believe that
Your tests should not be bound to your execution engine. Whether you choose Selenium or Puppeteer your tests should look almost the same. If you (later) feel the limitation of one engine you can easily switch your tests to other.
Layers of testing tools

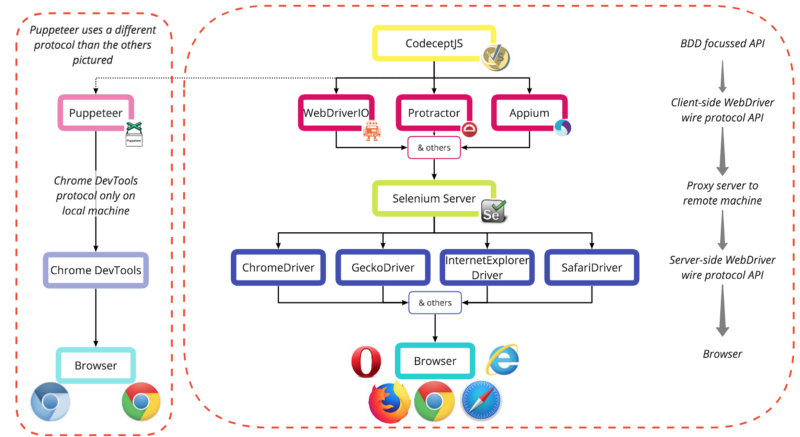
Let’s take a bottom-up approach to looking at how each layer builds on the last.
It is worth initially referencing Selenium, a long running project with an actively used set of tools, which today is made up of Selenium WebDriver, Grid, Server, and IDE. In creating these tools they have set many industry standards, often confusingly named after the Selenium product they came from. This can be seen in ‘Selenium WebDriver’, and the ‘WebDriver wire protocol’ that was established in its development. Those applicable will be shown in more detail below.
Browser
Any web browser: Chrome, Firefox, Internet Explorer, Safari, Opera, and so on. Often referred to as the ‘user agent’ in documentation.
W3C’s WebDriver wire protocol
The WebDriver wire protocol is a platform and language-neutral way of interacting with web browsers. It defines a common RESTful web service using JSON over HTTP in request/response pairs. It allows DOM elements to be manipulated from an external source, while also allowing navigation to web pages, user input, JavaScript execution, and more.
Initially written by Selenium for the Selenium WebDriver, this protocol has now reached the Editor’s Draft stage in becoming an official W3C standard.
Other protocols do exit, but will not be covered in great detail here. All explanations will assume a backend that implements the WebDriver wire protocol.
Another notable protocol is the Chrome DevTools protocol used by Puppeteer. Puppeteer does not use Selenium Server, and comes bundled with a recent version of Chromium intended for local use. If you wish to run Puppeteer in Docker, you can either use the CodeceptJS image (that comes with Puppeteer and Nightmare) or follow the official guide to creating a custom image that can support it.
Browser WebDrivers
These are browser specific implementations of the WebDriver wire protocol, for example ChromeDriver for Chrome or GeckoDriver for Firefox. Each acts as a standalone server to receive requests from the client where the WebDriver API is being used (generally where the tests are held). In order to communicate with the intended browser, the correct WebDriver implementation must be installed.
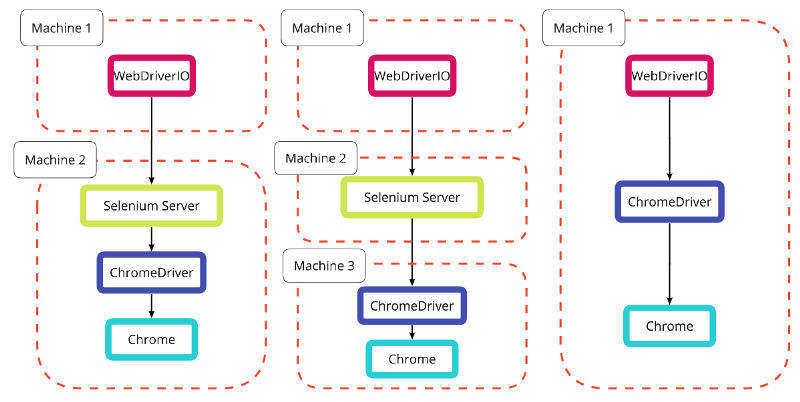
Selenium Server
If the tests are being run on the same machine that they are defined, then the client-side WebDriver API implementation used (described below) can communicate directly with the browser WebDriver and a Selenium Server is not required.
However, if tests are to be run on a different machine, whether in CI, in a Selenium Grid setup across multiple machines or virtual machines (VMs), on a remote testing platform such as BrowserStack or SauceLabs, or within Docker, then a Selenium Server is used. It acts as a proxy to forward requests from the client-side WebDriver API to the correct browser WebDriver, and passes back the response from the browser.
Client-side WebDriver Implementation
A variety of tools implement the client-side WebDriver wire protocol. Here the protocol can be seen as an API to send requests to the browser via the layers described above. Many tools using the protocol are full frameworks, such as WebDriverIO, that include their own test runners.
Other implementations include: the original Selenium WebDriver, Protractor, Appium, and more.
The libraries of each aim to achieve the same results, but with slightly different focuses and API implementations. This can be as basic as Protractor’s browser.get(url) versus WebDriverIO’s browser.url(url).
One API to rule them all
As described at the beginning of this section, this is where CodeceptJS comes into play. It refers to other client-side WebDriver protocol (or other) implementations as “helpers”, and allows you to specify the helper you prefer while using one API language. CodeceptJS does not care which protocol is being used by the helper chosen.
WebDriverIO, Puppeteer, Protractor, Nightmare and Appium are all current helpers that are available.
In CodeceptJS the previous command would be I.amOnPage(url) no matter which helper was chosen. This means that if you wanted to switch out your backend to one of the other helpers supported, your tests would not have to be re-written. It is possible to overwrite or add to the default API methods via custom classes should you wish.
Creating a test project
With so many layers this starts to sound complex, but between CodeceptJS’s initialisation script and Docker images, we can quickly have a working example.
What we will produce
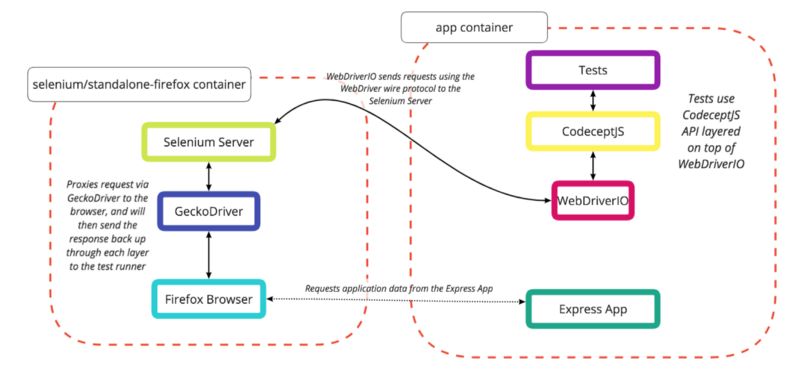
We will write a simple test in CodeceptJS, specifying a WebDriverIO backend helper, that will communicate with a remote browser within the standalone-firefox Docker container. We will use the Express “hello world” app, but this could be replaced by any app you wish.
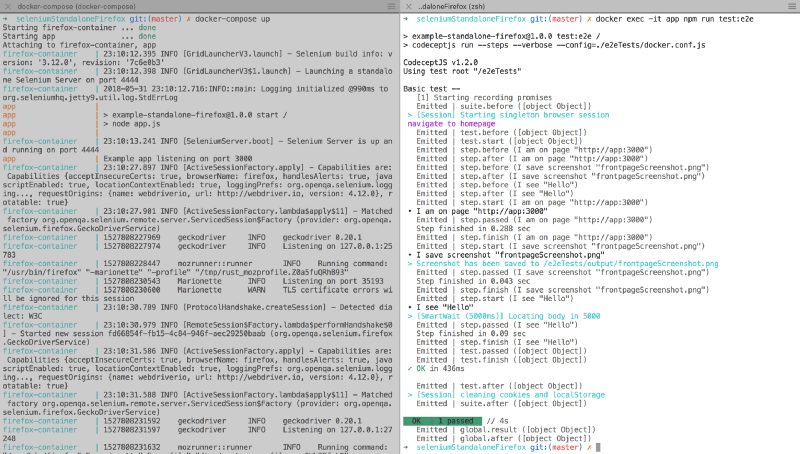
Once we have everything set up, we will be able to run only two commands to run the tests:
docker-compose up --builddocker exec -it app npm run test:e2e
By running in two side by side terminal windows, we can see the containers running and the test executing in real time.
Prerequisites
- Docker, for whichever machine you are developing on.
- You could also install Node.js, & npm for local development and debugging, but these can also be fully run within Docker.
File structure
We will be producing the file structure below. You can see a working example on Github.
|-- .gitignore
|-- output/
|-- Dockerfile
|-- app.js
|-- docker-compose.yml
|-- package.json
|-- package-lock.json
|-- e2eTests/
    |-- common_test.js
    |-- docker.conf.js
Dependencies
First we will create our package.json with Express as a dependency and CodeceptJS and WebDriverIO as dev dependencies.
{
  "name": "example-standalone-firefox",
  "version": "1.0.0",
  "description": "Example of Dockerizing E2E testing",
  "scripts": {
    "start": "node app.js",
    "test:e2e": "codeceptjs run --steps --verbose --config=./e2eTests/docker.conf.js"
  },
  "dependencies": {
    "express": "^4.16.3"
  },
  "devDependencies": {
    "codeceptjs": "^1.2.0",
    "webdriverio": "^4.12.0"
  }
}
We have also included two scripts, one to run the Express app we will add (npm run start), and one to run our CodeceptJS test (npm run test:e2e).
codeceptjs run --steps --verbose --config=./e2eTests/docker.conf.js--steps is great for showing output in the terminal as tests are running, while --verbose extends the level of detail even further. --verbose is likely not needed as standard, but is good for seeing how the example works. --config shows us the path to the backend configuration file, in this case kept in a separate e2eTests directory.
Our app
Next we need an app to test. For this we will run the Express “hello world” app from app.js.
const express = require('express');

const app = express();

app.get('/', (req, res) => res.send('Hello World!'));

const server = app.listen(3000, () => {
    const port = server.address().port
    console.log(`Example app listening on port ${port}`)
 })
You can view this using npm run start and then going to localhost:3000 in your browser.
Test configuration
CodeceptJS requires two files, a configuration file and a test file. The test file is extremely simple: it tests that the app can be accessed, saves a screenshot, and checks that the text “Hello” can be seen on the page.
Feature('Basic test');

Scenario('navigate to homepage', I => {
  I.amOnPage('http://app:3000');
  I.saveScreenshot('frontpageScreenshot.png');
  I.see('Hello');
});
The first indication that we will be using multiple Docker containers is shown here in the use of app:3000 rather than localhost:3000. localhost can only be understood from within a single container. If a command is being run from another container (in this case by Firefox in our second Selenium container), then it needs a more definitive reference. We could use the first container’s IP address directly, but using the container’s name is much easier to read.
In this case, app will be the name of the container that is running the app, so we can use app:3000. Don’t worry if you don’t follow this yet, seeing how our docker-compose.yml is structured will help.
We also need a main configuration file. This can be written in JSON or JS, but here we use JS. Let’s look at this:
exports.config = {
  tests: './*_test.js',    // how to know which files are test files
  output: './output',      // where to save screenshots
  helpers: {
   WebDriverIO: {               // which backend helper to use
     url: 'http://app:3000',    // a base URL to start on
     host: 'firefox-container', // identifying where selenium runs
     browser: 'firefox',        // a series of config options
     smartWait: 5000,
     waitForTimeout: 10000,
     desiredCapabilities: {        // for a demo app we do not want
         acceptInsecureCerts: true,   to worry about SSL certs
     }
   },
  },
  name: 'codeceptjs-docker',
};
Setting up Docker
Referring back to the diagram above in the “What we will produce” section, we can see that we will be using two Docker containers. They must be aware of each other and be able to communicate. One will contain our app and tests, and one a Selenium Server, GeckoDriver, and Firefox, so that we do not need Firefox installed on our local machine.
Docker Compose is a tool for “defining and running multi-container Docker applications.” It starts Docker containers with the command docker-compose up, and stops them with docker-compose down. If a user defined Dockerfile is being used, --build is used to build it, either the first time docker-compose up is run, or if changes have been made to the Dockerfile. docker-compose.yml is the file that defines what the up command will do.
Our next step is to create this docker-compose.yml. It is heavily dependant on indentation.
version: "2"        // which version of compose syntax you are using
services:
  app:
    container_name: app  // explicit so we can use this for app:3000
    build: .             // a self defined Dockerfile, see below
    ports:               // exposes port 3000 (where express runs)
      - "3000:3000"         to other containers, and to our local
    depends_on:             browser
      - firefox-container
    volumes:             // maps so changes to these can be seen
      - ./e2eTests:/e2eTests
      - ./package.json:/package.json
      - ./package-lock.json:/package-lock.json
      - ./.gitignore:/.gitignore
      - ./app.js:/app.js

  firefox-container:      // we'll look at this below
    container_name: firefox-container
    image: selenium/standalone-firefox:3.12.0-americium
    volumes:
      - /dev/shm:/dev/shm
    ports:
      - "4444:4444"
For our Selenium Server, drivers, and browser, we use a pre-defined image available from the public Docker Hub called selenium/standalone-firefox. We specify which version we want, 3.12.0-americium. If we did not specify this the latest image would be used by default (which is not a bad thing). As advised, we configure it to share the host’s memory to prevent the browser being run from crashing, and expose port 4444, the default Selenium port. We also map this to port 4444 on our local machine, allowing us to visit localhost:4444/wd/hub/static/resource/hub.html in our browser.
For our app container, we are not just using an image built by someone else, but are writing a Dockerfile to specify how our app is built. In the same way as the selenium-firefox container we expose a port, 3000 in this case, as that is where Express runs by default. By mapping this using 3000:3000 we are able to visit localhost:3000 while the app is being run in Docker to see it in our local browser.
Our Dockerfile uses the public node:carbon image as a base, sets the working directory, copies some files from our local machine to the container, runs npm install so that the container has all needed dependencies, and then runs the npm start command we specified.
FROM node:carbon
WORKDIR ./
COPY ./package.json ./package-lock.json ./app.js ./
RUN npm install
CMD [ "npm", "start" ]
This means that when docker-compose up --build is run, it will follow these steps, resulting in our app being ready and running on port 3000.
Note: The --build flag is only needed the first time docker-compose up is run, or if changes have been made to our Dockerfile or the steps executed within it. For example, if we added another dependency in our package.json then Docker would not know about it if we did not rebuild our image, as npm install is run within the Dockerfile.
Running tests
We now have a simple app, tests written for it, and a Docker Compose configuration that will run both our app, a Selenium Server, and Firefox.
We can start all of these using docker-compose up --build.
To run commands within a running Docker container, docker exec can be used from another terminal window. The format is:
docker exex <flags> <container_name> <command>
The command we will use is:
docker exec -it app npm run test:e2e
We can now see our test running, and see each step as it is performed! From here we can extend what our test does, add additional tests (ending the filenames in _test.js), and use the same two commands to run them. No more setup is needed.
You now have an easily extensible E2E testing setup that can be relied on to run the same way no matter which machine it is run on. It was written with API commands that can be easily understood by both developers and non-developers. All that remains now is to decide which behaviour your app should be capable of, and test it!
Final words
SeleniumHQ also produces Docker images for Chrome testing, and images for using Selenium Grid for running multiple instances of Chrome and Firefox at one time.
CodeceptJS also has instructions for running CodeceptJS in Docker, so that it does not need to be specified as a dependency in your app.
A more technical, but still starter level description of how Docker works can be seen in the first section of the post I wrote titled A beginner’s guide to Amazon’s Elastic Container Service.
Thanks for reading ?
Update:
I recently wrote Customising CodeceptJS e2e tests for anyone looking for next steps in testing complex applications.
Resources
- Github of CodeceptJS Docker examples
- CodeceptJS QuickStart guide
- Selenium WebDriver Architecture
- Selenium WebDriver Flow