
Automatically leprechaun-hat people on your website for St. Patrick’s Day.
!!! — WARNING — !!!
Giving a person a green hat can be considered OFFENSIVE to some Chinese people, as it has the same meaning as cheating in a relationship. So use this CAREFULLY when you are serving a Chinese user base.
!!! — WARNING — !!!
In this tutorial, we will go over how to drop a leprechaun hat onto your website images that contain people. The process will be done through the aid of some Computer Vision frameworks, so it will be the same amount of work even if you have millions of portraits to go through. A demo can be found here thanks to the permission from my teammates.
This tutorial is for more advanced audiences. I am assuming you can figure out a lot of the fundamentals on your own. I have also made some tutorials for total beginners, which I have attached in the end as links.

1. Initial Setup
Before we start this tutorial, we need to first perform some setup.
First of all, we are using tracking.js to help us in this project, and therefore, we need to download and extract the necessary files for tracking.js from here.
For this tutorial, we start with a template website I snatched from our team WiX which is a Content Management System (CMS) allowing you to build websites with much less effort. The template can be downloaded from here. Extract the files into the “tracking.js-master” folder from previous step.
In order to make everything work, we also need a server. We will be using a simple Python server for this tutorial. In case you do not have Python or Homebrew (which helps to install Python), you can use the following bash commands to install them.
Installing Homebrew:
/usr/bin/ruby -e "$(curl -fsSL https://raw.githubusercontent.com/Homebrew/install/master/install)"Installing Python:
brew install pythonNow that everything is ready, we will run the command below under our “tracking.js-master” to start the Python server.
python -m SimpleHTTPServerTo test, go to this link of your local host to see an example page. You should also be able to view the extracted example page from here. And that is all you have to do for the setup.

2. Creating the hat
Different from my other tutorials, we will be using an online image for this tutorial rather than trying to recreate everything with CSS.
I found a leprechaun hat from kisspng and it can be found here. Save the image to the root folder of our website. By appending the following code to the end above the </html>, we should be able to view the image in our example website after save and reload.
<body>
  <img id = "hat" class = "leprechaunhat" src = "./leprechaunhat_kisspng.png" >
</body>
Now we have to design a drop animation with CSS, and put the code above the hat declaration. The code basically allows the hat to drop down and then shake a little bit.
<style>
 @keyframes shake {
  0% {
   transform : translateY(-30px);
  }
  40% {
   transform : rotate(10deg);
  }
  60% {
   transform : rotate(-10deg);
  }
  80% {
   transform : rotate(10deg);
  }
  100% {
   transform : rotate(0deg);
  }
 }
 .leprechaunhat {
  animation : shake 1s ease-in;
 }
</style>
3. Drop hats onto portraits
Now we will go over dropping hats precisely onto portraits. First we have to reference the JavaScript files from “tracking.js” with the following code.
<script src = "build/tracking-min.js" type = "text/javascript" ></script>
<script src = "build/data/face-min.js" type = "text/javascript" ></script>
The code provides us a Tracker class which we can feed images into. Then we can listen for a response indicating a rectangle outlining the faces inside the image.
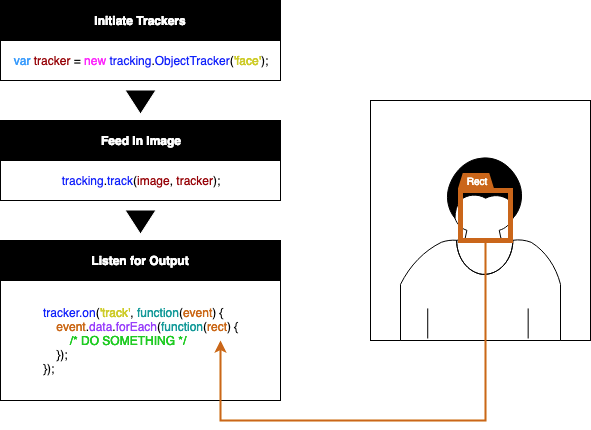
We start by defining a function that executes when the page is loaded. This function can be attached to anywhere else if necessary. The yOffsetValue is an offset aligning the hat into a more appropriate position.
const yOffsetValue = 10;
window.onload = function() {
};
Inside, we define our hat creation function, allowing it to create hats with arbitrary sizes and positions.
function placeHat(x, y, w, h, image, count) {
 hats[count] = hat.cloneNode(true);
 hats[count].style.display = "inline";
 hats[count].style.position = "absolute";
 hats[count].style.left = x + "px";
 hats[count].style.top = y + "px";
 hats[count].style.width = w + "px";
 hats[count].style.height = h + "px";
 image.parentNode.parentNode.appendChild(hats[count]);
}
We should also twist our image declaration script a little bit to make it hide the image, as we are now showing it with JavaScript.
<img id = "hat" class = "leprechaunhat" src = "./leprechaunhat_kisspng.png" style = "display : none" >Then we add the following code to create the hats on top of faces, with the size matching the face.
var hat = document.getElementById("hat");
var images = document.getElementsByTagName('img');
var trackers = [];
var hats = [];
for(i = 0; i < images.length; i++)
{
 (function(img)
 {
  trackers[i] = new tracking.ObjectTracker('face');
  tracking.track(img, trackers[i]);
  trackers[i].on('track', function(event) {
   event.data.forEach(function(rect) {
    var bcr = img.getBoundingClientRect();
    placeHat(rect.x, rect.y + yOffsetValue - rect.height, rect.width, rect.height, img, i);
   });
  });
 })(images[i]);
}
Now, while our Python server is still running, calling the following address should show us leprechaun hats dropping onto portraits.
http://localhost:8000/TEAM%20MEMBERS%20_%20Teamwebsite.html
Congratulations! You just learned how to drop leprechaun hats onto all the portraits on a website with computer vision. Wish you, your friends, and your audiences a great St. Patricks Day!!!
In the end
I have linked some of previous guides below on similar projects. I believe there are certain trends in front end design. Despite the newly emerging .js frameworks and ES updates, Computer Animations and Artificial Intelligence can do wonders in the future for front end, improving user experience with elegancy and efficiency.
Beginner:
- how to fill your website with lovely VALENTINES HEARTS
- how to add some FIREWORKS to your website
- how to add some BUBBLES to your website
Advanced:
I am passionate about coding and would love to learn new stuff. I believe knowledge can make the world a better place and therefore am self-motivated to share. Let me know if you are interested in reading anything in particular.
If you are looking for the source code of this project, they can be found here. Thanks again for my teammates who allowed me to use their portraits for this project and be wary before using this on a website with a Chinese user base.