by Codesmith
When you visit wecodejs.com, you might think to yourself, “Man, what a navigation bar. What a big, beautiful navigation bar. It’s winning.”
And then you go to your code editor and can’t seem to get your blob of HTML elements to resemble that big, beautiful navigation bar.
Writing CSS is like getting a root canal, you think. Heck, it might as well be magic.
Well, it’s not magic. You can style a “nav bar” or any other web component easily. All you have to do is change how you view CSS.
Element, what are you?
The first thing we have to get out of the way is the notion that all CSS does is prettify things. It’s the wrong way to go about tackling a CSS project, because it distracts you from what CSS is really used for. At a very base level, we use CSS to organize elements on a web page.
Now what is an element? This is how the MDN defines an HTML element:
An element is a part of a webpage. In XML and HTML, an element may contain a data item or a chunk of text or an image, or perhaps nothing. A typical element includes an opening tag with some attributes, enclosed text content, and a closing tag.
Yuck. That doesn’t really help us. W3Schools’ definition is more straightforward, which is: “All HTML elements can be considered as boxes.”
That’s amazing! No, seriously this can’t be stressed enough. It’s very easy to simply gloss past that statement when grinding your way through CSS. If we can conceptualize that every single HTML element we create is a new box, we can better understand CSS’ role in arranging those boxes.
Suddenly, the “box model” makes sense. I’m sure you’ve seen it before.
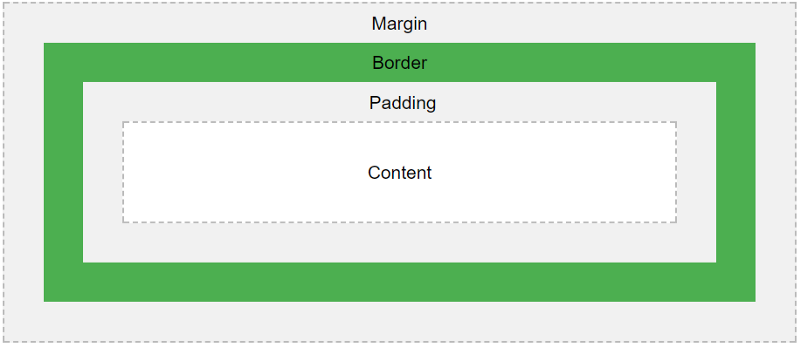
The padding, border, and margin properties all help to give shape to our boxes. We use padding to create the visual image of the box, a border to fence its perimeter, and a margin to set it apart from every other box.
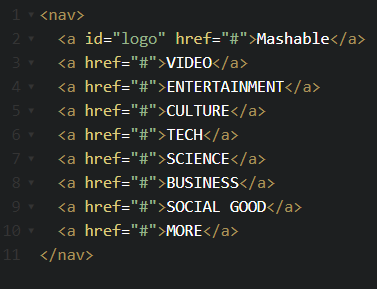
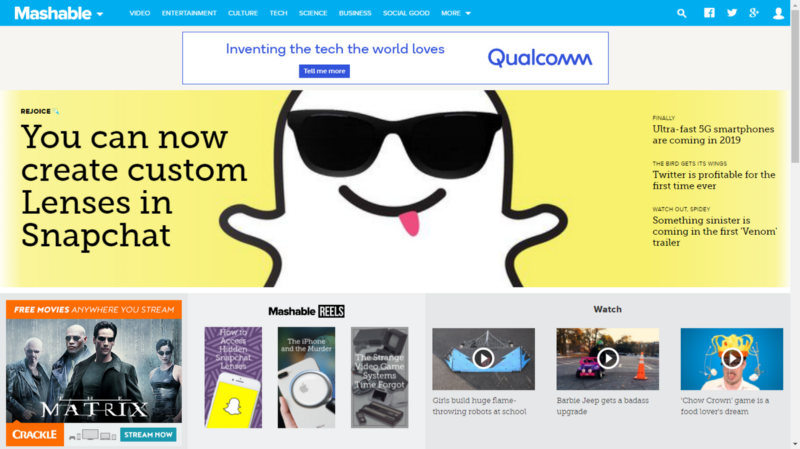
Now, how does this apply to our nav bar conundrum? Let’s start coding to find out. We’re going to recreate Mashable’s nav bar minus the dropdown and social icons(that’s for another tutorial). Be sure to code along as that’s the best way to learn.

Plan, plan, plan
Starting off a project with a checklist helps us write organized code. Normally, we’d set up a wireframe, but we already have a model to work off of.
HTML:
- Create a nav element that contains all of the tab elements
- Create tab elements
- Id the topmost tab as a logo
CSS:
- Set the color of the nav bar to a hue of blue
- Set the color of the tab box to a lighter hue of blue
- Set the fonts within the tab boxes to sans-serif and color them white
- Set the font and box properties of the logo.
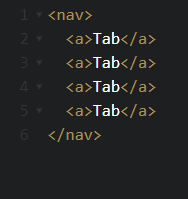
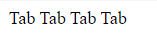
A Tale of Two Nav Bars
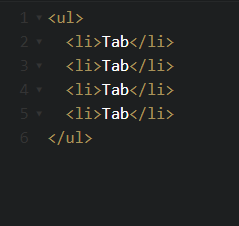
It seems like we’re ready to code, but hold up! Remember when we mentioned “blob of HTML” earlier? Well, you want to think about the elements you want to use to create your nav bar. One way of writing it in HTML is by creating an unordered list:
output:
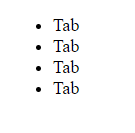
If you’re just starting out with CSS, this might look like an immutable blob. We didn’t even add links, which means we have to nest elements.
Here’s a simpler approach to creating a nav bar while keeping our markup semantic:
As you can see, we’ve hacked a nav bar just by using HTML. Now all we have to do is implement the box model to space them out. Let’s use the second HTML boilerplate to create Mashable’s nav bar, and then we’ll provide a walk-through on how to style it properly.
CSS to the rescue
Now let’s organize these boxes with some CSS. We’re going to list all the selectors we’re going to need for this task.
/* we'll target the entire nav */nav {}/*we'll target a specific tab*/ nav a { }/*we're going to use a css pseudo-class to change the background color when we hover over a tab */ nav a:hover { }/*we're going to target the logo for some specific styles 'cause the logo is super special*/ #logo { }The first thing we should start with is setting the width and height of our nav, and adding a bit of color. A great resource for a color wheel is right here.
nav { width: 100%; //width should be a percentage for responsiveness height: 38px; //height should be px. Adjust to your liking background-color: #0b98de;//hex color code should be used} nav a { } nav a:hover { } #logo { }
We have our nav bar! Next, let’s start creating some boxes that we can move around. We can do that by displaying the elements as blocks.
nav { width: 100%; background-color: #0b98de;} nav a { display: block; } nav a:hover { } #logo { }
It seems like we’ve broken our nice nav. We didn’t necessarily need to do this, but aligning our elements is much easier when we can treat each element as a block. To fix this, we simply write, float: left;. This will get us back to square one.
Note: this step can be skipped, but if you’re using an unordered list, then it must be implemented.
Now let’s create the boxes. If you look back at the box model, you’ll notice that padding is what creates these boxes. If you want to see how this works and test the size of your boxes, set a background-color and border: within the nav a selector.
nav a { display: block; float: left;/*We're just setting up fonts settings here*/ font-family: sans-serif; font-size: 9px; color: white;/*Box Method Test AKA handicap*/ background-color: #17b0cf; border: 1px solid #000; /*Padding Our Box*/ padding-top: 20px; padding-right: 10px; padding-bottom: 10px; padding-left: 10px;/Let's remove the dumb link decoration*/ text-decoration: none;} 
The widths are all different, but that’s consistent with Mashable’s random style. You can always set a width if you crave consistency. We also adjusted the font here for a clean look. You can get some great fonts from Google. Make sure to stick the link tag they provide into your <head> tag.
We’ll delete our handicap and move the background-color property to the nav a:hover selector. You can always keep the handicap on if you need to make adjustments.
We’re almost done. Let’s work on the logo.
#logo { /*font*/ font-family: 'Hind', sans-serif; font-size: 30px; letter-spacing: -2px; text-shadow: 1px 1px 2px #c4c4c4;/*box*/ padding-left: 20px; padding-right: 40px; margin-right: 10px; margin-top: -20px; }You might have noticed by now that your padded boxes extend past the nav. All you have to do is hide the overflow by adding overflow: hidden; to your nav selector. This little property gets rid of a lot of frustrations.
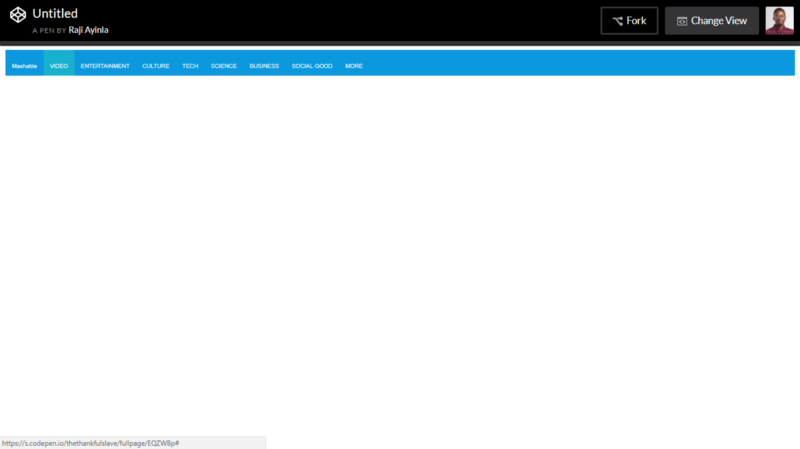
The final product

Closing statements
CSS can appear to be a language full of magic, especially if you’re used to the logic of programming languages. But all you have to do is keep the box method in mind when constructing the layout of a site.
Of course, there are tricks that CSS masters use to add that extra bit of style. We’ll list a bunch of resources below that’ll make you a pro at CSS in no time. If you’re still annoyed with CSS, then you should take a look at some of the pre-processors designed to make the task of styling an entire site more efficient.
Resources:
You’ll know how to create anything you can dream of by browsing through this site.
Thecodeplayer offers live coding to help you understand the nuances of CSS.
Get precise values for your background colors.
Don’t forget to drop some claps if this tutorial helped. Share it with friends who head desk when wrangling with CSS.
Code in peace,
Raji Ayinla|intern technical content writer|email: rajiayinla858@gmail.com