
by Yogi
How to easily implement QRCoder in ASP.NET Core using C#

QRCoder is a very popular QR Code implementation library written in C#. It is available in GitHub. Here I am going to implement the QRCoder library to generate QR Codes in my ASP.NET Core application. I will also be using C#.
I will implement QRCoder in 3 ways, which are:
1. Create QR Code Bitmap image for any text.
2. Create QR Code File (.qrr) for any text and then save these files in the application.
3. Read and display all the QR Code Files (.qrr).
Let’s start with the Installation of QRCoder in ASP.NET Core Framework.
You can download the full code from my GitHub Respositiory.
Installation
Install QRCoder via NuGet Package Manager. If you want to use NuGet, just search for “QRCoder” or run the following command in the NuGet Package Manager console:
PM> Install-Package QRCoder
The QRCoder will install in 1 minute and will be ready to use.
Now let us start with the implementation of QRCoder in the 3 ways mentioned above.
Create QR Code Bitmap image for any text
Create a new Controller called ‘QRCoderController’ inside the Controllers folder. The controller will be created and it will have just one Action Method called ‘Index’ in it:
public IActionResult Index()
{
    return View();
}
Import the following namespaces in the controller:
using System;
using System.Collections.Generic;
using System.Drawing;
using System.IO;
using Microsoft.AspNetCore.Mvc;
using QRCoder;
Next, add the Index Action of type [HttpPost] to the controller:
[HttpPost]
public IActionResult Index(string qrText)
{
    QRCodeGenerator qrGenerator = new QRCodeGenerator();
    QRCodeData qrCodeData = qrGenerator.CreateQrCode(qrText,
    QRCodeGenerator.ECCLevel.Q);
    QRCode qrCode = new QRCode(qrCodeData);
    Bitmap qrCodeImage = qrCode.GetGraphic(20);
    return View(BitmapToBytes(qrCodeImage));
}
This Index Action receives a string parameter called ‘qrText’. It contains the text that is provided by an Input control defined in the View. This text will be converted to QR Code Bitmap image. The following code lines do this work:
QRCodeGenerator qrGenerator = new QRCodeGenerator();

QRCodeData qrCodeData = qrGenerator.CreateQrCode(qrText, QRCodeGenerator.ECCLevel.Q);

QRCode qrCode = new QRCode(qrCodeData);
Bitmap qrCodeImage = qrCode.GetGraphic(20);
The QRCode object (‘qrCode’) defined calls a static function called ‘BitmapToBytes()’. The role of this function is to convert the Bitmap image to ‘Byte[]’.
Add this function to your controller:
private static Byte[] BitmapToBytes(Bitmap img)
{
    using (MemoryStream stream = new MemoryStream())
    {
        img.Save(stream, System.Drawing.Imaging.ImageFormat.Png);
        return stream.ToArray();
    }
}
Finally create the Index View inside the ‘Views/QRCoder’ folder with the following code:
@model Byte[]
@{
    Layout = null;
}

<!DOCTYPE html>
<html>

<head>
  <meta name="viewport" content="width=device-width" />
  <title>Implementing QRCoder in ASP.NET Core - Create QR Code</title>
  <style>
    body {
      background: #111 no-repeat;
      background-image: -webkit-gradient(radial, 50% 0, 150, 50% 0, 300, from(#444), to(#111));
    }

    h1,
    h2,
    h3 {
      text-align: center;
      color: #FFF;
      margin: 5px 0;
    }

    h1 {
      font-size: 30px;
    }

    h2 a {
      font-size: 25px;
      color: #0184e3;
      text-decoration: none;
    }

    h3 {
      font-size: 23px;
      border-bottom: solid 3px #CCC;
      padding-bottom: 10px;
    }

    h3 a {
      color: #00e8ff;
      text-decoration: none;
    }

    h3 a:hover,
    h2 a:hover {
      text-decoration: underline;
    }

    .container {
      width: 800px;
      margin: auto;
      color: #FFF;
      font-size: 25px;
    }

    .container #content {
      border: dashed 2px #CCC;
      padding: 10px;
    }

    #reset {
      padding: 5px 10px;
      background: #4CAF50;
      border: none;
      color: #FFF;
      cursor: pointer;
    }

    #reset:hover {
      color: #4CAF50;
      background: #FFF;
    }

    #viewContent table {
      width: 100%;
    }

    #viewContent table tr {
      height: 80px;
      background: darkcyan;
    }

    #viewContent table tr td {
      width: 50%;
      padding-left: 5px;
    }
  </style>
</head>

<body>
  <div class="container">
    <div id="content">
      <h1>Implementing QRCoder in ASP.NET Core - Create QR Code</h1>
      <h2>
        <a href="http://www.yogihosting.com/category/aspnet-core/">Read the tutorial on YogiHosting » </a>
        <button id="reset" onclick="location=''">Reset »</button>
      </h2>
      <div id="viewContent">
        @using (Html.BeginForm(null, null, FormMethod.Post)) {
        <table>
          <tbody>
            <tr>
              <td>
                <label>Enter text for creating QR Code</label
                </td>
                <td>
                  <input type="text" name="qrText" />
                </td>
              </tr>
              <tr>
                <td colspan="2">
                  <button>Submit</button>
                </td>
              </tr>
            </tbody>
          </table>
        }
      </div>

      @{
        if (Model != null)
        {
          <h3>QR Code Successfully Generated</h3>
          <img src="@String.Format("data:image/png;base64,{0}", Convert.ToBase64String(Model))" />
        }
      }
    </div>
  </div>
</body>
</html>
The Index View has an ‘input’ control. The user enters their text into this control to create the QR Code:
<input type="text" name="qrText" />
Once the QR Code is generated by the Index Action method, its ‘byte’ array is returned to the View as model and then the bitmap image is displayed by the below code:
@{
  if (Model != null)
  {
    <h3>QR Code Successfully Generated</h3>
    <img src="@String.Format("data:image/png;base64,{0}", Convert.ToBase64String(Model))" />
  }
}
Testing the Code
Run your application and go to the URL — ‘http://localhost:50755/QRCoder’ to invoke the Index Action method.
In the text box, add your text and click the submit button to create the QR Code Bitmap image.
See this image which illustrates it working:
Create QR Code File (.qrr) for any text and then save these files in the application
You can also generate QR Code files for a text and save it in your website. These files have .qrr extension.
To your controller add the following Action methods called ‘GenerateFile’:
public IActionResult GenerateFile()
{
  return View();
}

[HttpPost]
public IActionResult GenerateFile(string qrText)
{
  QRCodeGenerator qrGenerator = new QRCodeGenerator();
  QRCodeData qrCodeData = qrGenerator.CreateQrCode(qrText,   QRCodeGenerator.ECCLevel.Q);

  string fileGuid = Guid.NewGuid().ToString().Substring(0, 4);

  qrCodeData.SaveRawData("wwwroot/qrr/file-" + fileGuid + ".qrr", QRCodeData.Compression.Uncompressed);

  QRCodeData qrCodeData1 = new QRCodeData("wwwroot/qrr/file-" + fileGuid + ".qrr", QRCodeData.Compression.Uncompressed);

  QRCode qrCode = new QRCode(qrCodeData1);
  Bitmap qrCodeImage = qrCode.GetGraphic(20);
  return View(BitmapToBytes(qrCodeImage));
}
The [HttpPost] version of this action method generates the QR Code files inside the ‘wwwroot/qrr’ folder. The code that does this work is the following:
QRCodeGenerator qrGenerator = new QRCodeGenerator();

QRCodeData qrCodeData = qrGenerator.CreateQrCode(qrText, QRCodeGenerator.ECCLevel.Q);

string fileGuid = Guid.NewGuid().ToString().Substring(0, 4);

qrCodeData.SaveRawData("wwwroot/qrr/file-" + fileGuid + ".qrr", QRCodeData.Compression.Uncompressed);
Once the .qrr file is created then I am simply reading it for its saved location in the website. Then I am converting it to Bitmap type and finally sending the image’s bytes to the view. The corresponding code is:
QRCodeData qrCodeData1 = new QRCodeData("wwwroot/qrr/file-" + fileGuid + ".qrr", QRCodeData.Compression.Uncompressed);

QRCode qrCode = new QRCode(qrCodeData1);
Bitmap qrCodeImage = qrCode.GetGraphic(20);

return View(BitmapToBytes(qrCodeImage));
Next, add the GenerateFile view inside the ‘Views/QRCoder’ folder and add the following code to it:
@model Byte[]
@{
    Layout = null;
}

<!DOCTYPE html>
<html>

<head>
  <meta name="viewport" content="width=device-width" />
  <title>Implementing QRCoder in ASP.NET Core - Create QR Code File</title>
  <style>
    body {
      background: #111 no-repeat;
      background-image: -webkit-gradient(radial, 50% 0, 150, 50% 0, 300, from(#444), to(#111));
    }

    h1,
    h2,
    h3 {
      text-align: center;
      color: #FFF;
      margin: 5px 0;
    }

    h1 {
      font-size: 30px;
    }

    h2 a {
      font-size: 25px;
      color: #0184e3;
      text-decoration: none;
    }

    h3 {
      font-size: 23px;
      border-bottom: solid 3px #CCC;
      padding-bottom: 10px;
    }

    h3 a {
      color: #00e8ff;
      text-decoration: none;
    }

    h3 a:hover,
    h2 a:hover {
      text-decoration: underline;
    }

    .container {
      width: 800px;
      margin: auto;
      color: #FFF;
      font-size: 25px;
    }

    .container #content {
      border: dashed 2px #CCC;
      padding: 10px;
    }

    #reset {
      padding: 5px 10px;
      background: #4CAF50;
      border: none;
      color: #FFF;
      cursor: pointer;
    }

    #reset:hover {
      color: #4CAF50;
      background: #FFF;
    }

    #viewContent table {
      width: 100%;
    }

    #viewContent table tr {
      height: 80px;
      background: darkcyan;
    }

    #viewContent table tr td {
      width: 50%;
      padding-left: 5px;
    }
  </style>
</head>

<body>
  <div class="container">
    <div id="content">
      <h1>Implementing QRCoder in ASP.NET Core - Create QR Code File</h1>
      <h2>
        <a href="http://www.yogihosting.com/category/aspnet-core/">Read the tutorial on YogiHosting » </a>
        <button id="reset" onclick="location=''">Reset »</button>
      </h2>
      <div id="viewContent">
        @using (Html.BeginForm(null, null, FormMethod.Post)) {
        <table>
          <tbody>
            <tr>
              <td>
                <label>Enter text for creating QR File</label>
              </td>
              <td>
                <input type="text" name="qrText" />
              </td>
            </tr>
            <tr>
              <td colspan="2">
                <button>Submit</button>
              </td>
            </tr>
          </tbody>
        </table>
        }
      </div>
      @{ if (Model != null) {
      <h3>QR Code file Successfully Generated</h3>
      <img src="@String.Format(" data:image/png;base64,{0} ", Convert.ToBase64String(Model))" /> } }
    </div>
  </div>
</body>

</html>
The code of this View is exactly similar to the ‘Index’ View and works exactly like it.
The URL to invoke this View is ‘http://localhost:50755/QRCoder/GenerateFile’.
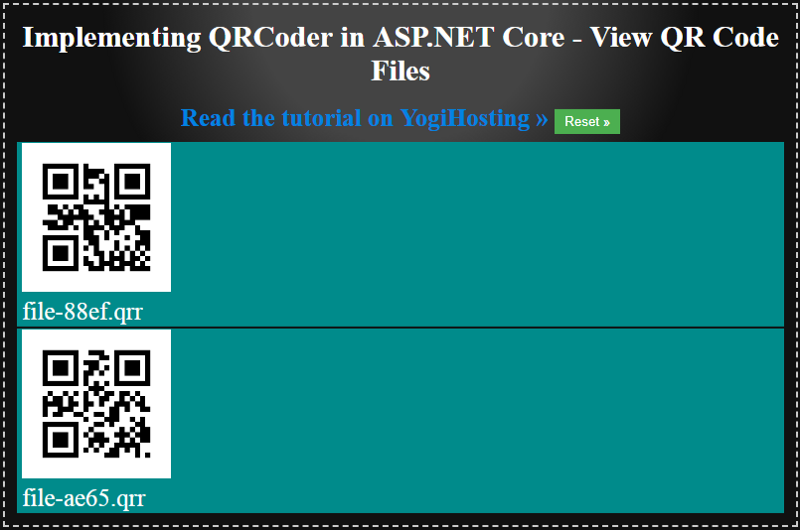
Read and display all the QR Code Files (.qrr)
You can also read all the .qrr files saved in the website. Go to your controller and add a new action called ‘ViewFile’:
public IActionResult ViewFile()
{
  List<KeyValuePair<string, Byte[]>> fileData=new List<KeyValuePair<string, byte[]>>();

  KeyValuePair<string, Byte[]> data;
  string[] files = Directory.GetFiles("wwwroot/qrr");
  foreach (string file in files)
  {
    QRCodeData qrCodeData = new QRCodeData(file, QRCodeData.Compression.Uncompressed);

    QRCode qrCode = new QRCode(qrCodeData);
    Bitmap qrCodeImage = qrCode.GetGraphic(20);

    Byte[] byteData = BitmapToBytes(qrCodeImage);
    data = new KeyValuePair<string, Byte[]>(Path.GetFileName(file), byteData);
    fileData.Add(data);
  }
  return View(fileData);
}
In this action method, I read the filed located in the ‘qrr’ folder using the code:
Directory.GetFiles("wwwroot/qrr")Then I add each qrr file’s bytes and name inside a List<KeyValuePair<string, Byte[]>> object.
This object is returned to the View at the end:
return View(fileData);Finally create the ‘ViewFile’ View inside the ‘Views/QRCoder’ folder with the following code:
@model List
<KeyValuePair<string, Byte[]>>
@{
    Layout = null;
}

  <!DOCTYPE html>
  <html>

  <head>
    <meta name="viewport" content="width=device-width" />
    <title>Implementing QRCoder in ASP.NET Core - View QR Code Files</title>
    <style>
      body {
        background: #111 no-repeat;
        background-image: -webkit-gradient(radial, 50% 0, 150, 50% 0, 300, from(#444), to(#111));
      }

      h1,
      h2,
      h3 {
        text-align: center;
        color: #FFF;
        margin: 5px 0;
      }

      h1 {
        font-size: 30px;
      }

      h2 a {
        font-size: 25px;
        color: #0184e3;
        text-decoration: none;
      }

      h3 {
        font-size: 23px;
        border-bottom: solid 3px #CCC;
        padding-bottom: 10px;
      }

      h3 a {
        color: #00e8ff;
        text-decoration: none;
      }

      h3 a:hover,
      h2 a:hover {
        text-decoration: underline;
      }

      .container {
        width: 800px;
        margin: auto;
        color: #FFF;
        font-size: 25px;
      }

      .container #content {
        border: dashed 2px #CCC;
        padding: 10px;
      }

      #reset {
        padding: 5px 10px;
        background: #4CAF50;
        border: none;
        color: #FFF;
        cursor: pointer;
      }

      #reset:hover {
        color: #4CAF50;
        background: #FFF;
      }

      #viewContent table {
        width: 100%;
      }

      #viewContent table tr {
        height: 80px;
        background: darkcyan;
      }

      #viewContent table tr td {
        width: 50%;
        padding-left: 5px;
      }

      #viewContent table tr td img {
        width: 150px;
      }

      #viewContent table tr td span {
        display: block;
      }
    </style>
  </head>

  <body>
    <div class="container">
      <div id="content">
        <h1>Implementing QRCoder in ASP.NET Core - View QR Code Files</h1>
        <h2>
          <a href="http://www.yogihosting.com/category/aspnet-core/">Read the tutorial on YogiHosting » </a>
          <button id="reset" onclick="location=''">Reset »</button>
        </h2>
        <div id="viewContent">
          <table>
            <tbody>
              @foreach (KeyValuePair
              <string, Byte[]> k in Model) {
                <tr>
                  <td>
                    <img src="@String.Format(" data:image/png;base64,{0} ", Convert.ToBase64String(k.Value))" />
                    <span>@k.Key</span>
                  </td>
                </tr>
                }
            </tbody>
          </table>
        </div>
      </div>
    </div>
  </body>

  </html>
This View displays all the qrr files as bitmap images inside a ‘HTML’ table. The below code creates the HTML table:
<table>
  <tbody>
    @foreach (KeyValuePair<string, Byte[]> k in Model)
    {
      <tr>
        <td>
          <img src="@String.Format("data:image/png;base64,{0}", Convert.ToBase64String(k.Value))" />
         <span>@k.Key</span>
        </td>
      </tr>
    }
  </tbody>
</table>
Testing the Code
Run your application and go to the URL — ‘http://localhost:50755/QRCoder/ViewFile’ to invoke the ViewFile Action method. You will see all the .qrr files saved in your website.
See the below image which illustrates it working:
You can download the full code from my GitHub Respositiory.
Conclusion
I hope you love this repository which will help you to use QRCoder in your ASP.NET Core Project. Make sure you like this repository to show your love to it.
If you need any help in ASP.NET Core then let me know in the below comments section.

I publish 2 web development articles per week. Consider following me and get email notification whenever I publish a new tutorial on Medium. If this post was helpful, please click the clap button for a few times to show your support! It will bring a smile on my face and motivate me to write more for the readers like you.
I have also published another tutorial on freeCodeCamp, if you would like to see it too — How to create a login feature with Bootstrap Modal and jQuery AJAX
Thanks and Happy Coding!