by Karthik Venkateswaran
How to get instant GraphQL APIs on your existing Django application
TL;DR
Here are the topics we’ll cover in this article if you want to jump around:
Why GraphQL?
GraphQL is a data query language developed by Facebook. It is not tied to any specific database. It provides a way for the client to query from different databases at the same time by requesting what they need. It returns the response in the format requested by the client
Build a GraphQL Server
What are the different approaches available to build a GraphQL server? We’ll learn how Hasura GraphQL engine provides the easiest way to get a GraphQL API on your existing database.
Setup GraphQL engine
We’ll go through installing Hasura GraphQL engine. Then we’ll expose tables over a GraphQL API.
Securing GraphQL server
Handle Migration
So let’s get started!
Why GraphQL?
In a typical Django application, any new feature requirements or schema change will require adding to or modifying an existing view. This can have a huge impact on developer productivity. This will require code updates at all the places that a particular API is being consumed.
This is where GraphQL comes in handy. GraphQL is a query language for APIs. It abstracts multiple data sources. This enables app developers to request data in the format they need. It does this without requiring any backend API changes. Instead of calling individual endpoints to get data we call a single endpoint. We get back all the information we want, structured exactly the way we want it.
So this may make you wonder: how do I get a GraphQL API on my existing Django app?
Build a GraphQL server
To build a GraphQL server, all you need to do is define a schema. A Schema is a directory of the data types in your application. Resolver functions tell the server where and how to fetch the data for each data type.
Current approaches involve writing it from scratch (schema, resolver functions) with the help of tools like django-graphene.
In this post, I will use Hasura GraphQL engine to get a GraphQL API on my existing Django application running locally. We will arrive at a solution as shown in the below diagram.
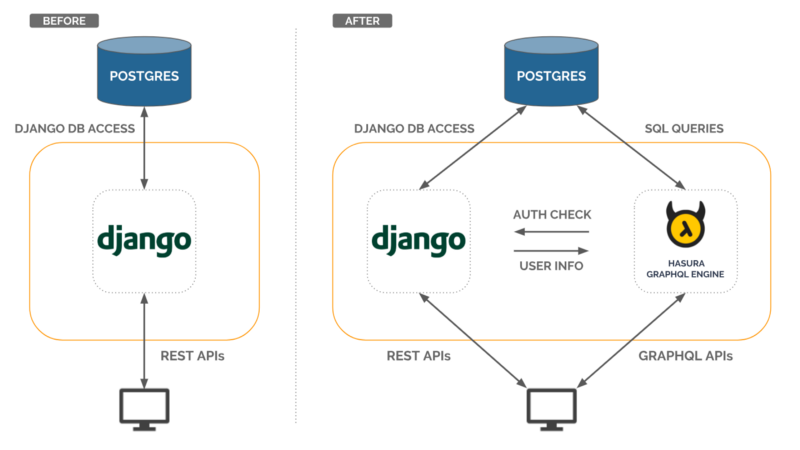
Hasura GraphQL engine (HGE) gives you Instant Real-time GraphQL API on top of your existing Postgres. HGE works out of the box with your existing:
- Postgres database — Connects with your existing database and provides a GraphQL API to your database.
- Authentication system — Connects with your existing authentication system to secure GraphQL API.
- Migration system — Hasura GraphQL Engine doesn’t interfere with the existing Django’s migration system. The schema can be managed separately through models.py and django migrate until and unless it doesn’t alter the schema tracked by the GraphQL Engine. More info on how Hasura GraphQL engine manages your schema state can be found here.
Also, it comes with a nifty console (similar to Django admin) which can be used for debugging GraphQL APIs.
Installation
Hasura GraphQL engine can be installed onto Heroku using the button below:

or onto any machine which can run Docker. Check out the getting-started section for more info.
Installation using docker and connecting to existing Postgres
Before I install Hasura GraphQL Engine, I need to get the Postgres connection string for the Hasura GraphQL engine to connect with the database. I can get the Postgres connection string from my application’s settings.py.
DATABASES = {
    'default': {
        'ENGINE': 'django.db.backends.postgresql',
        'NAME': 'postgres',
        'USER': 'postgres',
        'PASSWORD': 'SECUREPASSWORD',
        'HOST': '172.17.0.1',
        'PORT': '5432',
    }
}
The database connection URL will become:
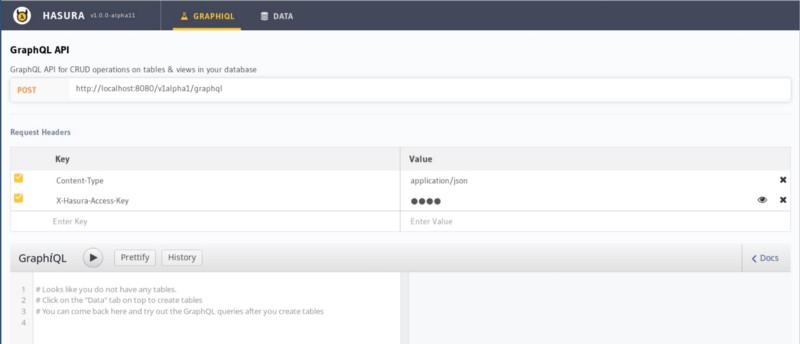
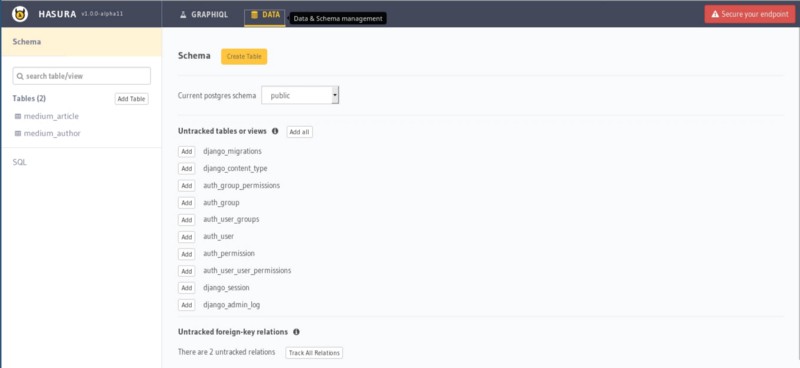
postgres://postgres:SECUREPASSWORD@172.17.0.1:5432/postgresOnce Hasura GraphQL engine starts, visiting http://localhost:8080 opens Hasura Console as below. The Data section shows a list of untracked tables present in the database grouped by schema. If you are wondering about what untracked tables are, head to the docs for more info.
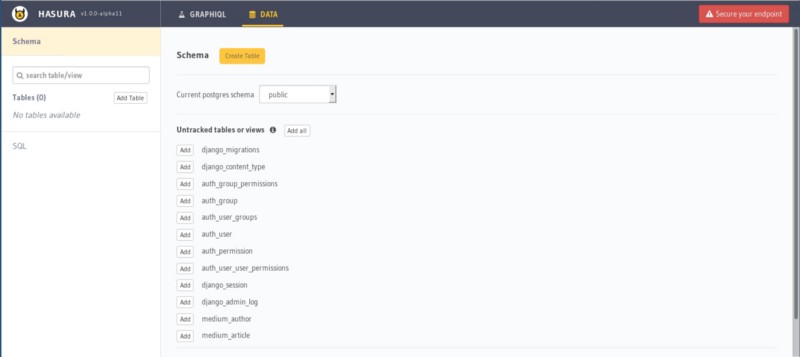
The above screenshot lists the tables created by the Django application as defined in this models.py file under untracked tables. Clicking on the add button shows on the list of tracked tables on the left. It exposes them to be queried via GraphQL APIs:
To test whether everything works, let’s try to fetch all the authors available in the table:
query {
  medium_author {
    id
    name
    interests
  }
}
The response from the GraphQL engine is:
{
  "data": {
    "medium_author": [
      {
        "name": "Karthik",
        "id": 2,
        "interests": "Cricket, Music, Code"
      },
      {
        "name": "Second Author",
        "id": 4,
        "interests": "Hockey"
      }
    ]
  }
}
Object and Array Relationship
GraphQL engine parses your schema and suggests relationships based on the foreign keys defined between tables.
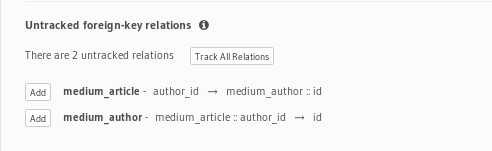
GraphQL engine automatically suggests two relationships for every foreign key it encounters.
- Object relationship: 1:1 relationship. For example, one article will have only one author.
- Array relationship: 1:many. For example, one author can write many articles.
In the blog schema, mediumArticlesByauthorId is an “array relationship.” It is based on the foreign key medium_article :: author_id -> id in the medium_article. mediumAuthorByAuthorId is an “object relationship” based on the same foreign key.
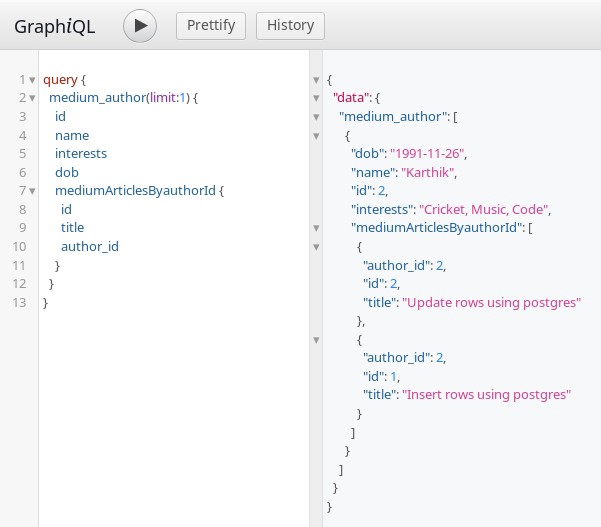
When we track these relationships, the derived GraphQL schema contains the relation names. Both tables and relationship can be queried in a single query:

Authentication
By default, GraphQL engine is installed in development mode. All the tables/views which are tracked by the GraphQL engine can be viewed/updated without any checks. This is dangerous and is not recommended for a production environment.
Hasura lets you define granular access controls for every field in your GraphQL schema, basically every table or view in your Postgres schema. These access control rules can use dynamic variables that come in with every request. Check out the docs for more info.
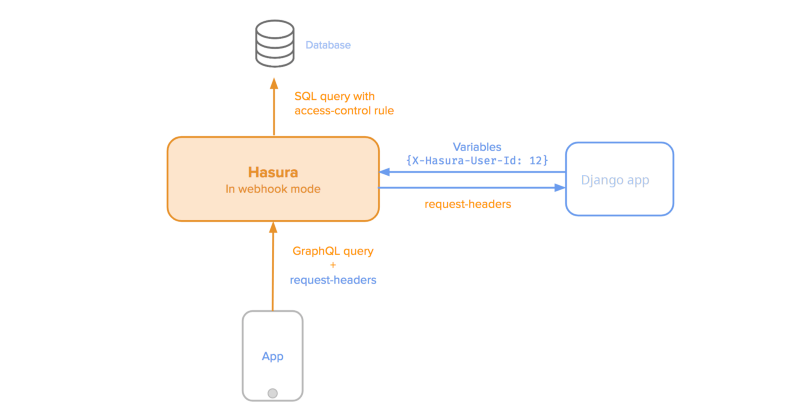
GraphQL engine can be secured from accessing it directly by configuring a webhook URL. This will be called by the GraphQL engine to validate every request unless the request contains a valid access-key.
Before we secure the GraphQL endpoint with access-key and auth-hook(webhook URL), let’s add a simple access control rule using Hasura console to restrict the author to fetch only his data and make a query using the GraphQL explorer.
Here is how the access control rule looks like for the medium_author table for role =user.
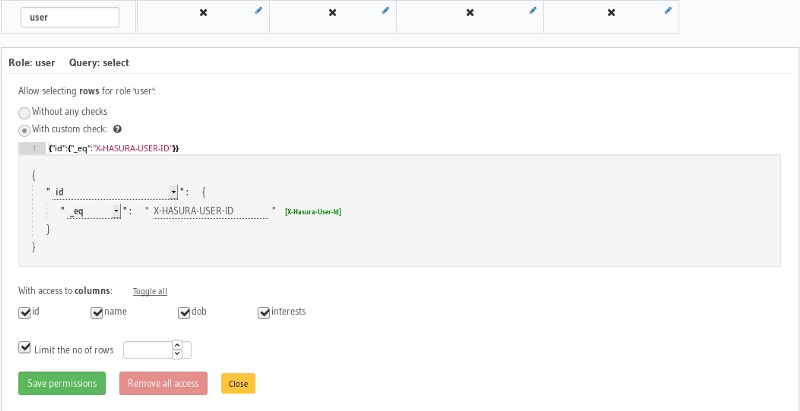
I have only created the select permission, but you can configure for all the four types of operation (select, insert, update, delete). Check out the docs for more info.
Let’s query from the medium_author table and see what the response is:
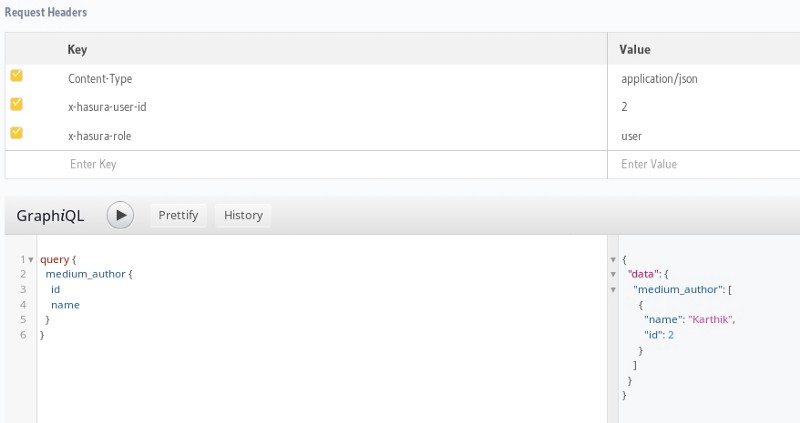
Here, please note that x-hasura-user-id is set to “2” and x-hasura-role is set to “user”. This is the auth data which will be passed by auth-hook in the production mode (GraphQL engine started with access-key and auth-hook).
Secure GraphQL API
Let’s secure the GraphQL engine withaccess-key. Let's configure auth-hook with the authentication handler, in this case the Django app. The configured webhook will be invoked by the GraphQL engine. The webhook will return appropriatex-hasura-role and x-hasura-user-id.
version: '3.6'
services:
  postgres:
    image: postgres
    environment:
    - "POSTGRES_PASSWORD:mysecretpassword"
    ports:
    - "5432:5432"
    restart: always
    volumes:
    - db_data:/var/lib/postgresql/data
  graphql-engine:
    image: hasura/graphql-engine:v1.0.0-alpha13
    ports:
    - "8080:8080"
    depends_on:
    - "postgres"
    restart: always
    environment:
      HASURA_GRAPHQL_DATABASE_URL: postgres://postgres:mysecretpassword@postgres:5432/postgres
    command:
      - graphql-engine
      - serve
      - --access-key=mysecretkey
      - --auth-hook=http://192.168.2.58:9090/validate_request
      - --enable-console
volumes:
  db_data:
Let’s try to make the query again and see what the response is:
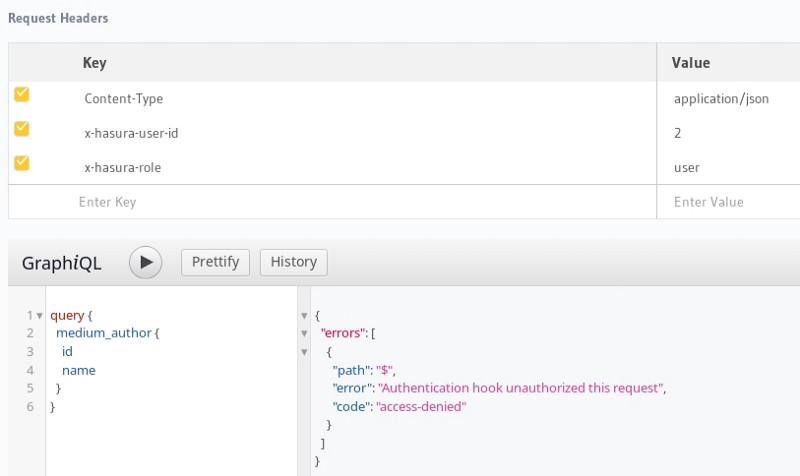
The configured webhook rejects, as the request is not authenticated. Let’s try to login as a user and make the request with the user’s auth token. Django auth system resolves cookies. It adds the user info into the request context, which can then be used by the request handler.
For the sake of this blog, I have written a simple auth middleware. It will parse Authorization: Bearer <token> and resolve it into a Django user. The user will be added to the request context. Here is the code snippet of the same.


The user is authenticated by the webhook. The webhook returns the corresponding x-hasura-user-id and x-hasura-role. GraphQL engine responds with the appropriate results as configured in the access rules.
Migration System
Hasura GraphQL engine comes with powerful Rails-inspired migration tooling to help you keep track of the changes you make to your schema. As you use the Hasura console, the Hasura CLI will spit out migration files for you. You can put them in version control and even edit them.
By default, Hasura console is served by the GraphQL engine. It can be used to quickly test out the features provided by the GraphQL engine. However if you are building a complex application or adding Hasura to the existing application or database, you’ll need to store migration to ensure your iteration and CI/CD is smooth.
Setup
Install hasura by executing the following command on your terminal if you are using a Mac/Linux machine. Otherwise, head to our docs to install hasura on different environments.
curl -L https://cli.hasura.io/install.sh | bashExecuting the following command will initialize a directory with hasura configuration files configured to use your GraphQL engine.
$ hasura init --directory blog-hasura-app --endpoint http://localhost:8080 --access-key=mysecretkey
Replace the value of endpoint and access-key to appropriate values.
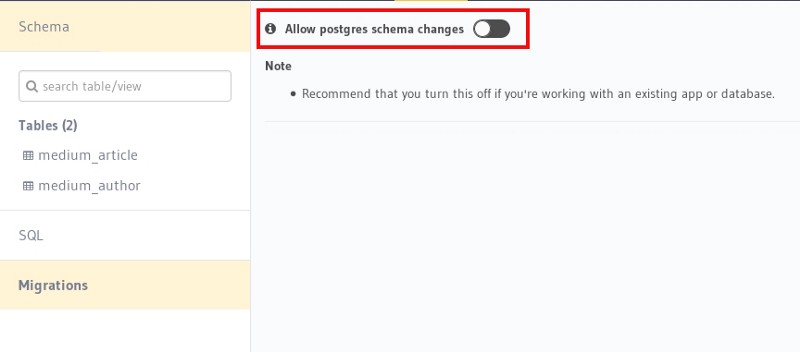
Disable migration
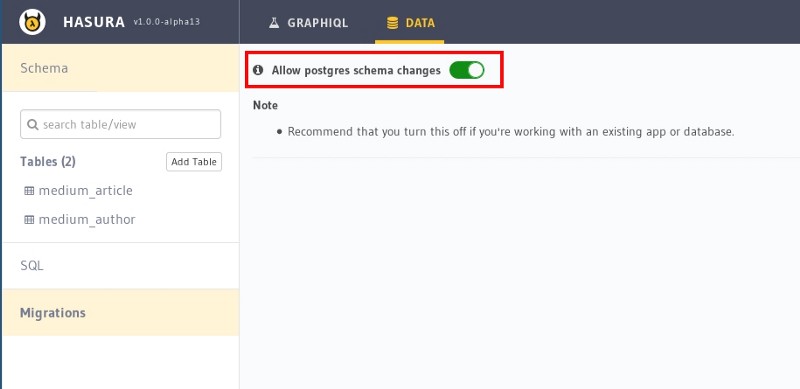
Since Django takes care of migrations by default, Hasura migration can be disabled by typing hasura console on your terminal. To open the Hasura console, navigate to Data ->Migrations (on the left nav bar) and disable Allow postgres schema changes.
We can still store the Hasura metadata just to ensure the application is always in a recoverable state:
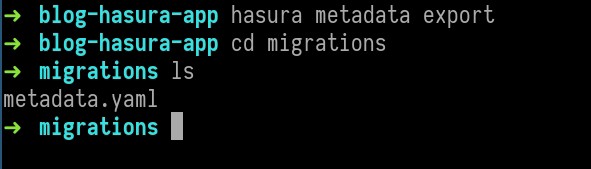
Metadata export
Export the Hasura metadata and store it in the migrations folder. This will ensure that your system is always recoverable from any undesirable state.
hasura metadata exportThe above command will export the metadata.yaml and store it inside the migrationsfolder.
Please ensure that tables/views are created/modified only through the Django models.py file to avoid inconsistency.
If you are looking to use Hasura migration system instead, check out the docs for more info.
Hasura gives you instant realtime GraphQL APIs over any Postgres database without having to write any backend code.
For those of you who are new to the Hasura GraphQL engine, this is a good place to get started.