by Pubs Abayasiri
How to host lightweight apps for free

When you look for web hosting services, there are many free options available. But there aren’t that many places where you can host full stack web apps that involve APIs, CGI, or AJAX backend queries — especially if you want to use something other than PHP.
This article is a simple but meaningful “walk before you can run” guide on how to get started with hosting your scripts on cloud servers.
When to use a Cloud Application Platform
Cloud Application Platforms work well in scenarios where you need a bit of code to run on a server. Many of these platforms offer a series of Linux-based application containers (that appear like virtual machines) where you deploy the code you developed on your local computer with a set of command line keywords.
Heroku is one such service you could use to host your code (in various languages) relatively easily. It offers a freemium model where they let you use about 500 hours of computing for free (their full pricing is here).

Once you’ve written your code on your local desktop, you can execute commands that deploy the code onto a workspace in Heroku. The code then executes depending on a trigger. Triggers can be a scheduled job, a web server which is triggered through a web page request, or something that is running constantly and processing data — which could get quite expensive.
What’s really nice is that you don’t have to worry about the operating system (memory, storage, CPU, security patches) as that is all managed for you — but at the same time it means that you do have limited flexibility since you cannot allocate resources directly.
Some specific examples where Heroku can work nicely for you:
- Hosting your own website where you want to write your own web server
- Periodically scraping data from a website and then storing it on a database for analysis
- Offering an API server for a specific task. Things like offering weather data, storing Internet of Things sensor data, or a web service call for a machine learning model
- A database service (although a service such as Firebase is possibly better suited)
Heroku Architecture
Heroku provides a lightweight virtual machine (VM) for you to deploy your code. Note that under the free option, you can deploy up to 5 applications that are considered as 5 lightweight VMs. For your actual application, you are provided a separate URL subdomain under Heroku. So your project names need to be unique.
These workspaces have their own space for components such as: code and resource files (not dynamic data files), database (Postgres), and log files.
On your local desktop, Heroku uses your directory name to define your project, and also for Heroku to understand your context. So you can have multiple projects in different directories and when you run the Heroku commands — just make sure you do so in the right folder.
The one key thing that you do need to be aware of (which I discovered the hard way through hours of debugging — I wish I paid more attention to the documentation) is that everything is run from memory. There is no persistent storage. I’ll say it again — you cannot store any files on the file server! For persistence, Heroku offers a postgress SQL database where you can add records as required.
A simple example — website change detection
Here’s a step-by-step guide to get a working example of a simple service that will email you if a website has changed — basically a clone of www.changedetection.com. There will be several key components of this:
- A database that will store: (a) the email address to notify of a changed website; (b) the website to track; (c) the last ‘copy’ of the website
- A piece of code that will check a given website from the database in #1 (Python script)
- A job scheduler that will run the program in #2 (equivalent of a cron job)
- A web user interface where you can add/delete websites to monitor into the database mentioned in #1
- A mechanism to send out emails
Understanding these components will arm you with the skills to do a lot of things already. I learned all of these things through multiple sources, so this acts as a consolidated post.
Assumptions
The following guide makes the following assumptions:
- You have a GitHub account — if you don’t, please create one here. You should also read this simple guide.
- You already have a Heroku account — if you don’t please create one here.
- You are running a Windows machine — if not, it is fine, the instructions are quite similar in other environments
- You already have Python installed — if you don’t, please go here to install it
- You can already program in Python — if not, then I’d suggest you learn some of the basics first. Some guides are here.
- You know SQL — if you don’t, please go here.
Overview of the steps
I find that going through a ‘walk before you can run’ approach helps with the learning process. It also serves as documentation for yourself for how to solve each piece of the larger process. That way, if something breaks in your future endeavor, you have a better chance of figuring out where it went wrong.
Step 1: Develop the web user interface — build Hello World first
Step 2: Persistence — create a database
Step 3: Check websites for changes
Step 4: Send an email notification on changes
Step 5: List the output on the web page
Step 6: Deploy
Step 1: Develop the web user interface — build Hello World first
First, let’s get a simple program deployed onto Heroku to get things started. This program will be a precursor to the web user interface (item #4) in the components list above. In order to serve up a page, we could simply have an HTML page, but then we would need to have a web server to server that file. In other words, when you type in the URL of the website, a program would need to interpret the request, then provide the contents of the HTML file. You can create your own mini web server with the Flask Python library, which is what we’ll do.
- Create a folder called webchecker and go into that directory (this directory name does not have to be the same as the Heroku application name)
- Install the Flask library. Enter the command: npm Flask
- Create the following Python program and name it showchecks.py:
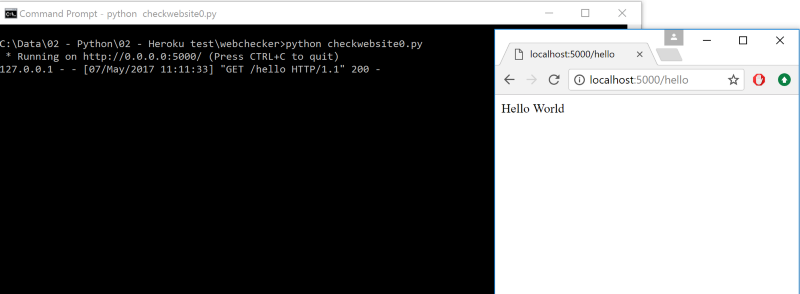
Before you deploy to Heroku, test that it works on your local PC. You can test it with the following steps:
- Run the program: python webchecker.com
- Open up your browser on your local pc and open up the page: http://localhost:5000/hello
Next, let’s deploy this to Heroku. Before you can deploy, there needs to be a few more files that need to be included to help Heroku know more about your application.
First, the requirements.txt
Second, the file to tell Heroku what to run when a webrequest is made:
Finally, the runtime version of Python to use (default is 2.7, but we want to specify the latest version of Python):
Hence, you should have four files:
- showchecker.py which is the code
- requirements.txt for the list of non-standard library dependencies. Whenever you have new libraries which are not part of the Python Standard Library — i.e. you need to install them using a tool such as “pip” — then add these here. You can find the version of an installed library such as Flask by running the command:
pip show Flaskin the command line - Procfile which is the actual Python script to run when the website is called — make sure to update this if you change the Python file
- runtime.txt which is the actual version of python to use
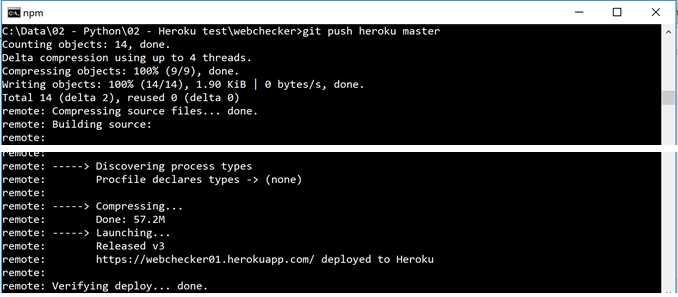
You can deploy with the following steps from the command line:
- heroku create webchecker01 — buildpack heroku/python
- git add *.* *
- git status
- git commit -m “all files”
- git push heroku master
For the command #1 (heroku create…), the “webechecker01” part is the unique name you’ll need to provide for the name of the app.
For command #3 (git status) this will tell you what files are ready to be deployed. Make sure all files are there, if not add them using git add <filename>.
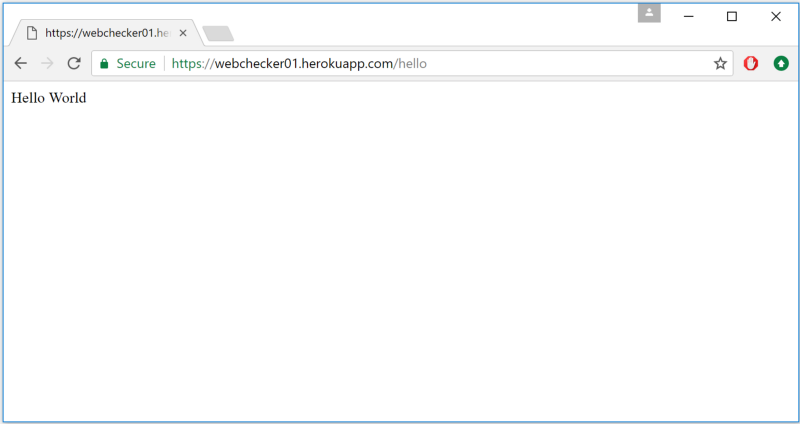
Now you can check your website: <application name>.herokuapp.com/hello
Let’s also make sure we can see the logs since this is a great way to see what’s going on with your app server. On your PC and in the webchecker directory, run the command: heroku logs
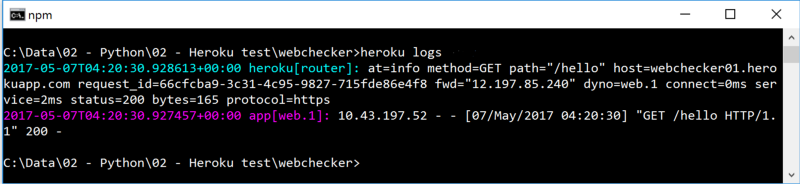
You’ll see the last execution steps. If things aren’t working as expected, this is your first stop to find out more detail.
You can also go to the Heroku dashboard to see your consumption:
Step 2: Persistence — create a database
In order to make more useful programs, you’ll need to have a data store of sorts. This is where the Postgres database service comes into play. You first need to deploy the Heroku database service, then create your tables, and finally be able to connect to the database from your code locally (for testing).
To deploy a database service, first create it using the following command:
heroku addons:create heroku-postgresql:hobby-dev
Next, access the database from the command line and create your tables. The database is created on the Heroku cloud service and not locally. However, you can access it through the command line. To log on to the database via the console, run the command heroku pg:psql. Remember, you have to do it in your webchecker folder so that Heroku knows that it is the database for the webchecker site.
To see the list of tables type the command \d

To create a table, you need to use normal SQL statements. For our webchecker program, let’s create a table with the following columns:
- ID — automatically generated ID for each entry (this will be the primary key). This is done by using the type “serial”
- website — the website to monitor
- emailaddress — the email address to send the notification that a change has occurred
- lasthashcode — we won’t store a copy of the whole webpage, instead we will generate a hash based on the HTML of the page, and then compare this each time. This is more efficient storage-wise, but will not tell us what actually changed
- lastchangedate — the date that the web changed last time. Hence we will get the database to default this with the current date
To create this table, enter the following command in the Heroku Postgres database console:
CREATE TABLE webcheckerdb (id serial, website varchar(250), emailaddress varchar(250), lasthashcode varchar(32), lastchangedate timestamp DEFAULT current_date );(Make sure you include the semicolon at the end!)

Next, let’s insert a single record in the database to ensure we have something to work with prior to getting our web UI up and running (you can use your own email address so it works in the future):
INSERT into webcheckerdb values(DEFAULT, 'news.google.com', 'email@me.com', '', DEFAULT);(Make sure you include the semicolon at the end!)
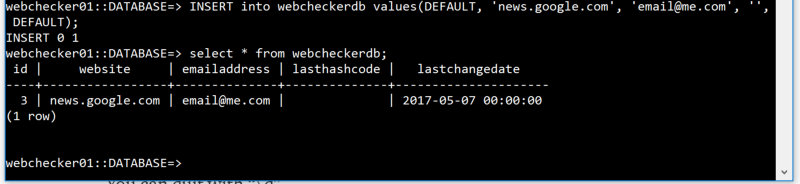
You can quit with \q.
Step 3: Check websites for changes
First, let’s get a piece of code to at least check if a hardcoded site can be retrieved (following on the concept of walking before running).
Hence, first step is to see if we can retrieve a webpage, hash it, and then compare it to a hardcoded hash. Create a new Python file called checkwebsite.py. Code here:
Running this will output the following:

If you have any errors with missing libraries, you can add them via: pip install <library> from the command line.
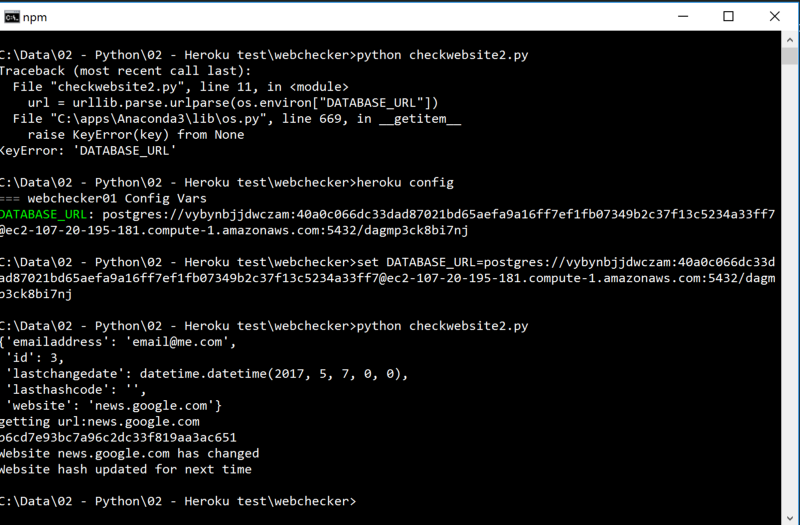
Next, let’s connect to the database with the following code:
When you try to run this code, you are likely going to get an error of the form KeyError: ‘DATABASE_URL’. This is because your Python code is trying to locate the web address of the Postgres database hosted on Heroku. This is automatically updated to the environment variable DATABASE_URL in the Heroku server. However, on your local PC you will have to do this manually:
- heroku config
- set DATABASE_URL=<the database string listed from “heroku config”>
Step 4: Send an email notification on changes
Final step is to send an email. To do this, you’ll need to install an Addon that has the ability to send emails — you can find these via the Heroku marketplace: https://elements.heroku.com/addons
In here, there is an Addon called SendGrid: https://elements.heroku.com/addons/sendgrid
You can add SendGrid to your app in the command line by typing:
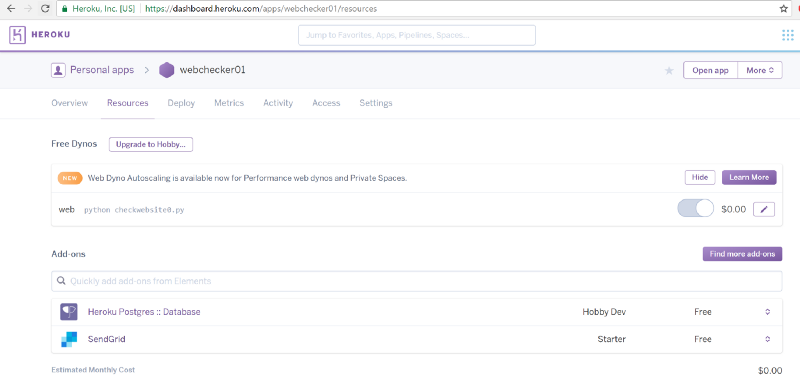
heroku addons:create sendgrid:starter
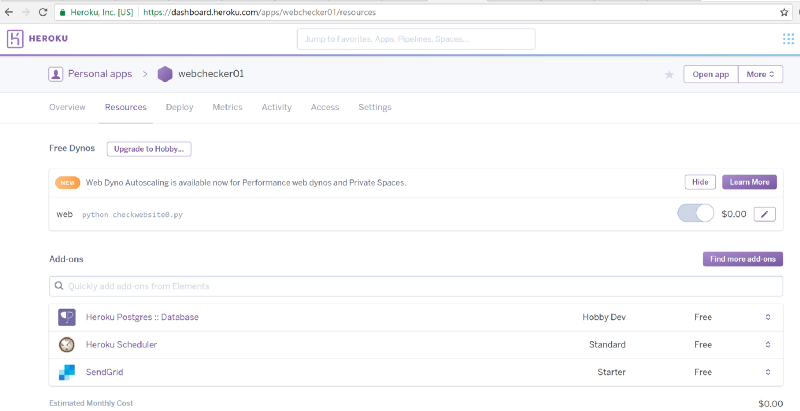
When you go to your dashboard you can see the new Addon in the Resources section:
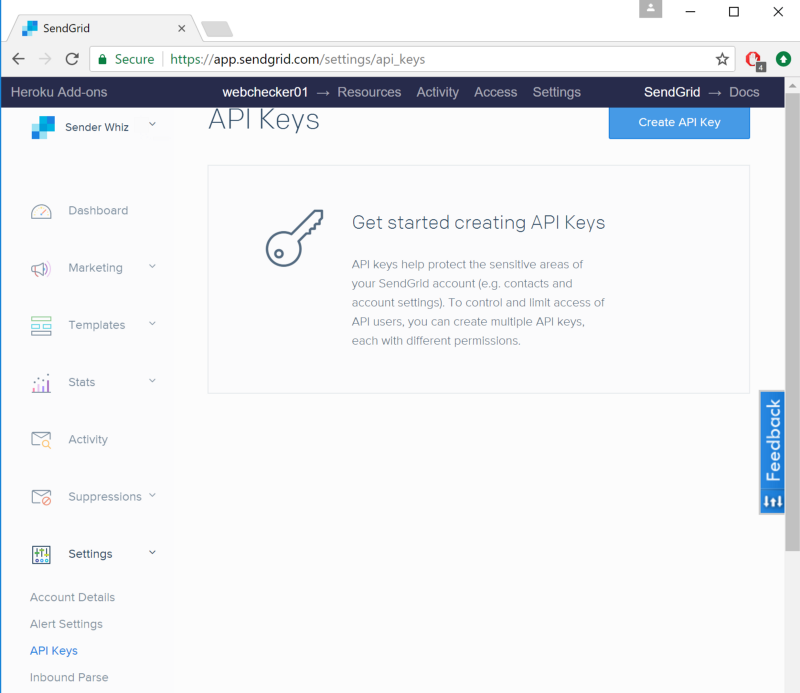
Before using it, you’ll need to create an API key. Double click the SendGrid component above and go into Settings->API Key->Create Key (blue button on top right).
Once you create the key, copy it and go back to the command prompt and enter:
heroku config:set SENDGRID_API_KEY=<API key from above>
This will only register it on the server, you need to add it locally to your desktop with:
set SENDGRID_API_KEY=<API Key from above again>
Once done, you can test your code in a new Python script called sendmail.py. Install the library via pip install sendgrid:
To confirm the email was sent and delivered, you can go back to the SendGrid dashboard and checking the Statistics Overview screen:
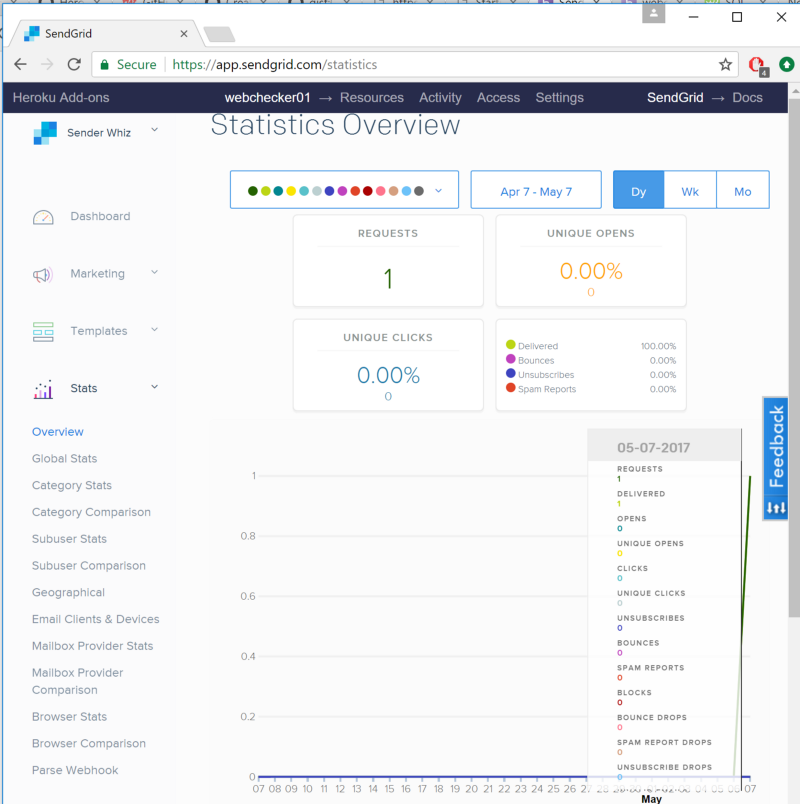
When checking your email, remember to check your spam.
Once it is working, there are only two lines of code you need to add to your main checkwebsite.py script. It is:
import sendmail #import the send email subroutine you wrote above...#call the subroutine after find the hashcode has changedsendmail.sendemail(webrecord['emailaddress'], 'Website changed', webrecord['website'] + ' changed')The full code is here:
Step 5: List the output on the web page and schedule the job
The next step is to list the output on the webpage.
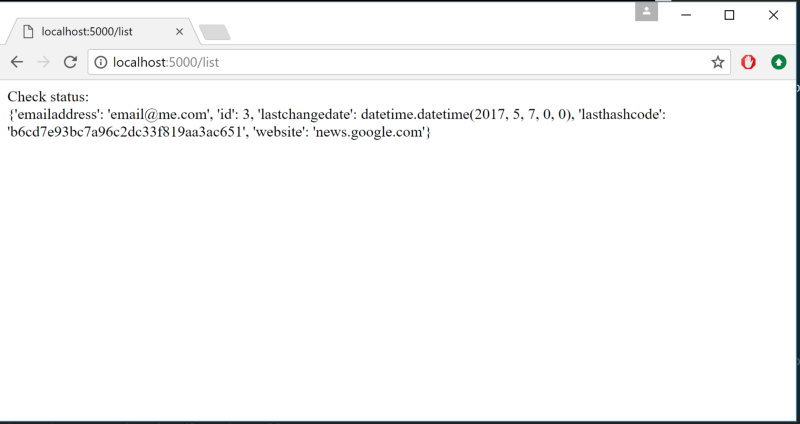
This involves querying the database, and then cycling through and showing the data on your screen. Hence, it takes the ‘Hello World’ code above, and makes the modification. I also created a different path for this, so to test this out you’ll need to go to the URL: http://localhost:5000/list
And here’s the output:
Step 6: Deploy
The final step is to deploy everything to Heroku and then schedule the job so that it checks email.
You should have the following files:
- Procfile — the file which points to showchecker.py
- requirements.txt — the file which contains the library dependencies
- runtime.txt — the version of python
- showchecker.py — the python code which shows the database output on the web via <your appname>.herokuapp.com/list
- checkwebsite.py — the python code that checks for any changes on the websites
For the requirements.txt, you will need to make amendments to add the latest libraries:
Deploy these all to Heroku:
- git add *.* *
- git commit -m “deployment”
- git push heroku master
Test each component:
- Go to <your app name>.herokuapp.com/hello
- Go to <your app name>.herokuapp.com/list
If there are any errors, then run heroku logs in the command line to see what is going on.
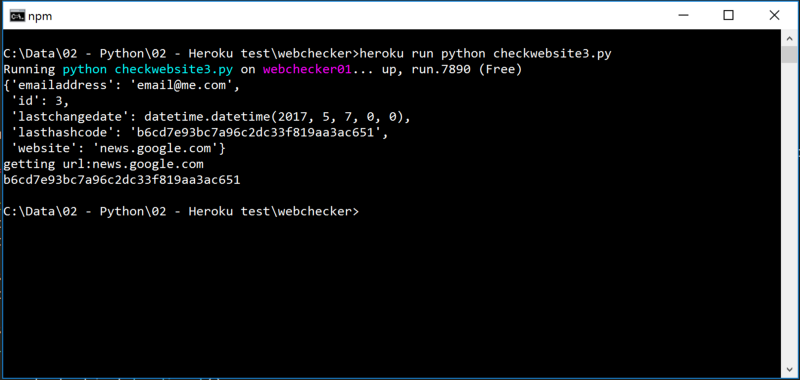
Next, run the checkwebsite.py directly on Heroku to make sure there are no issues. To do this, you can type:
heroku run python checkwebsite.py
Finally, you can now schedule your job. Again, you need to include an Addon to do this.
heroku addons:create scheduler:standard

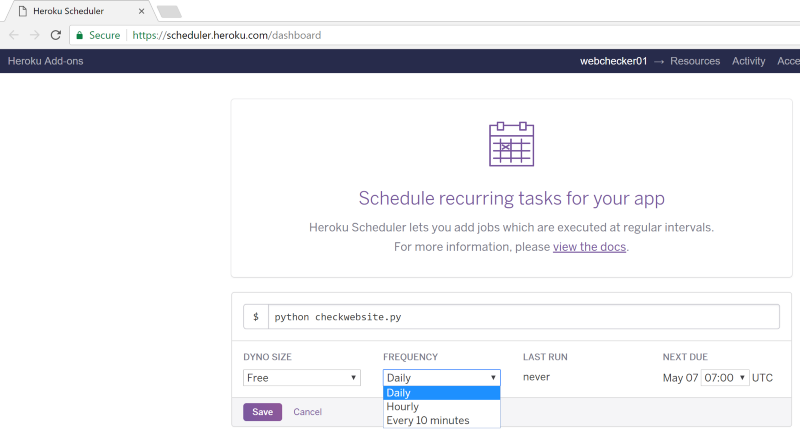
And you should be able to see the scheduler in your resources page:
You can simply use the command line to run the program, in our case it is: python checkwebsite.py (this is the same as what we tested above with the heroku run command).
Summary
And that’s it… the first time it is a little complex, but hopefully the above incremental steps will help you understand what’s going on under the hood. There are a lot more resources on Heroku as well as a wealth of information on Stack Overflow. These resources should make a lot more sense after going through the above.
Good Luck!
Thanks for reading! If you like what you read, hit the❤ button below so that others may find this (you can also find me on Twitter )