
by Aftab Ansari
How to import Google BigQuery tables to AWS Athena

As a data engineer, it is quite likely that you are using one of the leading big data cloud platforms such as AWS, Microsoft Azure, or Google Cloud for your data processing. Also, migrating data from one platform to another is something you might have already faced or will face at some point.
In this post, I will show how I imported Google BigQuery tables to AWS Athena. If you only need a list of tools to be used with some very high-level guidance, you can quickly look at this post that shows how to import a single BigQuery table into Hive metastore. In this article, I will show one way of importing a full BigQuery project (multiple tables) into both Hive and Athena metastore.
There are few import limitations: for example, when you import data from partitioned tables, you cannot import individual partitions. Please check the limitations before starting the process.
In order to successfully import Google BigQuery tables to Athena, I performed the steps shown below. I used AVRO format when dumping data and the schemas from Google BigQuery and loading them into AWS Athena.
Step 1. Dump BigQuery data to Google Cloud Storage
Step 2. Transfer data from Google Cloud Storage to AWS S3
Step 3. Extract AVRO schema from AVRO files stored in S3
Step 4. Create Hive tables on top of AVRO data, use schema from Step 3
Step 5. Extract Hive table definition from Hive tables
Step 6. Use the output of Step 3 and 5 to create Athena tables
So why do I have to create Hive tables in the first place although the end goal is to have data in Athena? This is because:
- Athena does not support using
avro.schema.urlto specify table schema. - Athena requires you to explicitly specify field names and their data types in CREATE statement.
- Athena also requires the AVRO schema in JSON format under
avro.schema.literal. - You can check this AWS doc for more details.
So, Hive tables can be created directly by pointing to AVRO schema files stored on S3. But to have the same in Athena, columns and schema are required in the CREATE TABLE statement.
One way to overcome this is to first extract schema from AVRO data to be supplied as avro.schema.literal . Second, for field names and data types required for CREATE statement, create Hive tables based on AVRO schemas stored in S3 and use SHOW CREATE TABLE to dump/export Hive table definitions which contain field names and datatypes. Finally, create Athena tables by combining the extracted AVRO schema and Hive table definition. I will discuss in detail in subsequent sections.
For the demonstration, I have the following BigQuery tables that I would like to import to Athena.

So, let’s get started!
Step 1. Dump BigQuery data to Google Cloud Storage
It is possible to dump BigQuery data in Google storage with the help of the Google cloud UI. However, this can become a tedious task if you have to dump several tables manually.
To tackle this problem, I used Google Cloud Shell. In Cloud Shell, you can combine regular shell scripting with BigQuery commands and dump multiple tables relatively fast. You can activate Cloud Shell as shown in the picture below.

From Cloud Shell, the following operation provides the BigQuery extract commands to dump each table of the “backend” dataset to Google Cloud Storage.
bq ls backend | cut -d ' ' -f3 | tail -n+3 | xargs -I@ echo bq --location=US extract --destination_format AVRO --compression SNAPPY <dataset>.@ gs://<bucket>@In my case it prints:
aftab_ansari@cloudshell:~ (project-ark-archive)$ bq ls backend | cut -d ' ' -f3 | tail -n+3 | xargs -I@ echo bq --location=US extract --destination_format AVRO --compression SNAPPY backend.@ gs://plr_data_transfer_temp/bigquery_data/backend/@/@-*.avrobq --location=US extract --destination_format AVRO --compression SNAPPY backend.sessions_daily_phase2 gs://plr_data_transfer_temp/bigquery_data/backend/sessions_daily_phase2/sessions_daily_phase2-*.avrobq --location=US extract --destination_format AVRO --compression SNAPPY backend.sessions_detailed_phase2 gs://plr_data_transfer_temp/bigquery_data/backend/sessions_detailed_phase2/sessions_detailed_phase2-*.avrobq --location=US extract --destination_format AVRO --compression SNAPPY backend.sessions_phase2 gs://plr_data_transfer_temp/bigquery_data/backend/sessions_phase2/sessions_phase2-*.avroPlease note: --compression SNAPPY, this is important, as uncompressed and big files can cause the gsutil command (that is used to transfer data to AWS S3) to get stuck. The wildcard (*) makes bq extract split bigger tables (>1GB) into multiple output files. Running those commands on Cloud Shell, copy data to the following Google Storage directory.
gs://plr_data_transfer_temp/bigquery_data/backend/table_name/table_name-*.avroLet’s do ls to see the dumped AVRO file.
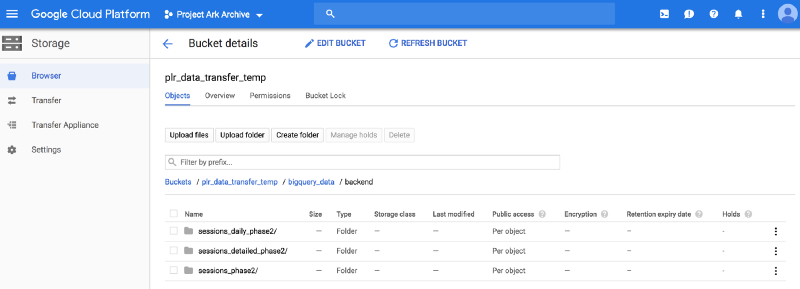
aftab_ansari@cloudshell:~ (project-ark-archive)$ gsutil ls gs://plr_data_transfer_temp/bigquery_data/backend/sessions_daily_phase2gs://plr_data_transfer_temp/bigquery_data/backend/sessions_daily_phase2/sessions_daily_phase2-000000000000.avroI can also browse from the UI and find the data like shown below.
Step 2. Transfer data from Google Cloud Storage to AWS S3
Transferring data from Google Storage to AWS S3 is straightforward. First, set up your S3 credentials. On Cloud Shell, create or edit .boto file ( vi ~/.boto) and add these:
[Credentials]aws_access_key_id = <your aws access key ID>aws_secret_access_key = <your aws secret access key>[s3]host = s3.us-east-1.amazonaws.comuse-sigv4 = TruePlease note: s3.us-east-1.amazonaws.com has to correspond with the region where the bucket is.
After setting up the credentials, execute gsutil to transfer data from Google Storage to AWS S3. For example:
gsutil rsync -r gs://your-gs-bucket/your-extract-path/your-schema s3://your-aws-bucket/your-target-path/your-schemaAdd the -n flag to the command above to display the operations that would be performed using the specified command without actually running them.
In this case, to transfer the data to S3, I used the following:
aftab_ansari@cloudshell:~ (project-ark-archive)$ gsutil rsync -r gs://plr_data_transfer_temp/bigquery_data/backend s3://my-bucket/bq_data/backendBuilding synchronization state…Starting synchronization…Copying gs://plr_data_transfer_temp/bigquery_data/backend/sessions_daily_phase2/sessions_daily_phase2-000000000000.avro [Content-Type=application/octet-stream]...Copying gs://plr_data_transfer_temp/bigquery_data/backend/sessions_detailed_phase2/sessions_detailed_phase2-000000000000.avro [Content-Type=application/octet-stream]...Copying gs://plr_data_transfer_temp/bigquery_data/backend/sessions_phase2/sessions_phase2-000000000000.avro [Content-Type=application/octet-stream]...| [3 files][987.8 KiB/987.8 KiB]Operation completed over 3 objects/987.8 KiB.Let’s check if the data got transferred to S3. I verified that from my local machine:
aws s3 ls --recursive s3://my-bucket/bq_data/backend --profile smoke | awk '{print $4}'bq_data/backend/sessions_daily_phase2/sessions_daily_phase2-000000000000.avrobq_data/backend/sessions_detailed_phase2/sessions_detailed_phase2-000000000000.avrobq_data/backend/sessions_phase2/sessions_phase2-000000000000.avroStep 3. Extract AVRO schema from AVRO files stored in S3
To extract schema from AVRO data, you can use the Apache avro-tools-<version>.jar with the getschema parameter. The benefit of using this tool is that it returns schema in the form you can use directly in WITH SERDEPROPERTIES statement when creating Athena tables.
You noticed I got only one .avro file per table when dumping BigQuery tables. This was because of small data volume — otherwise, I would have gotten several files per table. Regardless of single or multiple files per table, it’s enough to run avro-tools against any single file per table to extract that table’s schema.
I downloaded the latest version of avro-tools which is avro-tools-1.8.2.jar. I first copied all .avro files from s3 to local disk:
[hadoop@ip-10-0-10-205 tmpAftab]$ aws s3 cp s3://my-bucket/bq_data/backend/ bq_data/backend/ --recursivedownload: s3://my-bucket/bq_data/backend/sessions_detailed_phase2/sessions_detailed_phase2-000000000000.avro to bq_data/backend/sessions_detailed_phase2/sessions_detailed_phase2-000000000000.avrodownload: s3://my-bucket/bq_data/backend/sessions_phase2/sessions_phase2-000000000000.avro to bq_data/backend/sessions_phase2/sessions_phase2-000000000000.avrodownload: s3://my-bucket/bq_data/backend/sessions_daily_phase2/sessions_daily_phase2-000000000000.avro to bq_data/backend/sessions_daily_phase2/sessions_daily_phase2-000000000000.avroAvro-tools command should look like java -jar avro-tools-1.8.2.jar getschema your_data.avro > schema_file.avsc. This can become tedious if you have several AVRO files (in reality, I’ve done this for a project with many more tables). Again, I used a shell script to generate commands. I created extract_schema_avro.sh with the following content:
schema_avro=(bq_data/backend/*)for i in ${!schema_avro[*]}; do input_file=$(find ${schema_avro[$i]} -type f) output_file=$(ls -l ${schema_avro[$i]} | tail -n+2 \ | awk -v srch="avro" -v repl="avsc" '{ sub(srch,repl,$9); print $9 }') commands=$( echo "java -jar avro-tools-1.8.2.jar getschema " \ $input_file" > bq_data/schemas/backend/avro/"$output_file ) echo $commandsdoneRunning extract_schema_avro.sh provides the following:
[hadoop@ip-10-0-10-205 tmpAftab]$ sh extract_schema_avro.shjava -jar avro-tools-1.8.2.jar getschema bq_data/backend/sessions_daily_phase2/sessions_daily_phase2-000000000000.avro > bq_data/schemas/backend/avro/sessions_daily_phase2-000000000000.avscjava -jar avro-tools-1.8.2.jar getschema bq_data/backend/sessions_detailed_phase2/sessions_detailed_phase2-000000000000.avro > bq_data/schemas/backend/avro/sessions_detailed_phase2-000000000000.avscjava -jar avro-tools-1.8.2.jar getschema bq_data/backend/sessions_phase2/sessions_phase2-000000000000.avro > bq_data/schemas/backend/avro/sessions_phase2-000000000000.avscExecuting the above commands copies the extracted schema under bq_data/schemas/backend/avro/ :
[hadoop@ip-10-0-10-205 tmpAftab]$ ls -l bq_data/schemas/backend/avro/* | awk '{print $9}'bq_data/schemas/backend/avro/sessions_daily_phase2-000000000000.avscbq_data/schemas/backend/avro/sessions_detailed_phase2-000000000000.avscbq_data/schemas/backend/avro/sessions_phase2-000000000000.avscLet’s also check what’s inside an .avsc file.
[hadoop@ip-10-0-10-205 tmpAftab]$ cat bq_data/schemas/backend/avro/sessions_detailed_phase2-000000000000.avsc{"type" : "record","name" : "Root","fields" : [ {"name" : "uid","type" : [ "null", "string" ]}, {"name" : "platform","type" : [ "null", "string" ]}, {"name" : "version","type" : [ "null", "string" ]}, {"name" : "country","type" : [ "null", "string" ]}, {"name" : "sessions","type" : [ "null", "long" ]}, {"name" : "active_days","type" : [ "null", "long" ]}, {"name" : "session_time_minutes","type" : [ "null", "double" ]} ]}As you can see, the schema is in the form that can be directly used in Athena WITH SERDEPROPERTIES. But before Athena, I used the AVRO schemas to create Hive tables. If you want to avoid Hive table creation, you can read the .avsc files to extract field names and data types, but then you have to map the data types yourself from AVRO format to Athena table creation DDL.
The complexity of the mapping task depends on how complex the data types are in your tables. For simplicity (and to cover most simple to complex data types), I let Hive do the mapping for me. So I created the tables first in Hive metastore. Then I used SHOW CREATE TABLE to get the field names and data types part of the DDL.
Step 4. Create Hive tables on top of AVRO data, use schema from Step 3
As discussed earlier, Hive allows creating tables by using avro.schema.url. So once you have schema (.avsc file) extracted from AVRO data, you can create tables as follows:
CREATE EXTERNAL TABLE table_nameSTORED AS AVROLOCATION 's3://your-aws-bucket/your-target-path/avro_data'TBLPROPERTIES ('avro.schema.url'='s3://your-aws-bucket/your-target-path/your-avro-schema');First, upload the extracted schemas to S3 so that avro.schema.url can refer to their S3 locations:
[hadoop@ip-10-0-10-205 tmpAftab]$ aws s3 cp bq_data/schemas s3://my-bucket/bq_data/schemas --recursiveupload: bq_data/schemas/backend/avro/sessions_daily_phase2-000000000000.avsc to s3://my-bucket/bq_data/schemas/backend/avro/sessions_daily_phase2-000000000000.avscupload: bq_data/schemas/backend/avro/sessions_phase2-000000000000.avsc to s3://my-bucket/bq_data/schemas/backend/avro/sessions_phase2-000000000000.avscupload: bq_data/schemas/backend/avro/sessions_detailed_phase2-000000000000.avsc to s3://my-bucket/bq_data/schemas/backend/avro/sessions_detailed_phase2-000000000000.avscAfter having both AVRO data and schema in S3, DDL for Hive table can be created using the template shown at the beginning of this section. I used another shell script create_tables_hive.sh (shown below) to cover any number of tables:
schema_avro=$(ls -l bq_data/backend | tail -n+2 | awk '{print $9}')for table_name in $schema_avro; do file_name=$(ls -l bq_data/backend/$table_name | tail -n+2 | awk \ -v srch="avro" -v repl="avsc" '{ sub(srch,repl,$9); print $9 }') table_definition=$( echo "CREATE EXTERNAL TABLE IF NOT EXISTS backend."$table_name"\\nSTORED AS AVRO""\\nLOCATION 's3://my-bucket/bq_data/backend/"$table_name"'""\\nTBLPROPERTIES('avro.schema.url'='s3://my-bucket/bq_data/\schemas/backend/avro/"$file_name"');" ) printf "\n$table_definition\n"doneRunning the script provides the following:
[hadoop@ip-10-0-10-205 tmpAftab]$ sh create_tables_hive.shCREATE EXTERNAL TABLE IF NOT EXISTS backend.sessions_daily_phase2STORED AS AVROLOCATION 's3://my-bucket/bq_data/backend/sessions_daily_phase2' TBLPROPERTIES ('avro.schema.url'='s3://my-bucket/bq_data/schemas/backend/avro/sessions_daily_phase2-000000000000.avsc');CREATE EXTERNAL TABLE IF NOT EXISTS backend.sessions_detailed_phase2 STORED AS AVROLOCATION 's3://my-bucket/bq_data/backend/sessions_detailed_phase2'TBLPROPERTIES ('avro.schema.url'='s3://my-bucket/bq_data/schemas/backend/avro/sessions_detailed_phase2-000000000000.avsc');CREATE EXTERNAL TABLE IF NOT EXISTS backend.sessions_phase2STORED AS AVROLOCATION 's3://my-bucket/bq_data/backend/sessions_phase2' TBLPROPERTIES ('avro.schema.url'='s3://my-bucket/bq_data/schemas/backend/avro/sessions_phase2-000000000000.avsc');I ran the above on Hive console to actually create the Hive tables:
[hadoop@ip-10-0-10-205 tmpAftab]$ hiveLogging initialized using configuration in file:/etc/hive/conf.dist/hive-log4j2.properties Async: falsehive> CREATE EXTERNAL TABLE IF NOT EXISTS backend.sessions_daily_phase2> STORED AS AVRO> LOCATION 's3://my-bucket/bq_data/backend/sessions_daily_phase2' TBLPROPERTIES ('avro.schema.url'='s3://my-bucket/bq_data/schemas/backend/avro/sessions_daily_phase2-000000000000.avsc');OKTime taken: 4.24 secondshive>> CREATE EXTERNAL TABLE IF NOT EXISTS backend.sessions_detailed_phase2 STORED AS AVRO> LOCATION 's3://my-bucket/bq_data/backend/sessions_detailed_phase2'> TBLPROPERTIES ('avro.schema.url'='s3://my-bucket/bq_data/schemas/backend/avro/sessions_detailed_phase2-000000000000.avsc');OKTime taken: 0.563 secondshive>> CREATE EXTERNAL TABLE IF NOT EXISTS backend.sessions_phase2> STORED AS AVRO> LOCATION 's3://my-bucket/bq_data/backend/sessions_phase2' TBLPROPERTIES ('avro.schema.url'='s3://my-bucket/bq_data/schemas/backend/avro/sessions_phase2-000000000000.avsc');OKTime taken: 0.386 secondsSo I have created the Hive tables successfully. To verify that the tables work, I ran this simple query:
hive> select count(*) from backend.sessions_detailed_phase2;Query ID = hadoop_20190214152548_2316cb5b-29f1-4416-922e-a6ff02ec1775Total jobs = 1Launching Job 1 out of 1Status: Running (Executing on YARN cluster with App id application_1550010493995_0220)----------------------------------------------------------------------------------------------VERTICES MODE STATUS TOTAL COMPLETED RUNNING PENDING FAILED KILLED----------------------------------------------------------------------------------------------Map 1 .......... container SUCCEEDED 1 1 0 0 0 0Reducer 2 ...... container SUCCEEDED 1 1 0 0 0 0----------------------------------------------------------------------------------------------VERTICES: 02/02 [==========================>>] 100% ELAPSED TIME: 8.17 s----------------------------------------------------------------------------------------------OK6130So it works!
Step 5. Extract Hive table definition from Hive tables
As discussed earlier, Athena requires you to explicitly specify field names and their data types in CREATE statement. In Step 3, I extracted the AVRO schema, which can be used in WITH SERDEPROPERTIES of Athena table DDL, but I also have to specify all the fiend names and their (Hive) data types. Now that I have the tables in the Hive metastore, I can easily get those by running SHOW CREATE TABLE. First, prepare the Hive DDL queries for all tables:
[hadoop@ip-10-0-10-205 tmpAftab]$ ls -l bq_data/backend | tail -n+2 | awk '{print "hive -e '\''SHOW CREATE TABLE backend."$9"'\'' > bq_data/schemas/backend/hql/backend."$9".hql;" }'hive -e 'SHOW CREATE TABLE backend.sessions_daily_phase2' > bq_data/schemas/backend/hql/backend.sessions_daily_phase2.hql;hive -e 'SHOW CREATE TABLE backend.sessions_detailed_phase2' > bq_data/schemas/backend/hql/backend.sessions_detailed_phase2.hql;hive -e 'SHOW CREATE TABLE backend.sessions_phase2' > bq_data/schemas/backend/hql/backend.sessions_phase2.hql;Executing the above commands copies Hive table definitions under bq_data/schemas/backend/hql/. Let’s see what’s inside:
[hadoop@ip-10-0-10-205 tmpAftab]$ cat bq_data/schemas/backend/hql/backend.sessions_detailed_phase2.hqlCREATE EXTERNAL TABLE `backend.sessions_detailed_phase2`(`uid` string COMMENT '',`platform` string COMMENT '',`version` string COMMENT '',`country` string COMMENT '',`sessions` bigint COMMENT '',`active_days` bigint COMMENT '',`session_time_minutes` double COMMENT '')ROW FORMAT SERDE'org.apache.hadoop.hive.serde2.avro.AvroSerDe'STORED AS INPUTFORMAT'org.apache.hadoop.hive.ql.io.avro.AvroContainerInputFormat'OUTPUTFORMAT'org.apache.hadoop.hive.ql.io.avro.AvroContainerOutputFormat'LOCATION's3://my-bucket/bq_data/backend/sessions_detailed_phase2'TBLPROPERTIES ('avro.schema.url'='s3://my-bucket/bq_data/schemas/backend/avro/sessions_detailed_phase2-000000000000.avsc','transient_lastDdlTime'='1550157659')By now all the building blocks needed for creating AVRO tables in Athena are there:
- Field names and data types can be obtained from the Hive table DDL (to be used in columns section of
CREATEstatement) - AVRO schema (JSON) can be obtained from the extracted
.avscfiles (to be supplied inWITH SERDEPROPERTIES).
Step 6. Use the output of Steps 3 and 5 to Create Athena tables
If you are still with me, you have done a great job coming this far. I am now going to perform the final step which is creating Athena tables. I used the following script to combine .avsc and .hql files to construct Athena table definitions:
[hadoop@ip-10-0-10-205 tmpAftab]$ cat create_tables_athena.sh# directory where extracted avro schemas are storedschema_avro=(bq_data/schemas/backend/avro/*)# directory where extracted HQL schemas are storedschema_hive=(bq_data/schemas/backend/hql/*)for i in ${!schema_avro[*]}; do schema=$(awk -F '{print $0}' '/CREATE/{flag=1}/STORED/{flag=0}\ flag' ${schema_hive[$i]}) location=$(awk -F '{print $0}' '/LOCATION/{flag=1; next}\ /TBLPROPERTIES/{flag=0} flag' ${schema_hive[$i]}) properties=$(cat ${schema_avro[$i]}) table=$(echo $schema '\n' \ "WITH SERDEPROPERTIES ('avro.schema.literal'='\n"$properties \ "\n""')STORED AS AVRO \n" \ "LOCATION" $location";\n\n") printf "\n$table\n"done \ > bq_data/schemas/backend/all_athena_tables/all_athena_tables.hqlRunning the above script copies Athena table definitions to bq_data/schemas/backend/all_athena_tables/all_athena_tables.hql. In my case it contains:
[hadoop@ip-10-0-10-205 all_athena_tables]$ cat all_athena_tables.hqlCREATE EXTERNAL TABLE `backend.sessions_daily_phase2`( `uid` string COMMENT '', `activity_date` string COMMENT '', `sessions` bigint COMMENT '', `session_time_minutes` double COMMENT '')ROW FORMAT SERDE 'org.apache.hadoop.hive.serde2.avro.AvroSerDe'WITH SERDEPROPERTIES ('avro.schema.literal'='{ "type" : "record", "name" : "Root", "fields" : [ { "name" : "uid", "type" : [ "null", "string" ] }, { "name" : "activity_date", "type" : [ "null", "string" ] }, { "name" : "sessions", "type" : [ "null", "long" ] }, { "name" : "session_time_minutes", "type" : [ "null", "double" ] } ] }')STORED AS AVROLOCATION 's3://my-bucket/bq_data/backend/sessions_daily_phase2';CREATE EXTERNAL TABLE `backend.sessions_detailed_phase2`( `uid` string COMMENT '', `platform` string COMMENT '', `version` string COMMENT '', `country` string COMMENT '', `sessions` bigint COMMENT '', `active_days` bigint COMMENT '', `session_time_minutes` double COMMENT '')ROW FORMAT SERDE 'org.apache.hadoop.hive.serde2.avro.AvroSerDe'WITH SERDEPROPERTIES ('avro.schema.literal'='{ "type" : "record", "name" : "Root", "fields" : [ { "name" : "uid", "type" : [ "null", "string" ] }, { "name" : "platform", "type" : [ "null", "string" ] }, { "name" : "version", "type" : [ "null", "string" ] }, { "name" : "country", "type" : [ "null", "string" ] }, { "name" : "sessions", "type" : [ "null", "long" ] }, { "name" : "active_days", "type" : [ "null", "long" ] }, { "name" : "session_time_minutes", "type" : [ "null", "double" ] } ] } ')STORED AS AVROLOCATION 's3://my-bucket/bq_data/backend/sessions_detailed_phase2';CREATE EXTERNAL TABLE `backend.sessions_phase2`( `uid` string COMMENT '', `sessions` bigint COMMENT '', `active_days` bigint COMMENT '', `session_time_minutes` double COMMENT '')ROW FORMAT SERDE 'org.apache.hadoop.hive.serde2.avro.AvroSerDe'WITH SERDEPROPERTIES ('avro.schema.literal'='{ "type" : "record", "name" : "Root", "fields" : [ { "name" : "uid", "type" : [ "null", "string" ] }, { "name" : "sessions", "type" : [ "null", "long" ] }, { "name" : "active_days", "type" : [ "null", "long" ] }, { "name" : "session_time_minutes", "type" : [ "null", "double" ] } ] }')STORED AS AVROLOCATION 's3://my-bucket/bq_data/backend/sessions_phase2';And finally, I ran the above scripts in Athena to create the tables:
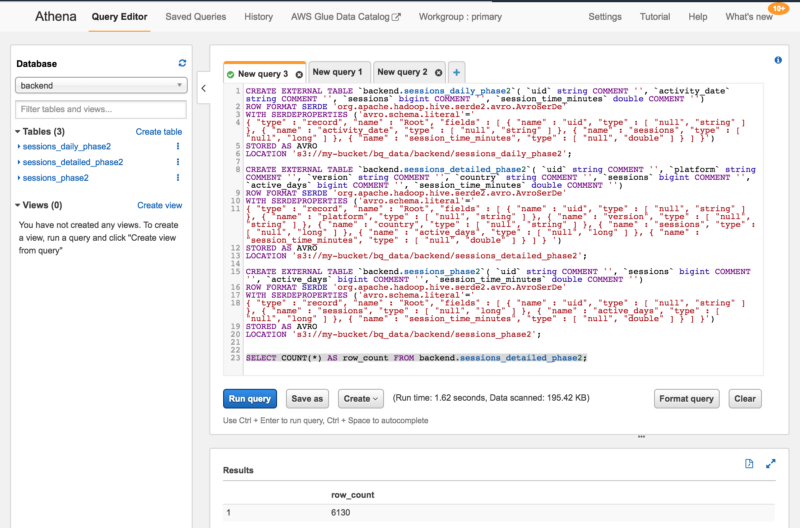
There you have it.
I feel that the process is a bit lengthy. However, this has worked well for me. The other approach would be to use AWS Glue wizard to crawl the data and infer the schema. If you have used AWS Glue wizard, please share your experience in the comment section below.