

Have you ever asked yourself how a framework works?
When I discovered AngularJS after learning jQuery many years ago, AngularJS seemed like dark magic to me.
Then Vue.js came out, and upon analyzing how it works under the hood, I was encouraged to try writing my own two-way binding system.
In this article, I’ll show you how to write a modern JavaScript framework with custom HTML element attributes, reactivity, and double-binding.
How does reactivity work?
It would be good to start with an understanding of how reactivity works. The good news is that this is simple. Actually, when you declare a new component in Vue.js, the framework will proxify each property (getters and setters) using the proxy design pattern.
Thus it will be able to detect property value changes both from code and user inputs.
What the proxy design pattern looks like
The idea behind the proxy pattern is simply to overload access to an object. An analogy in real life could be the access to your bank account.
For example, you can’t directly access your bank account balance and change the value according to your needs. It is necessary for you to ask someone that has this permission, in this case, your bank.
var account = {
	balance: 5000
}

// A bank acts like a proxy between your bank account and you
var bank = new Proxy(account, {
    get: function (target, prop) {
    	return 9000000;
    }
});

console.log(account.balance); // 5,000 (your real balance)
console.log(bank.balance);    // 9,000,000 (the bank is lying)
console.log(bank.currency);   // 9,000,000 (the bank is doing anything)
In the example above, when using the bank object to access the account balance, the getter function is overloaded, and it always returns 9,000,000 instead of the property value, even if the property doesn’t exist.
// Overload setter default function
var bank = new Proxy(account, {
    set: function (target, prop, value) {
        // Always set property value to 0
        return Reflect.set(target, prop, 0);
    }
});

account.balance = 5800;
console.log(account.balance); // 5,800

bank.balance = 5400;
console.log(account.balance); // 0 (the bank is doing anything)
By overloading the set function, it’s possible to manipulate its behavior. You can change the value to set, update another property instead, or even not do anything at all.
Reactivity example
Now that you’re confident about how the proxy design pattern works, let’s begin writting our JavaScript framework.
To keep it simple, we’ll mimic the AngularJS syntax to do it. Declaring a controller and binding template elements to controller properties is quite straightforward.
<div ng-controller="InputController">
    <!-- "Hello World!" -->
    <input ng-bind="message"/>
    <input ng-bind="message"/>
</div>

<script type="javascript">
  function InputController () {
      this.message = 'Hello World!';
  }
  angular.controller('InputController', InputController);
</script>
First, define a controller with properties. Then use this controller in a template. Finally, use the ng-bind attribute to enable double-binding with the element value.
Parse template and instantiate the controller
To have properties to bind, we need to get a place (aka controller) to declare those properties. Thus, it is necessary to define a controller and introduce it to our framework.
During the controller declaration, the framework will look for elements that have ng-controller attributes.
If it fits with one of the declared controllers, it will create a new instance of this controller. This controller instance is only responsible for this particular piece of template.
var controllers = {};
var addController = function (name, constructor) {
    // Store controller constructor
    controllers[name] = {
        factory: constructor,
        instances: []
    };

    // Look for elements using the controller
    var element = document.querySelector('[ng-controller=' + name + ']');
    if (!element){
       return; // No element uses this controller
    }

    // Create a new instance and save it
    var ctrl = new controllers[name].factory;
    controllers[name].instances.push(ctrl);

    // Look for bindings.....
};

addController('InputController', InputController);
Here is what the handmade controllers variable declaration looks like. The controllers object contains all controllers declared within the framework by calling addController.

For each controller, a factory function is saved to instantiate a new controller when needed. The framework also stores each of the new instances of the same controller used in the template.
Looking for bindings
At this point, we’ve got an instance of the controller and a piece of template using this instance.
The next step is to look for elements with bindings which use controller properties.
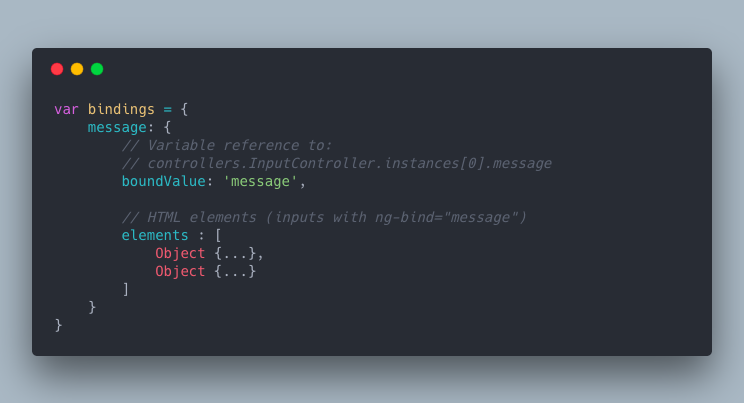
var bindings = {};

// Note: element is the dom element using the controller
Array.prototype.slice.call(element.querySelectorAll('[ng-bind]'))
    .map(function (element) {
        var boundValue = element.getAttribute('ng-bind');

        if(!bindings[boundValue]) {
            bindings[boundValue] = {
                boundValue: boundValue,
                elements: []
            }
        }

        bindings[boundValue].elements.push(element);
    });
Quite simple, it stores all bindings of an object (used as a hash map). This variable contains all the properties to bind with the current value and all DOM elements which bind this property.
Double bind controller properties
After the preliminary work has been done by the framework, now comes the interesting part: double-binding.
It involves binding the controller property to the DOM elements to update the DOM whenever the code updates the property value.
Also, don’t forget to bind the DOM elements to the controller property. This way, when the user changes the input value, it’ll update the controller property. Then it will also update all other elements bound to this property.
Detect updates from code with a proxy
As explained above, Vue wraps components within a proxy to react to property changes. Let’s do the same by proxying the setter only for controller bound properties.
// Note: ctrl is the controller instance
var proxy = new Proxy(ctrl, {
    set: function (target, prop, value) {
        var bind = bindings[prop];
        if(bind) {
            // Update each DOM element bound to the property
            bind.elements.forEach(function (element) {
                element.value = value;
                element.setAttribute('value', value);
            });
        }
        return Reflect.set(target, prop, value);
    }
});
Whenever a bound property is set, the proxy will check all elements bound to this property. Then it will update them with the new value.
In this example, we support only input elements binding, because only the value attribute is set.
React to element events
The last thing to do is reacting to user interactions. DOM elements trigger events when they detect a value change.
Listen to those events and update the bound property with the new value from the event. All other elements bound to the same property will update automatically thanks to the proxy.
Object.keys(bindings).forEach(function (boundValue) {
  var bind = bindings[boundValue];

  // Listen elements event and update proxy property
  bind.elements.forEach(function (element) {
    element.addEventListener('input', function (event) {
      proxy[bind.boundValue] = event.target.value; // Also triggers the proxy setter
    });
  })
});
Once you put everything together, you get handmade double-bound inputs. Here is a working demo including all the code.
Thank you for reading. I hope it helped you to demystify how JavaScript frameworks work.
Congratulations! You’ve developed popular features such as custom HTML element attributes, reactivity, and double-binding!
If you found this article useful, please click on the ? button a few times to make others find the article and to show your support! ?
Don’t forget to follow me to get notified of my upcoming articles ?
Check out my Other Posts
https://www.freecodecamp.org/news/author/jbardon/
➥ React for beginners
- A Quick Guide to Learn React and How its Virtual DOM Works
- How to Bring Reactivity into React with States