

Back in 2014, Apple made it possible to add an app preview to the the App Store. App previews are the best way to show potential users what your app has to offer before they download the app. In fact, users are 3x more likely to install an app with an app preview, according to StoreMaven.
Unfortunately, many solo makers don’t have the budget to hire a professional to make an app preview. Recently, I found myself in this position, and after some digging, I found a couple of free tools to make a quality app preview.
In this post, I’m going to go over the following:
- Preparing the content
- Recording the video
- Editing the video
- Common issues
I’m assuming that you are using a Mac, which comes with Xcode, Quicktime, and iMovie for free. If you are not using a Mac you might need to purchase these tools.
Preparing the content
Each app developer knows the most engaging and fun parts of their app. Make sure to highlight those in your app preview. Figure out where you need to add text overlays and ensure the text contrasts with the background it’s displayed on.
As of iOS 11, you can have up to three app previews to show off your app. It may be tempting to use the entire 90 seconds you are given, but I would suggest loading your most interesting features in the first one. If users aren’t interested in your app by the first preview, it’s unlikely they’ll take the time to watch the other two.
Finally, you may want to show the users how they will interact with your app. To show off touches and gestures, use GSTouchesShowingWindow. It’s super easy to install and will show off how users will interact with your app.
Recording the video
Once you have decided the content you want to show, you can start recording your video. The easiest way to do this is to use Quicktime to record the screen of a connected iPhone.
Plugin your iPhone, then open quicktime and hit File > New Movie Recording. This will open a recording window. From the dropdown next to the record button, you can select the device you have connected.
Using a connected device means that you are limited only to the devices you have. Luckily, you can use Xcode CLI to record your simulator actions.
To record with the Xcode CLI, begin running your simulator in Xcode. Then, open your terminal and enter the following command:
$ xcrun simctl io booted recordVideo example.mp4Perform the actions you want to record in the simulator then ctr-C in your terminal to end the recording session. The above command will add the video example.mp4 to the current directory of your terminal.
Editing the Video
There are two goals you are trying to hit while editing your preview:
- Show your app in the best light possible
- Edit the preview down to between 15 and 30 seconds
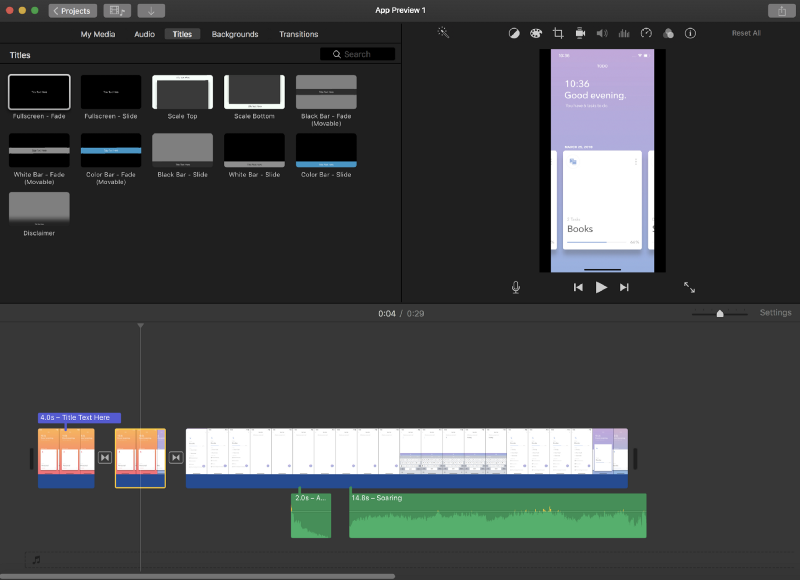
The best tool for editing an app preview is iMovie. Open iMovie and click File > New App Preview. Drop your video into the media area to add it to your project.
I’m not going to go into details of how to edit an iMovie app, but the UI is pretty intuitive. Just drag and drop the scenes you want onto the lower area to add them to your clip. command+B will allow you to split your clip so you can fit cool transitions and keep track of the pacing better. You can add transitions between split clips, audio, and title screens.
Once you are done editing, click File > Share > App Preview (if you don’t see App Preview you can also click file). Then, select the destination you want to save it to and hit enter. After a few seconds, your video will be available.
Common issues
So at this point there is a good chance you already have everything ready to go, but when you try to upload your preview to iTunes Connect, you get an error. It is likely that your problems are caused by one of these two app preview requirements:
- Your app preview’s resolution must match the requirements for the device type
- Your app preview must run at 30 fps
The likelihood that your app preview’s resolution doesn’t meet the requirements is pretty low, but I actually ran into trouble even when I recorded directly from my iPhone. For whatever reason, Quicktime captured everything off by one pixel, so iTunes Connect refused to let me upload the video.
After some searching, I found a free tool that lets you crop your .mov (or any video type) into the correct resolution. Go to ezgif.com and click Video to GIF on the nav bar. This opens another nav bar below the first one, where you will see Crop video. Click that, then you can upload your quicktime .mov file. Crop the video to the size you need and download the new file.
If you face issues related to your app preview not running at 30 fps, that’s an easy one to fix (for free) with ffmpeg. Open your terminal, ensure you have homebrew installed, and enter:
$ brew install ffmpegNow with ffmpeg installed, cd into the directory that contains your video and enter:
$ ffmpeg -i "original.mov" -r 30 "converted_30fps_video.mov" This will output your video converted to 30 fps.
Conclusion
You should now have an app preview that meets all of Apple’s requirements. Having an app preview is important so that your app stands out from the millions of apps on the app store. I found that the tools used in this guide landed me with a high quality app preview that I felt marketed my app well, and it didn’t cost a dime!
I hope this guide saved you some time and money. Good luck on the app store!
Thanks so much for reading! If you liked this story, follow me on Twitter where I post articles about product management, engineering, and design.