by Agam Mahajan
How to make an iOS on-demand build system with Jenkins and Fastlane
This article is about creating iOS builds through Jenkins BOT, remotely, without the need of a developer.

Before starting, I want to say that this is my first article. So feel free to leave a comment if something can be improved :)
Why is this a good idea?
When a developer makes a feature, they QA test it before pushing it to production. So a build has to be shared with the QA team with some test configurations.
Xcode (the IDE) takes a significant amount of time to compile and generate this build. This means that any person that needs the build would have to install the IDE, clone the repository, create a signing identity and certificate and then create the build themselves. Or depend on the developer to create one for them.
During the build creation process, the IDE is unusable. This severely impacts the productivity of the developer. In my company, the average build time of an .ipa is around 20 mins. On average, a developer makes 2–3 builds daily.
This means 5 working hours a week get wasted.

But what if there was an automated system which could generate the builds on its own? This would free the developers from this responsibility. It would also make it possible for anyone to get a build easily.
Jenkins is one of the solutions to our problem.
Making builds easily available to testers and developers ensures that people are able to test features faster and ship to production more easily. This improves the productivity of development teams. It also improves the quality of products pushed to production.
Let’s get started now.
Prerequisites
You will require:
- macOS Machine (it is better to run it on Mac products)
- 10 GB of drive space (for Jenkins)
- Java 8 installed (either a JRE or Java Development Kit (JDK) is fine)
http://www.oracle.com/technetwork/java/javase/downloads/jdk8-downloads-2133151.html
Additional Plugins to be installed
- homebrew
- wget
- RVM Plugin
Installation guide
https://rvm.io/rvm/security
Make one Branch with a file in it with the name Jenkinsfile with sample code:node { sh ‘echo HelloWorld’}
Let's name it jenkins-integration. Will come back to this later.
- Install Xcode on your machine from the App Store
- Install Fastlane on your machine. Jenkins will internally use fastlane commands to generate builds.
Now let’s go through it step by step.
Step 1. Install Jenkins on your machine
You can install on a MacBook or mac-mini. Mac-mini is preferred as it can be kept alive.
Download Jenkins -> https://jenkins.io/
Run java -jar jenkins.war --httpPort=8080 in the command line. If you’re getting an error in the terminal, try a different port (for example, 9090) as sometimes some ports are not available.
Browse to http://localhost:8080 and follow the instructions to complete the installation.
Then add admin credentials and don’t forget them (as did I :P). Later you can go to Jenkins > Manage Jenkins > Manager Users and do your changes if needed.
Step 2. Creating Your first Pipeline
Create a new job and choose Pipeline Project.
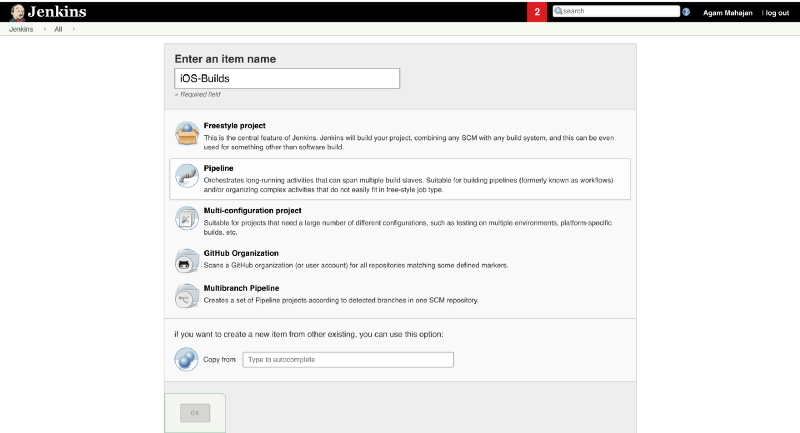
To check out your project, under the section Pipeline, in Definition, choose Pipeline Script from SCM and in SCM choose Git
Then add your repo URL and add the credentials if its a private repo. In branches to build , add */jenkins-integration, the branch which we created earlier.
Make sure Script Path is Jenkinsfile which we have created in our new branch. All the scripts will be written in this Jenkinsfile.

Click on Save and Jenkins will automatically scan your repo with the mentioned branch and will run the Jenkinsfile script.

Now we are ready to configure our Jenkinsfile to create builds
Step 3. Add parameters to the Job
User input is required for
- branch
- environment (test or prod)
For that we need to configure our project to take input parameters for a job.
Go to the Configure section and check This project is parameterised.
Then select add parameter and add the same accordingly.
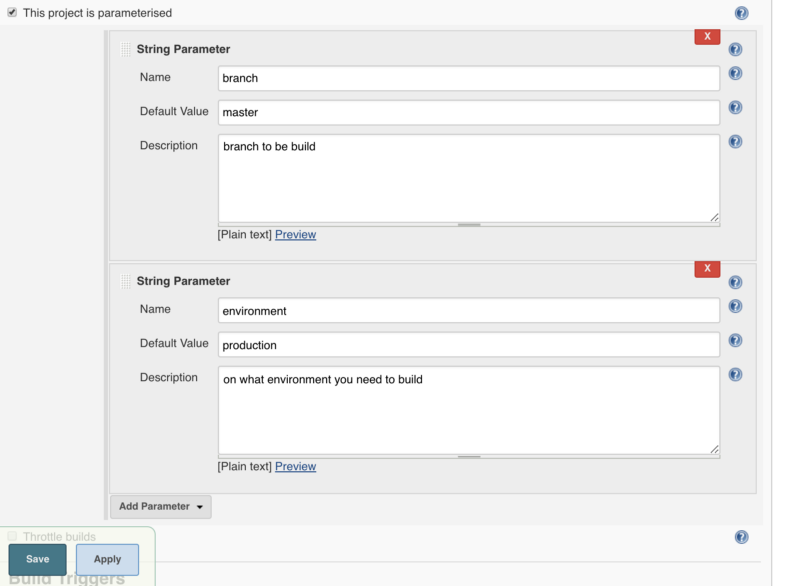
When you click on save, you will see a new section on left side -> Build with Parameters. This will be the user interface to make builds.
These params will be used in our Jenkins script.
Step 3. Configure Jenkins Script
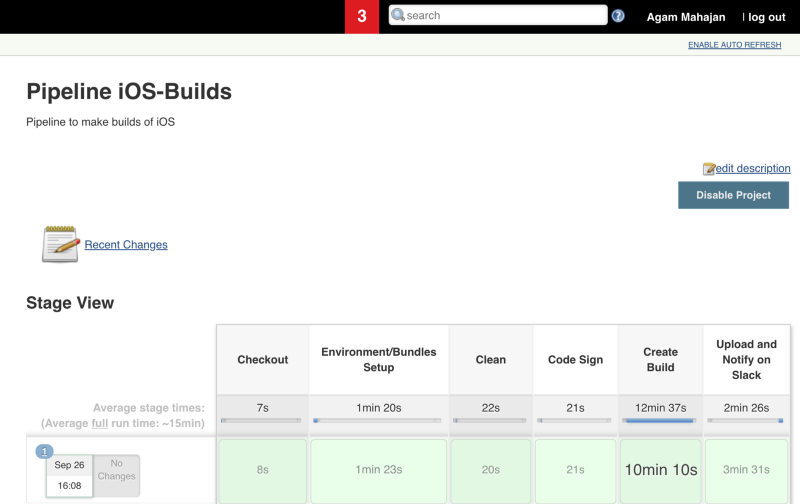
Will create multiple steps in our Jenkinsfile, each having one responsibility, and it will create a nice UI when it is built.
Go to your Jenkinsfile and replace the script with the following:
First, check out the branch through the parameter which we added earlier. Add your repo and GitHub token.
Now the GitHub token should not be visible to others. To do this, go to Manage Jenkins-> Configure System ->Global properties and add githubToken as an environment variable.
Then invoke the script to change the environment.
Next, invoke fastlane to clean (remove derived data, clean, delete .dsym files etc).
If code signing is required, do that next using ad-hoc. You can use development or app store based on your needs.
Next, create builds using the gym command in fastlane.
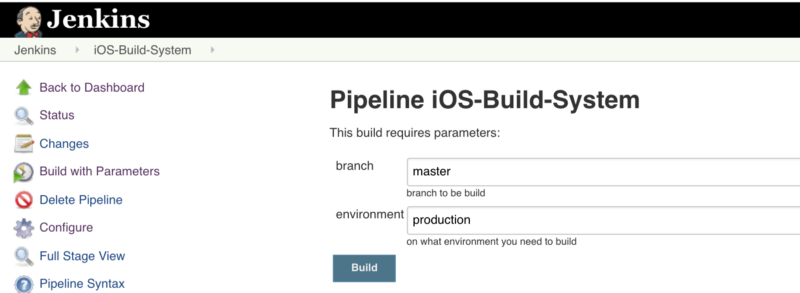
Step 4. Run the Job
Now our script is ready. Go to Jenkins and open Build with Parameters.
It will start to run the script and will create a nice UI with multiple steps as mentioned in the Jenkinsfile.
When the job is completed, go to the project Users/agammahajan/.jenkins/workspace/iOS_Build_Systems
and you will see that the .ipa has been created. Voilà!
Now you can share this build with others. You can use the Slack plugin to upload the builds to Slack if you want.
Wrapping up
So to conclude here, we can see how easy it is to setup an automated bot which enables any person to trigger builds in just 2 steps: Give Branch->Test Environment-> Done.
This has helped me and my fellow developers improve productivity and ship faster. It has also helped the QA team, so that they don’t have to depend on developers every time they need to test something. I hope it benefits you and your company also.
From here, the possibilities are endless.
- You can make scheduled jobs to generate nightly builds.
- Upload builds directly to the App Store.
- Cache the builds, so builds with the same configuration are not generated again.
- Distributing the IPA in house for OTA (Over the air) installation.
- Make a CI-CD pipeline to run automated tests on every commit and make them production ready.