
by nolan grace
How to manage more containers with Docker Swarm

Scaling beyond a single server is a an important feature to understand about containers. When you start using containers to make it easy to scale your application, things really start to get interesting. Imagine you have used Docker containers for development and testing. Now you’re ready to go live.
How can you make sure your application has enough resources? If you go viral, how will you scale?
This is where you should start using a container orchestrator like Swarm. The same group that brought you Docker built Swarm. Swarm exists to manage Docker containers on a cluster of machines. Docker Swarm makes it easy to deploy, manage, and scale your containers.
In this article, we will walk though the basics of container orchestration on a cluster. We will discuss the features of Docker Swarm, including how to start a Swarm, deploy an application, and scale that application. If you are not familiar with Docker, take a look at my other articles.
What is Docker?
Starting your first container
Creating your first Dockerfile
Building your first image
Moving past one container
Make your way back here when you feel ready.
You may have heard me call Swarm a container orchestrator. What do I mean by that? Swarm takes control of managing and organizing both the hosts and Docker containers running on your cluster.
Think of Swarm as an application that understands how to run Docker commands. You tell it where all your Docker hosts are, what containers you want to run, and Swarm takes care of the rest. Swarm manages networking, access, the state of your containers, scaling services, load balancing, and even relocating containers if a host becomes unresponsive.
In this article, we are going to start up a Docker Swarm on your local machine. With our local Swarm we will familiarize ourselves with the most common commands and deploy some services.
Starting a swarm
To get started, you will need to have Docker-CE installed. To help you install Docker on your machine, please take a look at the Docker-CE site.
Once you have successfully installed Docker, starting up your first Docker Swarm is as easy as running one command. Open up your terminal or command line and run the command below.
> docker swarm initYou have done it! You are running your first Swarm.
If you’re running this host on a cloud platform like AWS or in a server farm, adding more nodes to your swarm cluster is simple. Simply follow the instructions in the Docker Documentation on how to create a Swarm. This documentation will show you how to manually initialize and add nodes to a Docker Swarm cluster.
Another option is to spin up your own Rancher cluster. After you set up Rancher, you can let it do the heavy lifting for you. Rancher is a service that I use when exploring the features of different container orchestrators. Rancher makes it easy to spin up a cluster of machines and start a container orchestrator of your choice. Rancher has a nice and interactive web dashboard that makes it easy to spin up different orchestrators including Swarm, Mesos, or Kubernetes.
You can find information about Getting Started with Rancher and Using Rancher to Start a Swarm in the Rancher Documentation.
For the purposes of this article, we will stick to the one node running on your local machine. This will make it a lot easier to familiarize ourselves with Docker Swarm and the Swarm CLI.
Deploy to Swarm
Now that you have your swarm running, lets start some containers! If you are familiar with Docker, deploying to Docker Swarm should be a piece of cake. The commands used to deploy services and stacks for Docker-CE are the same commands used for Docker Swarm.
To deploy the pintail-whoami docker image, run the command below.
> docker service create --name pintail-whoami -p 80:80 pintailai/pintail-whoami:0.0.1Open your browers and go to http://localhost and you should see the page below.

The command used to start this service may be exactly the same as Docker-CE, but things work a little differently when connected to a Swarm.
When running services in a Swarm, the biggest difference is the physical location of your running containers. Docker Swarm will start a container on any host where resources are available. So just because you start a container from one host does not mean that is where the container will run.
So how do you access a service that could be started anywhere in your cluster?
Docker Swarm has a very useful tool to solve this problem called the Swarm routing mesh. The routing mesh manages ingress into your running containers. By default, Swarm makes all services accessible via their published port on each Docker host.
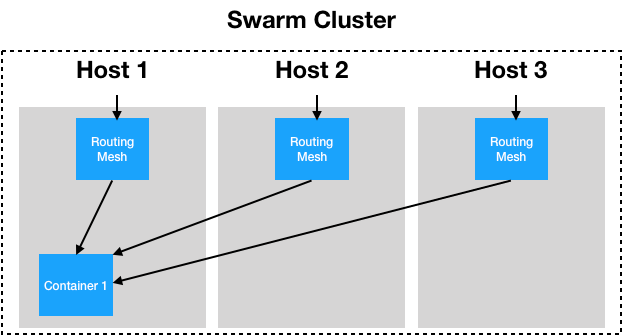
Let’s say you have a Swarm containing three Docker Hosts. If you deploy a service to your Swarm published on port 80, it doesn’t matter from which host you access that port — you will be routed to your service.
In the real world, if you have a web application and a Rest API, you could deploy you web app on port 80 and your API on 8080. With that configuration, you can scale the number of containers running different parts of your application. But you can always be sure that port 80 on any node in the Swarm cluster will take you to the website, and port 8080 to the Rest API.
The Swarm routing mesh has its pros and cons. This default configuration has its limitations, but it is designed to make getting started as easy as possible. As your applications get more complex, the routing mesh can be configured to behave differently and different services can be deployed to use different routing configurations. For more information, please take a look at the Swarm Mode routing mesh documentation.
Scaling your service
Now that we have a service running, let’s ramp thing up a bit!
Imagine you are running your website on a Docker Swarm in production and your site starts trending on Hacker News. Your traffic triples and you need to handle the additional load. To triple the number of containers you are running, simply run the command below:
> docker service scale pintail-whoami_pintail-whoami=3Presto! Docker Swarm scales the number of replicas you are running and routes traffic to the containers. After the command above completes, head back to you the “Pintail.ai Docker Example” in your browser and click refresh a few times. You should see the number change as the routing mesh navigates you to different containers.
Swarm makes scaling services easy so you can worry about bigger issues.
Clean Up
Now let’s clean up our containers and Swarm.
To remove the pintail-whoami stack, run
> docker stack rm pintail-whoamiBe careful with this next command. If you are running anything else within the swarm, it will be deleted.
To delete your Swarm cluster, run
> docker swarm leave --forceSo in this article, we started a Swarm Host, we discussed adding nodes to our cluster, we started and scaled a service, and we talked about the Swarm routing mesh. Hopefully this introduction will help you better wrap your brain around container orchestration and Docker Swarm.
This article barely scratches the surface of what is possible with containers and Swarm, but I hope it gives you some context to help you continue learning.
Please let me know if you have any comments, questions, or concerns in the comments. I am always open to feedback and would love to hear your suggestions. If you liked the article, please leave me lots of claps to let me know.