by Andrew Li
How to program a neural network to predict breast cancer in only 5 minutes
It’s that simple.
Minute One — Introduction:
This is a high-level tutorial intended for those new to machine learning and artificial intelligence and assumes that you have:
- Either Python 2 or 3 installed
- At least beginner-level coding experience
- 5 minutes
This tutorial will skip the low-level, math-heavy details of neural networks and focus on getting a neural network to predict breast cancer in only 5 minutes!
We will be using the neural network implementation from the scikit-learn library to predict whether someone has breast cancer using data from the UC Irvine “Breast Cancer Wisconsin” data set. Cell nuclei properties (e.g. texture or area) for a breast mass will be input into the neural network and subsequently a prediction of whether the mass is malignant or benign will be output by the neural network.
Minute Two — Getting Started:
If you don’t have scikit-learn installed yet, run pip install scikit-learn in your terminal. That should handle installing scikit-learn and all prerequisites libraries that we will need.
Open up an IDE or editor and create a blank file called neuralnet.py or a name that you prefer. Next, we’ll import the neural network implementation, the breast cancer data set, and a function for splitting our data into training and testing sets to feed into our neural network.
For reference as we go along, here is relevant scikit-learn documentation:
- Documentation for the breast cancer data set (
load_breast_cancer) - Documentation for the preprocessing function (
train_test_split) - Documentation for the neural network implementation (
MLPClassifier)
Minute Three — Preprocessing:
Before we’re ready to perform machine learning on the breast cancer data set, data preprocessing is first necessary. We begin by loading in our data and subsequently saving the breast mass properties (a list of lists containing numeric values) as attributes and whether the breast mass is malignant or benign (a list of 0's and 1's) as labels. The contents of each index of each list correspond e.g. a breast mass with attributes at attributes[0] is defined to be either malignant or benign at labels[0].
Next, we split our data into training (to train the neural network) and testing (to test the performance of the neural network) sets. The training set consists of attributes_train and labels_train and the testing set consists of attributes_test and labels_test. We allocate a third of our data set to our testing set which follows that the remaining two-thirds is in the training set.
Minute Four — The Neural Network:
Now that our data has been split into training and testing sets, we are ready to proceed with the neural network portion of this tutorial! After instantiating a multi-layer perceptron neural network, we train our neural network with our training set using the fit function, assess our neural network’s accuracy with the score function, and print the accuracy.
Try running the neural network through the terminal with python neuralnetworktutorial.py around 10 times (it should only take a second each time) and note the results!
Minute Five — Optimizing Results:
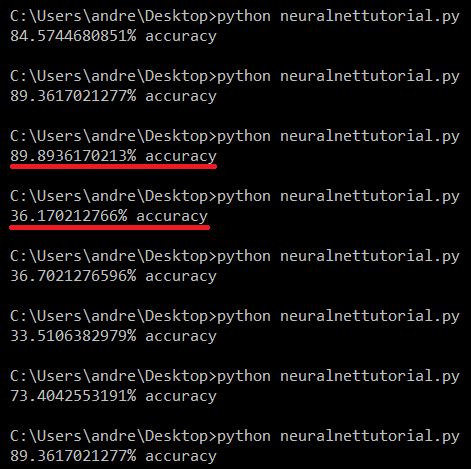
Chances are, you see great variation in the performance of the neural network. When we divided our data into training and testing sets, the data was shuffled using a random seed, which explains the fluctuation in our results; with only 569 entries in our data set, the neural network isn’t always trained with a training set (379 entries) that is representative of the whole data set, causing overfitting.
Moreover, when we instantiated a new neural network with neuralnet = MLPClassifier() in our code, we left the constructor blank which meant that the neural network was constructed with default parameters defined by scikit-learn, leading to a non-optimized neural network.
We can fix this by either training and testing on a bigger data set or making the best of our situation by tweaking the parameters of the data set.
Attempting the latter, I chose to switch the weight-optimization solver from the default adam to lbfgs, in short because the documentation mentions that lbfgs performs the best on small data set. I also changed the activation function in the hidden layer from relu to logistic after some experimenting, and finally bumped up the alpha from 0.0001 to 10.0 to prevent overfitting, which I suspected was the reason behind the drastic fluctuations in our accuracy across multiple runs.
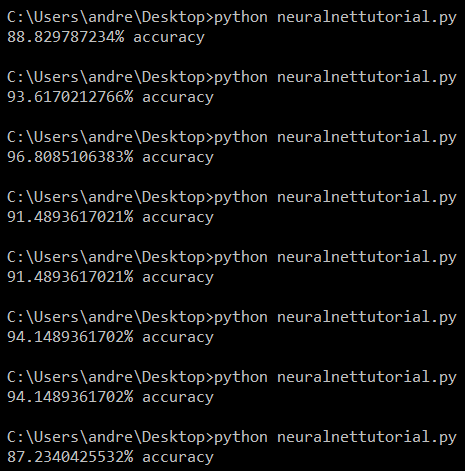
That looks much better! There are still some dips in accuracy, but we’re able to achieve a much higher accuracy consistently with substantially smaller drops in accuracy across multiple runs. The adjustments we made were simple and basic, leaving room for more optimization, but that’s for another time.
Conclusion
What you learned extends to any data set and any machine learning algorithm implementation found in scikit-learn; I chose to demonstrate using a neural network to predict breast cancer because both aforementioned topics are currently great areas of interest in STEM.
Trying another algorithm is as simple as replacing the lines that import and instantiate the neural network implementation with lines importing and instantiating a different algorithm implementation like so:
There are a lot of online resources to cultivate your understanding in machine learning and artificial intelligence if you don’t have access to in-person courses regarding the subject matters. If a lot of the machine learning in this tutorial went over your heard, don’t fret, this crash course article is very informative. If this tutorial seemed too high-level, I recommend this Coursera course taught by Andrew Ng that a lot of my colleagues have found helpful that focuses on the math and theory behind machine learning as well as low-level implementations.
Thanks for reading and remember to clap and to follow me on Medium for more tech-centric tutorials and commentary!
Also check me out on Twitter!