Introduction
SMPP (Short Message Peer-to-Peer) is a protocol used by the telecommunications industry. It exchanges SMS messages between (SMSC) and ESME. SMSC acts as middleman to store the message and route it. ESME is the system that delivers SMS to SMSC.
This tutorial will help you to send SMS messages using your own SMSC gateway.
Getting Started
Where is SMPP used?
SMPP is particularly suited to high-volume and high-throughput SMS applications. It has the following features:
- Connections established by the client with the server are persistent and may be kept open indefinitely. There is not the connection overhead to be found with protocols such as HTTP that use transient connections.
- Requests can be issued by the SMPP client as well as the SMPP server.
- Requests are processed asynchronously. Meaning that requests can be issued without having to wait first for responses to earlier requests to be received.
How to use it
We will be using Node.js node-smpp for the implementation.
SMPP Requests:
- bind request to establish the SMPP session
- submit_sm requests issued by the client to send messages to a mobile phone
- deliver_sm requests issued by the server to forward messages from the mobile phone to the client, including delivery receipts
- enquire_link requests issued by both the server and client to keep the SMPP session alive
- unbind request issued by either the server or the client to terminate the SMPP session
How it works
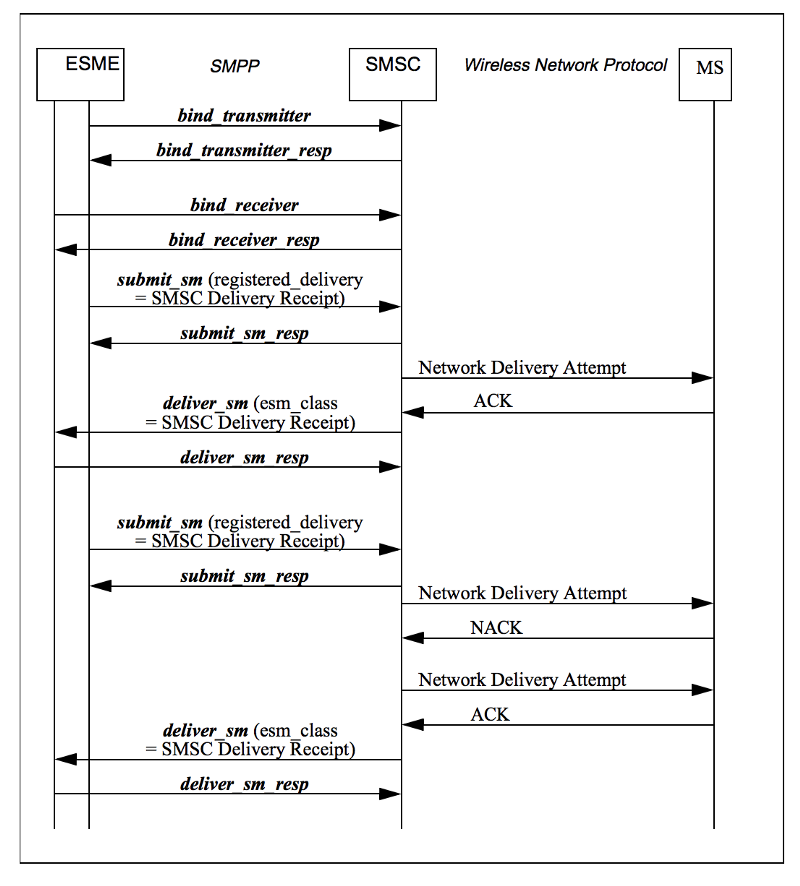
An SMPP session must be established between the ESME (External Short Messaging Entities) and the Message Centre or SMPP Routing Entity where appropriate.
This session is created using an SMPP client that communicates with an SMPP protocol. There is a continuous exchange of SMPP PDU (Protocol Data Units or Packets) to ensure a proper bind/connection is established.
The SMPP client takes care of the SMS and delivers them to the SMPP server. The SMPP server also transmits a delivery report back to the client when there is a change of status for an SMS.
Node.js will help us to achieve high MPS as it performs all I/O operations asynchronously.
Traditionally, I/O operations either run synchronously (blocking) or asynchronously by spawning off parallel threads to perform the work.
This old approach consumes a lot of memory and is notoriously difficult to program.
In contrast, when a Node application needs to perform an I/O operation, it sends an asynchronous task to the event loop, along with a callback function. It then continues to execute the rest of its program.
When the async operation completes, the event loop returns to the task to execute its callback.
Store and Forward Message Mode
The conventional approach to SMS has been to store the message in an SMSC storage area (e.g. message database) before forwarding the message for delivery to the recipient SME. With this model, the message remains securely stored until all delivery attempts have been made by the SMSC. This mode of messaging is commonly referred to as “store and forward”.

Step 1: Create SMPP Session
In beginning, we need to create a new smpp session with IP address and port.
const smpp = require('smpp');
const session = new smpp.Session({host: '0.0.0.0', port: 9500});
Step 2: Bind Transceiver
As soon as it connects we will bind it on connect event:
let isConnected = false
session.on('connect', () => {
  isConnected = true;

  session.bind_transceiver({
      system_id: 'USER_NAME',
      password: 'USER_PASSWORD',
      interface_version: 1,
      system_type: '380666000600',
      address_range: '+380666000600',
      addr_ton: 1,
      addr_npi: 1,
  }, (pdu) => {
    if (pdu.command_status == 0) {
        console.log('Successfully bound')
    }

  })
})

session.on('close', () => {
  console.log('smpp is now disconnected')

  if (isConnected) {
    session.connect();    //reconnect again
  }
})

session.on('error', error => {
  console.log('smpp error', error)
  isConnected = false;
});
Step 3: Send SMS
So now we are connected, let's send the SMS:
function sendSMS(from, to, text) {
   from = `+${from}`

// this is very important so make sure you have included + sign before ISD code to send sms

   to = `+${to}`

  session.submit_sm({
      source_addr:      from,
      destination_addr: to,
      short_message:    text
  }, function(pdu) {
      if (pdu.command_status == 0) {
          // Message successfully sent
          console.log(pdu.message_id);
      }
  });
}
Now after sending the SMS, SMSC will send the delivery report that the message has been delivered.
I hope you find this tutorial useful. Feel free to reach out if you have any questions.
Further reading:
If you would like to learn more about SMPP, check out: http://opensmpp.org/specifications.html
Don’t hesitate to clap if you considered this a worthwhile read!
Follow Shailesh Shekhawat to get notified whenever I publish a new post.
Originally published at 101node.io on September 16, 2018.

