

One of the messier bits of a new app setup is trying to figure out where to stash your Google Analytics initialization scripts. There are some existing options like React Helmet to manage the head of your document. You can toss it in your monolithic index.html file.
The thing is, those setups rarely work out the way you want them to. They end up as ugly blocks of HTML strings in your JavaScript. You end up having to manage that monolith of an index.html file I mentioned before throughout your project’s lifecycle.
Why this matters
Beyond how you manage your code, if analytics is crucial to you and your business, you want to make sure the setup is reliable and correctly installed.
Many developers assume that because it’s a JS snippet, the best practice is to toss it at the bottom of the page. The issue with this is that throwing it at the end leaves a higher risk that you’ll miss tracking a hit before a user exits the page, as Analytics won’t initialize until the rest of the page loads. That’s why Google itself recommends installing the snippet as high in the head as possible.
As important as I say this is, you might not care as much if you’re more relaxed about it and want to get a general idea about how things are running on your portfolio site. However, if you expand your reach into other tools like A/B testing with Google Optimize, it’s even more critical to have GA recognize the page and the experiment running to avoid additional delays or worse, page flickering. ?

How we’ll fix this
Partials for HTML Webpack Plugin is an extension of HTML Webpack Plugin that simplifies your partial management. Its goal is to specifically try to avoid the practice of maintaining an index.html file in Webpack projects and instead defer to maintainable partials simplifying your setup.
For now, we’re going to focus on getting Google Analytics set up, but I recommend checking out Google Tag Manager for managing tags generally, which I’ll cover later in a followup post.
TL;DR — If you want to jump straight to the solution, you can grab the code here.
Getting started
We’ll want to start out with a basic Webpack setup with HTML Webpack Plugin already configured. This guide won’t walk you through that setup, but here are a couple of starting points if you’re not familiar:
- Webpack’s Getting Started guide
- Webpack’s guide for HTML Webpack Plugin
- A ton of excellent tutorials out there you can find by Googling around a little bit
Lastly, if you already have an index.html set up, I won’t judge you for now, but hopefully this inspires you to approach other snippets the same way and remove the need for a managed index.html file at all.
Installing Partials for HTML Webpack Plugin
Once you already have your basic setup and HTML Webpack Plugin installed, our Partials plugin is an easy add:
yarn add html-webpack-partials-plugin -DNote: make sure to properly set up the package dependency based on your project configuration.
Set up your partial
Next, we’ll want to create our partial. My preference for generally managing them is to create a new directory called partials in the source root. For example, if your entry point lives at src/main.js, your partials directory would be right next to it at src/partials.

Once you have your preferred location, let’s create an analytics.html file in our new partials directory. For now, let’s throw in some test code, so we know it works. In analytics.html:
<style>
body { background-color: #5F4B8B; }
</style>
Configure your partial
Open up your webpack.config.js and let’s set up the partial to get included in our build.
First, require the plugin at the top of your config. In webpack.config.js:
const HtmlWebpackPartialsPlugin = require('html-webpack-partials-plugin');Next, and this is very important, include a new instance of the plugin AFTER your instance of HtmlWebpackPlugin(). In the plugins section of webpack.config.js:
...
plugins: [
  new HtmlWebpackPlugin(),
  new HtmlWebpackPartialsPlugin({
    path: './path/to/src/partials/analytics.html'),
    location: 'head',
    priority: 'high'
  })
...
Now let’s first break down that config before moving on:
- path: this is what it sounds like, the path to the partial file in our project. Make sure to update this to the right location so the plugin can find it.
- location: the HTML tag the plugin looks for.
- priority: this determines whether at compile time, our plugin adds our partial at the beginning of the specified
locationtag or the end (opening vs. closing).
Like we covered earlier, we want to add this as high in the <head> as possible. For most HTML tags used in location, Partials add it right after the opening tag if the priority is high. But with the <head> tag, Partials looks for your charset meta tag and injects it immediately after, as it’s important to render that in the document first.
Test it out
Compile Webpack, open your project in your browser, and you should now see a nice, ultraviolet background. ?
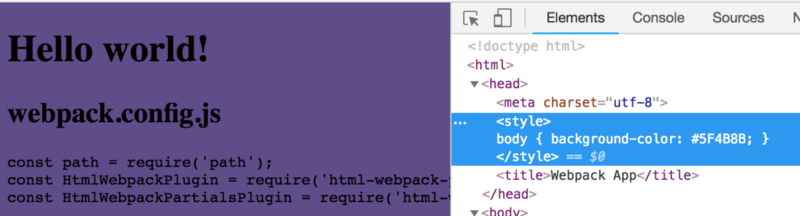
If you take a look at the source, you should see the snippet get added right after the charset tag!
Now to Analytics
Let’s update our analytics.html file to look something like this:
<script async src="https://www.googletagmanager.com/gtag/js?id=UA-XXXXXXXX-X"></script>
<script>
window.dataLayer = window.dataLayer || [];
function gtag(){dataLayer.push(arguments);}
gtag('js', new Date());
gtag('config', 'UA-XXXXXXXX-X');
</script>
Just make sure to update the IDs (UA-XXXXXXXX-X) to your match your Google Analytics property value. Your Analytics snippet may also vary depending on your setup.
You should now be able to recompile Webpack and see your page start to ping Google Analytics! ?
Note: you might have to load your project file from a server before GA is recognized rather than straight off of your local filesystem
Let’s take it a step further
This is great and all, but when dealing with Google Analytics, it’s nice to have a few different properties, such as one for development and one for production. This helps avoid polluting the production property with data from your development team (or you) poking around the application.
Setting up partial variables
Let’s go back to our webpack.config.js file and set up a variable to pass our property ID in:
...
plugins: [
  new HtmlWebpackPlugin(),
  new HtmlWebpackPartialsPlugin({
    path: './path/to/src/partials/analytics.html'),
    location: 'head',
    priority: 'high',
    options: {
      ga_property_id: 'UA-XXXXXXXX-X'
    }
  })
...
Next, update your analytics.html file to recognize this value. Similar to HTML Webpack Plugin, Partials uses Lodash templating to make this work. In analytics.html:
<script async src="https://www.googletagmanager.com/gtag/js?id=<%= ga_property_id %>"></script>
<script> window.dataLayer = window.dataLayer || [];
function gtag(){dataLayer.push(arguments);}
gtag('js', new Date());
gtag('config', '<%= ga_property_id %>');
</script>
Now compile again and profit!

To verify your tag is appropriately set up, I recommend checking out Google Tag Assistant available on Chrome.
Setting this up for different property IDs
From here, you have a few options as to how you manage your different property IDs. You can:
- Set up separate development and production Webpack configs
- Create an environment config (ex:
env.config.js) that allows you to import the settings - Both (recommended)
Setting it up this way will give you the opportunity to run the properties dynamically between your local development and production builds. Just remember not to store your env file in git if you’re going to add sensitive data. ?
So what are we getting out of this?
The ideal scenario is you take this and run with it for the rest of your HTML living in index.html. This helps split your code up into more manageable pieces and lets Webpack generate the file for you rather than you trying to override and manage it yourself.
Specifically for Google Analytics, we have a few benefits:
- Ensuring the snippet is loading in a reliable location
- Providing a more reasonable way to maintain the snippet itself
- Managing your property ID through your Webpack config
- And bonus: loading it as an env variable through your Webpack config
To see the full solution with some example code, check out the example in the GitHub repo.

Originally published at https://www.colbyfayock.com/2018/08/reliable-and-maintainable-google-analytics-in-webpack.