by Dimitri Ivashchuk
How to source content with Gatsby.js
Gatsby.js is a powerful static site generator (with dynamic capabilities) which can be used to build super performant web-sites. It has a very rich plug-in functionality and is perfect for your next personal blog, product landing, portfolio page or small e-commerce app.
Sourcing content
It’s fairly evident that when you build your web-site, apart from business logic, performance, security and stylings, you care about actual content presented to an end user.
The case may be fairly simple: let’s say you have a product page with sections that need to be edited by marketing team which doesn’t want to edit those fancy h1’s and p’s in the code editor.
Another scenario may be personal-blog page which has lots of posts, with each post having its own title, content, and tons of other information that you might want to display.
Thanks to loads of plugins written by community and Gatsby maintainers, we are lucky to choose from a wide range of options to get our content on the page.
Sourcing from project folder with gatsby-source-filesystem and gatsby-markdown-remark
One of the easiest ways to grab our content is to source it directly from our project folder. We can grab assets like images, and more complicated content types like blog posts written in markdown.
Scenario 1: Access images from assets folder to display them on the page
First we need to install gatsby-source-filesystem and set it up in gatsby-config.js.
npm install gatsby-source-filesystem
In gatsby-config.js:
With the lines above we are telling Gatsby that we want to allow GraphQL to query all the insides of assets folder of our project located at the specified path.
Now that the plugin is prepared, we can actually query our assets folder with the following graphQL query ( sourceInstanceName is a filter parameter that corresponds to the name in the config above):
Note that to be able to use images returned by this query inside component rather than inside of page, we need to use StaticQuery available from Gatsby.
StaticQuery accepts the query prop where we can use our GraphQL query from above and render prop which renders whatever we feed to it that has access to data which is nothing more than a wrapper for our queried files.
If you are querying the same images but want to use them inside one of your pages you can access it directly from props.data
Scenario 2: Access one particular image to display it on the page
To access one particular image by its name, we have to adapt our GraphQL query a little bit. Otherwise we can use it in the ways described above in first scenario by using StaticQuery in component and props.data in page.
Let’s specify the absolute path to the file and use a regex to cherry pick the desired image.
Scenario 3: Access blog post written in markdown together with its frontmatter
As Gatsby is often used as a blog template, it offers a very convenient way of working with blogposts written in markdown. To access markdown posts, we first need to tweak our config a little bit so that Gatsby knows where our markdown files live.
We use gatsby-source-filesystem to achieve that:
To be able to work with markdown files in a really convenient way, we also need to set up gatsby-transformer-remark plugin. Note how we add other plugins inside of gatsby-transformer-remark like gatsby-remark-images or gatsby-remark-prismjs. Those are here so we are able to directly embed images into our markdown and highlight code chunks with prismjs, respectively.
With all of the above set up, we can now query our markdown posts with query (we can conveniently use sort to get our blog posts in chronological order and filter to be sure that we query only those markdowns which are located in the blog folder of our project):
We already know that we can now access our markdown blog posts in any page just via this.props.data.allMarkdownRemark.edges, map trough them, and display all the necessary data generated for us by plugin.
For example, we have access to frontmatter which is nothing more than JSON-like structure that we include in our markdown.
Here is a quick example:
We have included title and date, but you can feel free to add any other parameters that you want to be accessible from the query (like tags in a form of array):
Headless CMSs
Sometimes its not really convenient to change all the content types like images or blog posts in the code editor. Moreover, your final user may not be aware of how to navigate through code and may require a more straightforward solution.
Scenario 4: Access complex content model from CMS and display the contents on the page
This is where headless CMS comes into play. Imagine a scenario where you make a static product page with Gatsby and pass it to the marketing department that is responsible for copywriting and images on the page. You built it with code — they interact with a user-friendly UI that makes it easy to change any content. Awesome!
Let’s explore how we would do it with Gatsby.js!
Sourcing from Contentful
To be able to source something from Contentful you will need an account at https://www.contentful.com/. After registration you will get a simple example project that we will use for learning purposes.
For now let’s start with installing gatsby-source-contentful and adding it to our config.
npm install --save gatsby-source-contentful
In gatsby-config.js we need to add the plugin and provide our spaceId and accessToken which can both be found in the settings -> API keys of our project dashboard:
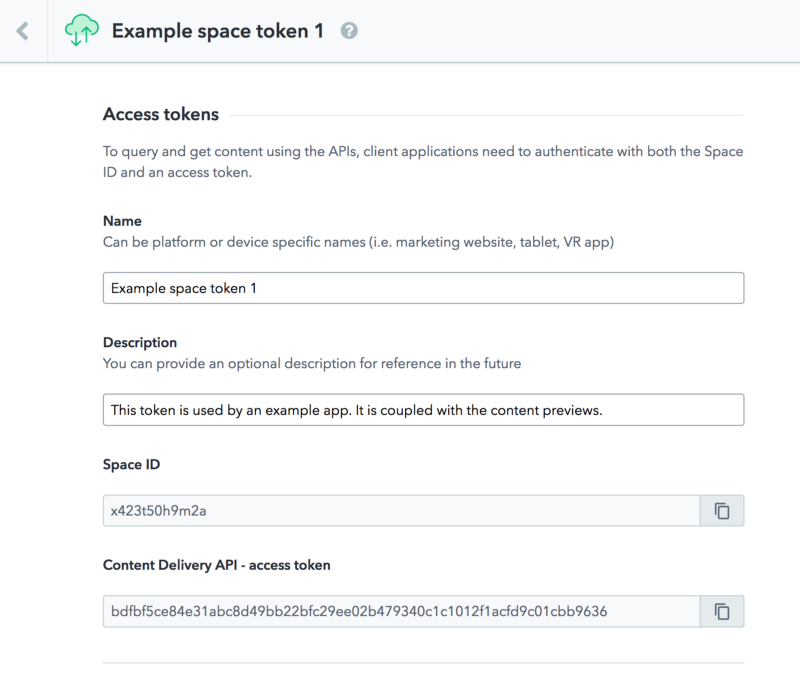
Note that it’s not a good idea to expose your accessToken to the config file directly so it can be visible by everyone on GitHub. For training purposes, I will include it in the code for this tutorial, but try to use environment variables to protect your keys as it can be seen in the example above. If it's your first time seeing the term environment variable don't worry, you can grasp the concept from this post .
Before we move any further, I want to show you how we can resolve a little conflict coming from the fact that some Contentful files are treated as markdown by Gatsby.
Our gatsby-node.js is responsible for programmatically creating pages from our markdown posts which are situated in the blog folder. By default it uses allMarkdownRemark query, which would source also Contentful markdown which we don't need. Let's adapt our query to source only those files which are located in our project folder:
In gatsby-node.js we have added filter and set it to /blog/:
Now we are ready to source our content from Contentful. In a new page named contentful.js we first want to query our assets that Contentful created for us. At the time, we have one particular interesting content type called Course which has all the necessary items for us to train.
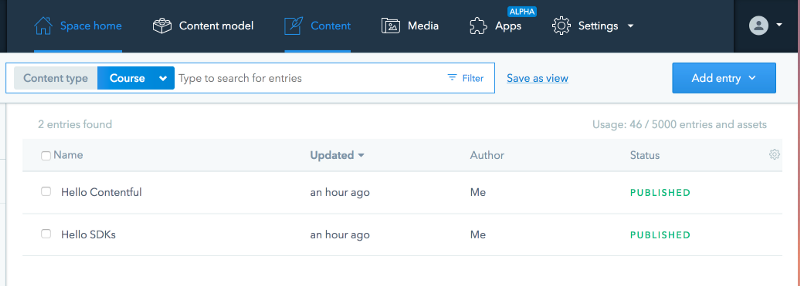
It is straightforward to query Contentful assets with GraphQL, and all we need to do to get all the entries that are of type Course is to run the allContentfulCourse query.
You may have already guessed that we can query yourCustomType of content with allContentfulYourCustomType. Do note how we filter our courses on a language basis, otherwise we would get duplicates of every course in each language specified in Contentful. This is quite specific to this case, because every course has a translation:
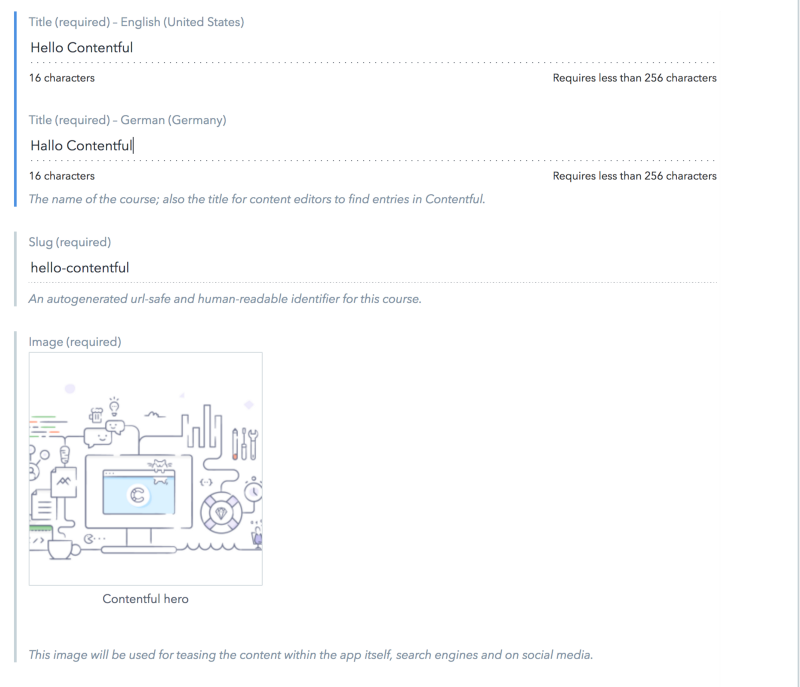
From exploring our content on Contentful, we can see that each Course has a title, duration, short description and image. We have included those in our query and now can access them in our component via this.props.data.
Recap
In this small tutorial, you have learned several ways of sourcing different content types in Gatsby. You’ve also learned how to combine them in a single project, avoiding possible sourcing conflicts by precisely specifying what we want to query from what source.
Thanks for reading! I hope you’ve enjoyed reading this post as much as I’ve enjoyed writing it! If you have any questions or want to bring up a discussion don’t hesitate to reach out to me on twitter. I would be happy if you hit that follow button so you don’t miss any future posts that I will release ?
As always you can find the code for this tutorial here on github
Originally published at divdev.io